background image

6

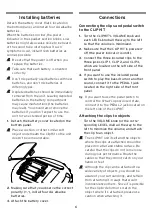
Installing batteries

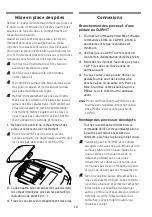
Detach the battery cover that’s located on 
the bottom panel, and install four AA alkaline 
batteries.
When the batteries run low, the power 
indicator in the speaker section blinks. Low 
batteries might also cause noise to be heard, 
or the sound to be interrupted. If such 
symptoms occur, install fresh batteries as 
soon as possible.

  Be sure that the power is off when you 

replace the batteries.

  Take care that each battery is oriented 

correctly.

  Don’t mix partially-used batteries with new 

batteries, and don’t mix batteries of 
differing types.

  Depleted batteries should be immediately 

removed from the unit. Leaving depleted 
batteries in the battery compartment 
may cause malfunctions (the batteries 
may leak). You should also remove the 
batteries if you don’t expect to use the 
unit for an extended period of time.

1. 

Detach the battery cover located on the 
bottom panel.

  Place a cushion or other similar soft 

object underneath the ClipHit so the unit 
doesn’t become unstable. 

2. 

Making sure that you observe the correct 
polarity (+, -), install four AA alkaline 
batteries.

3. 

Attach the battery cover.

Connections

Connecting the clips and pedal switch 
to the CLIPHIT

1. 

Turn the CLIPHIT's VOLUME knob and 
each LEVEL knob all the way to the left 
so that the volume is minimized.

2. 

Make sure that the CLIPHIT is powered-
off (the power indicator is unlit).

3. 

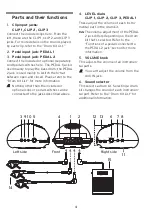
Connect the three included clips to the 
three jacks CLIP 1, CLIP 2, and CLIP 3, 
which are located on the left side of the 
front panel.

4. 

If you want to use the included pedal 
switch to play the bass drum or another 
sound, connect it to the PEDAL 1 jack 
located on the right side of the front 
panel.

Tip

  If you want to use the pedal switch to 

control the hi-hat's open/closed state, 
connect it to the PEDAL 2 jack located on 
the left side of the CLIPHIT.

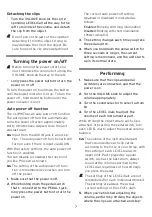
Attaching the clips to objects

 · 

Turn the VOLUME knob (or the corre-
sponding LEVEL dial) all the way to the 
left to minimize the volume, and attach 
the clip to an object.

  The CLIPHIT unit itself and the objects 

where the clips are attached should be 
placed on a flat and stable surface. Be 
careful that the clips do not come loose 
during your performance. Route the 
cables so that they do not catch on your 
hands or feet.

  Although the clip can be attached to a 

wide variety of objects, you should be 
aware of your surroundings, and refrain 
from attaching it in ways that would 
inconvenience others. Since it is possible 
for the clip to deform or scratch the 
object where it’s attached, please use 
caution when attaching it.

Содержание CLIPHIT

Страница 1: ...récautions 9 Éléments et leurs fonctions 10 Mise en place des piles 12 Connexions 12 Mise sous hors tension 13 Jeu 13 Fiche technique 14 DEUTSCH Bedienungsanleitung 15 Vorsichtsmaßnahmen 15 Bauteile und deren Funktionen 16 Batterien einlegen 18 Anschlüsse 18 Ein Ausschalten 19 Spielen 19 Technische Daten 20 ESPAÑOL Manual de usuario 21 Precauciones 21 Partes y sus funciones 22 Instalación de las p...

Страница 2: ...PEN CONGA LOW MUTE OPEN x EFX CAT Linked with CLIP 1 3 Fr La fonction ON OFF de la pédale branchée à PEDAL 2 permet d alterner entre les sons De PEDAL 2 ON OFF schaltet zwischen Sounds um Es PEDAL 2 ON OFF cambia entre sonidos 4 Fr La pédale branchée à la prise PEDAL 2 contrôle le volume De PEDAL 2 regelt die Lautstärke Es PEDAL 2 ajusta el volumen 5 Fr Lié à la pince CLIP 1 De Gekoppelt mit CLIP ...

Страница 3: ...These limits are designed to provide reasonable protection against harmful interference in a residential instal lation This equipment generates uses and can radiate radio frequency energy and if not installed and used in accordance with the instructions may cause harmful interference to radio communica tions However there is no guarantee that interfer ence will not occur in a particular installati...

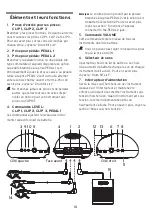
Страница 4: ...thing other than the included or optional clips or pedal switches can be connected to the jacks described above 4 LEVEL dials CLIP 1 CLIP 2 CLIP 3 PEDAL 1 These adjust the volume of each instru mental part in the drum kit Note The volume adjustment of the PEDAL 2 jack differs depending on the drum kit that s selected Refer to the Functions of a pedal connected to the PEDAL 2 jack section for more ...

Страница 5: ...ains a magnet Do not place it near memory cards hard drives or medical devices that might be affected by magnetism Do not insert your finger or any foreign object into the bass reflex port located at the bottom of the CLIPHIT Doing so may cause malfunction or injury 13 Power indicator When the power is on the indicator in the speaker section will be lit up 14 Clips x3 These are clips with built in...

Страница 6: ...he CLIPHIT 1 Turn the CLIPHIT s VOLUME knob and each LEVEL knob all the way to the left so that the volume is minimized 2 Make sure that the CLIPHIT is powered off the power indicator is unlit 3 Connect the three included clips to the three jacks CLIP 1 CLIP 2 and CLIP 3 which are located on the left side of the front panel 4 If you want to use the included pedal switch to play the bass drum or an...

Страница 7: ...wn the pedal switch that s connected to the PEDAL 1 jack long press the power button to turn the power on The current auto power off setting enabled or disabled is indicated as follows Enabled Blinking with long illumination Disabled Blinking with short illumination Power indicator 3 The setting changes each time you press the pedal switch 4 When you hold down the pedal switch for three seconds or...

Страница 8: ...tteries Included items Owner s manual Clips x3 clip opening width 30 mm cable length 1 5 m equivalent to CM 200 contact microphone Pedal switch x1 cable length 1 6 m PS 3 pedal switch 4 AA size alkaline batteries Options sold separately PS 3 Pedal switch AC adapter DC 9V Specifications and appearance are subject to change without notice for improvement IMPORTANT NOTICE TO CONSUMERS This product ha...

Страница 9: ...verse ou coule il risque de pro voquer des dommages un court circuit ou une électrocution Veillez à ne pas laisser tomber des objets métalliques dans le boîtier trombones par ex Si cela se produit débranchez l alimentation de la prise de courant et contactez votre reven deur korg le plus proche ou la surface où vous avez acheté l instrument Note concernant les dispositions Seulement EU Quand un sy...

Страница 10: ...mmandes ajustent le niveau des instru ments respectifs du kit de batterie 8 11 12 7 6 13 4 2 1 5 14 15 10 9 3 Remarque Le volume du son produit par la pédale branchée à la prise PEDAL 2 varie selon le kit de batterie sélectionné Pour en savoir plus voyez la section Functions of a pedal connected to the PEDAL 2 jack 5 Commande VOLUME Cette commande règle le niveau de tous les instruments du kit de ...

Страница 11: ... vous blesser et ou d endommager l instru ment 13 Témoin d alimentation Quand l instrument est sous tension le témoin d alimentation près du haut parleur s allume 14 Pinces x3 Chacune de ces pinces est dotée d un capteur Branchez chaque pince à une des prises d entrée CLIP 1 3 du CLIPHIT puis fixez les pinces à un magazine ou tout autre objet qui vous tombe sous la main Pour en savoir plus voyez l...

Страница 12: ... de polarité 3 Fixez le couvercle du compartiment des piles Connexions Branchement des pinces et d une pédale au CLIPHIT 1 Tournez la commande VOLUME et chaque commande LEVEL du CLIPHIT à fond à gauche de sorte que le volume soit minimum 2 Vérifiez que le CLIPHIT est hors tension son témoin d alimentation doit être éteint 3 Branchez les 3 pinces fournies aux prises CLIP 1 3 situées du côté gauche ...

Страница 13: ... sans aucune manip de l utilisateur même si l instrument reçoit un signal à la prise AUX IN La fonction de coupure automatique de l alimenta tion a été activée à la sortie d usine Si vous préférez vous pouvez désactiver cette fonction afin que l instrument ne soit jamais mis automatiquement hors tension Effectuez les étapes ci dessous Remarque Le réglage de la fonction de coupure automatique de l ...

Страница 14: ...anchée à la prise PEDAL 2 Quand vous frappez cet objet sans enfoncer la pédale vous obtenez le son de charley ouvert Pour plus de réalisme le son de fermeture du charley est déclenché quand vous appuyez sur la pédale Fiche technique Kits de batterie 11 Commandes commande LEVEL x 4 commande VOLUME sélecteur SOUND interrupteur d alimentation Connexions prise d entrée CLIP x 3 prise d entrée PEDAL x ...

Страница 15: ... der dazugehörigen Bedienungsanleitung der Batterie oder dem Batte riefach sehen müssen Sie das Produkt in der vorgeschriebenen Art und Weise entsorgen Dies bedeutet dass dieses Produkt mit elektrischen und elektronischen Komponenten nicht mit dem normalen Hausmüll entsorgt werden darf Für Produkte dieser Art existiert ein separates gesetzlich festgelegtes Entsorgungssystem Gebrauchte elektrische ...

Страница 16: ...ie an die oben beschriebenen Buchsen ausschließlich die im Lieferumfang enthaltenen oder als Zubehör erhältlichen Clips und Pedalschalter an 8 11 12 7 6 13 4 2 1 5 14 15 10 9 3 4 LEVEL Regler CLIP 1 CLIP 2 CLIP 3 PEDAL 1 Regelt die Lautstärke der Einzelinstrumente des Drum Kits Anmerkung Die Lautstärkeregelung der PEDAL 2 Buchse arbeitet je nach ausgewähltem Drum Kit unterschiedlich Weitere Inform...

Страница 17: ...telautsprecher Ihr Spiel wird über einen Gerätelautsprecher wiedergegeben Falls Sie einen Kopfhörer an die Kopfhörerbuchse angeschlossen haben wird der Gerätelautsprecher stumm geschaltet Der Lautsprecher dieses Instruments enthält einen Magneten Legen Sie niemals Speicher karten Festplatten oder medizinische Geräte die durch Magnetfelder gestört werden könnten in seine Nähe Stecken Sie keine Fing...

Страница 18: ...nd aus dem Gerät Falls erschöpfte Batterien im Batteriefach bleiben drohen Beschädigungen durch Auslaufen der Batterien Entfernen Sie die Batterien außerdem wenn Sie das Instrument längere Zeit nicht verwenden möchten 1 Öffnen Sie den Batteriefachdeckel an der Unterseite Legen Sie hierzu den CLIPHIT auf ein Kissen oder eine weiche Unterlage um es nicht zu beschädigen 2 Legen Sie vier AA Alkalibatt...

Страница 19: ...arfunktion Der CLIPHIT ist mit einer Energiesparfunktion ausgestattet Diese schaltet das Gerät automatisch aus wenn über etwa 30 Minuten hinweg keine Bedienung des Geräts erfolgt Anmerkung Mit Ausnahme des an der AUX IN Buchse anliegenden Signals d h die Energiespar funktion wird selbst bei an der AUX IN Buchse anliegendem Signal aktiviert Werksseitig ist die Energiesparfunktion aktiviert Sie könn...

Страница 20: ...bei gleichzeitigem Gedrückthalten des an die PEDAL 2 Buchse angeschlossenen Pedals den Sound einer geschlossenen Hi Hat Schlagen Sie auf das Objekt ohne das Pedal zu drücken hören Sie den Klang einer geöffneten Hi Hat Beim Drücken des Pedals ist der Klang zu hören der beim Treten der Hi Hat entsteht Technische Daten Drum Kits 11 Regler LEVEL Regler x 4 VOLUME Regler SOUND Wahlschalter Ein Ausschal...

Страница 21: ...o caiga ningún objeto metálico dentro del equipo Nota respecto a residuos y deshechos solo UE Cuando aparezca el símbolo del cubo de basura tachado sobre un producto su manual de usuario la batería o el embalaje de cualquiera de éstos significa que cuando quiere tire dichos artículos a la basura ha de hacerlo en acuerdo con la normativa vigente de la Unión Europea No debe verter dichos artículos j...

Страница 22: ...ón Únicamente se pueden conectar las pedaleras o los clips incluidos u opcionales a los jacks descritos anteriormente 8 11 12 7 6 13 4 2 1 5 14 15 10 9 3 4 Diales LEVEL CLIP 1 CLIP 2 CLIP 3 PEDAL 1 Ajustan el volumen de cada parte instrumental en el grupo de percusión Nota El ajuste de volumen del jack PEDAL 2 varía en función del grupo de percusión seleccionado Consulte la sección Functions of a ...

Страница 23: ...nterno Este altavoz que está integrado en el instrumento contiene un imán No lo coloque cerca de tarjetas de memoria discos duros o dispositivos médicos que puedan verse afectados por el magnetismo No inserte el dedo ni otros objetos en el puerto de potenciador de graves situado en la parte inferior del CLIPHIT Si lo hace pueden producirse fallos de funcionamiento o lesiones 13 Indicador de alimen...

Страница 24: ... de los clips y la pedalera al CLIPHIT 1 Gire el mando VOLUME del CLIPHIT y cada mando LEVEL completamente hacia la izquierda para silenciar el volumen 2 Asegúrese de que la alimentación del CLIPHIT está desactivada el indicador de alimentación está apagado 3 Conecte los tres clips incluidos a los tres jacks CLIP 1 CLIP 2 y CLIP 3 que se encuentran en el lado izquierdo del panel frontal 4 Si desea...

Страница 25: ...e los pasos siguientes Nota La unidad recuerda el ajuste de la función de desactivación automática aunque desactive la alimentación 1 Asegúrese de que la alimentación está desactivada 2 Con la pedalera conectada al jack PEDAL 1 presionada realice una pulsación larga del botón de alimentación para activar la alimentación El ajuste de desactivación automática actual activado o desactivado se indica ...

Страница 26: ...OLUME selector SOUND botón de alimentación Conexiones Jack de entrada CLIP x 3 jack de entrada PEDAL x 2 jack AUX IN jack mini estéreo de 3 5 mm jack DC 9V jack para auriculares jack mini estéreo de 3 5 mm Salida de amplificador altavoz 2 vatios 3 Fuente de alimentación 4 pilas alcalinas AA o adaptador de CA opcional DC 9V Duración de las pilas Aproximadamente 6 horas la duración de las pilas vari...

Отзывы: