background image

ASSEMBLY

6

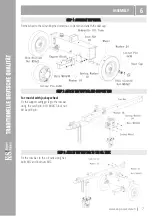
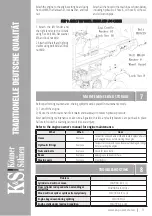
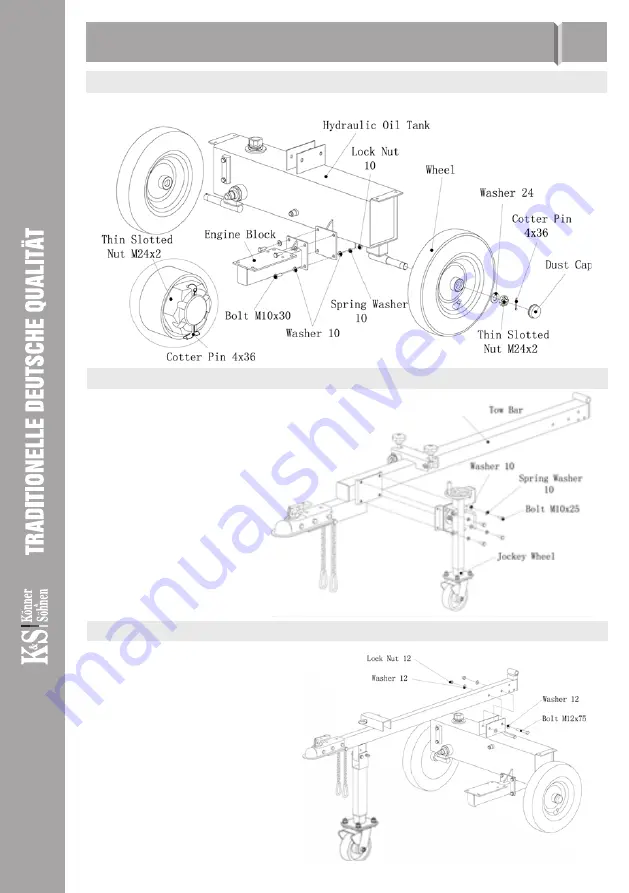
STEP 1: ASSEMBLE THE WHEEL

STEP 1: ASSEMBLE THE WHEEL

Fix the wheel to the oil tank by the slotted nut , cotter pin and attach the dust cap.

Fix the support outrigger leg to the tow bar 

using the catch pin, bolt M10X75,lock nut 

M10 and R pin.

For model with jockey wheel

STEP 2: ATTACH THE TOW BAR AND SUPPORT LEG

STEP 2: ATTACH THE TOW BAR AND SUPPORT LEG

STEP 3: ATTACH THE TOW BAR TO THE OIL TANK

STEP 3: ATTACH THE TOW BAR TO THE OIL TANK

Fix the tow bar to the oil tank using hex 

bolts M12 and lock nuts M12.

7

www.ks-power.de/en


|


Содержание KS 27THG 65/55

Страница 1: ...Gasolline Log Splitter Please read this manual carefully before use Owner s Manual KS 27THG 65 55 EN ...

Страница 2: ...llow the instructions marked with this sign may lead to serious injury or death of the operator or third parties Useful information on operation of the machine ATTENTION DANGER IMPORTANT SAFETY INFORMATION 1 Please read this manual carefully before use WARNING PROTECTING YOURSELF AND THOSE AROUND YOU 1 1 This is a high powered machine with moving parts operating with high energy You must operate t...

Страница 3: ...se precautions Never run the engine in an enclosed area or without proper ventilation as engine exhaust contains carbon monoxide which is an odorless tasteless and a deadly poisonous gas Replace rubber fuel lines and grommets when worn or damaged and after 5 years of use Fill the fuel tank outdoors with the engine off and allow the engine to cool completely Allow the engine to cool completely befo...

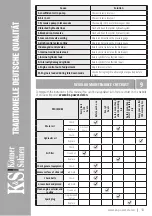
Страница 4: ... it is filled with sufficient amount of motor oil 1 Unscrew the oil dipstick and wipe it out with a clean cloth 2 Insert the dipstick without screwing it in 3 Check the oil level by a mark on the oil dipstick 4 Add oil if its level is below the mark on the oil dipstick 5 Screw on the dipstick Recommended motor oil Recommended motor oil SAE 10W30 SAE 10W40 Recommended motor oil grade Recommended mo...

Страница 5: ...g out of position while under pressure Engine switch OFF ON air damper fuel valve Open Close Open Close OPERATION INSTRUCTIONS 4 Proper operation of the log splitter 1 Load a log onto the beam and against the endplate 2 Serious accidents can happen when other people are allowed inside the work zone Keep everyone else out of the work zone while operating the control valve 3 Make sure hands are clea...

Страница 6: ...P www ks power de en 5 ...

Страница 7: ...and backward A two handle option is only available for European market 4 Wedge The wedge features a taper that makes splitting easier welded cross can be put on 5 Log cradle Keeps the log on the beam without operator assistance Can be upgraded to a bigger table 6 Engine The air cooled engine powers the hydraulic pump 7 Tires Maximum rated speed is 30 mile per hour 8 Gear pump The gear pump makes t...

Страница 8: ...rigger leg to the tow bar using the catch pin bolt M10X75 lock nut M10 and R pin For model with jockey wheel STEP 2 ATTACH THE TOW BAR AND SUPPORT LEG STEP 2 ATTACH THE TOW BAR AND SUPPORT LEG STEP 3 ATTACH THE TOW BAR TO THE OIL TANK STEP 3 ATTACH THE TOW BAR TO THE OIL TANK Fix the tow bar to the oil tank using hex bolts M12 and lock nuts M12 7 www ks power de en ...

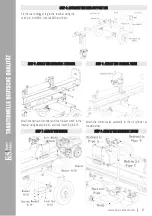
Страница 9: ...am comb to the tow bar using beam pin 47 and lock it with R pin 16 Attach the control valve assembly to the oil cylinder as shown below STEP 5 ATTACH THE HYDRAULIC CYLINDER STEP 5 ATTACH THE HYDRAULIC CYLINDER STEP 6 ATTACH THE CONTROL VALVE STEP 6 ATTACH THE CONTROL VALVE STEP 7 ATTACH THE ENGINE STEP 7 ATTACH THE ENGINE STEP 8 ATTACH THE HYDRAULIC HOSES STEP 8 ATTACH THE HYDRAULIC HOSES 8 www ks...

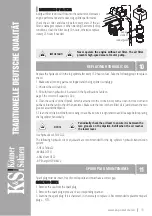
Страница 10: ...uring splitting SOLUTION G L Engine stalls under low load condition SOLUTION D E L M TROUBLESHOOTING 8 MAINTENANCE AND STORAGE 7 Before performing maintenance the log splitter must be placed in maintenance mode 1 Turn off the engine 2 Move the control valve handle forward and backward to relieve hydraulic pressure After performing maintenance make sure all guards shields and safety features are pu...

Страница 11: ...linder Return cylinder for authorized repair L Engine control out of adjustment Adjust idle control nuts M Engine is loaded during idle down mode Use shorter log length to allow engine to speed up before contact REGULAR MAINTENANCE CHECKLIST 9 PROCEDURE Every start or 20 hours Before each use Every 5 hours Each 3 months or after 50 working hrs Each 6 months or after 100 working hrs Every year or a...

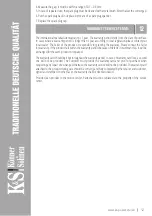
Страница 12: ...rew the oil drain bolt 3 Fill with fresh hydraulic oil As stated in the Specifications Table on page 5 the correct oil capacity is 20 L 4 Clean the surface of the dipstick which is attached to the oil drain bolt with a clean lint free cloth and put back into the tank to check the new level Make sure the level of the refilled oil is just between the two grooves around the dipstick 5 Clean the oil d...

Страница 13: ... a second one will not be provided The Customer must provide the warranty card and proof of purchase when requesting any repair or exchange Otherwise the warranty service will not be provided The warranty card attached to the product during sale should be correctly and fully completed by the retailer and customer signed and stamped In other cases the warranty shall be deemed invalid Provide clean ...

Страница 14: ......

Страница 15: ...ntie Reparatur und Garantie Reparatur und Service Service service dimaxgroup de Sonstiges Sonstiges info dimaxgroup de Polska DIMAX International Poland Sp z o o Polen Warczawska 306B 05 082 Stare Babice www ks power pl info pl dimaxgroup de Україна ТОВ Техно Трейд КС вул Електротехнічна 47 02222 м Київ Україна www ks power com ua sales ks power com ua Россия ТД Рус Энержи К С 129090 г Москва прос...

Отзывы: