background image

77

English

Safety

General safety

•  Read the manual carefully before use. Keep the manual 

for future reference.

•  Only use the device for its intended purposes. Do not 

use the device for other purposes than described in the 

manual.

•  Do not use the device if any part is damaged or 

defective. If the device is damaged or defective, replace 

the device immediately.

•  Do not expose the device to water or moisture.

•  Do not expose the device to sunlight.

•  Keep the device away from heat sources.

•  Do not block the ventilation openings.

Electrical safety

•  To reduce risk of electric shock, this product should 

only be opened by an authorized technician when 

service is required.

•  Disconnect the product from the mains and other 

equipment if a problem should occur.

•  Do not use the device if the mains cable or mains plug 

is damaged or defective. If the mains cable or mains 

plug is damaged or defective, it must be replaced by 

the manufacturer or an authorised repair agent.

•  Before use, always check that the mains voltage is the 

same as the voltage on the rating plate of the device.

•  Make sure that the mains cable cannot become 

entangled.

•  Make sure that the mains cable does not hang over the 

edge of a worktop and cannot be caught accidentally 

or tripped over.

•  Do not touch the device during thunderstorms to 

avoid electric shocks.

•  Switch off the device when it will not be used for a long 

period.

Battery safety

•  Use only the batteries mentioned in the manual.

•  Do not use old and new batteries together.

•  Do not use batteries of different types or brands.

•  Do not install batteries in reverse polarity.

•  Do not short-circuit or disassemble the batteries.

•  Do not expose the batteries to water.

•  Do not expose the batteries to fire or excessive heat.

•  Batteries are prone to leakage when fully discharged. 

To avoid damage to the product, remove the batteries 

when leaving the product unattended for longer 

periods of time.

•  If liquid from the batteries comes into contact with skin 

or clothing, immediately rinse with fresh water.

Warranty

Any changes and/or modifications to the product will void 

the warranty. We cannot accept any liability for damage 

caused by incorrect use of the product.

Disposal

•  The product is designated for separate collection at an 

appropriate collection point.  

Do not dispose of the product with household waste.

•  For more information, contact the retailer or the local 

authority responsible for waste management.

Documentation

The product has been manufactured and supplied in 

compliance with all relevant regulations and directives, 

valid for all member states of the European Union. The 

product complies with all applicable specifications and 

regulations in the country of sales.

Formal documentation is available upon request. The 

formal documentation includes, but is not limited to the 

Declaration of Conformity, the Material Safety Data Sheet 

and the product test report.

Disclaimer

Designs and specifications are subject to change without 

notice. All logos, brands and product names are 

trademarks or registered trademarks of their respective 

holders and are hereby recognized as such.

Содержание DVB-T2 FTA20

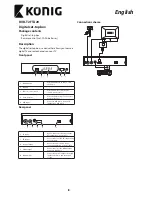
Страница 1: ...FTA20 Digital set top box USER MANUAL EN GEBRUIKSAANWIJZING NL BEDIENUNGSANLEITUNG DE MANUAL DE USUARIO ES MANUEL DE L UTILISATEUR FR BRUGSVEJLEDNING DA BRUKSANVISNING SV K YTT OPAS FI MANUAL DE UTILI...

Страница 2: ......

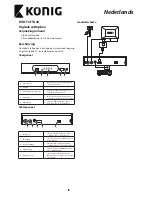
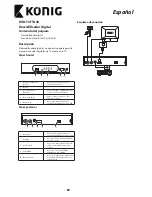
Страница 3: ...buttons Press the buttons to go to the next or previous channel 5 USB input Connect a USB device to the USB input using a USB cable Rear panel 6 7 8 9 10 HD OUT DC 5V IN ANT OUT COAXIAL ANT IN 6 RF in...

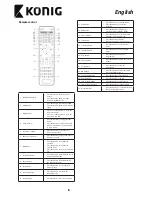
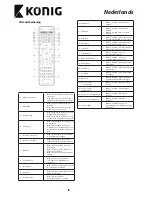
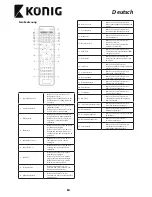
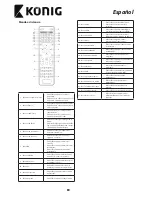
Страница 4: ...9 Recall button Press the button to switch between the last two channels 10 Goto button Press the button to select the play time of media 11 Favourite button Press the button to display the favourite...

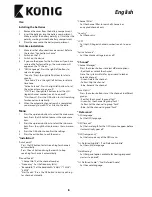
Страница 5: ...onfirm the settings 4 Press the exit button to exit the menu Installation Auto Search Press the OK button to start searching for channels automatically Press the exit button during the search to stop...

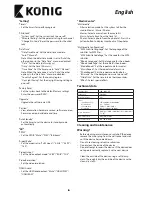
Страница 6: ...media Movies Music Photos Movies Select a movie from the movie list Music Select a track from the track list Photos Select a photo from the photo list Press the yellow button to display thumbnails of...

Страница 7: ...o not use old and new batteries together Do not use batteries of different types or brands Do not install batteries in reverse polarity Do not short circuit or disassemble the batteries Do not expose...

Страница 8: ...oppen Druk op de knoppen om naar het volgende of het vorige kanaal te gaan 5 USB ingang Sluit een USB apparaat met een USB kabel aan op de USB ingang Achterpaneel 6 7 8 9 10 HD OUT DC 5V IN ANT OUT CO...

Страница 9: ...knop Druk op de knop om tussen de laatste twee kanalen te schakelen 10 Goto knop Druk op de knop om de afspeeltijd van media te selecteren 11 Favorietenknop Druk op de knop om het favorietenmenu weer...

Страница 10: ...op om het menu te verlaten Installatie Auto Search Druk op de OK knop om te starten met het automatisch zoeken naar kanalen Druk tijdens het zoeken op de exit knop om te stoppen met het automatisch zo...

Страница 11: ...a te filteren Films Muziek Foto s Films Selecteer een film uit de filmlijst Muziek Selecteer een track uit de tracklijst Foto s Selecteer een foto uit de fotolijst Druk op de gele knop om miniaturen v...

Страница 12: ...terijen Combineer geen oude en nieuwe batterijen Gebruik geen batterijen van verschillende typen of merken Installeer batterijen niet met omgekeerde polariteit Veroorzaak geen kortsluiting van de batt...

Страница 13: ...en um den n chsten oder vorherigen Kanal aufzurufen 5 USB Eingang Verbinden Sie mit einem USB Kabel ein USB Ger t mit dem USB Eingang R ckseite 6 7 8 9 10 HD OUT DC 5V IN ANT OUT COAXIAL ANT IN 6 RF E...

Страница 14: ...beiden Kan len umzuschalten 10 Gehe zu Taste Dr cken Sie auf die Taste um den Wiedergabezeitpunkt des Mediums zu w hlen 11 Favoritentaste Dr cken Sie auf die Taste um das Favoritenmen anzeigen zu las...

Страница 15: ...OK Taste um die Einstellung zu best tigen 4 Dr cken Sie auf die Beenden Taste um das Men zu verlassen Installation Automatischer Suchlauf Dr cken Sie auf die OK Taste um den automatischen Kanalsuchlau...

Страница 16: ...e fest welche Medientypen vom System eingelesen werden Film Musik Fotos Film W hlen Sie einen Film aus der Liste der Filme Musik W hlen Sie einen Titel aus der Titel Liste Fotos W hlen Sie ein Foto au...

Страница 17: ...n Sie ausschlie lich die in dieser Anleitung genannten Batterien Verwenden Sie keine alten und neuen Batterien zusammen Verwenden Sie nicht Batterien unterschiedlicher Typen oder Marken Setzen Sie die...

Страница 18: ...s de flecha Pulse los botones para ir al canal siguiente o anterior 5 Entrada USB Conecte un dispositivo USB a la entrada USB utilizando un cable USB Panel posterior 6 7 8 9 10 HD OUT DC 5V IN ANT OUT...

Страница 19: ...cambiar entre los dos ltimos canales 10 Bot n Ir a Pulse el bot n para seleccionar el tiempo de reproducci n del soporte 11 Bot n de favoritos Pulse el bot n para mostrar el men de favoritos 12 Bot n...

Страница 20: ...3 Pulse el bot n OK para confirmar los ajustes 4 Pulse el bot n Salir para salir del men Installation Auto Search Pulse el bot n OK para empezar la b squeda de canales autom ticamente Pulse el bot n S...

Страница 21: ...otos Pel culas Selecciona una pel cula de la lista de pel culas M sica Selecciona una pista de la lista de pistas Fotos Selecciona una foto de la lista de fotos Pulse el bot n amarillo para mostrar im...

Страница 22: ...cionadas en el manual No use conjuntamente pilas nuevas y usadas No utilice pilas de distintos tipo o marcas No instale las pilas con la polaridad invertida No cortocircuite ni desmonte las pilas No e...

Страница 23: ...t l commande 4 Boutons fl ch s Appuyez sur les boutons pour passer la cha ne suivante pr c dente 5 Entr e USB Connectez un appareil USB l entr e USB avec un c ble USB Panneau arri re 6 7 8 9 10 HD OUT...

Страница 24: ...ton aller Appuyez sur le bouton pour s lectionner la dur e de lecture du m dia 11 Bouton favori Appuyez sur le bouton pour afficher le menu des favoris 12 Bouton menu Appuyez sur le bouton pour acc de...

Страница 25: ...confirmer les r glages 4 Appuyez sur le bouton sortie pour sortir du menu Installation Auto Search Appuyez sur le bouton OK pour lancer la recherche automatique de cha nes Appuyez sur le bouton sorti...

Страница 26: ...Films Musique Photos Films S lectionnez un film dans la liste des films Musique S lectionnez une piste dans la liste des pistes Photos S lectionnez une photo dans la liste des photos Appuyez sur le b...

Страница 27: ...nn es dans le manuel N utilisez jamais des piles us es avec des piles neuves N utilisez pas des piles de marques ou de types diff rents N installez pas les piles selon une polarit invers e Ne court ci...

Страница 28: ...erne for at bev ge dig til den n ste eller den foreg ende kanal 5 USB indgang Slut en USB enhed til USB indgangen ved hj lp af et USB kabel Bagpanel 6 7 8 9 10 HD OUT DC 5V IN ANT OUT COAXIAL ANT IN 6...

Страница 29: ...radiofunktion 9 Genkald knap Tryk p knappen for at skifte mellem de sidste to kanaler 10 G til knap Tryk p knappen for at v lge mediets spilletid 11 Favorit knap Tryk p knappen for at vise menuen for...

Страница 30: ...pen for at bekr fte indstillingen 4 Tryk p knappen Exit for at forlade menuen Installation Auto Search Tryk p OK knappen for at p begynde automatisk s gningen efter kanaler Tryk p Exit knappen for at...

Страница 31: ...trering af media Film Musik Foto Film V lg en film fra filmlisten Musik V lg et lydspor fra listen med lydspor Foto V lg et foto fra listen med foto Tryk p den gule knap for at vise thumbnails af foto...

Страница 32: ...edningen Brug ikke gamle og nye batterier sammen Brug ikke batterier af anden type eller m rker Installer ikke batterierne med omvendt polaritet Kortslut eller afmonter ikke batterierne Uds t ikke bat...

Страница 33: ...llssensorn 4 Pilknappar Tryck p knapparna f r att g till n sta eller f reg ende kanal 5 USB ing ng Anslut en USB enhet till USB ing ngen med en USB kabel Bakpanel 6 7 8 9 10 HD OUT DC 5V IN ANT OUT CO...

Страница 34: ...sknapp Tryck p knappen f r att byta mellan de tv senaste kanalerna 10 G till knapp Tryck p knappen f r att v lja mediets uppspelningstid 11 Favoritknapp Tryck p knappen f r att visa favoritmenyn 12 Me...

Страница 35: ...kr fta inst llningarna 4 Tryck p exit knappen f r att l mna menyn Installation Auto Search Tryck p OK knappen f r att b rja s ka efter kanaler automatiskt Tryck p exit knappen under s kning f r att st...

Страница 36: ...f r att filtrera medierna Filmer Musik Foton Filmer V lj en film fr n filmlistan Musik V lj ett sp r fr n sp rlistan Foton V lj ett foto fr n bildlistan Tryck p den gula knappen f r att visa miniatyre...

Страница 37: ...anda inte gamla och nya batterier Anv nd inte batterier av olika typ eller m rke Montera inte batterierna med polerna felv nda Kortslut eller ppna inte batterierna Uts tt inte batterierna f r vatten U...

Страница 38: ...inanturiin 4 Nuolipainikkeet Siirry seuraavaan tai edelliseen kanavaan painamalla ko painikkeita 5 USB tulo Liit USB laite USB tuloon USB johdolla Takapaneeli 6 7 8 9 10 HD OUT DC 5V IN ANT OUT COAXIA...

Страница 39: ...e Vaihda kahden viimeisen kanavan v lill painamalla painiketta 10 Mene painike Valitse median toistoaika painamalla painiketta 11 Suosikki painike Avaa Suosikki valikko painamalla painiketta 12 Valikk...

Страница 40: ...K painiketta 4 Poistu valikosta painamalla Poistu painiketta Installation Auto Search Aloita kanavien automaattinen haku painamalla OK painiketta Lopeta kanavien automaattinen haku haun aikana painama...

Страница 41: ...rjestelm suodattamaan media Elokuvat musiikki valokuvat Elokuvat Valitse elokuva elokuvaluettelosta Musiikki Valitse raita raitaluettelosta Valokuvat Valitse valokuva valokuvaluettelosta N yt kuvien p...

Страница 42: ...nhoja ja uusia paristoja yhdess l k yt eri tyyppisi tai eri merkkisi paristoja l asenna paristoja v rin p in l aiheuta paristoissa oikosulkua tai pura niit l altista paristoja vedelle l altista parist...

Страница 43: ...ale Ap sa i butoanele pentru a trece la canalul urm tor sau anterior 5 Intrare USB Conecta i un dispozitiv USB la intrarea USB cu un cablu USB Panou posterior 6 7 8 9 10 HD OUT DC 5V IN ANT OUT COAXIA...

Страница 44: ...butonul pentru a comuta ntre ultimele dou canale 10 Buton Goto Ap sa i butonul pentru a selecta punctul din linia de redare a materialului respectiv 11 Buton favorite Ap sa i butonul pentru a afi a me...

Страница 45: ...a accesa elementul din submeniu 3 Ap sa i butonul OK pentru a confirma set rile 4 Ap sa i butonul de ie ire pentru a ie i din meniu Installation Auto Search Ap sa i butonul OK pentru a ini ia c utare...

Страница 46: ...ltrului Seta i sistemul pentru filtrarea suporturilor media Filme Muzic Poze Filme Selecta i un film din lista de filme Muzic Selecta i o melodie din lista de melodii Poze Selecta i o poz din lista de...

Страница 47: ...teriile Folosi i numai bateriile indicate n manual Nu utiliza i baterii noi i vechi mpreun Nu utiliza i baterii de tipuri sau m rci diferite Nu instala i bateriile cu polaritatea inversat Nu scurtcirc...

Страница 48: ...T 31 0 73 5993965 E service nedis com W http www nedis com en us contact contact form htm NEDIS B V De Tweeling 28 5215 MC s Hertogenbosch THE NETHERLANDS...

Отзывы: