3
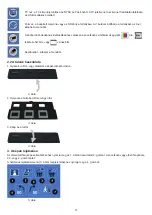
2.2 Usage of the trays
1. Open the film or slide holder as illustrated.
Figure 2
2. Insert a film or slide in the holder as shown.
Figure 3
3. Close the holder.
Figure 4
3. Image playback
To check the saved photos press button 2 displayed in picture 1. To go to the next or previous photo press button 3 or 2.
Press button 4 to display the playback menu with seven icons (see Figure 5).
Figure 5
1 + 2: Icons for manual slide and automatic slide show
3: Delete current image
4: Delete all images
5: Rotate image 90 degrees to the left
6: Rotate image 90 degrees to the right
7: Exit this menu and go back to scan modus
Copy images to a computer
To copy the images to a computer, disconnect the scanner from the AC adapter and plug the USB cable into the computer.
The computer will recognize the scanner automatically, except for Windows
®
98 SE. That OS will need the supplied driver
to be installed. The scanner will be recognized as a removable disc when connected, and the pictures can be easily
copied with Windows
®
Explorer.
Safety precautions:
To reduce risk of electric shock, this product should ONLY be opened by an authorized
technician when service is required. Disconnect the product from mains and other equipment
if a problem should occur. Do not expose the product to water or moisture.
RISK OF ELECTRIC SHOCK
DO NOT OPEN
CAUTION


