background image

IC-601

1-8

1.2

Conventions used in this manual

1

d  

Reference

This symbol indicates a reference.

View the reference as required.

Key symbols

[  ]


Key names on the touch panel or computer screen, or a name of user's guide are indicated by these brackets.

Bold text


Key names on the control panel, part names, product names and option names are indicated in bold text.

1.2.2

Original and paper indications

Paper size

The following explains the indication for originals and paper de-
scribed in this manual. 


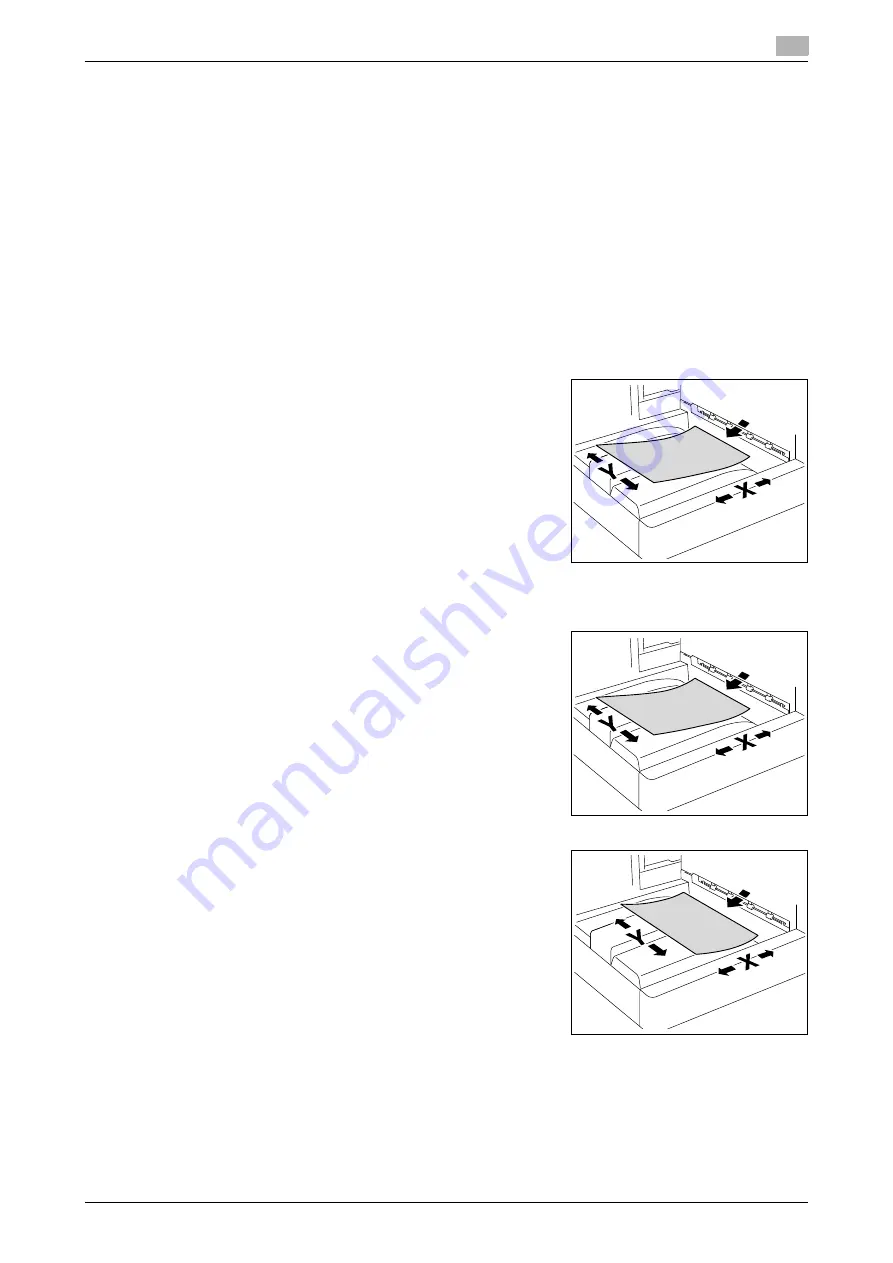
When indicating the original or paper size, the Y side represents 
the width and the X side the length.

Paper indication

w

 indicates the paper size with the length (X) being longer than the 

width (Y).

v

 indicates the paper size with the length (X) being shorter than the 

width (Y).

Содержание Color Centro IC-601

Страница 1: ......

Страница 2: ...the Network Scanner Features 4 2 4 2 Send by an E Mail 4 3 4 2 1 Items to be configured 4 3 4 3 Storing in Hard Disk 4 4 4 3 1 Items to be configured 4 4 4 4 Sending to the FTP Server 4 5 4 4 1 Items...

Страница 3: ...6 9 Scan Setting in Controller 6 40 6 9 1 Auto Delete Document 6 41 6 9 2 File Name 6 41 6 9 3 Color Space 6 42 6 9 4 Frame Erase 6 42 6 9 5 Z Folded 6 43 6 9 6 Thickness 6 43 6 9 7 E mail Initial Se...

Страница 4: ...1 Introduction...

Страница 5: ...uide provides precautions and requests that should be followed to ensure safe usage of this ma chine Please be sure to read this guide before using the ma chine User s guide CD manuals Overview User s...

Страница 6: ...n of network scan ner functions using IC 601 Scan to E Mail Scan to HDD Scan to FTP Scan to SMB User s Guide Security This guide describes the security functions Please refer to this guide for how to...

Страница 7: ...tion on machine management and how to customize the ma chine according to your daily use Both Sides Adjustment Curl Adjustment Controller settings Adjustment Utility Menu Screen Network settings PageS...

Страница 8: ...ble on the machine with the optional Paper Feeder Unit with scanner PF 705 equipped Making a basic copy and setting procedures Quality Adjustment Application Output Setting and advanced infor mation T...

Страница 9: ...of this machine Note that basic technical knowledge about the product is required to enable users to perform maintenance work or troubleshooting operations Limit your maintenance and troubleshooting...

Страница 10: ...g that may cause injury or property damage NOTICE This symbol indicates a risk that may result in damage to this machine or originals Follow the instructions to avoid property damage Procedural instru...

Страница 11: ...panel part names product names and option names are indicated in bold text 1 2 2 Original and paper indications Paper size The following explains the indication for originals and paper de scribed in t...

Страница 12: ...address storage location for the Network Scanner features Chapter 6 Using the Network Scanner Features This chapter describes in detail how to use the Network Scanner features Chapter 7 Utility Menu...

Страница 13: ...guide for the TWAIN driver TWAIN Driver Non GUI Version It is the driver to create a connection between a computer and the copier to retrieve the scanned data stored in the box to the computer It use...

Страница 14: ...2 Overview of the Scanning Features...

Страница 15: ...ns of bizhub PRESS C7000 C6000 are used for explanations The scanned data can be sent as an E Mail attached file upload to a FTP Server or SMB server or stored in a hard disk By instructing a scan ope...

Страница 16: ...ment to digital data 7 CAUTION To use the copier as a network scanner it needs to be connected to the network For more information on the network configuration contact your network administrator Scann...

Страница 17: ...2mm Custom form 303mm x 483mm when using an original glass Cubic object Weight Max 6 8kg Original position Deep left sided Scanning resolution 200dpi 300dpi 400dpi 600dpi Reading speed A4 Max 40 sheet...

Страница 18: ...3 Preparation for Use...

Страница 19: ...when the sub power switch is turned on 4 Data LED Flashes while receiving print data 5 Interrupt Stops copying printing scanning in progress to allow a simple copying job 6 Stop Ceases the machine ope...

Страница 20: ...erious machine trouble such as toner fixation d Reference Refer to User s Guide POD Administrator s Reference for how to turn off the power 11 Access Sets the machine to allow the operation only when...

Страница 21: ...touching keys lightly on the Touch Panel Select a function Touch a function displayed in a key to select the function The selected key is highlighted To input values Touch lightly the KEYPAD on the To...

Страница 22: ...between pages When all items cannot be displayed in a single page touch lightly to switch between pages 7 CAUTION You may also input values through the KEYPAD on the Control Panel d Reference For more...

Страница 23: ...followings describe basic steps to input characters on the character input screen 1 Press the corresponding key to input the desired character 2 Touch OK The character input screen closes The input ch...

Страница 24: ...server addresses and SMB server addresses The following is how to use Search 1 Press Search 2 Input the Character for Search you registered and press OK You can search by at minimum one character If t...

Страница 25: ...the control panel from the data base in the LDAP server You can also select the acquired E mail address and transmit and register the data 1 Press Search on the Select E mail Address screen Before us...

Страница 26: ...x Number is searched Detail Search A keyword can be respectively specified for Register Name E mail Address Family Name Giv en Name City Name Company Name Organization Name Telephone Number and Fax Nu...

Страница 27: ...Search screen if you encounter with the LDAP search error 6 Check the search result The desired name will be displayed Press Address Display to display its E mail address Displays up to 100 addresses...

Страница 28: ...rom the result of search and press Register If more than one address is selected the address that is selected at last is registered In the LDAP Search Results Register Screen check Address Register Na...

Страница 29: ...4 About the Network Scanner Features...

Страница 30: ...ard Disk p 4 4 Sending to the FTP Server p 4 5 Sending to the SMB Server p 4 7 Sending to a Group p 4 9 Sending Using Web Service WS Scan p 4 11 Also you can configure the density zoom scan size resol...

Страница 31: ...e from 5 types or you can input a title as you operate scanning On how to input a title refer to page 6 4 Text You can choose a text from 5 types or you can input a text as you operate scanning On how...

Страница 32: ...mputer 4 3 1 Items to be configured In order to store the scanned data on the hard disk the following items need to be configured User Box Name Enter any User Box No You have to create the box by sele...

Страница 33: ...You specify a register name of the FTP server Reference Name You specify a reference name as a keyword for searching Host Address You specify an FTP server name or an IP Address of the FTP server Fil...

Страница 34: ...IC 601 4 6 4 4 Sending to the FTP Server 4 7 CAUTION Depending on a network condition transmission to the FTP server may damage the scanned data Make sure that the scanned data are not damaged...

Страница 35: ...ld be adjusted between this machine and a computer For details about the NTML setting or date time setting refer to the User s Guide Main Body or User s Guide POD Administrator s Reference 4 5 1 Items...

Страница 36: ...gister Name Reference Name Host Address File Path Login Name and Password beforehand On how to register it refer to page 5 15 7 CAUTION Depending on a network condition transmission to the SMB server...

Страница 37: ...ximum 100 groups can be registered At maximum 50 addresses can be registered for each group Multiple E mail addresses can be registered One setting can be registered for each of HDD FTP and SMB d Refe...

Страница 38: ...he Network Scanner d Reference Refer to 6 Using the Network Scanner Features for more detailed operation Original Setting Quality Adj Zoom Color Color Space Color Compression Scan Size Resolution dpi...

Страница 39: ...presetting required for the computer 4 8 1 Settings required to use the Web service The following settings are required to use the Web service Installing the driver program of this machine to a compu...

Страница 40: ...UAC User Account Control dialog box may ap pear Check the details and continue If both of the scan and printer functions of the Web service are enabled on the machine the machine is represented by the...

Страница 41: ...5 Registering Adding an Address for the Network Scanner Features...

Страница 42: ...formation on registering the scanned data to the respective ad dresses Registering an E mail Address p 5 4 Registering a User Box p 5 6 Registering the FTP server p 5 12 Registering the SMB Server p 5...

Страница 43: ...e a new group As the address for group you can specify an existing address E mail HDD FTP SMB HDD FTP SMB Group Cancel The input is canceled and you are brought back to the Select Addresses screen OK...

Страница 44: ...ab The Select Addresses screen appears 2 Make sure that E mail is selected In the initial settings the Select Addresses screen E mail is displayed The default destination tab of the scan screen can be...

Страница 45: ...urn to the Select Addresses screen Address Enter an E mail address within 64 characters in alphameric characters and signs Register Name Input the Name that is displayed on the Select Addresses screen...

Страница 46: ...nce Creating a User Box page 5 6 Registering a User Box as Destination page 5 10 5 3 1 Creating a User Box Controller You can create a user box in MACHINE Controller Scan Setting New User Box Reg To d...

Страница 47: ...IC 601 5 7 5 3 Registering a User Box 5 4 Press Register 5 Press Change for User Box No 6 Input the box number and press Set Make sure to specify the box number between 000000001 and 999999998...

Страница 48: ...IC 601 5 8 5 3 Registering a User Box 5 7 Press Return 8 Press Change for Register Name 9 Enter the registration name and then press OK 10 Press Change for Password...

Страница 49: ...IC 601 5 9 5 3 Registering a User Box 5 11 Enter the password and then press OK 12 Press Register The user box is created 13 Press Close 14 Press Return...

Страница 50: ...nformation about method to create the user box 0 You can register up to 150 user boxes as destinations 1 Press SCAN tab 2 Press HDD In the initial settings the Select Addresses screen E mail is displa...

Страница 51: ...not displayed on the page press to switch between pages 8 Press Return to return to the Select Addresses screen Box Name In Box Name input User Box No 000000001 999999998 that was registered when crea...

Страница 52: ...can be registered as many as 30 in sum 1 Press SCAN tab 2 Press FTP In the initial settings the Select Addresses screen E mail is displayed The default destination tab of the scan screen can be set a...

Страница 53: ...ters and signs File Path Enter a file path of the FTP server within 80 characters in alphameric characters and signs Login Name Enter an account of the FTP server within 32 characters in alphameric c...

Страница 54: ...Registering the FTP server 5 7 Make sure that the registered Name is displayed If the desired Name is not displayed on the page press to switch between pages 8 Press Return to return to the Select Ad...

Страница 55: ...can be registered as many as 30 in sum 1 Press SCAN tab 2 Press SMB In the initial settings the Select Addresses screen E mail is displayed The default destination tab of the scan screen can be set a...

Страница 56: ...in alphameric characters and signs Host Address Enter an SMB server address within 64 characters in alphameric char acters and signs File Path Enter a file path of the SMB server within 80 characters...

Страница 57: ...Registering the SMB Server 5 7 Make sure that the registered Name is displayed If the desired Name is not displayed on the page press to switch between pages 8 Press Return to return to the Select Ad...

Страница 58: ...0 addresses can be registered for each group 0 Multiple E mail addresses can be registered One setting can be registered for each of HDD FTP and SMB 1 Press SCAN tab 2 Press Group In the initial setti...

Страница 59: ...Pressing E mail HDD FTP or SMB displays the register names for each If the desired Name is not displayed on the page press to switch between pages At maximum 50 addresses can be registered for each g...

Страница 60: ...IC 601 5 20 5 6 Registering a Group 5 8 Confirm the list and press OK 9 Make sure that the registered Name is displayed 10 Press Return to return to the Select Addresses screen...

Страница 61: ...d address information can be changed or deleted in the following steps Changing the Registered Information 1 Press SCAN tab 2 Press E mail HDD FTP SMB or Group to display the address of which you want...

Страница 62: ...the new information and press OK 7 Press OK The registered information is updated 8 Press Return You are brought back to the Select Addresses screen Deleting the Registered Information 1 Press SCAN t...

Страница 63: ...7 Changing Deleting Registered Information 5 4 Select the address you want to delete and press Delete 5 Press Yes The selected address is deleted 6 Press Return You are brought back to the Select Add...

Страница 64: ...6 Using the Network Scanner Features...

Страница 65: ...register name correspond ing to the selected A to Z key Others When this key is pressed it displays the register name of which cap ital letter is a sign It also displays the register name having no r...

Страница 66: ...Keys on the Select Addresses Screen 6 In the Select Addresses screen Group it does not display Input Address Search A to Z Others Main and All keys Scan Settings Pressing this key displays the Scan S...

Страница 67: ...registration in the User s Guide POD Administrator s Reference When an E Mail Address is Already Registered 1 Press SCAN 2 Make sure that E mail is selected In the initial settings the Select Address...

Страница 68: ...s Guide POD Administrator s Reference 4 If you want to put a title on the E mail press Title Setting press 1 5 or Manual Setting to set the title and then press OK Pressing Manual Setting displays the...

Страница 69: ...or more information on how to input characters refer to page 3 6 You can set the fixed texts for 1 5 in Utility Counter Scan Address Register E mail Text Setting For details refer to page 7 3 6 If you...

Страница 70: ...sary items For more information on the configurations on the Scan Settings screen refer to page 6 34 Press File Name if you want to specify the name of the attached file 10 Set an original and press S...

Страница 71: ...en an E Mail Address is Input Manually 1 Follow the Step 1 to 6 of When an E Mail Address is Already Registered p 6 4 2 Press Input Address If you want to select the registered address refer to page 6...

Страница 72: ...IC 601 6 9 6 2 Transmission to an E mail Address 6 4 Press Scan Settings 5 Follow the Step 9 and after of When an E Mail Address is Already Registered p 6 4...

Страница 73: ...1 Press SCAN tab 2 Press HDD In the initial settings the Select Addresses screen E mail is displayed The default destination tab of the scan screen can be set at Utility Counter User Setting Scan Sett...

Страница 74: ...Press Address to return to the Select Addresses screen Refer to the user s guide for the HDD TWAIN driver for more information about method to load scanned data stored in the hard disk into a computer...

Страница 75: ...ng in the Hard Disk 6 When a Box is Not Registered 1 Follow the Step 1 to 2 of When a Box is Already Registered p 6 10 2 Press Input Address If you want to select the registered address refer to page...

Страница 76: ...r details refer to page 5 6 The job is canceled if you enter the user box number that has not been registered in the controller Make sure to record Box Name You need the name when you import scanned d...

Страница 77: ...egistered 1 Press SCAN tab 2 Press FTP In the initial settings the Select Addresses screen E mail is displayed The default destination tab of the scan screen can be set at Utility Counter User Setting...

Страница 78: ...are stored in an specified address Press Address to return to the Select Addresses screen The settings specified in the Scan Settings screen and address selected in the Select Addresses screen may be...

Страница 79: ...2 of When an FTP server is Already Registered p 6 14 2 Press Input Address If you want to select the registered address refer to page 6 14 3 Press Register Name to enter the Name The Name is automatic...

Страница 80: ...ress Pressing Host Address displays the character input screen For more information on how to input characters refer to page 3 6 5 Press File Path to input a File Path Pressing File Path displays the...

Страница 81: ...cters refer to page 3 6 Pressing Anonymous inputs anonymous in the Login Name field This key is available when you use the Anonymous FTP where file sharing is done between unspecified number of users...

Страница 82: ...r is configured in 5 digit numbers 1 65535 The initial setting is 21 No configuration is required under the normal condition Consult your network administrator about your port number 9 Press Scan Sett...

Страница 83: ...egistered 1 Press SCAN tab 2 Press SMB In the initial settings the Select Addresses screen E mail is displayed The default destination tab of the scan screen can be set at Utility Counter User Setting...

Страница 84: ...are stored in an specified address Press Address to return to the Select Addresses screen The settings specified in the Scan Settings screen and address selected in the Select Addresses screen may be...

Страница 85: ...2 Press Input Address If you want to select the registered address refer to page 6 20 The Address Manual Input screen appears 3 Press Register Name to enter the Name The Name is automatically inputted...

Страница 86: ...ress Pressing Host Address displays the character input screen For more information on how to input characters refer to page 3 6 5 Press File Path to input a File Path Pressing File Path displays the...

Страница 87: ...aracter input screen For more information on how to input characters refer to page 3 6 7 Press Password to input a Password Pressing Password displays the character input screen For more information o...

Страница 88: ...of When an SMB server is Already Registered p 6 20 To Search for an SMB Server from a Browsing List 1 Follow the Step 1 to 2 of When an SMB server is Already Registered p 6 20 2 Press Input Address If...

Страница 89: ...the Name The Name is automatically inputted in Reference Name If you want to change the Name press Reference Name and input the Name again For more information on how to input characters refer to pag...

Страница 90: ...than one page you can move between pages by pressing Previous or Next It can display up to 512 workgroups 6 Specify a computer name and press Down When the list consists of more than one page you can...

Страница 91: ...B server 6 7 The authentication screen is displayed Press Change for both the login name and password and input the authentication information 8 Press Login 9 Select a destination folder and press OK...

Страница 92: ...6 It can display up to 256 folders If the file path length exceeds the maximum 80 characters you can specify the file path within the length 10 Press Scan Settings 11 Follow the Step 5 and after of W...

Страница 93: ...ses screen E mail is displayed The default destination tab of the scan screen can be set at Utility Counter User Setting Scan Setting For details refer to page 7 6 3 Press the Name of the address Grou...

Страница 94: ...information on the configurations on the Scan Settings screen refer to page 6 34 Press File Name if you want to specify the file name 6 Set an original and press Start The original is scanned and the...

Страница 95: ...ceive the scanned data to the computer The following is an example of procedure for scanning originals via Windows Photo Gallery 0 For the settings you must configure in advance refer to page 4 11 1 S...

Страница 96: ...inal on the machine 5 Configure scan settings and then click Scan WS Scan can transmit a file only in JPEG and TIFF formats 6 In the Tag these images list enter the file name and then click Import The...

Страница 97: ...t this to scan the page as an image 4 Quality Adj Specify the density or contrast for scanning It is disabled when Black is selected as the color mode p 6 36 5 Zoom You can specify various settings on...

Страница 98: ...ial Setting press Utility Counter User Setting Ini tial Setting p 6 39 11 File Name You can input a Fine Name for data you are about to scan If you don t input the file name the file name is automatic...

Страница 99: ...o User s Guide Copier Quality Adjustment In Quality Adjustment you can configure the following functions Scan Density 4 4 Background Removal 4 4 Red 4 4 Green 4 4 Blue 4 4 Sharpness 4 4 Contrast 4 4 D...

Страница 100: ...Zoom Ratio 4 000 2 000 0 500 To enable zoom a setting is required For more information contact your service representative d Reference For details on Zoom refer to User s Guide Copier Color In Color...

Страница 101: ...v 5 5x8 5w 5 5x8 5v A3w A4w A4v A5w A5v A6w B4w B5w B5v B6w Full Area Input Size Size Registration Size Recall Tab Paper A4v 8 5 x 11v d Reference For details on Scan Size refer to User s Guide Copier...

Страница 102: ...o open Scan Initial Setting press Utility Counter User Setting Initial Setting d Reference For details on Simplex Duplex refer to User s Guide Copier File Type In File Type you can select the followin...

Страница 103: ...minute and sequence number p 6 41 Color Space You can set a color space for scanning with the TWAIN driver p 6 42 Frame Erase You can use the frame erase to erase a black shadow generated around the...

Страница 104: ...he data stored in the user box automatically 6 9 2 File Name You can set the string to add to the file name automatically The file name is generated in combination of the specified string year month d...

Страница 105: ...r Space You can set a color space for scanning with the TWAIN driver 6 9 4 Frame Erase You can use the frame erase to erase a black shadow generated around the scan image when scanning with the TWAIN...

Страница 106: ...TWAIN driver 6 9 7 E mail Initial Setting You can set initial settings for an E mail The set values will be used as the initial values for Subject Sen tence when sending scanned data via E mail For de...

Страница 107: ...For details refer to page 5 6 E mail Default Select Enable Disable Setting No Specify the setting number by using and Subject Specify the initial value for a subject for an E mail Setting No Specify t...

Страница 108: ...01 6 45 6 10 Job List 6 6 10 Job List You can check a job that was scanned using this machine in the Job List screen 6 10 1 Displaying the Job List Screen 1 In MACHINE press Controller 2 Press 09 Job...

Страница 109: ...utted jobs Send History Press this button to display all sent jobs Delete Press this button to delete the selected job Print Next Press this button to print the selected job preferentially Priority Pr...

Страница 110: ...7 Utility Menu...

Страница 111: ...screen 7 1 Displaying the Utility Menu Screen 1 Press Utility Counter on the control panel The Utility Menu screen is displayed This User s Guide describes the following items in the Utility Menu scre...

Страница 112: ...tting and E mail Text Set ting Displaying the Scan Address Register Screen 1 Open the Utility Menu screen by referring to page 7 2 2 Press 01 Scan Address Register The Scan Address Register screen is...

Страница 113: ...IC 601 7 4 7 2 Scan Address Register 7 E mail Title Setting You can register up to 5 titles for an E mail E mail Text Setting You can register up to 5 texts for an E mail Item Description...

Страница 114: ...g Screen 1 Open the Utility Menu screen by referring to page 7 2 2 Press 02 User Setting 3 Press 02 Initial Setting 4 Press 02 Scan Initial Setting 5 Set the initial values for the Scan Setting screen...

Страница 115: ...ault Address and Compress method in the Scan Setting screen Item Description File Type Default E mail Set the initial value for the file type for Scan to E mail File Type Default HDD This function is...

Страница 116: ...8 Troubleshooting...

Страница 117: ...confirm the IP Address of the copier contact your network administrator If the ping test fails check whether the copier s main power is switched on and also check the net work cable for proper connec...

Страница 118: ...ount of the hard disk space in the image controller 1 Start the Web browser 2 Input the IP address for the image controller in the URL field and press Enter The PageScope Web Connection screen appears...

Страница 119: ...9 Appendix...

Страница 120: ...vice to save data Host Name Name of a device on the network HTTP Abbreviation of HyperText Transfer Protocol A protocol used to trans mit or receive data between a web server and client web browser et...

Страница 121: ...tween the computer and printer Protocol Rules by which a computer communicates with other computer or pe ripheral device Resolution Degree how correctly the details of images or prints can be reproduc...

Страница 122: ...Input Address 6 2 J Job List 6 45 L LDAP Search 3 8 M Main 6 2 N New User Box Reg 6 44 O Original Setting 6 35 Overview 4 2 Overview of Features and Connection Modes 2 2 Overview of the Scanning Feat...

Страница 123: ...http konicaminolta com...

Отзывы: