background image

A1 Port

- To arm cylinder (Head side)

A2 Port

- To swing motor (A Port)

A3 Port

- To swivel joint (D Port)

A4 Port

- To swivel joint (C Port)

A5 Port

- To boom cylinder (Bottom side)

A6 Port

- To bucket cylinder (Bottom side)

A7 Port

- To swivel joint (F Port)

A8 Port

- To boom swing cylinder (Head side)

A9 Port

- To attachment

B1 Port

- To arm cylinder (Bottom side)

B2 Port

- To swing motor (B Port)

B3 Port

- To swivel joint (B Port)

B4 Port

- To swivel joint (A Port)

B5 Port

- To boom cylinder (Head side)

B6 Port

- To bucket cylinder (Head side)

B7 Port

- To swivel joint (E Port)

B8 Port

- To boom swing cylinder (Bottom side)

C Port

- To oil cooler

P Port

- From hydraulic pump (P Port)

Pa1 Port

- From L.H. PPC valve (4 Port)

Pa2 Port

- From L.H. PPC valve (1 Port)

Pa5 Port

- From R.H. PPC valve (2 Port)

Pa6 Port

- From R.H. PPC valve (1 Port)

Pa9 Port

- From attachment PPC valve

Pb1 Port

- From L.H. PPC valve (2 Port)

Pb2 Port

- From L.H. PPC valve (3 Port)

Pb5 Port

- From R.H. PPC valve (4 Port)

Pb6 Port

- From R.H. PPC valve (3 Port)

Pi1 Port

- From hydraulic pump (P3 Port)

Pi2 Port

- To ST1 solenoid valve (P Port)

P2 Port

- From hydraulic pump (P2 Port)

T Port

- To hydraulic tank

TS Port

- To hydraulic tank

10-35

PC12R-8 PC15R-8

Содержание PC12R-8 MISTRAL

Страница 1: ......

Страница 2: ...40 28 PC15R 8 ...

Страница 3: ...CONTENTS 00 1 PC12R 8 PC15R 8 10 STRUCTURE AND FUNCTION 10 1 20 TESTING AND ADJUSTING 20 1 30 REMOVAL AND INSTALLATION 30 1 40 MAINTENANCE STANDARD 40 1 ...

Страница 4: ...00 2 PC12R 8 PC15R 8 ...

Страница 5: ...0 29 10 30 10 31 10 32 10 33 10 34 10 35 10 36 10 37 10 38 10 39 10 40 10 41 10 42 10 43 10 44 10 45 10 46 10 47 10 48 10 49 10 50 10 51 10 52 10 53 10 54 10 55 10 56 10 57 10 58 10 59 10 60 10 61 10 62 10 63 10 64 10 65 10 66 10 67 10 68 10 69 10 70 10 71 10 72 10 73 10 74 10 75 10 76 10 77 10 78 10 79 10 80 10 81 10 82 10 83 10 84 10 85 10 86 10 87 10 88 10 89 10 90 10 91 10 92 10 93 10 94 10 95...

Страница 6: ...0 36 30 37 30 38 30 39 30 40 30 41 30 42 30 43 30 44 30 45 30 46 30 47 30 48 30 49 30 50 30 51 30 52 30 53 30 54 30 55 30 56 30 57 30 58 30 59 30 60 30 61 30 62 30 63 30 64 30 65 30 66 30 67 30 68 30 69 30 70 30 71 30 72 30 73 30 74 30 75 30 76 30 77 30 78 30 79 30 80 30 81 30 82 40 1 40 2 40 3 40 4 40 5 40 6 40 7 40 8 40 9 40 10 40 11 40 12 40 13 40 14 40 15 40 16 40 17 40 18 40 19 40 20 40 21 40...

Страница 7: ...t or any other work equipment to the ground If this is not possible use blocks to prevent the work equipment from falling down In addition be sure to lock all the control levers and hang warning sign on them 9 When disassembling or assembling support the machine with blocks jacks or stands before start ing work 10 Remove all mud and oil from the steps or other places used to get on and off the mac...

Страница 8: ... even start fires 18 As a general rule do not use gasoline to wash parts In particular use only the minimum of gaso line when washing electrical parts 19 Be sure to assemble all parts again in their origi nal places Replace any damage parts with new parts When installing hoses and wires be sure that they will not be damaged by conctat with other parts when the machine is being operated 20 When ins...

Страница 9: ... each component It serves not only to give an under standing of the structure but also serves as reference material for troubleshooting TESTING AND ADJUSTING This sections explains checks to be made before and after performing repairs as well as adjustments to be made at completion of the checks and repairs Troubleshooting charts correlating Problems to Causes are also included in this section DIS...

Страница 10: ...TY page SYMBOLS In order to make the shop manual greatly chelpful important points about safety and quality are marked with the following symbols Symbol Item Remarks Safety Special safety precautions are ne cessary when performing the work Extra special safety precautions are necessary when performing the work because it is under inter nal pressure Caution Special technical precautions or other pr...

Страница 11: ...ok during hoist ing and a serious accident can result Hooks have maximum strength at the middle portion 3 Do not sling a heavy load with one rope alone but sling with two or more ropes symmetrically wound on to the load Slinging with one rope may cause turning of the load during hoisting untwisting of the rope or slipping of the rope from its original winding position on the load which can cause d...

Страница 12: ...3w2 45w4 9 77w8 122w13 1 3w0 15 3 2w0 3 6 5w0 6 11w1 17 5w2 13 5w1 5 32 2w3 5 63w6 5 108w11 172w18 16 18 20 22 24 2 2 5 2 5 2 5 3 24 27 30 32 36 14 14 17 17 19 19 5w2 27w3 38w4 52w6 66w7 191w21 262w28 372w40 511w57 644w70 27w3 37w4 53w6 73w8 92w10 268w29 366w36 524w57 719w80 905w98 27 30 33 36 39 3 3 5 3 5 4 4 41 46 50 55 60 19 22 24 27 Ð 96w10 131w14 177w20 230w25 295w33 945w100 1287w140 1740w200...

Страница 13: ...for high resistant of threaded parts that can be removed with normal tools Loctite 270 Used for high resistant locking and for sealing threaded parts bolts and stud bolts Loctite 542 Used for sealing the union threads for hydraulic tubes Loctite 573 Used for sealing rather exact plane surfaces when the option of possible future dismantling is required Loctite 601 Used for high resistant locking of...

Страница 14: ...B A N A N Colour Light blue Light blue Red Light blue Yellow Light blue White Light blue Black Code B B R B R B N B N Ð Ð Ð Ð Colour White White Red White Black Ð Ð Code C C N C N C L C L C V C V Ð Ð Colour Orange Orange Black Orange Blue Orange Green Ð Code G G V G V G N G N G R G R Ð Ð Colour Yellow Yellow Green Yellow Black Yellow Red Ð Code H H R H R H N H N H L H L Ð Ð Colour Gray Gray Red Gr...

Страница 15: ... without fuel 2 5 2 5 Hydraulic tank without hydraulic oil 16 16 Control valve 32 32 Rear counterweight 48 48 Lateral counterweight 23 23 23 23 Swing motor 27 27 Swivel joint 5 5 5 5 Track frame assembly 770 720 770 720 Track roller 3x6 3x6 Idler assy 17 17 Final drive 17 17 Sprocket 5 5 Swing circle 20 20 Track shoe Steel track shoe L 230 mm Rubber track shoe 70x2 45x2 70x2 45x2 Swing bracket 22 ...

Страница 16: ...ristics specifically formulated and approved for the en gine the hydraulic circuit of equipment and for re ductions TABLE OF OIL AND COOLANT QUANTITIES 00 12 PC12R 8 PC15R 8 RESERVOIR KIND OF FLUID AMBIENT TEMPERATURE CAPACITY Specified Refill Crankcase sump 2 8 2 8 Hydraulic circuit 24 22 Final drive each 0 4 0 4 Fuel tank FUEL 20 Ð Engine coolant system WATER ANTI FREEZE 3 2 Ð WATER 3 2 Ð PERMAN...

Страница 17: ...GROUP 10 ...

Страница 18: ...40 28 PC15R 8 ...

Страница 19: ...ulic pump 29 PC12R 8 30 PC15R 8 30 Control valve PC12R 8 34 PC12R 8 MISTRAL with travel increment 34 Control valve PC12R 8 HS with variable gauge undercarriage 36 PC12R 8 MISTRAL HS with variable gauge undercarriage and travel increment 36 CLSS 44 Control valve PC15R 8 62 PC15R 8 HS with variable gauge undercarriage 64 CLSS 72 Swivel joint PC12R 8 89 PC12R 8 MISTRAL with travel increment 90 PC15R ...

Страница 20: ...or 2 Swing circle 3 Track shoe idler 4 Control valve 5 Travel increment valve optional 6 Swivel joint 7 Travel motor 8 Engine 9 Hydraulic pump POWER TRAIN PC12R 8 10 2 PC12R 8 PC15R 8 RKP00010 4 7 5 3 1 8 9 1 2 6 ...

Страница 21: ...1 Swing motor 2 Swing circle 3 Track shoe idler 4 Control valve 5 Travel increment valve 6 Swivel joint 7 Travel motor 8 Engine 9 Hydraulic pump PC15R 8 10 3 PC12R 8 PC15R 8 RKP00020 4 7 3 1 8 9 1 2 5 6 ...

Страница 22: ...race 2 Ball bearing 3 Inner race 4 Seal SWING CIRCLE 10 4 PC12R 8 PC15R 8 Sezione A A A 1 Sezione B B Sezione C C Sezione D D 3 B A C D D B C RKP00510 4 3 2 2 1 4 Section B B Section A A Section C C Section D D ...

Страница 23: ...fety valve a T Port To hydraulic tank b B Port From control valve B2 Port c A Port From control valve A2 Port SPECIFICATIONS Displacement 195 cc rev SWING MOTOR 10 5 PC12R 8 PC15R 8 1 1 c a b T B A RKP00940 ...

Страница 24: ...No 1 sun gear 5 Cover 6 Oil drainage plug 7 No 1 planetary gear 8 No 2 sun gear 9 Housing SPECIFICATIONS PC12R 8 Reduction ratio 1 31 77 PC15R 8 Reduction ratio 1 37 22 FINAL DRIVE H The figure represent PC12R 8 10 6 PC12R 8 PC15R 8 RKP00800 9 8 7 6 5 4 1 2 3 ...

Страница 25: ... Sprocket 4 Lower idler 5 Shoe 6 Guard 7 Final drive 8 Track shoe idler 9 Recoil spring 10 Grease nipple TRACK FRAME AND RECOIL SPRING For steel shoe 10 7 PC12R 8 PC15R 8 RKP00550 4 6 5 1 3 2 9 10 A A Sezione A A 8 2 7 Section A A ...

Страница 26: ...1 Track frame 2 Upper idler 3 Sprocket 4 Lower idler 5 Track shoe idler 6 Shoe 7 Final drive 8 Grease nipple For rubber shoe 10 8 PC12R 8 PC15R 8 RKP00560 1 3 8 Sezione A A A A 6 2 7 4 5 2 Section A A ...

Страница 27: ...6 Guard 7 Variable gauge track 8 Variable gauge track cylinder 9 Final drive 10 Track shoe idler 11 Recoil spring 12 Grease nipple VARIABLE GAUGE TRACK FRAME AND RECOIL SPRING 10 9 PC12R 8 PC15R 8 RKP11340 2 9 10 4 6 5 1 3 2 11 12 A A Sezione A A 7 8 Section A A ...

Страница 28: ...For rubber shoe 1 Bearing 2 Spacer 3 Seal 4 Roller 5 Shaft 6 Snap ring CARRIER ROLLER For steel shoe 10 10 PC12R 8 PC15R 8 1 2 3 4 5 6 RKP00030 RKP00040 1 2 3 4 5 6 ...

Страница 29: ...1 Link shoe 2 Shoe 3 Cotter pin 4 Pin 5 Bushing 6 Master pin 7 Master housing STEEL SHOE 10 11 PC12R 8 PC15R 8 RKP00050 1 2 3 4 5 6 7 ...

Страница 30: ...10 12 PC12R 8 PC15R 8 PAGE INTENTIONALLY LEFT BLANK ...

Страница 31: ... 1 Bucket cylinder 2 Arm cylinder 3 Boom cylinder 4 Boom swing cylinder 5 Cutting shovel solenoid valve 6 Servocontrol solenoid valve 7 R H PPC valve 8 Oil cooler 9 L H PPC valve 10 Hydraulic pump 11 Hydraulic tank 12 Swing motor 13 Final drive 14 Swivel joint 15 Blade cylinder 16 Control valve ...

Страница 32: ...10 14 PC12R 8 PC15R 8 PAGE INTENTIONALLY LEFT BLANK ...

Страница 33: ...r 4 Boom swing cylinder 5 Cutting shovel solenoid valve 6 Servocontrol solenoid valve 7 R H PPC valve 8 Oil cooler 9 L H PPC valve 10 Hydraulic pump 11 Hydraulic tank 12 Swing motor 13 Final drive 14 Swivel joint 15 Blade cylinder 16 Control valve 7 16 1 2 RKP01020 8 9 10 6 4 5 3 11 12 13 14 15 ...

Страница 34: ...10 16 PC12R 8 PC15R 8 PAGE INTENTIONALLY LEFT BLANK ...

Страница 35: ... Swing Right Swing motor Boom swing cylinder Ø60 x Ø30 313 Bucket cylinder Ø50 x Ø30 378 Boom cylinder Canopy Ø55 x Ø30 354 Cabin Ø55 x Ø30 342 Arm cylinder Ø50 x Ø30 453 L H PPC valve R H PPC valve Cylinder block Accumulator 12 bar Filter 10 µn L H swing R H swing Curled Open Raise Lower Close Open Additional equipment Boom swing Blade Bucket Boom R H travel Reverse Forwards L H travel Reverse Fo...

Страница 36: ...10 18 PC12R 8 PC15R 8 PAGE INTENTIONALLY LEFT BLANK ...

Страница 37: ...00 mesh RKP11401 A3 B3 A4 B4 P1 P2 P3 Arm cylinder Ø50 x Ø30 453 Close Open Boom cylinder Canopy Ø55 x Ø30 354 Cabin Ø55 x Ø30 342 Raise Lower Bucket cylinder Ø50 x Ø30 378 Curled Open Boom swing cylinder Ø60 x Ø30 313 L H swing R H swing Swing Left Swing Right Swing motor Additional equipment Boom swing Blade Bucket Boom R H travel L H travel Reverse Forwards Reverse Forwards Swing Arm L H travel...

Страница 38: ...10 20 PC12R 8 PC15R 8 PAGE INTENTIONALLY LEFT BLANK ...

Страница 39: ...H travel L H travel Forwards Forwards Swing Arm R H swing Close arm L H swing Open arm Curled bucket Lower boom Open bucket Raise boom Oil cooler R H travel motor capacity 21 6 ᐉ Hydraulic tank Raise Lower L H travel motor 2 3 1 4 1 100 mesh 4 2 3 100 mesh 0 35 ᐉ 1 5kg cm2 EV1 a2 a1 R G T1 T2 P1 P2 T1 T2 P2 P1 Pb6 Pb5 A7 B7 30 kg cm2 Ts Pi3 Pi1 Pa9 Pi2 A8 B8 A9 125 kg cm 2 T A B Pa5 A5 A6 B6 B5 Pa...

Страница 40: ...10 22 PC12R 8 PC15R 8 PAGE INTENTIONALLY LEFT BLANK ...

Страница 41: ... swing Close arm L H swing Open arm R H PPC valve Curled bucket Lower boom Open bucket Raise boom Cylinder block Accumulator 12 bar Filter 10 µn Oil cooler R H travel motor capacity 21 6 ᐉ Hydraulic tank Raise Lower L H travel motor 4 2 3 1 100 mesh P T 1 4 2 3 0 35 ᐉ EV1 EV2 100 mesh P T 30 kg cm2 Ts Pi3 Pi2 Pi1 Pb6 Pb5 A7 B7 A4 B4 125 kg cm 2 T A B 002 002 002 002 002 002 003 003 4 kg cm2 190 kg...

Страница 42: ...10 24 PC12R 8 PC15R 8 PAGE INTENTIONALLY LEFT BLANK ...

Страница 43: ...g R H swing Bucket cylinder Ø50 x Ø30 378 Open Curled Boom cylinder Canopy Ø55 x Ø30 354 Cabin Ø55 x Ø30 342 Lower Raise Arm cylinder Ø50 x Ø30 453 Close Open Additional equipment Boom swing Blade Bucket Boom Reverse R H travel Forwards Reverse L H travel Forwards Swing Arm L H PPC valve R H swing Close arm L H swing Open arm R H PPC valve Curled bucket Lower boom Open bucket Raise boom Cylinder b...

Страница 44: ...10 26 PC12R 8 PC15R 8 PAGE INTENTIONALLY LEFT BLANK ...

Страница 45: ...ing Left Swing Right Swing motor Boom swing cylinder Ø60 x Ø30 313 L H swing R H swing Bucket cylinder Ø50 x Ø30 378 Open Curled Boom cylinder Canopy Ø55 x Ø30 354 Cabin Ø55 x Ø30 342 Lower Raise Arm cylinder Ø50 x Ø30 453 Close Open Additional equipment Boom swing Blade Bucket Boom R H travel Reverse Reverse Forwards Forwards L H travel Swing Arm L H PPC valve R H swing Close arm L H swing Open a...

Страница 46: ...rd Optional Pi3 Pb9 Pi2 B9 P2 P1 T P Hammer Control valve Hydraulic tank Additional equipment PPC valve RKP11361 Pi3 Pb9 Pi2 B9 RKP11371 P2 P1 T P Control valve Hydraulic tank L H port R H port Additional equipment control valve Additional equipment PPC valve A B T P a b ...

Страница 47: ...d P1 Port To control valve P Port SPECIFICATIONS Type 1Px110 1Px0 45 1Px0 30 Theorical displacement 11 4 5 3 0 cc rev Nominal delivery 25 10 3 6 8 at 2450 rpm HYDRAULIC PUMP PC12R 8 10 29 PC12R 8 PC15R 8 RKP00831 Z View Z Suction Delivery Rotation C P3 B P2 A P1 a b c d RKP01040 A B P1 P2 C P3 DIESEL ...

Страница 48: ...l valve LS Port d S1 Port From hydraulic tank 1 Main pump 2 Gear pump SPECIFICATIONS Type PVK OB 16 Displacement 16 cc 2 75 cc Normal pressure Main pump 205 8 bar 210 kg cm2 Gear pump 29 bar 30 kg cm2 PC15R 8 10 30 PC12R 8 PC15R 8 RKP00060 a 2 1 d b c Vista X X A A View X RKP00320 PLS S1 P1 P2 ...

Страница 49: ...nt screw 4 Swash plate 5 Piston 6 Cylinder block 7 Valve plate 8 Spring 9 Adjustment screw 10 Joint 11 Control piston 12 Sliding shoe 13 Adjustment screw 10 31 PC12R 8 PC15R 8 RKP00070 10 1 4 6 5 7 8 9 3 2 11 12 13 Sezione A A Section A A ...

Страница 50: ...on 2 depends on the angle of swash plate 4 so by changing the an gle of swash plate 4 it is possible to change the amount of the discharge flow 2 Constant horsepower control Rocker pin 6 is assembled to swash plate 4 and it is installed to the body to make it possible to change the swash plate angle In addition swash plate 4 is equipped with spring 7 and cylinder block piston 2 which acts in the o...

Страница 51: ...signal pressure from the LS valve is transmitted to control piston 8 and control piston 8 pushes swash pla te 4 The angle of swash plate 4 changes to a point where this force is balanced with the total for ce of the spring and piston so the discharge amount changes Constant horsepower control is carried out with priority over load response control so the dischar ge amount changes in the range belo...

Страница 52: ...8 MISTRAL with travel increment 10 34 PC12R 8 PC15R 8 RKP00122 Pb1 Pb2 Pb5 Pb6 Pi1 A1 P2 A3 A4 A5 A6 A7 A8 B8 Pi2 B7 B6 B5 B4 B3 B2 B1 P T A9 Pa9 Pa6 Pa5 A2 Pa2 Pa1 T5 D E F G H H J K L M N O C D E F G H H J K L M N O C B A A B C ...

Страница 53: ... Port To bucket cylinder Head side B7 Port To swivel joint E Port B8 Port To boom swing cylinder Bottom side C Port To oil cooler P Port From hydraulic pump P Port Pa1 Port From L H PPC valve 4 Port Pa2 Port From L H PPC valve 1 Port Pa5 Port From R H PPC valve 2 Port Pa6 Port From R H PPC valve 1 Port Pa9 Port From attachment PPC valve Pb1 Port From L H PPC valve 2 Port Pb2 Port From L H PPC valv...

Страница 54: ... 8 MISTRAL HS with variable gauge undercarriage and travel increment 10 36 PC12R 8 PC15R 8 RKP00122 Pb1 Pb2 Pb5 Pb6 Pi1 A1 P2 A3 A4 A5 A6 A7 A8 B8 Pi2 B7 B6 B5 B4 B3 B2 B1 P T A9 Pa9 Pa6 Pa5 A2 Pa2 Pa1 T5 D E F G H H J K L M N O C D E F G H H J K L M N O C B A A B C ...

Страница 55: ...rt To bucket cylinder Head side B7 Port To EV3 solenoid valve P Port B8 Port To boom swing cylinder Bottom side C Port To oil cooler P Port From hydraulic pump P Port Pa1 Port From L H PPC valve 4 Port Pa2 Port From L H PPC valve 1 Port Pa5 Port From R H PPC valve 2 Port Pa6 Port From R H PPC valve 1 Port Pa9 Port From attachment PPC valve Pb1 Port From L H PPC valve 2 Port Pb2 Port From L H PPC v...

Страница 56: ...1 Suction valve Boom lower 2 Suction valve Boom L H swing 3 Suction valve Boom raise 4 Suction valve Arm close 5 Safety valve 10 38 PC12R 8 PC15R 8 RKP00130 5 1 2 3 4 Sezione A A Section A A ...

Страница 57: ...Arm 2 Spool Swing 3 Spool L H travel 4 Spool R H travel 5 Spool Boom 6 Spool Bucket 7 Spool Blade 8 Spool Boom swing 9 Main relief valve 10 39 PC12R 8 PC15R 8 RKP00140 1 2 3 4 5 6 7 8 9 Sezione B B Section B B ...

Страница 58: ...ravel 6 Boom 7 Bucket 8 Blade 9 Spool Hammer REDUCING PRESSURE COMPENSATION VALVE 10 Blade 11 Bucket 12 Boom 13 L H travel 14 R H travel 15 Arm 16 LS by pass plug 17 Cooler check valve 10 40 PC12R 8 PC15R 8 RKP00150 6 7 8 9 5 4 3 2 1 10 11 12 13 14 15 17 Sezione C C 16 Section C C ...

Страница 59: ... ARM VALVE 6 Spool 7 Check valve 8 Suction valve 9 Reducing pressure compensation valve 10 Flow compensation valve SWING VALVE 11 Spool 10 41 PC12R 8 PC15R 8 RKP00160 Sezione D D Sezione E E Sezione G G Sezione F F 4 5 3 1 2 6 7 8 9 10 11 Section D D Section E E Section F F Section G G ...

Страница 60: ...alve 8 Flow compensation valve 9 Spool BUCKET VALVE 10 Spool 11 Reducing pressure compensation valve 12 Flow compensation valve BLADE VALVE 13 Spool 14 Reducing pressure compensation valve 15 Flow compensation valve 10 42 PC12R 8 PC15R 8 RKP00170 Sezione H H 4 6 5 7 8 9 10 11 12 13 14 15 1 3 2 Sezione J J Sezione K K Sezione L L Section H H Section J J Section K K Section L L ...

Страница 61: ...MER VALVE 1 Spool Boom swing 2 Suction valve 3 Spool Hammer 4 Plug 5 Cover 6 Reducing valve Servocontrol 10 43 PC12R 8 PC15R 8 RKP00180 Sezione M M 2 1 3 4 5 6 Sezione N N Sezione O O Section M M Section N N Section O O ...

Страница 62: ... loads b Controllability enabling digging even in the control mode c Complex operability ensured by flow distribution determined according to the opening areas of spools during complex operation STRUCTURE The CLSS consists of a gear pump control valve and actuators CLSS 10 44 PC12R 8 PC15R 8 RKP00341 Actuator Control valve Unload valve Gear pump PLS PP ...

Страница 63: ...ssure at a con stant level LS differential pressure DPLS Pump discharge pressure PP LS pressure PLS If the LS differential pressure DPLS becomes lower than the setting pressure the Unload valve reduces drain flow to the circuit and if it becomes higher the Unload valve increases drain flow H For the details of this action refer to the descriptions of Unload valve 10 45 PC12R 8 PC15R 8 RKP00601 Act...

Страница 64: ... are complex operated the pressure differences DP at the upstream inlet and downstream outlet are made equal by these valves In this way the flow from the pump are distributed in proportion to the opening areas S1 and S2 of each valve 10 46 PC12R 8 PC15R 8 Load Actuator S1 Gear pump P Actuator S2 P Pressure compensation valve Load Unload valve Pressure compensation valve RKP01811 ...

Страница 65: ...kg cm2 8 Pilot relief valve 29 5 bar 30 kg cm2 3 Funzionamento per ogni circuito e valvola SCHEMA IDRAULICO E NOME DELLE VALVOLE 10 47 PC12R 8 PC15R 8 RKP00923 Pa5 Pa6 Pa9 Pi2 TS Pi1 P3 B9 B8 B7 A7 B6 A6 B5 A5 B4 A4 B3 A3 B2 A2 B1 A1 Pb1 Pb2 Pb5 Pb6 Pa2 P2 Pa1 P1 C T A8 B A P2 P1 P1 P2 3 8 4 3 3 3 3 3 4 1 5 2 7 6 Variable undercarriage Hammer Boom swing Blade Bucket Boom Reverse Forward R H travel...

Страница 66: ...nd LS pressure PLS is ac ting on area S3 The reason of difference between pump pressure PP1 and PP2 comes from pressure loss PP when the pump discharge amount passes through the orifice 3 of spool 1 PP1 PP2 DPP When the control valve is at HOLD LS pressure PLS is not generated so the pump pressure PP1 PP2 and spring force of spring 2 is acting on spool 1 As pump discharge pressure PP1 rises and re...

Страница 67: ...o the left and the oil flowing to tank circuit when control valve is at HOLD flows to ac tuator circuit The operation is same when fine control is carried out on the control valve When the pump discharge amount become smaller than actuator requirement amount Pump dischar ge amount Actuator requirement amount with operating actuators at same time spool 1 is mo ved to the left more till full stroke ...

Страница 68: ...en engine speed is high and low At that time the pressure loss DPP is va ried The balance of unload valve is PP2 x S1 PP1 x S2 PLS x S3 spring force of spring 2 Developing above formula LS differential pressure DPLS PP1 PLS is expressed PP1 PLS DPLS x S1 S3 spring force of spring Therefore LS differential pressure DPLS is varied according to PLS In other words when engine speed varies LS different...

Страница 69: ...ws from flow control valve 2 an notch a in spool 1 through bridge passage b to actuator circuit A At the same time reducing valve 3 also moves to the right so pump pressure PP has its pressure re duced by the pressure loss at notch C It is introdu ced to LS circuit PLS and then goes to spring chamber PLS1 When this happens LS circuit PLS is connected to tank circuit T from LS bypass plug 4 see the...

Страница 70: ...same time the actuator circuit pressure pas ses through notch f in hammer spool 6 then goes through passage d and acts o the left end of piston 7 Piston 7 and reducing valve 3 then move to the right As a result pump pressure PP is reduced at notch d becomes the actuator circuit pressure and is sent to LS circuit PLS H The boom swing and blade valves are different from the boom arm bucket and trave...

Страница 71: ...spool 6 to actuator cir cuit A At the same time actuator circuit pressure PA pas ses through check valve 8 and is interconnected with the LS circuit PLS H The hammer circuit is different from the other cir cuits actuator circuit pressure PA goes directly to LS circuit PLS 10 53 PC12R 8 PC15R 8 RKP00631 e 2 6 A PA a 8 4 4 PLS PP PLS ...

Страница 72: ...ss in the throttled flow of the spool and increases the stability by lowering the effective LS differential pressure OPERATION The pressurized oil for LS circuit PLS passes from clearance filter a formed by the clearance LS bypass plug 1 and the valve body through orifice b and flows to the tank circuit T PP Pump circuit PLS LS circuit T Tank circuit A To control valve spool 10 54 PC12R 8 PC15R 8 ...

Страница 73: ...d flow control valve 2 are pushed to the left Flow control valve 2 throttles the area of opening between pump circuit PP and spool upstream PPA and pressure loss is generated between PP and PPA Flow control valve 2 and reducing valve 1 are ba lanced in position where the difference in pressure between PLS and PA acting on both ends of redu cing valve 1 and the pressure loss between PP and PPA on b...

Страница 74: ...pressure PP spool notch upstream pressure PPA 6 LS circuit pressure PLS actuator circuit pressure PA A and oil flow is divided in proportion to area of opening of spool When ratio is more than 1 00 PP PPA PLS PA A and oil flow to side receiving compensation is divided in a proportion less than area of opening of spool When ratio is less than 1 00 PP PPA PLS PA A and oil flow to side receiving comp...

Страница 75: ...hamber PLS2 of the other ac tuator right side becomes the same as pump cir cuit pressure PP because of the balance of redu cing valve 1 PLS2 passes through LS introduction throttle b of reducing valve 1 and becomes PLS PLS is con nected to the tank circuit from LS bypass plug 4 so pressure loss is generated at LS introduction throttle b the condition becomes PLS PLS2 As a result even if the other ...

Страница 76: ...ler so the machine can be steered OPERATION When travelling in a straight line When left and right travel spools 1 are operated the pump discharge flows from pump circuit PP and circuits PAL and PAR to actuator circuits AL and AR When travelling in a straight line to make actuator circuits PAL and PAR equal left and right reducing valves 2 are pushed to the right by the same amount and notch a and...

Страница 77: ...de with the high load pressure As a result flow control valve 3 on the left travel side is pushed to the left by LS circuit PLS Because of this the opening of the left notch a is made smal ler so it becomes possible to operate the steering when travelling Damper b is provided in the circuit to dampen any excessive characteristics in the opening or closing of the travel junction circuit if the spoo...

Страница 78: ...ure to 29 5 bar 30 kg cm2 OPERATION The discharge pressure from the gear pump ente ring chamber A acts on the bottom of valve 1 The gear pump discharge pressure is set to 29 5 bar 30 kg cm2 10 60 PC12R 8 PC15R 8 A TS PC2 Gear pump To servocontrol solenoid valve RKP00641 1 2 ...

Страница 79: ...10 61 PC12R 8 PC15R 8 PAGE INTENTIONALLY LEFT BLANK ...

Страница 80: ...ALVE PC15R 8 10 62 PC12R 8 PC15R 8 D E F G H H J K L M N O D E F G H H J K L M N O C B A A B C RKP00192 LS Pb1 Pb2 Pb5 Pb6 Pi1 Pi2 A8 A7 A6 A5 A4 A3 A2 A1 C T P B1 B2 B3 B4 B5 B6 B7 B8 A9 Pa9 Pa6 Pa5 Pa2 Pa1 T5 ...

Страница 81: ... Port To bucket cylinder Head side B7 Port To swivel joint E Port B8 Port To boom swing cylinder Bottom side C Port To oil cooler LS Port To hydraulic pump PLS Port P Port From hydraulic pump P1 Port Pa1 Port From L H PPC valve 4 Port Pa2 Port From L H PPC valve 1 Port Pa5 Port From R H PPC valve 2 Port Pa6 Port From R H PPC valve 1 Port Pa9 Port From attachment PPC valve Pb1 Port From L H PPC val...

Страница 82: ...able gauge undercarriage 10 64 PC12R 8 PC15R 8 D E F G H H J K L M N O D E F G H H J K L M N O C B A A B C RKP00192 LS Pb1 Pb2 Pb5 Pb6 Pi1 Pi2 A8 A7 A6 A5 A4 A3 A2 A1 C T P B1 B2 B3 B4 B5 B6 B7 B8 A9 Pa9 Pa6 Pa5 Pa2 Pa1 T5 ...

Страница 83: ...rt To bucket cylinder Head side B7 Port To EV3 solenoid valve P Port B8 Port To boom swing cylinder Bottom side C Port To oil cooler LS Port To hydraulic pump PLS Port P Port From hydraulic pump P1 Port Pa1 Port From L H PPC valve 4 Port Pa2 Port From L H PPC valve 1 Port Pa5 Port From R H PPC valve 2 Port Pa6 Port From R H PPC valve 1 Port Pa9 Port From attachment PPC valve Pb1 Port From L H PPC ...

Страница 84: ...1 Suction valve Boom lower 2 Suction valve Boom L H swing 3 Suction valve Boom raise 4 Suction valve Arm close 5 Safety valve 10 66 PC12R 8 PC15R 8 RKP00200 5 1 2 3 4 Sezione A A Section A A ...

Страница 85: ...Arm 2 Spool Swing 3 Spool L H travel 4 Spool R H travel 5 Spool Boom 6 Spool Bucket 7 Spool Blade 8 Spool Boom swing 9 Main relief valve 10 67 PC12R 8 PC15R 8 RKP00210 1 2 3 4 5 6 7 8 9 Sezione B B Section B B ...

Страница 86: ...l 7 Boom 8 Bucket 9 Blade 10 Spool Hammer REDUCING PRESSURE COMPENSATION VALVE 11 Blade 12 Bucket 13 Boom 14 R H travel 15 L H travel 16 Swing 17 Arm 18 LS by pass plug 19 Cooler check valve 10 68 PC12R 8 PC15R 8 RKP00220 7 8 9 10 6 5 3 2 1 11 12 13 14 15 17 19 Sezione C C 4 16 18 Section C C ...

Страница 87: ...ve 9 Suction valve 10 Reducing pressure compensation valve 11 Flow compensation valve SWING VALVE 12 Spool 13 Reducing pressure compensation valve 14 Flow compensation valve 10 69 PC12R 8 PC15R 8 4 5 3 1 2 7 8 9 10 11 12 14 13 6 RKP00230 Sezione D D Sezione E E Sezione G G Sezione F F Section D D Section E E Section F F Section G G ...

Страница 88: ...alve 8 Flow compensation valve 9 Spool BUCKET VALVE 10 Spool 11 Reducing pressure compensation valve 12 Flow compensation valve BLADE VALVE 13 Spool 14 Reducing pressure compensation valve 15 Flow compensation valve 10 70 PC12R 8 PC15R 8 RKP00240 Sezione H H 4 6 5 7 8 9 10 11 12 13 14 15 1 3 2 Sezione J J Sezione K K Sezione L L Section H H Section J J Section K K Section L L ...

Страница 89: ...MER VALVE 1 Spool Boom swing 2 Suction valve 3 Spool Hammer 4 Plug 5 Cover 6 Reducing valve Servocontrol 10 71 PC12R 8 PC15R 8 RKP00250 4 5 1 3 2 6 Sezione M M Sezione N N Sezione O O Section M M Section N N Section O O ...

Страница 90: ...x operability ensured by flow distribution determined according to the opening areas of spools during complex operation d Energy saving feature using variable pump control STRUCTURE The CLSS consists of a variable displacement single piston pump control valve and actuators The pump body consists of the main pump TCC valve and LS valve CLSS 10 72 PC12R 8 PC15R 8 RKP00661 Actuator Control valve TCC ...

Страница 91: ...he LS differential pressure DPLS becomes lower than the setting pressure of the LS valve the pump swash plate angle becomes larger and if it becomes higher the pump swash plate angle becomes smaller H For the details of this action refer to the descriptions of HYDRAULIC PUMP 10 73 PC12R 8 PC15R 8 Actuator Control valve Pump passage Main pump LS passage PLS Min Max PLS LS valve Differential pressur...

Страница 92: ...actuators are complex operated the pressure differences DP at the upstream inlet and downstream outlet are made equal by these valves In this way the flow from the pump are distributed in proportion to the opening areas S1 and S2 of each valve 10 74 PC12R 8 PC15R 8 Load Actuator S1 PUMP P Actuator S2 P Pressure compensation valve Load Pressure compensation valve RKP00681 ...

Страница 93: ...e 4 bar 4 kg cm2 8 Pilot relief valve 29 5 bar 30 kg cm2 3 Funzionamento per ogni circuito e valvola SCHEMA IDRAULICO E NOME DELLE VALVOLE 10 75 PC12R 8 PC15R 8 RKP00933 Pa5 Pa6 Pa9 Pi2 TS Pi1 P2 B9 B8 B7 A7 B6 A6 B5 A5 B4 A4 B3 A3 B2 A2 B1 A1 Pb1 Pb2 Pb5 Pb6 Pa2 Pa1 P1 C T A8 B A P2 P1 P1 P2 P s LS 3 8 4 3 3 3 3 3 4 1 5 2 6 Variable undercarriage Blade 3 4 4 Hammer Boom swing Bucket Boom R H trav...

Страница 94: ...l 1 pump pressure PP is acting on area S2 and LS pressure PLS is acting on area S3 When the control valve is at HOLD LS pressure PLS is not generated so only pump discharge PP has any effect and PP is set by the load of spring 2 As pump discharge pressure PP rises and reaches the PP x S1 PP x S2 spring force of spring 2 spool 1 is moved to the right Pump circuit PP is then connected to tank circui...

Страница 95: ...s carried out on the control val ve LS pressure PLS is generated and acts on area S3 at the right and of spool 1 When this happens the area of the opening of the control valve spool is small so there is a big diffe rence between LS pressure PLS and pump dischar ge pressure PP When the difference in pressure between pump di scharge pressure PP and LS pressure PLS reaches the load of spring 2 spool ...

Страница 96: ... acts on area S3 at the right end of spool 1 When this happens the area of the opening of the control valve spool is large so the difference bet ween LS pressure PLS and pump discharge pressu re PP is small For this reason the difference in pressure between pump discharge pressure PP and LS pressure PLS does not reach the load of spring 2 19 6 9 8 bar 20 10 kg cm2 so spool 1 is pushed to the left ...

Страница 97: ...ows from control valve 2 and notch a in spool 1 through bridge passage b to actuator circuit A At the same time reducing valve 3 also moves to the right so pump pressure PP has its pressure re duced by the pressure loss at notch C It is introdu ced to LS circuit PLS and then goes to spring chamber PLS1 When this happens LS circuit PLS is connected to tank circuit T from LS by pass plug 4 see the s...

Страница 98: ...same time the actuator circuit pressure pas ses through notch f in hammer spool 6 then goes through passage d and acts on the left end of pi ston 7 Piston 7 and reducing valve 3 then mo ve to the right As a result pump pressure PP is reduced at notch d becomes the actuator circuit pressure and is sent to LS circuit PLS H The boom swing and blade valves are different from the boom arm bucket and tr...

Страница 99: ... spool 6 to actuator circuit A At the same time actuator circuit pressure PA pas ses through check valve 8 and is interconnected with the LS circuit PLS H The hammer circuit is different from the other cir cuits actuator circuit pressure PA goes directly to LS circuit PLS 10 81 PC12R 8 PC15R 8 RKP00630 e 2 6 A PA a 8 4 4 PLS PP PLS ...

Страница 100: ...ed flow of the spool or shuttle valve and increases the stability by lowering the effective LS differential pressure OPERATION The pressurized oil for LS circuit PLS passes from clearance filter a formed by the clearance between LS by pass plug 1 and the valve body through ori fice b and flows to the tank circuit T PP Pump circuit PLS LS circuit T Tank circuit A To valves B To pump LS valve 10 82 ...

Страница 101: ...trol valve 2 are pushed to the left Flow control valve 2 throttles the area of opening between pump circuit PP and spool upstream PPA and pressure loss is generated between PP and PPA Flow control valve 2 and reducing valve 1 are ba lanced in position where the difference in pressure between PLS and PA acting on both ends of redu cing valve 1 and the pressure loss between PP and PPA on both sides ...

Страница 102: ...ressure PP spool notch upstream pressure PPA 6 LS circuit pressure PLS actuator circuit pressure PA A and oil flow is divided in proportion to area of opening of spool When ratio is more than 1 00 PP PPA PLS PA A and oil flow to side receiving compensation is divided in a proportion less than area of opening of spool When ratio is less than 1 00 PP PPA PLS PA A and oil flow to side receiving compe...

Страница 103: ...mber PLS2 of the other ac tuator right side becomes the same as pump cir cuit pressure PP because of the balance of redu cing valve 1 PLS2 passes through LS introduction throttle b of reducing valve 1 and becomes PLS PLS is con nected to the tank circuit from LS by pass plug 4 so pressure loss is generated at LS introduction throttle b the condition becomes PLS PLS2 As a result even if the other a...

Страница 104: ...ler so the machine can be steered OPERATION When travelling in a straight lint When left and right travel spools 1 are operated the pump discharge flows from pump circuit PP and circuits PAL and PAR to actuator circuits AL and AR When travelling in a straight line to make actuator circuits PAL and PAR equal left and right reducing valves 2 are pushed to the right by the same amount and notch a and...

Страница 105: ...ide with the high load pressure As a result flow control valve 3 on the left travel side is pushed on the left by LS circuit PLS Because of this the opening of the left notch a is made smaller so it becomes possible to operate the steering when travelling Damper b is provided in the circuit to dampen any excessive characteristics in the opening or closing of the travel junction circuit if the spoo...

Страница 106: ...ure to 29 5 bar 30 kg cm2 OPERATION The discharge pressure from the gear pump ente ring chamber A acts on the bottom of valve 1 The gear pump discharge pressure is set to 29 5 bar 30 kg cm2 10 88 PC12R 8 PC15R 8 A TS PC2 Gear pump To servocontrol solenoid valve RKP00641 1 2 ...

Страница 107: ...rt To blade cylinder Boom side g Port Not used A Port From control valve B4 Port B Port From control valve B3 Port C Port From control valve A4 Port D Port From control valve A3 Port E Port From control valve A7 Port F Port From control valve B7 Port G Port Not used SWIVEL JOINT PC12R 8 10 89 PC12R 8 PC15R 8 RKP00261 1 2 A A B B f d b g e c a 3 4 A B E C F D G Sezione A A Sezione B B Section A A S...

Страница 108: ... g Port To travel motor PS Port A Port From control valve B4 Port B Port From control valve B3 Port C Port From control valve A4 Port D Port From control valve A3 Port E Port From control valve A7 Port F Port From control valve B7 Port G Port From EV2 solenoid valve B Port PC12R 8 MISTRAL with travel increment PC15R 8 10 90 PC12R 8 PC15R 8 RKP00261 1 2 A A B B f d b g e c a 3 4 A B E C F D G Sezio...

Страница 109: ...HS to travel motors PS port 2 Port To variable gauge undercarriage cylinder Head side 3 Port To blade cyinder Bottom side 4 Port To R H travel motor P1 port 5 Port To L H travel motor P1 port 6 Port To R H travel motor P2 port 7 Port To L H travel motor P2 port 8 Port To safety valve blade cylinder V2 port and to variable gauge undercarriage cylinder Bottom side D Port From travel motors T port PC...

Страница 110: ...ivel joint a Port P2 Port To swivel joint c Port T2 Port To swivel joint h Port L H motor T1 Port To swivel joint h Port P1 Port To swivel joint d Port P2 Port To swivel joint b Port T2 Port Not used SPECIFICATIONS Nominal pressure 186 bar 190 kg cm2 Displacement 12 46 cm3 rev Swing speed 1040 rpm TRAVEL MOTOR PC12R 8 10 92 PC12R 8 PC15R 8 RKP00861 10 11 Sezione A A A A 1 4 6 5 7 8 3 2 6 9 12 T1 P...

Страница 111: ...PC12R 8 with travel increment PC15R 8 10 93 PC12R 8 PC15R 8 RKP00872 B Sezione A A A A B B 4 6 5 7 8 9 10 11 12 13 14 15 16 17 1 3 2 T1 P1 P2 T2 Section A A ...

Страница 112: ...tor T1 Port Not used P1 Port From swivel joint a Port P2 Port From swivel joint c Port T2 Port From swivel joint h Port PS Port From swivel joint g Port L H motor T1 Port From swivel joint h Port P1 Port From swivel joint d Port P2 Port From swivel joint b Port T2 Port Not used PS Port From swivel joint g Port SPECIFICATIONS Nominal pressure 206 bar 210 kg cm2 Displacement High speed 6 27 cm3 rev ...

Страница 113: ... bushing 2 Bottom side bushing 3 Piston rod 4 Head 5 Washer 6 Cylinder 7 Ring 8 Spacer 9 Piston ring 10 Wear ring 11 Piston 12 Nut RKP00300 4 6 5 7 8 9 10 1 3 2 1 Head side bushing 2 Bottom side bushing 3 Piston rod 4 Head 5 Washer 6 Cylinder 7 Piston ring 8 Wear ring 9 Piston 10 Nut ...

Страница 114: ...hing 3 Piston rod 4 Head 5 Washer 6 Cylinder 7 Piston ring 8 Wear ring 9 Piston 10 Nut 1 Head side bushing 2 Bottom side bushing 3 Piston rod 4 Head 5 Washer 6 Cylinder 7 Piston ring 8 Wear ring 9 Piston 10 Nut RKP00310 1 2 3 4 5 6 7 8 9 10 11 RKP04660 12 11 10 9 8 7 6 5 4 3 1 2 ...

Страница 115: ... rod 4 Head 5 Wear ring 6 Washer 7 Cylinder 8 Piston ring 9 Wear ring 10 Piston 11 Nut 1 Head side bushing 2 Bottom side bushing 3 Piston rod 4 Head 5 Washer 6 Cylinder 7 Spacer 8 Spacer 9 Piston ring 10 Wear ring 11 Piston 12 Nut RKP00310 1 2 3 4 5 6 7 8 9 10 11 RKP04660 12 11 10 9 8 7 6 5 4 3 1 2 ...

Страница 116: ...C15R 8 Cylinder Boom Arm Bucket Boon swing Blade Variable gauge undercarriage with canopy with cabin Piston rod diameter 35 35 35 30 30 35 30 Cylinder inside diameter 60 60 55 50 60 70 50 Piston stroke 355 345 447 378 313 60 315 Max cylinder length 985 975 1153 1027 910 470 850 Min cylinder length 630 630 706 649 597 410 535 Piston nut width across flat 32 32 32 32 32 41 32 VARIABLE GAUGE UNDERCAR...

Страница 117: ... equipment Supplementary equipment 1 Blade control lever 2 L H PPC valve 3 L H safety lock lever 4 Servocontrol feed unit 5 Work equipment control pedal 6 Control valve 7 L H track shoe control lever 8 R H track shoe control lever 9 Boom swing control pedal 10 Cutting shovel control valve 11 R H safety lock lever canopy model only 12 R H PPC valve 1 2 3 4 5 6 7 8 9 10 11 12 13 14 15 16 17 18 VALVE...

Страница 118: ...ure in the circuit to which the accumulator is connec ted OPERATION When the engine is running the chamber A of the rubber bag 1 containing nitrogen is compressed by oil under pressure coming from line B If the oil under in line B falls below the maximum calibration pressure even after intensive use the rubber bag 1 will expand due to pressure from the nitrogen it ACCUMULATOR 10 100 PC12R 8 PC15R ...

Страница 119: ...ntrol valve Pb1 Port P Port From EV1 solenoid valve A Port 1 Port To control valve Pa2 Port T Port To hydraulic tank FUNCTION 1 Port R H swing 2 Port Close arm 3 Port L H swing 4 Port Open arm PPC VALVE Left 10 101 PC12R 8 PC15R 8 1 4 3 2 T P RKP11601 2 1 T P 4 3 Only HS versions ...

Страница 120: ... T Port To hydraulic tank 4 Port To control valve Pa5 Port 3 Port To control valve Pb6 Port 2 Port To control valve Pb5 Port FUNCTION 1 Port Curl bucket 2 Port Lower boom 3 Port Open bucket 4 Port Raise boom Right 10 102 PC12R 8 PC15R 8 1 4 3 2 T P RKP11610 4 3 T P 1 T 2 ...

Страница 121: ...ammer control To control valve Pa9 Port Cutting shovel control see hydraulic circuit 1 Spool 2 Adjusting spring internal 3 Return spring external 4 Plunger 5 Lever 6 Cover 7 Retainer 8 Body 9 Filter 100 mesh PPC VALVE hammer cutting shovel 10 103 PC12R 8 PC15R 8 RKP00960 A A Sezione A A 4 6 5 7 8 1 3 2 c 9 d a b Front machine RKP00950 P1 P2 T P 100 Mesh ...

Страница 122: ...t almost the same time it is connected to drain chamber D to release the pressure at port P1 When this happens spool 1 moves up or down so that the force of metering spring 2 is balanced with the pressure at port P1 The relationship in the po sition of spool 1 and body 8 fine control hole f is at a point midway between drain hole D and pump pressure chamber PP does not change until retai ner 7 con...

Страница 123: ... spool of the control valve returns oil in drain chamber D flows in from fine control hole f in the valve on the side that is not working The oil passes through port P2 and enters chamber B to fill the chamber with oil Fig 3 4 At full stroke When lever 5 pushes down piston 4 and retainer 7 pushes down spool 1 fine control hole f is shut off from drain chamber D and is connected with pump pressure ...

Страница 124: ...a T Port To hydraulic tank b P Port From control valve Pi2 Port c A Port To PPC valves P Port 1 EV1 Servocontrol SOLENOID VALVE SERVOCONTROL PC12R 8 PC12R 8 HS 10 106 PC12R 8 PC15R 8 RKP00850 a b c 1 ...

Страница 125: ... b A Port To PPC valves P Port c B Port To swivel joint G Port d P Port From control valve Pi2 Port e T Port To hydraulic tank 1 EV1 Servocontrol 2 EV2 Travel increment SERVOCONTROL PC12R 8 MISTRAL PC12R 8 MISTRAL HS PC15R 8 PC15R 8 HS 10 107 PC12R 8 PC15R 8 RKP00810 1 2 a b c e d ...

Страница 126: ... b A Port To PPC valves P Port c B Port To swivel joint G Port d P Port From control valve Pi2 Port e T Port To hydraulic tank 1 EV1 Servocontrol 2 EV2 Travel increment SERVOCONTROL PC12R 8 MISTRAL PC12R 8 MISTRAL HS PC15R 8 PC15R 8 HS 10 108 PC12R 8 PC15R 8 RKP11590 a b c e d 1 2 ...

Страница 127: ...tore B7 Port b B Port To swivel joint 2 Port c A Port To swivel joint 8 Port 1 EV3 solenoid valve optional equipment L H side VARIABLE GAUGE UNDERCARRIAGE SERVOCONTROL FOR VERSION HS 10 109 PC12R 8 PC15R 8 RKP11310 a b c 1 ...

Страница 128: ...a C2 Port To blade cylinder Bottom side b V2 Port From swivel joint 3 Port c C1 Port From swivel joint 8 Port SAFETY VALVE BLADE with variable gauge undercarriage 10 110 PC12R 8 PC15R 8 RKP11320 a b c ...

Страница 129: ...b P Port To hydraulic tank c A Port To attachment Left side d B Port To attachment Right side e a Port From PPC valve Hammer P2 Port f b Port From PPC valve Hammer P1 Port CUTTING SHOVEL CONTROL VALVE 10 111 PC12R 8 PC15R 8 RKP11320 a b c ...

Страница 130: ...10 112 PC12R 8 PC15R 8 PAGE INTENTIONALLY LEFT BLANK ...

Страница 131: ...3 L H Servocontrol push button 14 Warning lights Instrument check box 15 Starting motor 16 Horn push button 17 Safety pressure switch TBG 18 Battery 12V 45Ah 210A 19 Rotating beam switch optional 20 Horn 21 Travel increment pedal 22 Fuel pump 23 Stop motor instantaneous current 30A constant current 0 8A 24 Preheater 10A 25 Engine oil pressure switch 26 TBG switch optional 27 Fan heating switch opt...

Страница 132: ......

Страница 133: ...GROUP 20 ...

Страница 134: ...40 28 PC15R 8 ...

Страница 135: ...2R 8 46 Control and regulation of the servo control power supply PC15R 8 47 Elimination of residual pressures pressurisation of the tank 48 Bleeding air from the hydraulic circuits 49 Control of hydraulic drifts analysis of the causes of a drift 51 Checking for any leakages inside the working equipment cylinders 57 Checking for any leakages inside the swing motor 58 Methods for testing for leakage...

Страница 136: ...Oil temperature 40 60ëC Engine speed kg cm2 rpm 33w1 250 26w1 250 Blow by pressure SAE30 oil Water temperature in operating range At high idling speed mm H2O Engine oil pressure Water temperature in operating range At high idling speed SAE30 At low idling speed SAE30 At low idling speed SAE10 kg cm2 kg cm2 kg cm2 Engine oil temperature Whole speed range ëC Max 120ë Max 120ë Fuel injection timing B...

Страница 137: ...C15R 8 3D68E N3FB Standard value Permissible value 2780w25 1390w25 2600 Ð Ð Ð 3 5 0 4 Max 7 0 Max 0 7 0 20 0 20 Ð Ð 33w1 250 26w1 250 Max 120ë Max 120ë 14w1 Ð 10 15 Ð FOR THE ENGINE 20 3 PC12R 8 PC15R 8 ...

Страница 138: ...om control lever At centre of lever knob Reading at end of travel Equipment on the ground Engine stopped Tip of pedal Neutral Raise Lower mm 75 65 85 Arm control lever Neutral Open Curled 75 65 85 Bucket control lever Neutral Open Curled 75 65 85 Swing control lever Neutral Swing RH Swing LH 75 65 85 Blade control lever Neutral Raise Lower 60 50 70 Boom swing pedal Neutral Swing RH Swing LH 20 17 ...

Страница 139: ... 8 Standard value Permissible value a b a b 30 6 6 30 6 6 20 6 6 20 6 6 75 65 85 75 65 85 75 65 85 75 65 85 60 50 70 20 17 23 85 70 100 60 50 70 Max 5 Max 8 Max 10 Max 15 FOR THE MACHINE 20 5 PC12R 8 PC15R 8 ...

Страница 140: ... 8 Max Min 6 0 5 7 Unload pressure Engine speed high idling Hydraulic oil temperature 45 55ëC Check one circuit at a time All levers at HOLD Relieve pump outlet pressure P1 kg cm2 20 20 30 P2 P3 29 26 35 Boom Engine speed high idling Hydraulic oil temperature 45 55ëC Check one circuit at a time Relieve pump outlet pressure kg cm2 190 190 200 Arm 190 190 200 Bucket 190 190 200 Swing 125 125 135 Boo...

Страница 141: ...1 7 2 3 2 0 1 7 2 3 2 0 1 7 2 3 2 0 1 7 2 3 6 5 5 5 7 5 3 0 2 5 3 5 2 0 1 7 2 3 7 0 6 8 6 0 5 7 20 20 30 29 26 35 210 210 220 210 210 220 210 210 220 125 210 210 220 210 210 220 210 210 220 29 26 35 20 20 30 FOR THE MACHINE 20 7 PC12R 8 PC15R 8 ...

Страница 142: ...en for swings to start from positions at 90ë and 180ë 90ë sec 2 1 8 2 2 180ë 3 8 3 4 4 2 Time taken for to swing Work equipment at max reach No load in bucket Engine speed high idling Hydraulic oil temperature 45 55ëC Make one turn to settle machine Measure the time taken to make 5 full swings sec 34 0 Max 38 0 Hydraulic drift of swing Load in bucket PC12R 63 kg PC15R 72 kg Engine switched off Hyd...

Страница 143: ...PC15R 8 Standard value Permissible value 72 18ë Max 84 Max 21ë 1 8 1 6 2 0 3 1 2 8 3 9 32 0 Max 36 0 300 75ë Max 360 Max 90ë FOR THE MACHINE 20 9 PC12R 8 PC15R 8 ...

Страница 144: ...ne turn then measure time taken for next sec 29 5 29 5w3 Ð Ð Travel speed 2 Measuring posture Engine speed high idling Hydraulic oil temperature 45 55ëC On flat ground Travel for at least 10 metres and then check on the time needed to cover 20 metres for rubber shoe sec 36 0 36w4 Ð Ð Travel deviation Engine speed high idling Hydraulic oil temperature 45 55ëC Travel 20 metres on flat ground and mea...

Страница 145: ...PC15R 8 Standard value Permissible value 600 Max 1000 28 0 28w3 14 0 14w2 34 0 34w4 17 0 17w2 Max 500 Max 550 FOR THE MACHINE 20 11 PC12R 8 PC15R 8 ...

Страница 146: ...al and level ground Levers neutral Engine switched off Oil temperature 45 55ëC Take measurements as soon as the engine stops Measure the variations every 5 minutes and check the total variation after 15 mins Short arm mm Max 300 Max 340 Long arm Max 300 Max 350 Boom cylinder Retraction Short arm Max 20 Max 30 Long arm Max 20 Max 33 Arm cylinder Extension Short arm Max 20 Max 30 Long arm Max 20 Max...

Страница 147: ...alue Permissible value Max 200 Max 240 Max 75 Max 90 Max 300 Max 340 Max 300 Max 350 Max 20 Max 30 Max 20 Max 33 Max 20 Max 30 Max 20 Max 33 Max 15 Max 20 Max 15 Max 20 Max 15 Max 22 FOR THE MACHINE 20 13 PC12R 8 PC15R 8 ...

Страница 148: ...mum height and measure the height of the edge from the ground Measure the downward after 15 mins mm Max 20 Max 30 Boom Engine speed high idling Hydraulic oil temperature 45 55ëC Check leakages on the cylinder on the si de opposite to the one under pressure H Check one cylinder at a time cm3 min 2 Max 5 Arm 2 Max 5 Bucket 2 Max 5 FOR THE MACHINE 20 14 PC12R 8 PC15R 8 Hydraulic drift of working equi...

Страница 149: ...PC15R 8 Standard value Permissible value Max 20 Max 30 2 Max 5 2 Max 5 2 Max 5 FOR THE MACHINE 20 15 PC12R 8 PC15R 8 ...

Страница 150: ... 0 3 0 2 5 2 0 3 0 Bucket Cylinder fully retracted Cylinder fully extended Measuring posture Engine speed high idling Hydraulic oil temperature 45 55ëC 2 6 2 0 3 2 2 6 2 0 3 2 Boom swing Cylinder fully retracted Cylinder fully extended Measuring posture Engine speed high idling Hydraulic oil temperature 45 55ëC 4 9 3 9 5 9 5 1 4 1 6 1 Blade Blade on the ground Blade raised to max height Measuring ...

Страница 151: ...ermissible value Canopy 2 0 Cabin Canopy 1 6 2 4 Cabin Canopy 2 0 Cabin Canopy 1 6 2 4 Cabin 2 5 2 0 3 0 2 5 2 0 3 0 2 6 1 8 2 6 2 0 1 6 2 4 6 2 5 2 7 2 5 8 4 8 6 8 0 9 0 7 1 1 1 1 0 8 1 4 FOR THE MACHINE 20 17 PC12R 8 PC15R 8 ...

Страница 152: ...asure the time elapsing from when the arm stops at dead centre until it starts to move again Max 2 Max 2 Bucket Measuring posture Engine speed low idling Hydraulic oil temperature 45 55ëC Bring the boom into a horizontal position Retract the bucket cylinder completely then extend it Measure the time elapsing from when the bucket stops at dead centre until it starts to move again Max 2 Max 2 Blade ...

Страница 153: ...PC15R 8 Standard value Permissible value Max 2 Max 2 Max 2 Max 2 Max 2 Max 2 Max 1 Max 1 FOR THE MACHINE 20 19 PC12R 8 PC15R 8 ...

Страница 154: ... Motor speed rpm 2450 Test pressure kg cm2 190 5 Nominal capacity min 25 Gear pump P2 Theoretical flow cm3 rev 4 5 Motor speed rpm 2450 Test pressure kg cm2 125 5 Nominal capacity min 10 3 Gear pump P3 Theoretical flow cm3 rev 3 Motor speed rpm 2450 Test pressure kg cm2 30 5 Nominal capacity min 6 8 FOR THE MACHINE 20 20 PC12R 8 PC15R 8 Pumps ...

Страница 155: ...PC15R 8 Standard value Permissible value Ð Ð Ð Ð Ð Ð Ð Ð 2 75 2600 30 5 6 6 Ð Ð Ð Ð Ð Ð Ð Ð FOR THE MACHINE 20 21 PC12R 8 PC15R 8 ...

Страница 156: ...easurements with the engine running at a speed close to the test speed and then make a proportional calculation Example MEASUREMENT Engine speed 2525 rpm Delivery 31 min PROPORTIONAL DELIVERY AT 2600 rpm 31x2600 2525 31 9 min 20 22 PC12R 8 PC15R 8 Pump characteristics 0 10 40 0 30 50 100 98 150 200 196 210 205 8 49 147 20 50 Q ᐍ min 107 8 bar 39 ᐉ min 107 8 bar 44 ᐉ min 205 8 bar 14 ᐉ min Maximum ...

Страница 157: ... ATR800060 Stroboscopic tachometer 1 6 30000 rpm Water and oil temperature D 1 Commercially available Digital temperature gauge 1 50 1200 ëC Hydraulic pressure E 1 ATR800170 Compression gauge 1 Scale 60 bar 2 ATR800140 Compression gauge 1 Scale 400 bar 3 ATR800010 Compression gauge 1 Scale 600 bar 4 ATR800200 Servocontrol kit Differential pressure 1 Ð 5 3F3055600 Elbow 1 P2 Pressure F 1 ATR800120 ...

Страница 158: ...20 24 PC12R 8 PC15R 8 PAGE INTENTIONALLY LEFT BLANK ...

Страница 159: ...erator lever in mini mum position High idling without load accelerator lever in ma ximum position H Low idling PC12R PC15R 1350 50 rpm H High idling PC12R 2600w50 rpm PC15R 2775w50 rpm H If the minimum and maximum speeds do not fall within permissible limits when the engine is wi thout load check the position locks of the accele rator lever and the sheathing of the accelerator well before carrying...

Страница 160: ...g flat on the val ve stem and that there is no lop sided wear 1 If the valve caps 5 are damaged replace them with new ones 2 Make sure that the valve caps fit perfectly and are lying flat on the valve stem 4 Insert the feeler gauge A1 between the rocker 4 and the valve cap 5 Rotate the adjusting screw 6 until it rubs against the feeler gauge A1 Secure this position with the nut 3 Lock nut 25 5w2 5...

Страница 161: ... B2 and connect the test pressure gauge B1 H Check that the seal is mounted in the adapter and that it is undamaged 6 Turn the engine using the starting motor and read the compression value H Read the compression value when the pressure gauge has stabilised H While reading the compression also check the engine rpm using the stroboscopic tachometer C2 If the speed does not correspond with the contr...

Страница 162: ...t tension H With a new belt the flexion should be 7 9 mm 2 Adjusting the belt tension 1 Loosen the screws 4 that secure the alternator 2 and the screw 5 that secures the belt tighte ning stop 2 Rotate the alternator 2 to give the belt 1 the cor rect tension and tighten the screws 4 and 5 3 Check the belt 1 tension H If the belt has been replaced with a new one check the tension again after about 2...

Страница 163: ...e that both valves are closed H Once the B T D C has been ascertained rotate the drive shaft in a clockwise direction seen from the flywheel side for about 25 teeth 3 Take off the clamp 3 and disconnect all the fuel de livery tubes 4 from the injection pump 4 Rotate the flywheel slowly in a counter clockwise di rection seen from the flywheel side checking care fully the level of the fuel in the No...

Страница 164: ...cale 7 7 Lock the nuts 6 that fasten the pump to its block Pump fastening nuts 25 35 Nm 2 Method B Pump in its block 8 Remove the injection pump 8 and change the shim 9 provided underneath the pump To DELAY the injection increase the shim thick ness To BRING FORWARD the injection decrease the shim thickness 9 Secure the pump 8 with the nuts 10 Nuts 50 60 Nm H After adjustment of the fuel injection...

Страница 165: ...ces between the sheathing 5 and the belt stretcher 6 H Check carefully that the positions of the two levers remain fixed 5 Loosen the nut 7 and loosen the screw 8 by several turns 6 Start the engine and accelerate up to high idling speed using the tachometer C1 or C2 to check H If using the stroboscopic tachometer C2 make a distinct mark on the engine pulley to facilitate rea ding H Max speed PC12...

Страница 166: ...de nut 7 and tighten the other until the lever 5 is centered with the outside nuts 7 be hind the supports 4 Secure the position with the inside nuts 3 5 Loosen the nuts 8 and unscrew the lock screws 9 6 Execute a full stroke in one of the two directions with the lever 5 H Make sure that the valve block spool executes the full stroke 7 Tighten the lock screw 9 until it rests on the lever and then t...

Страница 167: ... nuts 2 and unscrew the lock screws 3 by a few turns 3 Push one lever 4 to the end of its stroke in one direc tion Maintaining this position tighten the correspon ding lock screw 3 until it touches the lever Turn the screw 3 by another half turn 4 Keeping the position of the lever 4 tighten the nut 2 5 Repeat the same operations for the other direction and for the other lever Before starting the e...

Страница 168: ... the ground 1 Raise the rubber mat 1 on the right hand side of the machine 2 Loosen the nut 2 on the joint 3 for a few turns 3 Remove the screw 4 4 Tighten or unscrew the joint 3 in the fork 5 connec ted to the control valve until the horizontal position of the pedal has been restored 5 Mount the screw 4 and secure the position of the joint 3 with the nut 2 PC12R 8 PC15R 8 RKPA0170 1 RKPB5950 5 2 ...

Страница 169: ...til the pitch point of the roller 7 is approximately 3 mm from the starting point of the cut off slot 4 Keep this position and bring the rubber pad into con tact with the console 8 5 Release the servo control engagement lever and se cure the rubber pad 5 with the nut 4 Adjustment of the microswitch 1 Disconnect the connectors 9 2 Loosen the nut 10 and unscrew the microswitch 11 by a few turns 3 Lo...

Страница 170: ...RUBBER TRACK SHOE STEEL TRACK SHOE PC12R A 10 15 mm A 10 20 mm PC15R A 10 15 mm A 10 20 mm 2 Adjustment If the track shoe tensions do not fall within permissible limits adjust them as follows H On completion of the adjustment and before en gaging the greasing pump G1 thoroughly clean the grease nipple and surrounding area 1 If the tension is too low Inject grease through the grease nipple 1 using ...

Страница 171: ...er Raise A7 B7 Boom swing Right Left A8 B8 Hammer Throw B9 PC12R 8 PC15R 8 RKP04891 DIESEL P1 TANK COOLER 2 1 3 4 P2 P3 RKP04870 A B 3 2 1 4 5 6 7 8 RKP04880 A 9 B 2 H Test conditions Engine at working temperature MIN and MAX engine speeds within permissi ble limits Hydraulic oil 45 55 ëC Before removing the plugs in order to measure the pressures release the residual pressures in the circuits see...

Страница 172: ...e E2 400 bar or E3 600 bar 3 Start the engine and bring it up to high idling 4 Check the pressure for each movement with the command lever at the end of its stroke and with the pressure stabilised To check the pressure of the working equip ment push the piston to the end of its stroke To check the machine travel pressure insert a block A between the chassis and the sprocket wheel H Normal pressure...

Страница 173: ... about 125 bar 128 kg cm2 3 Lock the nut 3 Nut 59w10 Nm H After adjustment check the adjustment of the main relief valve with the same procedures as used for the measurements 2 Adjustment of the safety valve of the swing mo tor If the pressures measured for the swings to the right and to the left do not come within the normal values adjust the safety valve 1 of the swing motor as fol lows 1 Remove...

Страница 174: ...e Lower Raise A7 B7 Boom swing Right Left A8 B8 Hammer Throw B9 PC12R 8 PC15R 8 RKP04901 2 1 3 4 DIESEL P1 P2 TANK COOLER 4 RKP04850 A B 3 2 1 4 5 6 7 8 RKP04860 A 9 B 2 H Test conditions Engine at working temperature MIN and MAX engine speeds within permissi ble limits Hydraulic oil 45 55 ëC Before removing the plugs in order to measure the pressures release the residual pressures in the circuits...

Страница 175: ...ssures of the working equipment machine travel and swing 1 Remove the plug 1 of pump P1 and mount a pressure adapter 2 Connect a pressure gauge E2 400 bar or E3 600 bar 3 Start the engine and bring it up to high idling 4 Check the pressure for each movement with the command lever at the end of its stroke and with the pressure stabilised To check the pressure of the working equip ment push the pist...

Страница 176: ...re by about 125 bar 128 kg cm2 3 Lock the nut 3 Nut 59w10 Nm H After adjustment check the adjustment of the main relief valve with the same procedures as used for the measurements 2 Adjustment of the safety valve of the swing mo tor If the pressures measured for the swings to the right and to the left do not come within the normal values adjust the safety valve 1 of the swing motor as fol lows 1 R...

Страница 177: ...od with pressure gauges E2 or E3 H The maximum differential pressure is 20 kg cm2 roughly 20 bar For a precise check use the sa me pressure gauge together with a decimal scale 1 Remove the plugs 1 and 2 and mount two pressure adapters 2 Connect pressure gauge E2 or E3 to the pressu re adapter 3 3 Start the engine and use the working equipment to raise one track shoe 4 Bring the engine up to high i...

Страница 178: ...ube 4 2 Loosen the lock nut 5 and turn the adjusting screw 6 To INCREASE pressure turn in a CLOCKWISE direction To DECREASE pressure turn in a COUNTER CLOCKWISE direction H Each turn of the adjusting screw 6 varies the pressure by about 13 bar 13 kg cm2 3 Lock the nut 5 Nut 31w3 5 Nm H After the adjustment check the setting of the LS valve 3 following the procedure used for the test PC12R 8 PC15R ...

Страница 179: ...ve 1 should be regulated as follows 1 Loosen the check nut 2 2 Turn the adjustment screw 3 If the working equipment speed is low turn the screw 3 in a CLOCKWISE direction to INCREASE the torque absorption of the pump If the engine rpm suffer an abnormal drop turn the screw 3 in a COUNTER CLOCKWISE direc tion to DECREASE the torque absorption H Turn the adjusting screw 3 within an adjustment range ...

Страница 180: ...ecking the pressure of the servo controls 1 Remove the cap 1 of pump P3 and mount a pres sure adapter 2 Connect the pressure gauge E1 60 bar 3 Start the engine and bring it up to high idling with all levers in neutral position 4 Check the pressure H Normal pressure 29 6 3 bar 30 6 3 kg cm2 2 Regulating the servo control valve If the pressure value does not fall within the toleran ces regulate the ...

Страница 181: ...the pressure of the servo controls 1 Remove the cap 1 of pump P2 and mount elbow E5 and a pressure adapter 2 Connect the pressure gauge E1 60 bar 3 Start the engine and bring it up to high idling with all leers in neutral position 4 Check the pressure H Normal pressure 29 6 3 bar 30 6 3 kg cm2 2 Regulating the servo control valve If the pressure value does not fall within the toleran ces regulate ...

Страница 182: ...ank is of the sealed and pres surised type When tubes are to be removed or disconnected for controls or repairs or when caps are remo ved tank pressure must be eliminated using the following method 1 Rest the working equipment on the ground and stop the engine 2 Slowly loosen the oil refuelling cap in order to re lease residual pressure 3 Pressurising the tank H This operation should be performed ...

Страница 183: ...ion repair control valve p p p p Repair Substitution cylinders Removal of cylinders tube p p p p Repair substitution swing motor Removal of tubes from swing motor p p p p Repair substitution travel motor joint Removal of tubes from travel motor joint p p p p 1 Only bleed air from the swing and travel motors if the engine oil casing is to be drained 2 Only for PC15R 1 Bleeding air from the pump PC1...

Страница 184: ...is not enga ged 1 With the engine at low idling rotate the revolving frame three turns towards the left 2 Repeat the same manoeuvre rotating the revol ving frame to the right 4 Bleeding air from the travel motors 1 With the engine at low idling use the working equipment to raise the left hand track shoe from the ground 2 Let the track shoe turn for about 30 seconds 3 Repeat points 1 and 2 for the ...

Страница 185: ...ON OF THE RESIDUAL PRESSURES 1 Boom test 1 Position the machine with the arm vertical and with the back of the bucket resting on the ground 2 Stop the engine and release the residual hy draulic pressures 3 Disconnect the hoses 1 and 2 that supply the cylinder on the head side and on the base side 4 Plug the two hoses to prevent entry of impuri ties 5 Plug the rigid tube 3 that supplies the cylinde...

Страница 186: ...1 and 2 from the arm cylinder and plug them to prevent the entry of impurities 4 Plug the hole of the arm cylinder on the head side and attach a provisional tube on the base side to catch any oil leakages 5 Start the engine and raise the boom 6 Stop the engine and check the position of the arm for 15 minutes If the arm moves downwards the drift is due to the cylinder gaskets If the arm does not mo...

Страница 187: ...isconnect the bucket cylinder hoses 1 and 2 and plug them to prevent the entry of impu rities 4 Plug the hole of the bucket cylinder on the ba se side and attach a provisional tube on the head side to catch any oil leakages 5 Start the engine and raise the boom 6 Stop the engine and check the position of the bucket for 15 minutes If the bucket makes an opening movement the drift is due to the cyli...

Страница 188: ...he boom swing cylinder hoses 1 and 2 and plug them 4 Plug the hole of the boom swing cylinder on the base side and attach a provisional tube on the head side to catch any oil leakages 5 Start the engine and move the machine to a 15ë slope 6 Stop the engine and check the position of the boom for 15 minutes If the boom makes a rotating movement the drift is due to the cylinder gaskets If the boom do...

Страница 189: ...h any oil leakages 6 Start the engine and force the boom down to raise the machine in order to remove the block on which the blade is resting 7 Lower the blade and stop the engine 8 Check the position of the blade for 15 minutes If the blade moves downwards the drift is due to the cylinder If the blade does not move downwards the drift is due to the safety valve H In order to check whether the dri...

Страница 190: ... leakages 4 Start the engine move the machine to a 15ë slope and stop the engine 5 Mark the position between revolving frame and lower track frame on the swing circle and for 15 minutes check whether or not the revolving fra me rotates If the revolving frame rotates the drift is due to either the safety valve or the control valve H To establish the cause of the drift install a new safety valve PC1...

Страница 191: ...onnect the tube 1 from the head side of the cy linder and bind it to the structure Take great care not to disconnect the tube on the base side of the cylinder 3 Start the engine bring it up to high idling and bring the base side of the cylinder up to maximum pressure 4 After 30 seconds wait for a full minute to collect any leakages from the free tube PC12R 8 PC15R 8 RKP04710 POSITION FOR THE BOOM ...

Страница 192: ... catch the drainage oil 3 Start the motor and bring it up to maximum swing 4 Make sure that the turret is locked in place and push the swing command lever to the end of its stroke 5 Hold it in this position for 15 seconds and then mea sure the leakage for the next full minute 6 Bring the motor back to low speed and repeat the rea ding for the other direction of swing 7 Check that the average betwe...

Страница 193: ...and measuring any leakages from the adja cent lines according to the following tables PC12R 8 PC12R 8 PC15R 8 TABLE A Symbol Line to be controlled under pressure Adjacent line possible leakages Sym A Travel motor to the right Reverse Travel motor to the left Reverse B External leak visible Ð B Travel motor to the left Reverse Travel motor to the right Forward C Travel motor to the right Reverse A ...

Страница 194: ...eft Reverse 7 Travel motor to the left Forward 5 5 Travel motor to the left Forward Travel motor to the right Forward 6 Travel motor to the right Reverse 4 4 Travel motor to the right Reverse Travel motor to the left Forward 5 Blade cylinder base side Descent 3 3 Blade cylinder base side Descent Travel motor to the right Reverse 4 Variable gauge undercarriage head side Close 2 2 Variable gauge und...

Страница 195: ... left Forward 5 5 Travel motor to the left Forward Travel motor to the right Forward 6 Travel motor to the right Reverse 4 4 Travel motor to the right Reverse Travel motor to the left Forward 5 Blade cylinder base side Descent 3 3 Blade cylinder base side Descent Travel motor to the right Reverse 4 Variable gauge undercarriage head side Close 2 2 Variable gauge undercarriage Head side Close Blade ...

Страница 196: ...tor to the left Forward D F Blade cylinder bottom side Descent Travel increment G Blade cylinder head side Rise E G Travel increment External leak visible Ð Blade cylinder bottom side Descent F The symbols correspond to the symbols stamped onto the input and output ports of the swivel joint 3 Preparation for the testing Travel motor Travel increment 1 Release all residual hydraulic pressures See E...

Страница 197: ...revent entry of impurities 3 Disconnect from the relative actuators the tubes that correspond to the lines adjacent to the one being checked Plug the disconnected tubes to prevent entry of impurities H To identify the lines adjacent to the line being tested please refer to Tables A and B 4 Wait a few minutes to give the oil in the tubes time to drain out 5 Checking the leaktightness 1 Start the mo...

Страница 198: ......

Страница 199: ...GROUP 30 ...

Страница 200: ...40 28 PC15R 8 ...

Страница 201: ...EIGHT Removal 21 Installation 21 TOP COVER AND SIDE PANELS Removal 22 Installation 23 HYDRAULIC OIL TANK Removal 24 Installation 25 FUEL TANK Removal 27 Installation 27 ENGINE PUMP GROUP Removal 28 Installation 30 PUMP Removal 31 Installation 31 ENGINE PUMP COUPLING Removal 32 Installation 32 CONTROL VALVE Removal 33 Installation 34 RIGHT HAND PPC VALVE Removal 35 Installation 35 LEFT HAND PPC VAL...

Страница 202: ... AND THRUST CYLINDER GROUPS Disassembly 61 Assembly 61 TRACK ROLLERS Removal 62 Installation 62 BOOM CYLINDER Removal 63 Installation 63 ARM CYLINDER Removal 64 Installation 64 BUCKET CYLINDER Removal 65 Installation 65 BOOM SWING CYLINDER Removal 66 Installation 66 BLADE CYLINDER Removal 67 Installation 67 WORKING EQUIPMENT CYLINDERS Disassembly 68 Assembly 70 UPPER WORKING EQUIPMENT Removal 74 I...

Страница 203: ...stallation H Technique or important point to remember when re moving 2 Addition of water or oil Step in removal procedure H Point to remember when adding water or oil 2 To the precautions to be taken during the removal or installation of the groups must be added the specific PRECAUTIONS TO BE TAKEN DURING THE OPERATIONS Always make sure that these precautions are taken 3 List of special tools 1 Fo...

Страница 204: ...ve oil and grease then apply just enough adhesive to cover the threading in a uniform manner When applying a liquid sealant clean the surface involved remove residual oil and grease check that there are no dents or dirt then apply the liquid sealant in a uniform manner Clean all the parts remove dirt rust burrs or dents Apply a film of engine oil over all the moving parts Apply a film of anti fric...

Страница 205: ...nder é 65 1 Removal installation of head Wrench for cylinder é 70 1 Wrench for cylinder é 75 1 Wrench for cylinder é 80 1 6 6 point socket wrench 30 1 Removal installation of piston 6 point socket wrench 32 1 6 point socket wrench 36 1 ATR200870 6 point socket wrench 41 1 7 Plunger for piston rod é 30 1 Mounting ring on the head Plunger for piston rod é 35 1 8 Plunger for cylinder é 50 1 Mounting ...

Страница 206: ...ston cylinder Bushing for piston é 55 1 ATR201190 Bushing for piston é 60 1 ATR201200 Bushing for piston é 70 1 Disassembly assembly final drive D 1 Plunger 1 Mounting planetary gear 2 Tool 1 Mounting front seal 3 Spacer 1 Mounting motor gears 4 Pad 1 Removal and mounting bearings 30 6 REMOVAL AND INSTALLATION SPECIAL TOOLS PC12R 8 PC15R 8 ...

Страница 207: ...ke out the toolbox 2 2 Disconnect the electric wiring 4 from the starter mo tor 3 3 Take out the screws 5 and remove the starter motor INSTALLATION OF THE STARTER MOTOR To install reverse the removal procedure Screw 45 52 Nm 30 7 REMOVAL AND INSTALLATION STARTER MOTOR PC12R 8 PC15R 8 RKPA0480 1 2 RKPA0490 3 5 4 ...

Страница 208: ...r 3 3 Loosen and take out the screws 4 and 5 4 Remove the alternator 6 INSTALLATION OF THE ALTERNATOR To install reverse the removal procedure Screws 4 23 29 Nm Screws 5 45 52 Nm H Adjust the tension of the fan belt For details see 20 CONTROLS AND ADJUSTMENTS 30 8 REMOVAL AND INSTALLATION ALTERNATOR PC12R 8 PC15R 8 RKPA0480 1 2 RKPA0500 3 RKPA0510 4 5 6 ...

Страница 209: ...the pump group 5 5 Remove the high pressure tubes 7 6 Loosen and remove the nuts 8 and remove the pum ping group 5 H Take care not to damage the shim underneath the pump group INSTALLATION OF THE PUMPING GROUP To install reverse the removal procedure High pressure tube unions 29 34 Nm Nuts 44 53 Nm H Check the fuel injection timing For details see 20 CONTROLS AND ADJUSTMENTS 30 9 REMOVAL AND INSTA...

Страница 210: ...ure pipes 3 and the fuel re turn tubes 4 3 Remove the complete injection nozzles 5 INSTALLATION OF THE INJECTION NOZZLES To install reverse the removal procedure High pressure pipe unions 29 34 Nm Injection nozzles 50 53 Nm 30 10 REMOVAL AND INSTALLATION INJECTION NOZZLES PC12R 8 PC15R 8 RKPA0520 2 1 RKPA0550 4 5 5 3 ...

Страница 211: ... its support 3 Remove the tail pipe 4 4 Remove the injection pump supply tube 5 and the fuel return tube 6 from the injection nozzles 5 Remove the fuel filter 7 without disconnecting the tank supply and return tubes Put it to one side 6 Tip up the seat 8 and take out the toolbox 9 7 Take out the screws 10 the nuts 11 and remove the muffler 12 30 11 REMOVAL AND INSTALLATION CYLINDER HEAD PC12R 8 PC...

Страница 212: ...ly for machines with cab heating disconnect the heating pipe 21 from the pump and disconnect the return tube 22 14 Take out the screws 23 and remove the cooling fan 24 and the spacer 25 Take out the fan cooling conveyor 14 15 Loosen the alternator drive belt and disengage the pulley of the water pump 16 Remove the water pump 26 complete with joint 27 and washer 28 30 12 REMOVAL AND INSTALLATION CY...

Страница 213: ... turns 21 Take out the rocker arm control rods 33 22 Take out the screws 34 in the sequence indicated and remove the cylinder head 35 H The cylinder head gasket 36 must be substituted every time it is dismantled 30 13 REMOVAL AND INSTALLATION CYLINDER HEAD PC12R 8 PC15R 8 RKPA0551 29 31 30 32 33 RKP05110 34 35 36 RKP05120 RKP05131 2 4 8 6 10 14 11 13 12 9 5 3 7 1 Intake side Flywheel side Fan side...

Страница 214: ...crews M8 23 28 Nm High pressure pipe unions 29 34 Nm H Check that the valve tappets are firmly engaged in the rods H Start tightening the rocker arm shaft from the centre outwards Rocker arm shaft screws 23 28 Nm H Adjust valve clearance For details see 20 CON TROLS AND ADJUSTMENTS H Raise the cylinder head keeping it horizontal and place it on the gasket without shifting anything H Lubricate the ...

Страница 215: ...il cooler oil approx 0 3 3 Disconnect the tubes 2 and 3 and plug them to pre vent entry of any impurities 4 Take out the screws 4 and remove the oil cooler 5 INSTALLATION OF THE OIL COOLER To install reverse the removal procedure Rear grill screws 108w11 Nm H Fill the hydraulic oil tank with oil up to its maximum le vel Hydraulic oil required approx 0 3 1 Start the engine to fill the oil cooler an...

Страница 216: ... 6 Disconnect the fan cooling conveyor 6 7 Remove the oil cooler 7 without disconnecting the tubes and put it to one side 8 Take out the radiator screws 8 9 Remove the radiator 9 INSTALLATION OF THE RADIATOR To install reverse the removal procedure H Fill up the cooling circuit Coolant approx 3 2 H Add hydraulic oil to the tank See INSTALLATION OF THE OIL COOLER 1 Start the engine to circulate the...

Страница 217: ...sed position take out the screws 2 that fasten the hinge 3 to the fra me and remove the hood INSTALLATION OF THE ENGINE HOOD To install reverse the removal procedure H Check the alignment of the outside edges the cente ring and the adjustment of the closing mechanism 4 30 17 REMOVAL AND INSTALLATION ENGINE HOOD PC12R 8 PC15R 8 RKPA0650 3 2 2 1 3 RKPA2070 4 ...

Страница 218: ...Attach the canopy 1 to some hoisting tackle 2 Loosen and remove the screws 2 and 3 3 Remove the canopy 2 Removal of the cab 1 Disconnect the connector 4 2 Remove the cover 5 3 Take out the screws 6 and remove the heater 7 putting it to one side 4 Remove the front cover 8 30 18 REMOVAL AND INSTALLATION CAB AND CANOPY PC12R 8 PC15R 8 RKPA0660 2 1 3 RKPA0670 6 5 4 6 7 RKPA0680 8 ...

Страница 219: ...remove the front and rear screws 11 and nuts 12 8 Remove the cab 10 INSTALLATION OF CANOPY AND CAB To install reverse the removal procedure Canopy screws 108w11 Nm Cab screws 108w11 Nm 30 19 REMOVAL AND INSTALLATION CAB AND CANOPY PC12R 8 PC15R 8 RKPA0690 9 RKPB5970 10 RKPA0710 11 12 ...

Страница 220: ...isconnect the heating pipes 4 and 5 from the radiator 3 4 Remove the fan group 6 INSTALLATION OF THE HEATER FAN To install reverse the removal procedure H Check that the lower diffuser engages in its union 1 Make sure that the heating cock is fully open 2 Fill up the coolant circuit Coolant approx 3 2 3 Start the engine to circulate the coolant 4 Stop the engine and top up the level 30 20 REMOVAL ...

Страница 221: ...t screws 4 to eliminate the tightening torque 4 Attach the counterweight 5 to some hoisting tackle remove the screws and pull out the counterweight 5 INSTALLATION OF THE REAR COUNTERWEIGHT To install reverse the removal procedure Grill screws 108w11 Nm Counterweight screws Loctite 262 Counterweight screws 268w29 Nm 30 21 REMOVAL AND INSTALLATION REAR COUNTERWEIGHT PC12R 8 PC15R 8 RKPA0612 1 2 5 RK...

Страница 222: ...e with its support and the toolbox 3 3 Remove the knobs 4 and 5 from the accelerator and blade levers Pull off the rubber sleeves 6 4 Remove the accelerator and blade command guard 7 5 Remove the core hitch and push the connector 8 inside the casing 6 Remove the cap 9 of the diesel fuel tank 30 22 REMOVAL AND INSTALLATION TOP COVER AND SIDE PANELS PC12R 8 PC15R 8 RKPA0750 1 1 RKPA0482 3 2 RKPA0760...

Страница 223: ...els 1 Only for the version with canopy Disengage the hooks 13 of the floor mat 14 2 Remove the front buttons 15 and take up the mat 3 For all versions Take out the screws and remove the side panels 16 INSTALLATION OF THE TOP COVER AND SIDE PANELS To install reverse the removal procedure 30 23 REMOVAL AND INSTALLATION TOP COVER AND SIDE PANELS PC12R 8 PC15R 8 RKPA0780 12 11 10 RKPA0790 16 14 15 13 ...

Страница 224: ... the left hand PPC valve 3 3 Remove the battery 4 Disconnect first the negative terminal and then the positive terminal 4 Disconnect the drainage tubes 5 and remove the fil ter 6 Also remove the filter head 7 5 Disconnect the servo controls tubes L blue 8 and C green 9 H Plug the tubes to prevent entry of impurities 6 Disconnect the other tubes 10 from the left hand PPC valve and draw them off the...

Страница 225: ...ll reverse the removal procedure H Connect first the positive terminal and then the negative terminal H Make sure that the threading of the filter head is leak tight H Carefully check the connection on the PPC valve Position P T 1 2 3 4 White S White M Green R Green C Blue L Green A 30 25 REMOVAL AND INSTALLATION HYDRAULIC OIL TANK PC12R 8 PC15R 8 RKPA0840 13 14 RKPA0850 16 15 15 RKPB5980 1 2 3 4 ...

Страница 226: ...its maximum level Hydraulic oil approx 22 2 Start the engine at low idling to circulate the oil throu ghout the system 3 Pressurise the tank and bleed air from all circuits For details see 20 CONTROLS AND ADJUST MENTS 30 26 REMOVAL AND INSTALLATION HYDRAULIC OIL TANK PC12R 8 PC15R 8 ...

Страница 227: ...el indicator 3 Disconnect the suction line 5 and the fuel return tu be 6 from the tank and plug them H Mark the tubes to avoid exchanging them during re installation 5 Loosen and remove the nut 7 of the retaining band 8 Remove the band and the tank 4 INSTALLATION OF THE FUEL TANK To install reverse the removal procedure 1 Fill up the tank Fuel max 20 2 Bleed the air from the fuel pipes and start t...

Страница 228: ...ghts the cen tral counterweight and the oil cooler radiator group For details please refer to the removal of each indivi dual component 2 Remove the expansion chamber 1 and its support 2 3 Disconnect the oil drainage tubes from the filter fitting and remove the oil filter 4 4 Disconnect the suction 5 and delivery tubes 6 from the pumps H Plug the tubes and their fittings to prevent entry of impuri...

Страница 229: ...cator 20 and the grounding plait 21 10 Only for machines with heating Disconnect the tubes 22 and 23 Remove the cock 24 and the engine connection tube 11 Attach the engine hoisting hook to some hoisting tackle and apply a slight tension to the cable 12 Take out the nuts 26 and the four washers 27 raise the engine slowly and lift it out H Check that the motor swings completely free whi le it is bei...

Страница 230: ...g the tank bleed air from the pump For details see 20 CONTROLS AND ADJUST MENTS Hydraulic oil required approx 22 2 Fill the cooling circuit up to its maximum level Coolant approx 3 2 3 Start the engine to circulate the oil and coolant and check that there are no leaks 4 Stop the engine check the levels and if necessary top them up 5 Bleed air from the hydraulic circuits and pressurise the tank For...

Страница 231: ...oval procedure H Before connecting the suction flange 3 check that the seal is undamaged Suction flange screws PC12R 45w4 9 Nm PC15R 63w6 5 Nm Pump screws Loctite 262 Pump screws PC12R 63w6 5 Nm PC15R 108w11 Nm 1 Fill the tank to its maximum level Hydraulic oil required approx 22 Only for PC15R Bleed the air from the pump For details see 20 CONTROLS AND ADJUSTMENTS 2 Start the engine to circulate ...

Страница 232: ...eel cover screws 55 Nm Coupling screws Loctite 262 Coupling screws 55 Nm 1 Fill the tank up to its maximum level Hydraulic oil required approx 22 Only for the PC15R Bleed the air from the pump For details see 20 CONTROLS AND ADJUSTMENTS 2 Start the engine to circulate the oil and check that there are no leaks 3 Stop the engine check the oil level and if necessary top it up 4 Bleed the air from the...

Страница 233: ...s the working equipment H Mark the tubes to avoid exchanging them during re assembly 7 Disconnect the couplings of the tubes 8 and 9 co ming from the PPC valves Pull out the lower tubes H Check that the tubes are identifiable by letters and colours If necessary mark them to avoid ex changing them during re assembly 8 Disconnect all the tubes from the control valve 14 with the exception of a the se...

Страница 234: ...e removal procedure While positioning the control valve group direct and accompany the tubes still connected to it to avoid creasing or entangling them 1 Fill the hydraulic oil tank up to its maximum level Hydraulic oil required approx 22 2 Start the engine to circulate the oil and check that there are no leaks 3 Stop the engine check the level of the hydraulic oil and if necessary top it up 4 Ble...

Страница 235: ...lug them to prevent entry of impurities H Check that the tubes are marked to avoid exchan ging them during re assembly 5 Raise the rubber sleeve 8 remove the screws 9 and remove the PPC valve 10 INSTALLATION OF THE RIGHT HAND PPC VALVE To install reverse the removal procedure H Check carefully the positions for re connecting the tubes Position P T 1 2 3 4 White M White S Yellow C Red D Yellow A Re...

Страница 236: ... prevent entry of impurities H Check the marks on the tubes to avoid exchan ging them during re assembly 4 Raise the rubber sleeve 7 remove the screws 8 and remove the PPC valve 9 INSTALLATION OF THE RIGHT HAND PPC VALVE To install reverse the removal procedure H Carefully check the positions for re connecting the tubes Position P T 1 2 3 4 White S White M Blue R Green C Blue L Green A If the coup...

Страница 237: ...ove the entire seat 2 2 Remove the toolbox 3 3 Disconnect the connector 4 4 Disconnect the servo control delivery tube coupling 5 5 Disconnect the tubes 6 and 7 H Plug the tubes to prevent entry of impurities 6 Take out the screws 8 and remove the solenoid group 9 complete with accumulator 10 INSTALLATION OF THE SERVO CONTROL SOLENOID GROUP To install reverse the removal procedure 30 37 REMOVAL AN...

Страница 238: ... Disconnect the servo control delivery tube coupling 6 5 Disconnect the tubes 7 H Mark the tubes to avoid exchanging them during re assembly H Plug the tubes to prevent entry of impurities 6 Take out the screws 8 and remove the solenoid group 9 complete with accumulator 10 INSTALLATION OF THE SERVO CONTROL SOLENOID GROUP To install reverse the removal procedure 30 38 REMOVAL AND INSTALLATION SERVO...

Страница 239: ...e cover 4 from the lower track frame 4 Disconnect the tubes 5 from the swivel joint 6 H Mark the tubes to avoid exchanging them during re assembly H Plug the tubes to prevent entry of impurities 5 Take out the screws 7 and the washers and remove the swivel joint 6 H Mark the position between the joint and the frame INSTALLATION OF THE SWIVEL JOINT To install reverse the removal procedure H Make su...

Страница 240: ...cab floor 2 2 Disconnect the tubes 3 and the drainage tube 4 Plug them to prevent entry of impurities 3 Take out the four screws 5 and remove the complete swing motor 6 INSTALLATION OF THE SWING MOTOR To install reverse the removal procedure Gearmotor screws 108w11 Nm 1 Start the engine disengage the turret locking device and perform several swings in both directions to bleed air from the system 3...

Страница 241: ... the working equipment For details see REMOVAL OF THE WORKING EQUIPMENT 8 Remove the boom raising cylinder For details see REMOVAL OF THE BOOM CYLINDER 9 Disconnect the upper tubes 3 from the swivel joint 2 and plug them 7 tubes for the PC12R and 8 tubes for the PC12R with travel increment PC15R H Mark the tubes to avoid exchanging them during re assembly 10 Remove the bracket 4 of the joint 2 11 ...

Страница 242: ...ll the hydraulic tank Quantity of oil approx 22 2 Start the engine to circulate the oil and check for leaks 3 Bleed air from all hydraulic circuits For details see 20 CONTROLS AND ADJUSTMENTS 4 Stop the engine check and top up the hydraulic oil le vel in the tank and pressurise the tank H Take great care not to damage the reference pins and the swivel joint Swing circle lubrication ASL800050 30 42...

Страница 243: ...3 Remove the swing circle 2 Swing circle 20 kg INSTALLATION OF THE SWING CIRCLE To install reverse the removal procedure H Before attaching the swing circle check that the area marked with an S is placed to the right of the frame Screws Loctite 262 Screws 66w7 Nm Swing circle ASL800050 30 43 REMOVAL AND INSTALLATION SWING CIRCLE PC12R 8 PC15R 8 RKPA1170 1 2 S ...

Страница 244: ...R with travel increment and the PC15R Disconnect also the travel increment tube 4 3 Take out the screws 5 that secure the motor 6 4 Remove the motor 6 INSTALLATION OF THE TRAVEL MOTOR To install reverse the removal procedure Motor screws Loctite 262 Motor screws 75 Nm 1 Start the engine and bleed air from the travel motor For details see 20 CONTROLS AND ADJUST MENTS 2 Stop the engine and check the...

Страница 245: ...uld never be loosened by more than one turn H If the grease does not run out easily move the machine slowly backwards and forwards 3 Force the boom downwards to raise the machine 4 Insert three steel pipes into the track shoe and then reverse the track shoe until the first pipe is above the idler 5 Push the track shoe 2 outwards and remove it Track shoe 45 kg INSTALLATION OF RUBBER TRACK SHOES To ...

Страница 246: ...nd piece of the track shoe raised move the machine in order to remove the track shoe 4 and lay it on the ground 5 Push down with the boom in order to raise the lower track frame and pull out the track shoe 4 Track shoe 70 kg INSTALLATION OF TRACK SHOES To install reverse the removal procedures H Adjust the track shoe tension For details see 20 CONTROLS AND ADJUSTMENTS 1 Rotate the turret 90ë towar...

Страница 247: ...pendicular to the ground and raise the lower track frame Insert safety blocks underneath the track frame 4 Take out the screws 1 and their washers 5 Remove the sprocket wheel 2 Sprocket wheel 5 kg INSTALLATION OF THE SPROCKET WHEEL To install reverse the removal procedure Screws Loctite 262 Screws 75 Nm 30 47 REMOVAL AND INSTALLATION SPROCKET WHEEL PC12R 8 PC15R 8 RKP05241 BLOCK RKPA1210 1 2 ...

Страница 248: ...H Mark the tubes to avoid exchanging them during re assembly 3 Take out the screws 2 4 Remove the final drive 3 Complete final drive 17 kg INSTALLATION OF THE FINAL DRIVE To install reverse the removal procedure Final drive screws Loctite 262 Final drive screws 75 Nm 1 Start the engine and bleed air from the travel motors For details see 20 CONTROLS AND ADJUST MENTS 30 48 REMOVAL AND INSTALLATION ...

Страница 249: ... the snap ring 2 and shoulder that secure the outer cover 3 2 Insert a socket wrench into the cavity 1 of the oil re filler cap Use it as a lever to pull off the outer cover 3 30 49 REMOVAL AND INSTALLATION FINAL DRIVE PC12R 8 PC15R 8 RKP05400 4 6 5 7 8 9 10 11 12 13 14 15 16 1 3 2 RKPA1690 1 2 3 RKPA1700 3 1 ...

Страница 250: ...tract the no 1 planetary gear or sun gear 6 5 Extract the planetary carrier 7 from the no 1 plane tary gear 6 Remove the four snap rings 8 30 50 REMOVAL AND INSTALLATION FINAL DRIVE PC12R 8 PC15R 8 RKPA1710 4 5 RKPA1720 6 RKPA1730 7 RKPA1740 8 ...

Страница 251: ...lic motor seating 11 9 Using an internal puller remove the centering ring 12 H Only remove the centering ring 12 if the hydrau lic motor is to be substituted 10 Using the tool D4 and a puller separate the hydraulic motor 11 from its housing 4 30 51 REMOVAL AND INSTALLATION FINAL DRIVE PC12R 8 PC15R 8 RKPA1750 9 RKPA1760 10 11 RKPA1770 12 RKPA1780 4 11 D4 ...

Страница 252: ... second half seal 13 from the housing 4 13 Remove the spacer 14 from the housing 4 NOTE Note down the assembly side 14 Remove the snap ring 15 from the housing 4 30 52 REMOVAL AND INSTALLATION FINAL DRIVE PC12R 8 PC15R 8 RKPA1790 13 11 RKPA1800 13 4 RKPA1810 14 4 RKPA1820 4 15 ...

Страница 253: ...he half seals To obtain perfect leaktightness proceed with the assem bly of the rings as follows a Thoroughly clean casings 1 and 2 if necessary using metal brushes or solvents The surfaces in con tact with the rubber rings 3 must be perfectly clean and dry b Make sure that the sealing surfaces 4 of the rings 5 are completely without scoring dents or foreign bodies and that the surfaces 6 of the s...

Страница 254: ...cing up 2 Using the tool D4 and a press push the bearing 16 home in the housing 4 3 Mount the snap ring 15 in the housing 4 4 Mount the spacer 14 in the housing 4 H Carefully check the orientation of the spacer 30 54 REMOVAL AND INSTALLATION FINAL DRIVE PC12R 8 PC15R 8 RKPA1841 16 4 A RKPA1850 16 4 D4 RKPA1860 4 15 RKPA1870 4 14 RKP05420 4 14 ...

Страница 255: ...he housing 4 7 Repeat the operation of point 5 for the second half seal 13 and assemble it on the hydraulic motor 11 8 Lubricate the metal surface of the seal 13 with oil 30 55 REMOVAL AND INSTALLATION FINAL DRIVE PC12R 8 PC15R 8 RKPA1880 13 D2 RKPA1890 13 4 RKPA1900 11 13 RKPA1910 13 ...

Страница 256: ...n the hydraulic motor 11 and using a press and a push rod press it home 11 Mount the snap ring 15 in the seating of the hydrau lic motor 11 12 Mount the no 2 planetary gear on the pins of the hy draulic motor H Keep a careful check on the direction of assem bly 30 56 REMOVAL AND INSTALLATION FINAL DRIVE PC12R 8 PC15R 8 RKPA1920 11 D3 4 RKPA1930 12 RKPA1760 10 11 RKPA1940 9 RKP05430 9 ...

Страница 257: ...he pins of the hydraulic motor 14 Mount the snap rings 8 15 Install the planetary carrier 7 of the no 1 planetary gear 16 Install the no 1 planetary gear or sun gear 6 30 57 REMOVAL AND INSTALLATION FINAL DRIVE PC12R 8 PC15R 8 RKPA1950 9 D1 RKPA1740 8 RKPA1960 7 RKPA1970 6 ...

Страница 258: ...cover 3 and press it home 19 Mount the snap ring 2 20 Fill up mount the caps 1 complete with seals and tighten them Quantity of oil approx 0 4 Cap 8 12 Nm 30 58 REMOVAL AND INSTALLATION FINAL DRIVE PC12R 8 PC15R 8 RKPA1980 5 RKPA1990 3 RKPA2000 2 RKPA2010 1 ...

Страница 259: ...f the grease does not run out easily move the machine slowly backwards and forwards Rest the working equipment on the ground and stop the engine 3 Take out the connecting pin 4 using the tool A1 H First remove the safety cotter pin 6 H While dismantling the track shoe 7 support the part of the track shoe wound round the idler with a block placed beneath the shoe ribbing Once it is dismantled lay t...

Страница 260: ...2 3 Remove the screws 5 and their washers 6 4 Using a press take out the pin 7 and remove the snap rings 8 the bearings 9 and the lateral seals 10 ASSEMBLY OF THE IDLER To re assemble reverse the dismantling procedure H Use a press for the final assembly H Fill the inner chamber and the bearings with grease Grease ASL800050 H Quantity of grease 36 cc 30 60 REMOVAL AND INSTALLATION IDLER PC12R 8 PC...

Страница 261: ...released spring 200 mm 5 In sequence remove the cylinder 5 the spring 2 the spacer 6 and the support 7 Assembly To re assemble reverse the dismantling procedure H Tighten the nut 4 up to the indicated length of the spring See 40 STANDARD MAINTENANCE Mount the cotter pin 3 H After assembly check that the parallelism error bet ween the faces A and B is less than 0 5 mm 2 Thrust cylinder Disassembly ...

Страница 262: ...down to raise the lower track frame 2 3 Only for steel track shoes Remove the guard 3 4 Loosen the screws 4 and remove the rollers 5 INSTALLATION OF THE TRACK ROLLERS To install reverse the removal procedure H With the lower track frame 2 raised install the idler rollers 5 and slightly tighten the screws 4 H Slowly lower the lower track frame 2 until the rol lers 5 rest fully on the track shoe the...

Страница 263: ...o plug the holes in the cylinder to prevent entry of impurities 8 Remove the pin 6 9 Remove the cylinder 3 Boom cylinder PC12R 10 7 kg PC15R 12 kg INSTALLATION OF THE BOOM CYLINDER To install reverse the removal procedure H Check the centering and the smooth movement of the protection 1 on the shoes 7 Shoes and guides ASL800050 H Insert the shims on both sides of the piston rod When aligning the p...

Страница 264: ...LS AND ADJUSTMENTS 6 Disconnect the tubes 4 and plug them Also plug the holes in the cylinder to prevent the entry of impurities 7 Remove the pin 5 8 Remove the cylinder 1 Arm cylinder PC12R 10 kg PC15R 11 kg INSTALLATION OF THE ARM CYLINDER To install reverse the removal procedure H Insert the shims on both sides of the piston rod When aligning the positions between the hole and the pin turn the ...

Страница 265: ...onnect the hoses 4 and plug them Also plug the holes in the cylinder to prevent the entry of impu rities 6 Put a sling round the cylinder 1 7 Remove the pin 5 8 Remove the cylinder 1 Bucket cylinder PC12R 9 kg PC15R 9 kg INSTALLATION OF THE BUCKET CYLINDER To install reverse the removal procedure H Insert the shims on both sides of the piston rod When aligning the positions between the hole and th...

Страница 266: ...ase any residual hydraulic pressures For details see 20 CONTROLS AND ADJUSTMENTS 8 Disconnect the hoses 5 and plug them Also plug the holes in the cylinder 6 to prevent entry of impu rities 9 Remove the pin 7 on the base side and remove the cylinder Boom swing cylinder PC12R 10 kg PC15R 10 kg INSTALLATION OF THE BOOM SWING CYLINDER To install reverse the removal procedure H Insert the shims above ...

Страница 267: ...lso plug the holes in the cylinder to prevent entry of impurities 7 Only for HS version Disconect the unions 6 and plug them Also plug the holes in the cylinder to prevent entry of impurities 7 Remove the pin 7 8 Remove the cylinder 2 Blade cylinder PC12R 6 8 kg PC15R 11 kg INSTALLATION OF THE BLADE CYLINDER To install reverse the removal procedure H Insert the shims on both sides of the piston ro...

Страница 268: ... 2 on the apparatus C1 Engage the cylinder in the tools C4 having the same bushing diameter 3 Attach the special wrench C5 adjusted to fit the cylin der to the head and apply the dynamometric tool C2 4 Unscrew the head 3 and extract it completely from the cylinder 2 30 68 REMOVAL AND INSTALLATION WORKING EQUIPMENT CYLINDERS PC12R 8 PC15R 8 RKP05230 1 1 RKPA1390 2 C4 C1 23 RKPA1400 3 C2 C5 RKPA1410...

Страница 269: ...namometric tool with a multiplier C2 remove the nut H Socket wrench measurement Boom cylinder PC12R 30 mm PC15R 32 mm Arm cylinder PC12R 32 mm PC15R 36 mm Bucket cylinder 32 mm Boom swing 32 mm Blade cylinder PC12R 32 mm PC15R 41 mm Variable undercarriage 32 mm 10 Take all the groups to pieces and remove all the seals guard rings and guide rings The seals guard rings and guide rings cannot be used...

Страница 270: ...ad 3 H Check the orientation carefully 2 Mount the snap ring 8 3 Using the tool C3 mount the lip seal 9 H Check that the lips face into the cylinder 4 Mount the O ring 10 the anti extrusion ring 11 and the O ring 12 onto the cylinder head 3 H Only for the boom cylinders In sequence mount the anti extrusion ring 17 the O ring 18 and the 2nd anti extrusion ring 17 30 70 REMOVAL AND INSTALLATION WORK...

Страница 271: ...d the tool C4 adapted to the diame ter insert the bushing 17 into the piston rod 4 2 Insert the support A beneath the piston rod 3 Mount the pilot boss C10 adapted to the diameter on to the extremity of the piston rod 4 Slide the head 3 onto the piston rod 4 H For the PC15R blade cylinder slide the spacer 19 complete with its O ring 20 onto the piston rod 4 5 Remove the pilot boss C10 from the ext...

Страница 272: ...ctite 262 Nut Boom cylinder PC12R 392w39 Nm PC15R 539w54 Nm Arm cylinder PC12R 539w54 Nm PC15R 686w68 Nm Bucket cylinder 539w54 Nm Boom swing cylinder 539w54 Nm Blade cylinder PC12R 539w54 Nm PC15R 1127w112 Nm Variable undercarriage 539w54 Nm 4 Cylinder assembly 1 Mount the tools C4 onto the apparatus C1 2 Position the bushing 23 and mount it onto the cylin der 2 H Leave the cylinder in position r...

Страница 273: ...the head 3 and the piston rod approach the cylinder 9 Place the cylinder 2 in position for screwing in the head 3 10 Insert the head into the cylinder and screw it in by hand for a few turns 11 Attach the special wrench C5 to the dynamometric tool C2 and screw the head 3 fully home Head Boom swing cylinder PC12R 412w41 Nm PC15R 441w44 Nm Arm cylinder PC12R 392w39 Nm PC15R 412w41 Nm Bucket cylinder...

Страница 274: ...ntil it rests on a stand A 6 Stop the engine and release the residual hydraulic pressures For details see 20 CONTROLS AND ADJUSTMENTS 7 Disconnect the hoses 5 and plug them Also plug the holes in the cylinder to prevent entry of impurities H Disconnect the hoses from any optional equip ment Plug the hoses and the unions to prevent entry of impurities H Mark the hoses to avoid exchanging them durin...

Страница 275: ...ION OF THE UPPER WORKING EQUIPMENT To install reverse the removal procedure H Check the centering and the smooth movement of the protection 1 Shoes and guides ASL800050 H Insert shims on both sides of the piston rod When aligning the positions between the hole and the pin turn the engine over at low idling Do not insert fingers in the holes to check align ment H Insert the shim Internal bushings A...

Страница 276: ... to the arm 7 Bucket PC12R 21 kg PC15R 22 kg INSTALLATION OF THE BUCKET To install reverse the removal procedure H Insert shims on both sides of the piston rod When aligning the positions between the hole and the pin turn the engine over at low idling Do not insert fingers in the holes to check align ment Internal bushings ASL800040 H Insert shims on both sides between the bucket 3 and the arm 7 3...

Страница 277: ...Plug the tubes and fittings to prevent entry of im purities 4 Remove the pin 3 and the levers 4 H The links 5 are removed during the removal of the bucket cylinder 5 Extend the arm 6 and rest it on a block A 6 Stop the engine and release the residual pressures 7 Position a block B beneath the arm cylinder and re move the pin 8 8 Start the engine and completely retract the piston 9 30 77 REMOVAL AN...

Страница 278: ...positions between the hole and the pin do not insert fingers in the holes to check alignment H Insert the shims on both sides of the piston When aligning the positions between the hole and the pin turn the engine over at low idling Do not insert fingers in the holes to check align ment Internal bushings ASL800040 H Insert the shims on both sides of the arm When aligning the positions between the h...

Страница 279: ...eath the cylinder 2 7 Remove the pin 3 8 Start the engine to retract the piston 4 9 Stop the engine and release the residual pressures For details see 20 CONTROLS AND ADJUST MENTS 10 Disconnect the connector 5 and remove the working spotlight 6 11 Disconnect the rigid pipes 7 from the hoses of the optional equipment Plug the tubes and their fittings to prevent entry of im purities H Mark the hoses...

Страница 280: ...OOM To install reverse the removal procedure H Insert shims on both sides of the piston rod When aligning the positions between the hole and the pin turn the engine over at low idling Do not insert fingers in the holes to check align ment Internal bushings ASL800040 H Insert the shim Pin screws 63w6 5 Nm Start the engine and bleed the air from the cylinder H After bleeding the air stop the engine ...

Страница 281: ...swing support 2 to some hoisting tackle and apply a slight tension to the cable 5 Take out the screw 3 and remove the swing support 2 H Make a note of the position of the spacer 4 and the quantity of shims 5 Boom swing support PC12R 22 kg PC15R 22 kg INSTALLATION OF THE BOOM SWING SUPPORT To install reverse the removal procedure Pins ASL800040 H Insert the spacer 4 and the shims 5 between the fram...

Страница 282: ...nder attachment 2 H Adjust the length of the cables to balance the group 4 Take out the pin 3 5 Remove the blade 4 Blade PC12R 43 kg PC15R 54 kg INSTALLATION OF THE BLADE To install reverse the removal procedure Internal bushings ASL800050 When aligning the positions between the hole and the pin turn the engine over at low idling Do not insert fingers in the holes to check align ment 30 82 REMOVAL...

Страница 283: ...GROUP 40 ...

Страница 284: ...40 28 PC15R 8 ...

Страница 285: ...nal drive 6 Sprocket 7 Track roller 8 Track shoe 9 Hydraulic pump PC12R 8 11 PC15R 8 12 Control valve PC12R 8 13 PC15R 8 19 Swivel joint 25 Swivel joint variable gauge undercarriage 26 Swing motor 27 Travel motor PC12R 8 28 PC12R 8 HS 28 PC12R 8 MISTRAL 30 PC12R 8 MISTRAL HS 30 PC15R 8 30 PC15R 8 HS 30 PPC valve 32 Cylinders 34 Work equipment 36 ...

Страница 286: ...aring clearance Standard clearance Clearance limit Replace 0 3 0 8 2 Backlash between pinion and swing circle toothing 0 1 0 5 1 SWING CIRCLE 40 2 PC12R 8 PC15R 8 RKP00540 1 2 66w7 Nm 6 7w0 7 kgm with Loctite 262 66w7 Nm 6 7w0 7 kgm with Loctite 262 ...

Страница 287: ...welding or replace 2 Horizontal width of idler guide Track frame 161 164 Build up by welding Idler support 158 155 Build up by welding or replace 3 Recoil spring Standard size Repair limit Replace Free length Preloaded length Installed load Free length Installed load 200 168 6865 N 700 kg 195 6 5997 N 611 5 kg TRACK FRAME AND RECOIL SPRING 40 3 PC12R 8 PC15R 8 RKP02020 2 1 3 ...

Страница 288: ...or replace 2 Horizontal width of idler guide Track frame 161 164 Build up by welding Idler support 158 155 Build up by welding or replace 3 Recoil spring Standard size Repair limit Replace Free length Preloaded length Installed load Free length Installed load 200 168 6865 N 700 kg 195 6 5997 N 611 5 kg VARIABLE GAUGE TRACK FRAME AND RECOIL SPRING 40 4 PC12R 8 PC15R 8 RKP11341 2 1 3 ...

Страница 289: ...f tread 227 221 3 Width of track shoe guide 23 17 4 Total width 60 55 5 Width of tread 18 5 21 5 6 Clearance between bushing and idler Standard size Tolerance Standard clearance Clearance limit Replace Shaft Hole 62 0 030 0 0 030 0 0 0 030 1 5 7 Clearance between shaft and support 30 0 0 025 0 039 0 0 0 064 1 5 IDLER 40 5 PC12R 8 PC15R 8 5 7 6 1 3 4 2 RKP00690 ...

Страница 290: ...ance limit Replace 0 15 0 35 2 Backlash between No 1 planetary gear and housing 0 15 0 35 3 Backlash between No 2 sun gear and No 2 planetary gear 0 10 0 30 4 Backlash between No 1 sun gear and No 1 planetary gear 0 10 0 30 FINAL DRIVE 40 6 PC12R 8 PC15R 8 RKP00820 3 1 2 4 37w1 9 Nm 75 Nm with Loctite 262 8 12 Nm ...

Страница 291: ... size Tolerance Repair limit Build up by solder or replace 255 1 2 245 2 Wear at tips of sprocket teeth 290 w1 5 278 3 Face width at tips of sprocket teeth 17 Ð 12 4 Face width at base of sprocket teeth 23 1 2 18 SPROCKET 40 7 PC12R 8 PC15R 8 RKP00570 1 2 4 3 75 Nm with Loctite 262 ...

Страница 292: ...80 74 3 Width of thread 31 34 4 Width of protusion 26 23 5 Clearance between shaft and bushing Standard size Tolerance Standard interference Interference limit Replace Shaft Hole 25 0 0 021 0 2 0 4 0 179 0 4 Ð 6 Interference between roller and bushing 35 0 4 0 2 0 039 0 0 161 0 4 Ð TRACK ROLLER 40 8 PC12R 8 PC15R 8 RKP00031 4 6 5 1 3 2 75 Nm with Loctite 262 ...

Страница 293: ...en regular pin and link Standard size Tolerance Standard interference Interference limit Shaft Hole 14 0 155 0 150 0 050 0 0 100 0 104 Ð 6 Interference between bushing and link 22 0 154 0 150 0 050 0 0 100 0 104 Ð 7 Interference between master pin and link Standard size Tolerance Standard clearance Clearance limit Shaft Hole 14 0 020 0 050 0 050 0 0 020 0 100 0 8 TRACK SHOE STEEL SHOE 40 9 PC12R 8...

Страница 294: ...ndard size Repair limit Replace 23 25 5 2 Widht of sprocket treads 30 33 3 Wear of meshing portion of sprocket Standard size Tolerance Repair limit 23 1 5 0 27 RUBBER SHOE 40 10 PC12R 8 PC15R 8 RKP00330 Sezione A A A Sezione B B A B B 2 3 1 Section A A Section B B ...

Страница 295: ...HYDRAULIC PUMP PC12R 8 40 11 PC12R 8 PC15R 8 RKP00910 Z Vista Z 68 6 Nm 7 kgm 48 Nm 4 9 kgm View Z ...

Страница 296: ...PC15R 8 40 12 PC12R 8 PC15R 8 RKP00061 Vista Z Z View Z 30 4w2 9 Nm 3 1w0 3 kgm 63 7w4 9 Nm 6 5w0 5 kgm 57 9w6 9 Nm 5 9w0 7 kgm ...

Страница 297: ...CONTROL VALVE PC12R 8 40 13 PC12R 8 PC15R 8 RKP00121 E F J O E F J N O C B A A B C N 11 3w1 5 Nm 1 15w0 15 kgm 31 9w2 5 Nm 3 25w0 25 kgm 11 3w1 5 Nm 1 15w0 15 kgm 11 3w1 5 Nm 1 15w0 15 kgm ...

Страница 298: ...40 14 PC12R 8 PC15R 8 RKP00131 Sezione A A 44 1w4 9 Nm 4 5w0 5 kgm 44 1w4 9 Nm 4 5w0 5 kgm Section A A ...

Страница 299: ...nd replace the spring Free length x é D Installed length Installed load Free length Installed load 46 2x20 25 4 98 N 10 kg Ð 78 4 N 8 kg 2 Spool return spring arm swing boom bucket 29x17 5 28 5 22 6 N 2 3 kg Ð 18 1 N 1 84 kg 40 15 PC12R 8 PC15R 8 RKP00141 1 2 1 1 1 2 2 2 Sezione B B 8 3w1 5 Nm 0 85w0 15 kgm 8 3w1 5 Nm 0 85w0 15 kgm Section B B ...

Страница 300: ...4 12 6 86 N 0 7 kg Ð 5 49 N 0 56 kg 3 Pressure compensation valve spring 16 9x8 4 15 7 64 N 0 78 kg Ð 6 11 N 0 62 kg 4 Unload valve spring 38 5x17 7 18 28 8 N 2 94kg Ð 23 1 N 2 36 kg 5 Cooler check valve spring 27 2x13 2 21 78 8 N 8 04 kg Ð 63 0 N 6 43 kg 6 Back pressure check valve spring 29x13 3 21 15 3 N 1 56 kg Ð 12 2 N 1 25 kg 40 16 PC12R 8 PC15R 8 RKP00151 4 1 2 3 3 2 2 3 5 6 Sezione C C 1 5...

Страница 301: ...ce the spring Free length x é D Installed length Installed load Free length Installed load 21 9x5 15 8 1 96 N 0 2 kg Ð 1 57 N 0 16 kg 40 17 PC12R 8 PC15R 8 RKP00470 1 Sezione E E Sezione F F Sezione J J 1 147 1w9 8 Nm 15w1 kgm 53 9w4 9 Nm 5 5w0 5 kgm 22 1w2 5 Nm 2 25w0 25 kgm 22 1w2 5 Nm 2 25w0 25 kgm Section E E Section F F Section J J ...

Страница 302: ... damage or deformation is found replace the spring Free length x é D Installed length Installed load Free length Installed load 32 4x10 4 27 83 3 N 8 5 kg Ð 66 6 N 6 8 kg 40 18 PC12R 8 PC15R 8 RKP00251 1 Sezione N N Sezione O O 39 2w4 9 Nm 4w0 5 kgm 22 1w2 5 Nm 2 25w0 25 kgm Section N N Section O O ...

Страница 303: ...PC15R 8 40 19 PC12R 8 PC15R 8 RKP00191 E F J N O E F J N O C B A A B C 11 3w1 5 Nm 1 15w0 15 kgm 31 9w2 5 Nm 3 25w0 25 kgm 11 3w1 5 Nm 1 15w0 15 kgm 11 3w1 5 Nm 1 15w0 15 kgm ...

Страница 304: ...40 20 PC12R 8 PC15R 8 RKP00201 Sezione A A 44 1w4 9 Nm 4 5w0 5 kgm 44 1w4 9 Nm 4 5w0 5 kgm Section A A ...

Страница 305: ...nd replace the spring Free length x é D Installed length Installed load Free length Installed load 46 2x20 25 4 98 N 10 kg Ð 78 4 N 8 kg 2 Spool return spring arm swing boom bucket 29x17 5 28 5 22 6 N 2 3 kg Ð 18 1 N 1 84 kg 40 21 PC12R 8 PC15R 8 RKP00211 1 2 1 1 1 2 2 Sezione B B 2 8 3w1 5 Nm 0 85w0 15 kgm 8 3w1 5 Nm 0 85w0 15 kgm Section B B ...

Страница 306: ...sure compensation valve spring 16 9x8 4 15 7 64 N 0 78 kg Ð 6 11 N 0 62 kg 4 Pressure compensation valve spring 23 61x8 4 17 30 5 N 3 11 kg Ð 24 4 N 2 49 kg 5 Unload valve spring 29 1x18 7 18 82 4 N 8 4 kg Ð 65 9 N 6 7 kg 6 Cooler check valve spring 27 2x13 2 21 78 8 N 8 04 kg Ð 63 0 N 6 43 kg 7 Back pressure check valve spring 29x13 3 21 15 3 N 1 56 kg Ð 12 2 N 1 25 kg 40 22 PC12R 8 PC15R 8 RKP00...

Страница 307: ...ce the spring Free length x é D Installed length Installed load Free length Installed load 21 9x5 15 8 1 96 N 0 2 kg Ð 1 57 N 0 16 kg 40 23 PC12R 8 PC15R 8 RKP00490 1 1 Sezione E E Sezione F F Sezione J J 147 1w9 8 Nm 15w1 kgm 53 9w4 9 Nm 5 5w0 5 kgm 22 1w2 5 Nm 2 25w0 25 kgm 22 1w2 5 Nm 2 25w0 25 kgm Section E E Section F F Section J J ...

Страница 308: ... damage or deformation is found replace the spring Free length x é D Installed length Installed load Free length Installed load 32 4x10 4 27 83 3 N 8 5 kg Ð 66 6 N 6 8 kg 40 24 PC12R 8 PC15R 8 RKP00480 1 Sezione N N Sezione O O 39 2w4 9 Nm 4w0 5 kgm 22 1w2 5 Nm 2 25w0 25 kgm Section N N Section O O ...

Страница 309: ...Unit mm No Check item Criteria Remedy 1 Clearance between rotor and shaft Standard size Standard clearance Clearance limit Replace 45 0 055 0 085 0 090 SWIVEL JOINT 40 25 PC12R 8 PC15R 8 RKP00500 1 ...

Страница 310: ...mm No Check item Criteria Remedy 1 Clearance between rotor and shaft Standard size Standard clearance Clearance limit Replace 60 SWIVEL JOINT For variable gauge undercarriage 40 26 PC12R 8 PC15R 8 RKP11331 1 ...

Страница 311: ... damage or deformation is found replace the spring Free length x é D Installed length Installed load Free length Installed load 36 1x14 2 32 9 332 N 31 9 429 N SWING MOTOR 40 27 PC12R 8 PC15R 8 RKP00900 Sezione A A A A 1 120 Nm 12 2 kgm 3 9 Nm 0 39 kgm 98 Nm 10 kgm 3 9 Nm 0 39 kgm Section A A ...

Страница 312: ...TRAVEL MOTOR PC12R 8 40 28 PC12R 8 PC15R 8 RKP00891 1 2 A A Sezione A A 3 157w8 Nm 2 5w0 5 Nm 27w2 5 Nm 37w1 9 Nm Section A A ...

Страница 313: ...nce limit Replace 0 009 0 014 0 04 2 Clearance between shoe and piston 0 03 0 15 0 4 3 Cylinder block spring Standard size Repair limit When damage or deformation is found replace the spring Free length Installed length Installed load Free length Installed load 26 19 72 4N 24 6 58N 40 29 PC12R 8 PC15R 8 ...

Страница 314: ...12R 8 MISTRAL PC12R 8 MISTRAL HS PC15R 8 PC15R 8 HS 40 30 PC12R 8 PC15R 8 R B Sezione A A A A B B C C 4 3 1 2 37w1 9 Nm 15 2w0 8 Nm 2 5w0 5 Nm 27w2 5 Nm 2 5w0 5 Nm 2 5w0 5 Nm 10w1 Nm 157w8 Nm Section A A ...

Страница 315: ...g Standard size Repair limit When damage or deformation is found replace the spring Free length Installed length Installed load kg cm2 Free length Installed load kg cm2 17 8 12 3 6 85N 16 7 5 5N 4 Braking valve return spring 26 4 19 0 52 2N 24 9 41 8N 5 Travel increment spool return spring 25 4 20 5 33 4N 24 4 26 7N 6 Check valve spring 40 31 PC12R 8 PC15R 8 RKP00883 5 Sezione B B Sezione C C 6 37...

Страница 316: ...ndard size Repair limit Replace Free length x é D Installed length Installed load Free length Installed load 33 9x15 3 28 4 124 5 N 12 7 kg Ð 100 0 N 10 2 kg 2 Metering spring 22 7x8 1 22 0 16 7 N 1 7 kg Ð 13 7 N 1 4 kg HAMMER 40 32 PC12R 8 PC15R 8 RKP01710 1 2 ...

Страница 317: ...40 33 PC12R 8 PC15R 8 PAGE INTENTIONALLY LEFT BLANK ...

Страница 318: ...ket 30 Ð 0 099 0 040 Ð 0 1 Boom swing 30 Ð 0 099 0 040 Ð 0 1 Blade 35 Ð 0 134 0 072 Ð 0 1 Variable undercarriage 30 Ð 0 099 0 040 Ð 0 1 3 Clearance between cylinder bottom bushing and pin Boom 35 Ð 0 134 0 072 Ð 0 1 Arm 30 Ð 0 099 0 040 Ð 0 1 Bucket 30 Ð 0 099 0 040 Ð 0 1 Boom swing 30 Ð 0 099 0 040 Ð 0 1 Blade 35 Ð 0 134 0 072 Ð 0 1 Variable undercarriage 30 Ð 0 099 0 040 Ð 0 1 CYLINDERS PC12R 8 ...

Страница 319: ... Ð 0 099 0 040 Ð 0 1 Boom swing 30 Ð 0 099 0 040 Ð 0 1 Blade 35 Ð 0 134 0 072 Ð 0 1 Variable undercarriage 30 Ð 0 099 0 040 Ð 0 1 3 Clearance between cylinder bottom bushing and pin Boom 35 Ð 0 134 0 072 Ð 0 1 Arm 30 Ð 0 099 0 040 Ð 0 1 Bucket 30 Ð 0 099 0 040 Ð 0 1 Boom swing 30 Ð 0 099 0 040 Ð 0 1 Blade 35 Ð 0 134 0 072 Ð 0 1 Variable undercarriage 30 Ð 0 099 0 040 Ð 0 1 CYLINDERS PC15R 8 40 35 ...

Страница 320: ...8 40 36 PC12R 8 PC15R 8 RKP01560 A B C D E R Q P F G N M L K J I H RKP01570 1 Sezione A A Sezione B B Sezione C C Sezione D D Sezione E E Sezione F F 2 Section A A Section B B Section C C Section D D Section E E Section F F ...

Страница 321: ...0 082v 0 184 1 0 5 Clearance between bushing and mounting pin of bucket and link 30 0 090 0 130 0 117 0 080 0 170v 0 247 1 0 6 Clearance between bushing and mounting pin of bucket and link 30 0 010 0 050 0 134 0 072 0 082v 0 184 1 0 7 Clearance between bushing and mounting pin of bucket and arm 30 0 090 0 130 0 117 0 080 0 170v 0 247 1 0 8 Clearance between bushing and mounting pin of track frame ...

Страница 322: ...8 40 38 PC12R 8 PC15R 8 RKP01560 A B C D E R Q P F G N M L K J I H RKP01570 1 Sezione A A Sezione B B Sezione C C Sezione D D Sezione E E Sezione F F 2 Section A A Section B B Section C C Section D D Section E E Section F F ...

Страница 323: ...0 082v 0 184 1 0 5 Clearance between bushing and mounting pin of bucket and link 30 0 090 0 130 0 117 0 080 0 170v 0 247 1 0 6 Clearance between bushing and mounting pin of bucket and link 30 0 010 0 050 0 134 0 072 0 082v 0 184 1 0 7 Clearance between bushing and mounting pin of bucket and arm 30 0 090 0 130 0 117 0 080 0 170v 0 247 1 0 8 Clearance between bushing and mounting pin of track frame ...

Страница 324: ......
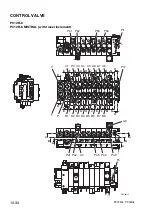
Отзывы:

Похожие инструкции для PC12R-8 MISTRAL