Vers. 111422
55
(3)
NUMBER OF SCREWS
Tap to set the number of screws (0 to 99) for this program. Also referred to as “batch
size” in the industry. The end of program signal will be raised upon the successful
tightening of the last screw in the program.
Enter zero to disable screw counting for this program.
Note
: a program with NUMBER OF SCREWS set to zero behaves the same as a program
with NUMBER OF SCREWS set to one when utilized in a sequence (SEQUENCE menu).
(4)
ROTATION
Tap to set the direction of rotation of the screwdriver for the tightening phase. All of the
screwdriver functions (angle measurements, direction of rotation for reverse phase, etc.)
will adapt to the selected direction of rotation.
(5)
SERIAL PRINT
Tap to enable and set a value from OFF to 5. The value identifies the number of line
feeds (empty lines) printed between a results string and the next on the serial ports
(CN2 and CN4) and serial printer accessory. Affected by the
RESULTS FORMAT
setting.
If OFF, no data will be transmitted through CN2 or CN4.
(6)
SWBX88/CBS880
Tap to enable and utilize the SWBX88 or CBS880 Kolver accessories with the current
program being edited.
Enter 1 through 8 to assign the current program (
) number to the
corresponding physical slot (1 through 8) of the Kolver accessory.
(7)
BARCODE
Tap to enter the SCAN BARCODE screen to assign a barcode to the current program
being edited. To be used in conjunction with the BARCODE MODE: - ON PRG - in the
GENERAL SETTINGS menu.
The PROGRAM barcode can be up to 16 alphanumeric characters. QR codes of up to 16
alphanumeric characters are supported, provided that the scanner is configured
correctly (RS-232, 9600 baud, 8 data bits, 1 stop bit, no parity).
(8)
PRESS OK
ON
: the “press OK” screen will appear upon successful completion of the last screw of
the program.
When this screen appears, the screwdriver will remain disabled until the operator taps
OK on the touch screen, or until the “REMOTE OK” external signal is received.
OFF
: the control unit will reset automatically when the lever is pressed or the remote
start signal is received after the last screw of the program is successfully completed.
Note
: the “press OK” screen will not appear if the NUMBER OF SCREWS is set to zero,
even if enabled. If you want the “press OK” screen to appear after every screw, set
NUMBER OF SCREWS to one.
Note
: this setting is ignored if the program is being used within a sequence (job). The
program transition setting within the sequence will define the behavior in this case.
(9)
PRESS ESC
ON
: the “press ESC” screen will appear whenever an error occurs during a tightening
or untightening operation.
Содержание 033001
Страница 1: ...KDU NT and KDS NT Torque range 5 70 cNm 7 100 ozfin OPERATOR MANUAL Patent pending...
Страница 13: ...Vers 111422 13 Threaded M3 fixturing holes side holes on CA models only...
Страница 24: ...Vers 111422 24 Main Screen Sequence Mode navigation tree see Torque and Angle graphing for more information...
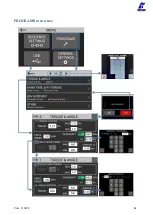
Страница 44: ...Vers 111422 44 PROGRAMS menu tree...
Страница 45: ...Vers 111422 45...
Страница 46: ...Vers 111422 46...
Страница 47: ...Vers 111422 47...
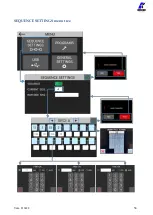
Страница 58: ...Vers 111422 58 SEQUENCE SETTINGS menu tree...
Страница 68: ...Vers 111422 68 USB menu tree...
Страница 72: ...Vers 111422 72 Pinout CN5...
Страница 83: ...Vers 111422 83 EXPLODED VIEW KDS NT70 KDS NT70 HM...
Страница 84: ...Vers 111422 84...
Страница 85: ...Vers 111422 85...
Страница 86: ...Vers 111422 86 SPARE PARTS KDS NT70 KDS NT70 HM Lever Kit HM Half Moon model...
Страница 87: ...Vers 111422 87 EXPLODED VIEW KDS NT70CA KDS NT70CA HM...
Страница 88: ...Vers 111422 88 SPARE PARTS KDS NT70 KDS NT70 HM...


