background image

1079129-T01-U

(

)

(

)

(

)

(

)

0 C

o

CONSUMER RESPONSIBILITIES

If you live in a hard water area, make certain that the holes in
the toilet rim are kept clean to ensure proper bowl flushing.
Toilet bowl cleaners should be used at least once a week.
Use a long-handled brush to clean the rim holes, and to clean
as far into the trap as possible to prevent mineral deposits
from forming.

Most toilet bowl cleaners are not harmful to the vitreous china
surface of the toilet bowl. Please follow the bowl cleaner
manufacturer is instructions carefully.

Do not use abrasive cleaners or solvents.

Do not use in-tank cleaners. Products containing
chlorine (calcium hypochlorite) can seriously damage
fittings in the tank. This damage can cause leakage
and property damage.

Kohler Company shall not be responsible or liable for any
damage to these tank fittings caused by the use of cleaners
containing chlorine (calcium hypochlorite).

WARNING: Risk of property or product damage.

'

Please do not use hard materials (like

scouring pad) to clean product surface, especially the
product logo.

CAUTION:

CAUTION: Don t use any cement while installing
the toilet.

WARNING: Risk of product damage.

Heat expansion of the toilet may damage

the feet of the toilet. Kohler will not be responsible for
any damage because of using cement.

Do not throw into the toilet what is easy to block it,
such as newspaper, paper pilch, sanitary towel.
Do not bump the vitreous china with great force to
prevent it from damaging and leaking.
Do not use the product in the water below 0 C.

o

-10-

Содержание OVE K-17737T-2

Страница 1: ...E Elongated 2 PC Toilet K 17737T RN Includes Tank K 19990T RN Includes Bowl K 17736T RN Includes Seat K 17669T M OVE Elongated 2 PC Toilet K 17737T RNS Includes Tank K 19990T RNS Includes Bowl K 17736T RN Includes Seat K 17660T M K 17737T S2 K 19990T 2 K 17736T 2 K 17660T M K 19990T TN3 K 17669T M K 17737T RN K 19990T RN K 17736T RN K 17669T M K 17737T RNS K 19990T RNS K 17736T RN K 17660T M K 177...

Страница 2: ...Vitreous china can break and chip if you over tighten bolts and nuts WARNING Risk of external leakage The fill valve nut has been factory tightened to design specifications If re tightening is required wrench tighten 1 4 turn past finger tight 1 4 TOOLS AND MATERIALS REQUIRED Not supplied 10 adjustable wrench Supply shut Off valve Tape measure Level Sponge Pipe wrench Tubing cutter Safety Glasses ...

Страница 3: ...ounting hole centerline on the floor per width of the bowl 2 Finished W all Rear Bowl 3 INSTALL THE TANK CISTERN Carefully turn the tank cistern upside down onto a protected surface Place the gasket with the tank cistern Position the tank cistern on the bowl pan by centering the gasket on the bowl pan inlet Line up the tank cistern and bowl pan screw holes Overtightening may cause breakage or chip...

Страница 4: ...e water supply hose to toilet supply shank for either back inlet or bottom inlet 4 Water Supply Hose 5 Select S trap to install your toilet according to the drain and shut off valve s Roughing in dimensions 5 S trap installation 200 220 305 1226681 S Trap ...

Страница 5: ...ugh the washer then tighten the screw Align the pan back to position over the brackets Install the sleeves and tighten the screw Attach the caps Hexagon Lag Screw Bracket Washer Anchor Hole Sleeve Screw 7 CONNECT THE SUPPLY Connect the supply shut off valve to the supply hose and connect supply hose to toilet supply shank Open the supply shut off valve slowly to check for leaks If the connections ...

Страница 6: ...e on the tank 8 INSTALL AND ADJUST PUSH BUTTONS 1 2 3 Test the push buttons 1 No need for any adjustment if the rods just touch the push buttons on the flush valve 2 If the rods are tightly against the push buttons on the flush valve take out the buttons loosen the small nuts and screw clockwise until the rods just touch the push buttons on the flush valve 3 If the rods cannot touch the push butto...

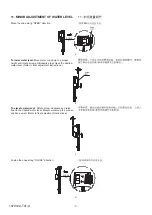
Страница 7: ...instructions b Screw To elevate water level Rotate screw clockwise and raise float to the desired water level Elevate water cup to a proper position as well Refer to float adjustment instructions c CLOSE Fasten the snap along CLOSE direction d SCALE 5 1 OPEN CLOSE 11 OPEN 11 MINOR ADJUSTMENT OF WATER LEVEL Move the snap along OPEN direction a Snap SCALE 5 1 OPEN CLOSE ...

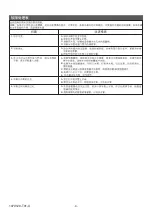
Страница 8: ...ve tank and tighten flush valve nut if flush valve gasket is leaking Do not overtighten If leakage continues replace gasket C Clean fill valve seat seat washer of debris or replace piston seat washer assembly D Replace fill valve if valve float sinks E Adjust tank water level if too high 2 No flush A Remove the canister out of the flush valve and check mechanic system If it has some part damage re...

Страница 9: ... 9 1079129 T01 U 2 A B 4 A B 3 A B C D E 1 A B C D 5 A B ...

Страница 10: ...sly damage fittings in the tank This damage can cause leakage and property damage Kohler Company shall not be responsible or liable for any damage to these tank fittings caused by the use of cleaners containing chlorine calcium hypochlorite WARNING Risk of property or product damage Please do not use hard materials like scouring pad to clean product surface especially the product logo CAUTION CAUT...

Отзывы: