background image

24

1383572-W2-A

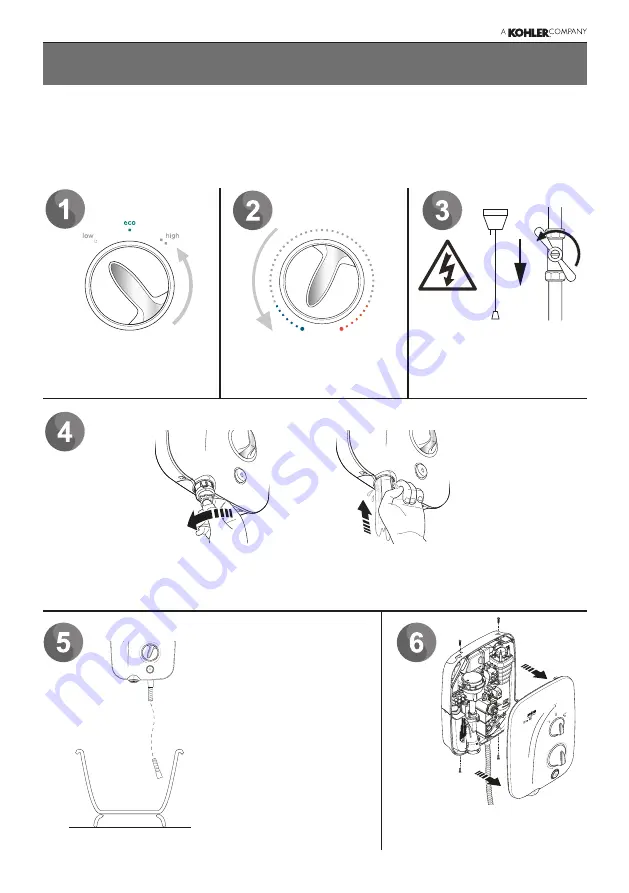
Commissioning

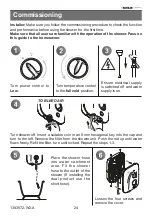
Turn temperature control 

to the 

full cold

 position.

Turn power control to 

Low

.

Ensure electrical supply 

is switched off and water 

supply is on. 

Installer:

 Make sure you follow the commissioning procedure to check the function 

and performance before using the shower for the first time.

Make sure that all users are familiar with the operation of the shower. Pass on 

this guide to the homeowner.

Loosen the four screws and 

remove the cover.

Place the shower hose 

into water catchment 

area. Fit the shower 

hose to the outlet of the 

shower (If installing the 

dual product use the 

short hose).

Turn shower off. Insert a suitable coin or an 8 mm hexagonal key into the cap and 

turn to the left. Remove the filter from the shower unit. Push the rod up until water 

flows freely. Refit the filter, turn until locked. Repeat the steps 1-3.

TO BLEED AIR

Содержание Mira Elite SE

Страница 1: ...e instructions must be left with the user Mira Elite SE 9 8kW and 10 8kW Pumped Electric Shower Installation and User Guide For SPARES ADVICE or REPAIRS Please call us on 01 531 9337 for Eire only or 0800 001 4040 UK only ...

Страница 2: ...he shower 3 Cleaning and user maintenance shall not be made by children without supervision 4 The outlet must not be connected to any tap or fitting other than those specified 5 The showerhead must be descaled regularly Any blockage of the showerhead or hose can cause damage to the shower 6 Warning Do not switch on if there is a possibility that the water in the heater is frozen 7 The shower must ...

Страница 3: ...witch when not in use This is recommended with all electrical appliances 17 Installation of the shower must be carried out in accordance with these instructions by qualified competent personnel Read all instructions before installing the shower 18 Isolate the electrical and water supplies before commencing installation The electricity must be isolated at the consumer unit and the appropriate circu...

Страница 4: ...ey should also be drained of water 25 If the shower is dismantled during installation or servicing then upon completion an inspection must be made to ensure all electrical connections are tight and that there are no leaks 26 DO NOT fit the shower to a mains water supply or where the maximum specified pressure may exceed 27 Maximum Static Pressure is 100 kPa 1 bar Decommissioning and Recycling When...

Страница 5: ...5 1383572 W2 A Pack Contents 1 x Pumped Electric Shower Pumped Electric Shower 3 x Screws 1 x Compression Nut 1 x Olive 3 x Wall Plugs ...

Страница 6: ...6 1383572 W2 A Shower Fitting 2 x Slide Bar Support 1 x Showerhead Multimode 1 x Shower Hose 2 x Hose Seal 2 x Mounting Pack 1 x Clamp Bracket 1 x Retaining Ring 1 x Slide Bar 2 x Cap ...

Страница 7: ... installed used and maintained in good working order in accordance with our instructions and recommendations Follow all warnings cautions and instructions contained in this guide and on or inside the shower This guide is also available in digital format from our website or by contacting customer services Domestic Light Commercial Heavy Commercial Healthcare Product Variant Model No Colour Mira Eli...

Страница 8: ...P Male to flexible hose Electrical Variant 9 8 kW 10 8 kW Nominal Power at 240 V ac 9 8 kW 10 8 kW Nominal Power at 230 V ac 9 kW 9 9 kW Recommended MCB Rating 40 A 45 A Maximum Supply Cable Size 16 mm Recommended RCD Rating 30 mA tripping current Recommended Isolator Switch 45 A double pole with 3 mm contact separation Appliance Sealing Rating IP X4 suitable for installation in Zone 1 Maximum Amb...

Страница 9: ...confirm if the electrical supply is adequate This range of showers complies with the requirements of the UK s water regulations European Conformity Information Eco Design Energy Labelling Mira Elite SE 9 8 kW 10 8 kW Load Profile XS XS Efficiency Class A A Efficiency 39 0 38 9 Daily Electricity Consumption kWh 2 172 2 177 Annual Electricity Consumption kWh 473 474 For domestic installations Mira S...

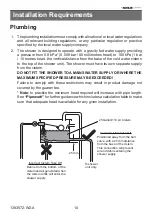
Страница 10: ...UPPLY OR WHERE THE MAXIMUM SPECIFIED PRESSURE MAY BE EXCEEDED Failure to comply with these restrictions may result in product damage not covered by the guarantee Note In practice the minimum head required will increase with pipe length See Pipework for further guidance which includes a calculation table to make sure that adequate head is available for any given installation Plumbing Installation R...

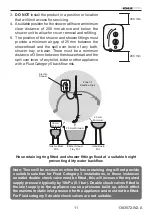
Страница 11: ...between the showerhead and the spill over lever of any toilet bidet or other appliance with a Fluid Category 5 backflow risk Note There will be occasions when the hose retaining ring will not provide a suitable solution for Fluid Category 3 installations in these instances an outlet double check valve must be fitted this will increase the required supply pressure typically by 10kPa 0 1 bar Double ...

Страница 12: ...ee Pipework for guidance and calculation table When using flexible plastic pipe it is essential that the pipe is kept flat to minimise air build up in the system 11 A full bore non restrictive servicing valve must be fitted in a readily accessible position adjacent to the shower to facilitate maintenance of the shower DO NOT use a valve with a loose washer plate jumper as this can lead to a build ...

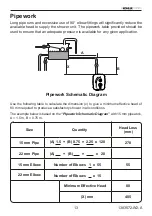
Страница 13: ...e provided should be used to ensure that an adequate pressure is available for any given application Pipework Pipework Schematic Diagram A B X Use the following table to calculate the dimension x to give a minimum effective head of 80 mm required to produce a satisfactory shower in all conditions The example below is based on the Pipework Schematic Diagram with 15 mm pipework A 1 5 m B 0 75 m A 1 ...

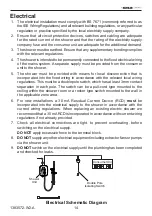
Страница 14: ...iring in accordance with the relevant local wiring regulations This must be a double pole switch which has at least 3 mm contact separation in each pole The switch can be a pull cord type mounted to the ceiling within the shower room or a rocker type switch mounted to the wall in the applicable zone area 6 For new installations a 30 mA Residual Current Device RCD must be incorporated into the elec...

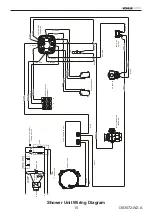
Страница 15: ... BLUE Q BROWN A GREEN B BLUE C BLUE C TERMINAL BLOCK ASSEMBLY HEATER TANK ASSEMBLY MICROSWITCHES RED F RED F RED E BROWN G BROWN G BROWN H BROWN H LED BROWN P BROWN P BROWN A BROWN D BROWN D BLUE Q L E N INLET CONNECTOR ASSEMBLY SOLENOID BLUE K GREY J GREY T GREY T GREY T LATCHING SWITCH BROWN D POWER LED USER SELECTED FLOW POWER SWITCH TANK P H H P SOLENOID VALVE N L E ...

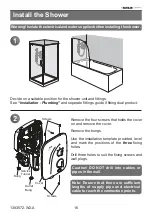
Страница 16: ...l Outlet Bung Bung Screws Screws Note Ensure that there are sufficient lengths of supply pipe and electrical cable to reach the connection points Caution DO NOT drill into cables or pipes in the wall Remove the four screws that holds the cover on and remove the cover Remove the bungs Use the installation template provided level and mark the positions of the three fixing holes Drill three holes to ...

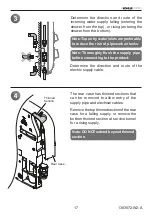
Страница 17: ...ly falling entering the shower from the top or rising entering the shower from the bottom Note Top entry water inlets are preferable to reduce the risk of pipework airlocks The rear case has thinned sections that can be removed to allow entry of the supply pipe and electrical cables Remove the top thinned section of the rear case for a falling supply or remove the bottom thinned section at service...

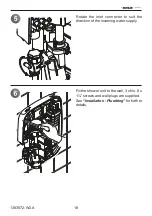
Страница 18: ...2 W2 A Rotate the inlet connector to suit the direction of the incoming water supply Fix the shower unit to the wall 3 x No 8 x 1 screws and wall plugs are supplied See Installation Plumbing for further details ...

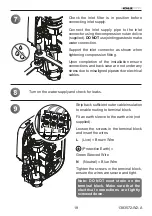
Страница 19: ... are not under any stress due to misaligned pipework or electrical cables Note DO NOT exert strain on the terminal block Make sure that the electrical connections are tightly screwed down Turn on the water supply and check for leaks Strip back sufficient outer cable insulation to enable routing to terminal block Fit an earth sleeve to the earth wire not supplied Loosen the screws in the terminal b...

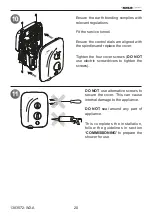
Страница 20: ... and replace the cover Tighten the four cover screws DO NOT use electric screwdrivers to tighten the screws DO NOT use alternative screws to secure the cover This can cause internal damage to the appliance DO NOT seal around any part of appliance This completes the installation follow the guidelines in section COMMISSIONING to prepare the shower for use ...

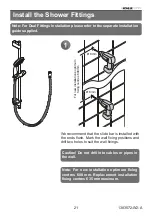
Страница 21: ...with the ends flush Mark the wall fixing positions and drill two holes to suit the wall fixings Caution Do not drill into cables or pipes in the wall Note For new installation optimum fixing centres 600 mm Replacement installation fixing centres 635 mm maximum Note For Dual Fittings Installation please refer to the separate installation guide supplied ...

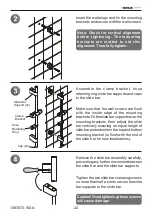
Страница 22: ... the slide bar for new installations Remove the slide bar assembly carefully preventing any further movement between the slide bar and the slide bar supports Tighten the two slide bar clamping screws no more than half a turn to secure the slide bar supports to the slide bar Caution Overtightening these screws will cause damage Insert the wall plugs and fix the mounting brackets and secure with the...

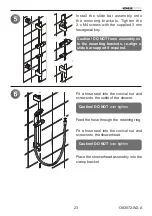
Страница 23: ...nical nut and screw onto the outlet of the shower Feed the hose through the retaining ring Fit a hose seal into the conical nut and screw onto the showerhead Place the showerhead assembly into the clamp bracket Caution DO NOT force assembly on to the mounting brackets re align a slide bar support if required Caution DO NOT over tighten Caution DO NOT over tighten ...

Страница 24: ...all users are familiar with the operation of the shower Pass on this guide to the homeowner Loosen the four screws and remove the cover Place the shower hose into water catchment area Fit the shower hose to the outlet of the shower If installing the dual product use the short hose Turn shower off Insert a suitable coin or an 8 mm hexagonal key into the cap and turn to the left Remove the filter fr...

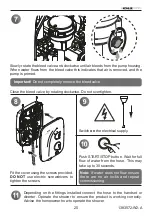
Страница 25: ...ver using the screws provided DO NOT use electric screwdrivers to tighten the screws Push START STOP button Wait for full flow of water from the hose This may take up to 30 seconds Depending on the fittings installed connect the hose to the handset or diverter Operate the shower to ensure the product is working correctly Advise the homeowner how to operate the shower Note If water does not flow en...

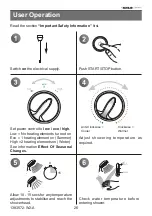
Страница 26: ...he section Important Safety Information first User Operation Switch on the electrical supply Set power control to low eco high Low No heating elements turned on Eco 1 heating element on Summer High 2 heating elements on Winter See information Effect Of Seasonal Changes Adjust showering temperature as required Anti Clockwise Cooler Clockwise Warmer Push START STOP button ...

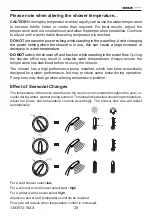
Страница 27: ...ay result in unstable temperatures at the showerhead Always ensure the temperature has stabilised before re using the shower A small amount of water may continue to drain drip from the overhead shower or handset shower until the head is empty ALWAYS switch the shower off at the electrical isolating switch when not in use This is recommended with all electrical appliances ...

Страница 28: ...ay result in unstable water temperatures Always ensure the temperature has stabilised before re using the shower The shower has a high performance pump installed which has been acoustically designed for quieter performance but may produce some noise during operation Pump tone may change when altering temperature position For a cold shower select low For a summer warm shower select eco high For a w...

Страница 29: ...ively scaled Contact your installer to replace Consult your installer about fitting a water softener for hard water areas Pump overheated or faulty Wait 30 minutes for pump to cool and reset automatically If fault persists contact your installer to replace Water pressure below minimum required for shower operation Make sure shower isolating valve is fully turned on Check filter for blockage and cl...

Страница 30: ...joined to the Heater Tank has failed Contact your installer to replace parts as required No hot water when set to eco high Shower s Flow Valve Microswitch or Heater Tank has failed Remove and descale Showerhead Hose kinked or blocked Check hose and replace if necessary No hot water from shower with the knobs in any position Electrical supply or product problem Contact your installer to check insta...

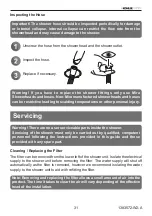
Страница 31: ...e no user serviceable parts inside the shower Servicing of the shower must only be carried out by qualified competent personnel following the instructions provided in this guide and those provided with any spare part Servicing Cleaning Replacing the Filter The filter can be removed from the lower left of the shower unit Isolate the electrical supply to the shower unit before removing the filter Th...

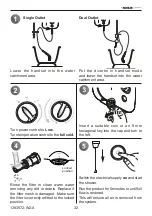
Страница 32: ...fitted to the locked position Locked position Switch the electrical supply on and start the shower Run the product for 5 minutes or until full flow is restored This will ensure all air is removed from the system Turn power control to Low Turn temperature control to the full cold Put the divertor in handset mode and lower the handset into the water catchment area Single Outlet Dual Outlet Lower the...

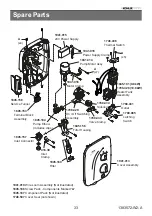
Страница 33: ...itch 1788 433 Valve Clamp 1788 434 Solenoid 1941 014 Pump Motor Assy 1941 016 Motor Clamp 1788 431 Outlet 1789 085 Latching Switch 1845 157 Inlet Connector 1845 156 Filter Housing 1845 160 Filter 416 38 Inlet Clamp 1941 013 Cover Assembly 1845 191 9 8kW 1788 428 10 8kW Heater Tank Assembly 1941 019 Wire Loom Assembly Not illustrated 1845 186 Screw Pack Components Marked A 1845 187 Component Pack N...

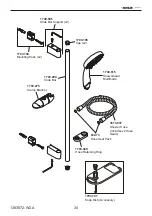
Страница 34: ...3 275 Clamp Bracket 1703 449 Hose Retaining Ring 1703 197 Soap Dish Accessory 1613 037 Shower Hose Includes x2 Hose Seals 1703 204 Slide Bar 1703 194 Mounting Pack x2 1740 595 Slide Bar Support x2 1703 196 Cap x2 1740 615 Showerhead Multimode ...

Страница 35: ...35 1383572 W2 A Notes ...

Страница 36: ...r indirect loss of any kind Damage or defects caused if the product is repaired or modified by persons not authorised by us or our appointed representative Routine maintenance or replacement parts to repaired or modified by persons not authorised by comply with the requirements of the TMV2 or repaired or modified by persons not authorised by TMV3 healthcare schemes Accidental or wilful damage Prod...

Страница 37: ...r Showers Power Showers Smart Showers Shower Towers From Top Shower Brands Mira Showers Aqualisa Showers Triton Showers Gainsborough Showers Shower Pumps can upgrade your showering experience even more Stuart Turner Shower Pumps Salamander Shower Pumps Grundfos Shower Pumps ...

Отзывы: