background image

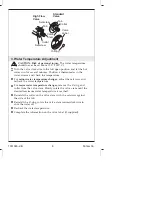
3. Water Temperature Adjustment

CAUTION: Risk of personal injury.

The water temperature

should never be set above 120° F (49° C).

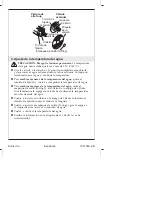
Turn the valve clockwise to the full open position and let the hot
water run for several minutes. Position a thermometer in the
water stream and check the temperature.

For

minor water temperature changes,

adjust the setscrew, and

recheck the water temperature.

For

major water temperature changes,

remove the O-ring and

collar from the valve stem. Slowly rotate the valve stem until the
desired maximum water temperature is reached.

Reinstall the collar on the valve stem with the setscrew against
the side of the tab.

Reinstall the O-ring, rotate the valve stem counterclockwise to
shut the water off.

Recheck the water temperature.

Complete the information on the valve label (if supplied).

O-Ring

Setscrew

Tab

Tab

Collar

Collar

Setscrew

Valve 
Label

Standard 
Valve

High Flow 
Valve

Valve 
Stem

1031365-2-B

6

Kohler Co.

Содержание K-T8224

Страница 1: ...trol Bath and Shower Trim M product numbers are for Mexico i e K 12345M Los números de productos seguidos de M corresponden a México Ej K 12345M Français page Français 1 Español página Español 1 K T8224 K T8226 K T8228 1031365 2 B ...

Страница 2: ...not compensate for changes in the water supply temperature adjust the maximum water temperature setting of this pressure balanced valve when such changes occur Pressure balanced valves may not provide protection against scalding if there is a failure of other temperature limiting devices elsewhere in the plumbing system The installer is responsible for installing the valve and adjusting the maximu...

Страница 3: ...d wall or bath shower unit must be installed prior to installing this trim We recommend that you determine if the maximum water temperature is acceptable before installing this trim If temperature adjustment is needed refer to the Water Temperature Adjustment section The valve shuts off by water pressure Do not force the handle in any direction To turn the valve off gently turn it to the Off posit...

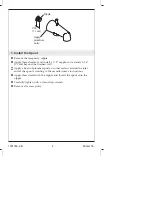
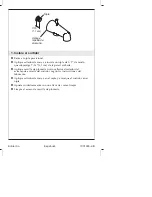
Страница 4: ...ed wall Apply a bead of plumbers putty or other sealant around the inlet end of the spout according to the manufacturer s instructions Apply thread sealant to the nipple and thread the spout onto the nipple Carefully tighten with a clean strap wrench Remove all excess putty Nipple 7 16 1 1 cm Apply plumbers putty 1031365 2 B 4 Kohler Co ...

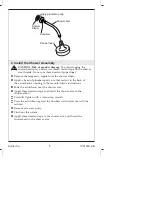
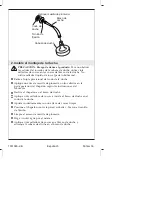
Страница 5: ... escutcheon according to the manufacturer s instructions Slide the escutcheon over the shower arm Apply thread sealant tape and install the shower arm to the shower elbow Carefully tighten with a clean strap wrench Press the escutcheon against the finished wall and secure with the setscrew Remove all excess putty Flush out the system Apply thread sealant tape to the shower arm and thread the showe...

Страница 6: ...ater temperature For major water temperature changes remove the O ring and collar from the valve stem Slowly rotate the valve stem until the desired maximum water temperature is reached Reinstall the collar on the valve stem with the setscrew against the side of the tab Reinstall the O ring rotate the valve stem counterclockwise to shut the water off Recheck the water temperature Complete the info...

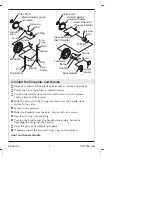
Страница 7: ...ing onto the plug Position the handle over the handle stem eyelets Secure by threading the plug into the handle Press the plug button firmly into place If needed install the second O ring ring and end piece Swirl and Square Handle Valve Stem Skirt O Ring O Ring O Ring Handle Plug Plug Faceplate Screws Screw Setscrew End Piece Ring Handle Stem Plug Button Plug Button Discard plaster guard with dome...

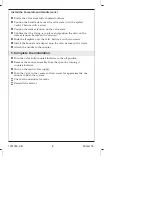
Страница 8: ...ew Slide the faceplate over the skirt Secure it with two screws Install the bonnet and adapter onto the skirt Secure with a screw Attach the handle to the adapter 5 Complete the Installation Turn the valve fully counterclockwise to the off position Remove the aerator assembly from the spout by turning it counterclockwise Turn on the main water supply Turn the valve to the center and run water for ...

Страница 9: ...e régulateur et pourront présenter un danger de brûlures La valve à pression équilibréene compensera pas les changements de température d alimentation d eau ajuster la température maximale de cette valve à pression équilibrée si de tels changements se produisent Les valves à pression équilibrée peuvent ne pas assurer une protection contre les brûlures en cas de défaillance d autres dispositifs de ...

Страница 10: ...nt de commencer Respecter tous les codes de plomberie et de bâtiment locaux Le mur fini ou la baignoire douche doit être installé avant d installer cette garniture Nous conseillons de déterminer si la température maximale de l eau est acceptable avant d installer la garniture S il un réglage de température est nécessaire se réferer à la section Réglage de la température d eau La valve s arrête par...

Страница 11: ...r du mastic d étanchéité ou un produit semblable sur le périmètre de l extrémité arrière du bec selon les instructions du fabricant du mastic Appliquer un ruban d étanchéité sur le filetage du mamelon et visser le bec sur ce dernier Serrer doucement à l aide d une clé à sangle propre Retirer tout excédant de mastic Mamelon 7 16 1 1 cm Appliquer du mastic de plomberie Kohler Co Français 3 1031365 2...

Страница 12: ...elon les instructions du fabricant du mastic Glisser la applique sur le bras de douche Appliquer du ruban d étanchéité et installer le bras de douche au coude de douche Serrer doucement à l aide d une clé à sangle propre Presser l applique contre le mur fini et sécuriser avec la vis de retenue Retirer tout excédant de mastic Vidanger les conduites Appliquer un ruban d étanchéité sur le bras de dou...

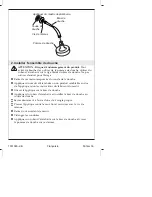
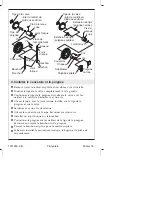
Страница 13: ...ents de température retirer les joints toriques et le collier de la tige de la valve Tourner lentement la tige de la valve jusqu à atteindre la température maximale désirée Réinstaller le collier sur la tige de la valve de manière à placer la vis de retenue contre la languette Réinstaller le joint torique tourner la tige de la valve vers la gauche pour arrêter l eau Vérifier de nouveau la températ...

Страница 14: ...la poignée sur les oeillets de la tige de la poignée Sécuriser en vissant le bouchon sur la poignée Presser le bouchon en place pour le mettre en place Si besoin installer le second joint torique la bague et la pièce de raccordement Tige de la valve Jupe Joint torique Poignée Bouchon Bouchon Bouchon Bouchon Couvercle Vis Vis Vis de retenue Pièce de raccordement Anneau Joint torique Joint torique T...

Страница 15: ...avec une vis de retenue Glisser le couvercle sur la jupe Sécuriser avec deux vis Installer le chapeau et l adaptateur sur la jupe Sécuriser avec une vis Attacher la poignée à l adaptateur 5 Compléter l installation Tourner la valve complètement vers la gauche à la position fermée Tourner l ensemble de l aérateur du bec vers la gauche pour le retirer Ouvrir l alimentation d eau principale Tourner l...

Страница 16: ... temperatura máxima del agua suministrada por la válvula y pueden causar quemaduras La válvula reguladora de presión no compensará los cambios de temperatura del agua ajuste la temperatura máxima del agua de esta válvula reguladora de presión cuando se produzcan tales cambios Es posible que las válvulas reguladoras de presión no protejan contra las quemaduras si otros aparatos de limitación de tem...

Страница 17: ...ntran en la cubierta posterior de esta guía Gracias nuevamente por escoger a Kohler Antes de comenzar Cumpla con todos los códigos locales de plomería y de construcción La pared acabada o la unidad de la bañera ducha debe instalarse antes que la guarnición Se recomienda determinar si la temperatura máxima del agua es aceptable antes de instalar esta guarnición Si es preciso realizar ajustes de tem...

Страница 18: ...Antes de comenzar cont La empresa Kohler se reserva el derecho de modificar el diseño de los productos sin previo aviso tal como se especifica en la lista de precios 1031365 2 B Español 3 Kohler Co ...

Страница 19: ... masilla de plomería u otro sellador alrededor del extremo de entrada del surtidor según las instrucciones del fabricante Aplique sellador de roscas en el niple y enrosque el surtidor en el niple Apriete cuidadosamente con una llave de correa limpia Limpie el exceso de masilla de plomería Niple 7 16 1 1 cm Aplique masilla de plomería Kohler Co Español 4 1031365 2 B ...

Страница 20: ...según las instrucciones del fabricante Deslice el chapetón en el brazo de ducha Aplique cinta selladora de roscas e instale el brazo de ducha en el codo de la ducha Apriete cuidadosamente con una llave de correa limpia Presione el chapetón contra la pared acabada y fije con el tornillo de fijación Limpie el exceso de masilla de plomería Haga circular agua por el sistema Aplique cinta selladora de ...

Страница 21: ...ue de anillo O ring y el collarín de la espiga de válvula Gire lentamente la espiga de válvula hasta obtener la temperatura máxima deseada del agua Vuelva a instalar el collarín en la espiga de válvula colocando el tornillo de fijación contra el lado de la lengüeta Vuelva a instalar el empaque de anillo O ring y gire la espiga a la izquierda para cerrar el suministro de agua Vuelva a verificar la ...

Страница 22: ... los ojales de la espiga de la manija Fije enroscando el tapón en la manija Presione el tapón en su lugar De ser necesario instale el segundo empaque de anillo O ring anillo y pieza terminal Espiga de válvula Base Manija Tapón Tapón Tapón Tapón Tornillos Tornillo Tornillo de fijación Pieza terminal Anillo Empaque de anillo O Ring Empaque de anillo O Ring Empaque de anillo O Ring Espiga de la manij...

Страница 23: ...espiga Fije con un tornillo de fijación Deslice la placa frontal sobre la base Fíjela con dos tornillos Instale el bonete y el adaptador en la base Fije con un tornillo Monte la manija en el adaptador 5 Termine la instalación Gire la válvula totalmente a la izquierda a la posición cerrada Gire el montaje del aireador hacia la izquierda para sacarlo del surtidor Abra el suministro principal de agua...

Страница 24: ...USA 1 800 4 KOHLER Canada 1 800 964 5590 México 001 877 680 1310 kohler com 2005 Kohler Co 1031365 2 B ...

Отзывы: