background image

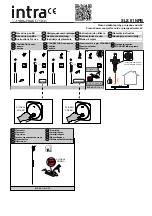
2. Install the Lavatory

NOTE:

Fastening devices other than hanger bolts may be used to

mount the lavatory. Ensure the fastening devices are of sufficient
size and strength.

Install the hanger bolts to the backing material. The hanger bolts
must extend 7/8

(2.2 cm) beyond the finished wall.

Install the faucet and drain to the lavatory according to the
manufacturer’s instructions.

CAUTION: Risk of product damage.

Do not overtighten the

wood screw. Overtightening may damage the product.

Move the pedestal over the drilled hole in the floor. Secure the
pedestal to the floor with the wood screw and washer.

Carefully set the lavatory on the pedestal so the hanger bolts
extend through the lavatory anchoring holes.

CAUTION: Risk of product damage.

Do not overtighten the cap

nuts. Overtightening may damage the product.

Install the cap nuts and washers to the hanger bolts. Level the
lavatory, then carefully tighten the cap nuts until snug.

Connect and tighten the trap to the drain.

Complete the water supply connections to the faucet according to
the instructions packed with the faucet.

Mount hanger 
bolts.

Finished Wall

Lavatory

Pedestal

Install faucet and drain.

Install cap nuts 
and washers.

Secure pedestal 
with the wood 
screw and washer.

Kohler Co.

5

1016191-2-C

Содержание K-2268

Страница 1: ...Guide Pedestal Lavatory M product numbers are for Mexico i e K 12345M Los n meros de productos seguidos de M corresponden a M xico Ej K 12345M Fran ais page Fran ais 1 Espa ol p gina Espa ol 1 K 2268...

Страница 2: ...pedestal Do not install the lavatory as a wall mount unit undermount or sell rimming lavatory Observe all local plumbing and building codes Prior to installation unpack the new lavatory and inspect i...

Страница 3: ...4 10 2 cm 2 3 8 6 cm 3 1 2 8 9 cm 34 3 4 88 3 cm 8 5 8 21 9 cm 3 11 16 9 4 cm 3 8 Cold 4 10 2 cm 1 1 4 OD 3 8 Hot 15 1 2 39 4 cm 1 2 1 3 cm D Mounting Hole in Pedestal Bottom 1 2 1 3 cm D Anchor Hole...

Страница 4: ...oughing in information for the required distance Carefully lift the lavatory into place on the pedestal If necessary slowly move the pedestal to ensure proper fit Level the lavatory If necessary add a...

Страница 5: ...e floor Secure the pedestal to the floor with the wood screw and washer Carefully set the lavatory on the pedestal so the hanger bolts extend through the lavatory anchoring holes CAUTION Risk of produ...

Страница 6: ...ENTION Risque de blessure corporelle Ce lavabo sur colonne est lourd Ne pas essayer de soulever ou d installer le lavabo sur colonne sans assistance IMPORTANT Le lavabo doit tre support par la colonne...

Страница 7: ...res installations fournir un renforcement appropri et des dispositifs de fixation de dimension et r sistance suffisantes Les murs et le sol doivent tre d querre d aplomb et nivel s Les dimensions du l...

Страница 8: ...cm Ext 1 1 4 3 8 Chaud 15 1 2 39 4 cm Orifice de montage dans la base de la colonne 1 2 1 3 cm Orifices d ancrage dans le lavabo 1 2 1 3 cm 34 3 4 88 3 cm 8 5 8 21 9 cm 21 3 4 55 2 cm 8 1 4 21 cm 2 3...

Страница 9: ...ce requise du mur fini Se r f rer l information de raccordement pour la distance requise D licatement soulever et mettre en place le lavabo sur la colonne Si n cessaire d placer lentement la colonne p...

Страница 10: ...Pr parer le site cont Percer des orifices de fixation de 1 4 aux emplacements marqu s sur le mur fini et le sol 1016191 2 C Fran ais 5 Kohler Co...

Страница 11: ...lonne au sol l aide de la vis bois et la rondelle Poser soigneusement le lavabo sur sa colonne de fa on faire passer les crous d ancrage dans les orifices pr vus ATTENTION Risque d endommagement du pr...

Страница 12: ...Riesgo de lesiones personales Este lavabo de pedestal es pesado No intente levantar o instalar los lavabos de pedestal sin ayuda IMPORTANTE El lavabo debe estar soportado por el pedestal No instale e...

Страница 13: ...ctura de madera Para otras instalaciones provea el soporte adecuado y los herrajes de suficiente tama o y resistencia Las paredes y el piso deben estar a escuadra a plomo y a nivel Las dimensiones del...

Страница 14: ...D E 3 8 Caliente 15 1 2 39 4 cm Orificio de fijaci n de 1 2 1 3 cm D en la parte inferior del pedestal Orificios de anclaje de 1 2 1 3 cm D en el lavabo Orificio de fijaci n de 8 1 2 21 6 cm 10 25 4 c...

Страница 15: ...pared acabada Consulte el diagrama de instalaci n para la distancia requerida Coloque el lavabo con cuidado sobre el pedestal De ser necesario mueva lentamente el pedestal para asegurarse de que encaj...

Страница 16: ...Prepare el sitio cont Taladre orificios de fijaci n de 1 4 en los lugares marcados en la pared y el piso acabados 1016191 2 C Espa ol 5 Kohler Co...

Страница 17: ...el piso Fije el pedestal al piso con el tornillo para madera y la arandela Coloque el lavabo con cuidado sobre el pedestal de manera que los pernos de sujeci n sobresalgan a trav s de los orificios d...

Страница 18: ...Instale el lavabo cont Termine de realizar las conexiones del suministro de agua a la grifer a seg n las instrucciones incluidas con la grifer a 1016191 2 C Espa ol 7 Kohler Co...

Страница 19: ...1016191 2 C...

Страница 20: ...USA 1 800 4 KOHLER Canada 1 800 964 5590 M xico 001 877 680 1310 kohler com 2005 Kohler Co 1016191 2 C...

Отзывы: