


Kohler Co.
9
1103349-X2-C
1
2
3
4
Flushing
actuator
Sealed floating
ball
Bump
Sealed floating
ball
Stainless steel
Rotary table
Flushing
actuator
S-hook
Metal chain
Tank cover
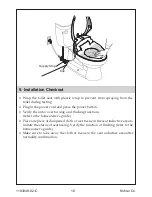
8. Installation of Flushing Actuator
¨
Remove the tank cover.
¨
Place flushing actuator above the sealed floating ball in the tank.
NOTE:
When installing the flushing actuator, you can adjust
the position of stainless steel so as to fit the tank cover properly.
¨
Connect the salient point of the rotary table on “flushing
actuator” and the hang clasper on the “sealed floating ball”
with “metal chain”.
NOTE:
1. Buckling and hanging points on the “sealed floating ball” shall be near to the
floating ball.
2. Twining on the primary manually lifting and pulling metal strip is not
allowed.
3. When installing the metal chain, you need to adjust the length of the chain
tailored to tank mechanism (Adjust S-hook to the proper position in the
chain, ensuring the chain is fully stretched and locked straight by S-hook).
¨
Rotate the auto flush dial manually. Ensure the dial can lift up the sealing
float completed in the rotation to achieve best flushing effect.
¨
Press key
to double confirm the flushing mechanism works smoothly.
¨
Cover the tank cover properly.
Содержание C3-225
Страница 11: ...Kohler Co 11 1103349 X2 C GFCI ELCB 220 240 50 60 16...
Страница 12: ...1103349 X2 C 12 Kohler Co 0 7 7 4 0 07 0 74...
Страница 14: ...1103349 X2 C 14 Kohler Co 4 1 2 2 1...
Страница 15: ...Kohler Co 15 1103349 X2 C 5 2...
Страница 16: ...1103349 X2 C 16 Kohler Co 6 1 4 G1 2...
Страница 17: ...Kohler Co 17 1103349 X2 C 7 6mm 45 2 6 45...
Страница 18: ...1103349 X2 C 18 Kohler Co 1 2 3 4 8 1 2 3...
Страница 19: ...Kohler Co 19 1103349 X2 C 9...


