


1103349-X2-C
6
Kohler Co.
Mounting
Plate
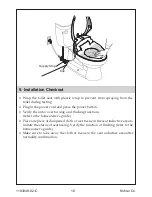
5. Install the Seat
¨
Align the slot on the mounting plate with the groove located below the
toilet seat. Slide the seat onto the mounting plate until you feel is snap into
place.
NOTE:
The mounting plate may need to be adjusted to properly align the seat.
For Toilets with Threaded Inserts:
¨
To adjust the seat position, remove the seat (see Homeowners Guide) and
reposition the mounting plate needed.
¨
Reinstall the seat. Repeat the adjustment procedure as needed until seat is
properly aligned.
¨
Once the seat is positioned as desired, remove the seat and securely tighten
down the mounting plate.
¨
Reinstall the seat.
For All Other Installation:
¨
No need to remove the seat for seat position adjustment, as shown in
Fig 2. Adjust the position seat and mounting plate only by loosening nuts
and tightening nuts when they are adjusted to properly align the seat.
Содержание C3-225
Страница 11: ...Kohler Co 11 1103349 X2 C GFCI ELCB 220 240 50 60 16...
Страница 12: ...1103349 X2 C 12 Kohler Co 0 7 7 4 0 07 0 74...
Страница 14: ...1103349 X2 C 14 Kohler Co 4 1 2 2 1...
Страница 15: ...Kohler Co 15 1103349 X2 C 5 2...
Страница 16: ...1103349 X2 C 16 Kohler Co 6 1 4 G1 2...
Страница 17: ...Kohler Co 17 1103349 X2 C 7 6mm 45 2 6 45...
Страница 18: ...1103349 X2 C 18 Kohler Co 1 2 3 4 8 1 2 3...
Страница 19: ...Kohler Co 19 1103349 X2 C 9...