background image

1103349-X2-C 

 Kohler Co.

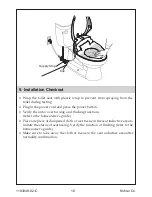
7. Installation of Remote Control Holder

6mm

Installation Step:

45 mm

Expansion

Tube

Remote Holder

Double-Sided

Tape

Expansion

Screw

Screw cover

Remote

Control

¨

  Choose a mounting location for the remote holder that is easily accessible 

while sitting on the seat.

¨

  Drill two holes with depth larger than 45 mm on the wall by drill with a 

diameter  of  6  mm  in  accordance  with  the  position  of  screw  holes  on  the   

remote control holder. Installing the expansion tube into the holes.

¨

  Place the installation holder on the fixing hole.

¨

  Peel off the release paper of double-sided tape at the back of holder.

¨

  Fix the holder with screws and install it.

¨

  Install the screw covers on the screws.

¨

  Place the remote controller on the holder.

NOTE:

 If the wall for installation is made 

of special material (such as wood board, 

density  board  and  etc.),  suitable  fixing 

methods shall be adopted.

Содержание C3-225

Страница 1: ...Installation Guide C3 225 Toliet Seat with Bidet Functionality C3 225 1103349 X2 C 2012 Kohler Co K 4736X...

Страница 2: ...g in the seat until all other installation steps have been completed Thank You for Choosing Kohler Company Thank you for choosing Kohler Kohler craftsmanship offers you a rare combination of proven pe...

Страница 3: ...Wrench Blade Screw driver Masonry Drill Screw driver CAUTION Risk of product damage Do not install this seat in a location where water might be splashed on the product CAUTION Risk of product damage...

Страница 4: ...round Connect to a dedicated 220 240 V 50 60 Hz 16A circuit protected by Ground Fault Circuit Interrupter GFCI or Earth Leakage Circuit Breaker ELCB It is recommended to use water resistant socket Do...

Страница 5: ...lates Please pay attention to washer direction Loosely thread the bolts into inserts Do not overtighten for future adjustment For All Other Installation Fig 2 Position the mounting plate over the toil...

Страница 6: ...eat position remove the seat see Homeowners Guide and reposition the mounting plate needed Reinstall the seat Repeat the adjustment procedure as needed until seat is properly aligned Once the seat is...

Страница 7: ...T valve Connect the T valve to the toilet seat with the supplied hose Connect the water supply to the T valve Turn on the water supply Check all connections for leaks and make any adjustment as needed...

Страница 8: ...by drill with a diameter of 6 mm in accordance with the position of screw holes on the remote control holder Installing the expansion tube into the holes Place the installation holder on the fixing h...

Страница 9: ...the hang clasper on the sealed floating ball with metal chain NOTE 1 Buckling and hanging points on the sealed floating ball shall be near to the floating ball 2 Twining on the primary manually liftin...

Страница 10: ...and press the power button Verify the auto cover turning and flushing functions refer to the homeowner s guide Place one piece of dampened cloth or wet tissue in the seat inductive area to imitate the...

Страница 11: ...Kohler Co 11 1103349 X2 C GFCI ELCB 220 240 50 60 16...

Страница 12: ...1103349 X2 C 12 Kohler Co 0 7 7 4 0 07 0 74...

Страница 13: ...Kohler Co 13 1103349 X2 C 1 2 1 2 3 4 5 GFCI ELCB 220 240 1 136 140 2 20 3 70 4 460 490 5 370 390 6 1 GFCI ELCB 220 240 50 60 16 3 25...

Страница 14: ...1103349 X2 C 14 Kohler Co 4 1 2 2 1...

Страница 15: ...Kohler Co 15 1103349 X2 C 5 2...

Страница 16: ...1103349 X2 C 16 Kohler Co 6 1 4 G1 2...

Страница 17: ...Kohler Co 17 1103349 X2 C 7 6mm 45 2 6 45...

Страница 18: ...1103349 X2 C 18 Kohler Co 1 2 3 4 8 1 2 3...

Страница 19: ...Kohler Co 19 1103349 X2 C 9...

Страница 20: ...022046222 022046224 E mail callcenterthailand kohler com KOHLER THAILAND PUBLIC COMPANY LIMITED 16th FL JasmineCityBldg 2 Soi Sukhumvit23 Sukhumvit Road Wattana Bangkok10110Thailand Call Center Tel 66...

Отзывы: