background image

16 


DRC (Dynamic Range Control) Value 


@


Note:  

 Set DRC to 

off

 indicates no compression, set DRC to 

low

 indicates little compression, set DRC to 

high  

shows maximum compression.


If you are listening to music with a high dynamic range in a noisy environment (for example 
classical music while cooking), you may wish to compress the audio dynamic range.  


This makes quiet sounds louder, and loud sounds quieter.  


To change DRC, press and hold 

MENU


à


DRC

, then set DRC to 

off

low

 or 

high

.   


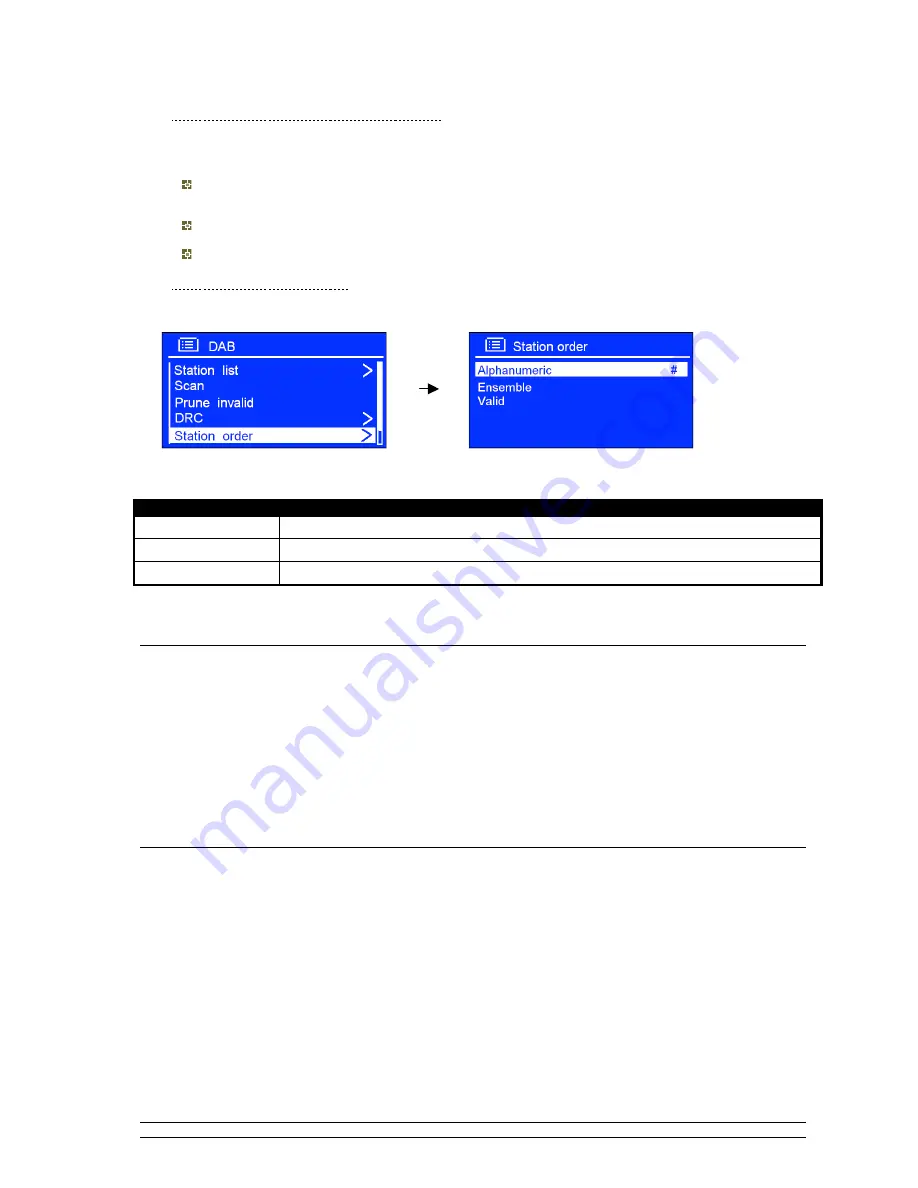
To change station order 


1.  Press and hold

 MENU

, and then turn the

 SELECT

 knob to < 

Station order 

>, press it to confirm. 


@


Note

: There are 3 options: Alphanumeric, Ensemble and Valid. 

#

shows on the default of your setting option to 

indicate current station order. 

STATION ORDER 

DESCRIPTION 

Alphanumeric 

Display all stations in alphanumeric order. 

Ensemble 

List currently broadcasting active stations before inactive ones. 

Valid 

Remove inactive stations from the station list. 


2.  Turn the 

SELECT

 knob to your expecting option, press it to confirm. 

Setting Station Presets 


Your radio can store 3 Internet, 3 DAB+ and 3 FM stations preset.  

To store the current station 

(Internet, DAB or FM mode use only):


1.  Press and hold one of the 

Preset

 buttons 1-3 until it says:”

Preset stored

”, it will return to its normal 

working condition, with preset icon appeared on display. 


Selecting a Preset Station 


To select a stored station

1.  Press 

MODE 

repeatedly


to go into relative mode (Internet, DAB or FM). 


2.  Press one of the 

Preset

 buttons 1-3 to recall, your radio will be accessed to your pointed preset 

station which you have been set. 


Содержание KGNDRVDA

Страница 1: ...KGNDRVDA USER MANUAL ...

Страница 2: ...or objects have fallen into the apparatus the apparatus has been exposed to rain or moisture does not operate normally or has been dropped 15 The apparatus shall not be exposed to dripping or splashing and no objects filled with liquids such as vases shall be placed on the apparatus 16 The mains plug or an appliance coupler is used as the disconnect device the disconnect device shall remain readil...

Страница 3: ...Stations 11 Changing the Station Information 12 Station Updates 12 Music Player Mode 13 DAB Mode 15 Setting Station Presets 16 Selecting a Preset Station 16 FM Mode 17 AUX IN Mode 18 Sleep Function 18 Setting Clock 19 Setting Alarm 20 General Operation 21 Return to Main Menu 21 Adjust Volume Level 21 Browse Station Information 21 System settings 21 Equaliser 21 Network Setup 22 Language 22 Factory...

Страница 4: ...2 Package Content Main Unit Adapter ...

Страница 5: ...the network If your wireless network is configured for trusted stations you will need to enter the Radio s MAC address into your wireless access point To find the Radio s MAC address use menu items as follows Main menu à System settings à Network à View settingsà MAC Address To enter the MAC address into your wireless access point you must read the instructions supplied with the wireless access po...

Страница 6: ...t DAB and FM mode use only Press and hold to store current playing station to station presets Press to access to appointed stored station MODE Press to shift to another mode BACK Internet DAB and FM mode use only Press to go back previous page or track Turn to adjust volume level Internet DAB and FM mode Turn to change options press to confirm FM mode While frequency is showing up press to auto se...

Страница 7: ...ne Socket is available for using either headphones or an earpiece Inserting a plug automatically mutes the internal loudspeaker AUX IN socket For connection to external audio device Power cord socket For inserting the power cord of provided power adapter ...

Страница 8: ...ess the SELECT knob to confirm Update from Network Now follow your radio s instruction configure the following parameters þ Timezone select your local timezone þ Daylight saving On or Off þ Wlan region Most of Europe USA Canada Spain etc þ SSID In some cases radio may find more than one network Turn the SELECT knob to your favorite one press it to confirm Note If your network is not configured to ...

Страница 9: ... d After select the final character of your password turn the SELECT knob to and then press it to confirm e Radio will automatically save the WEP WPA you input so no bother to re enter these codes 4 Press the SELECT knob to exit the setting is OK now Access to wireless network 1 Continue above steps or press and hold MENU to have your radio going back main menu page while cursor point to Station l...

Страница 10: ...hold MENU à Station list à Stations press the SELECT knob to confirm 2 There are five options available for you to choose a station as above photo showed Ø LOCATION enables you to choose from the radio stations provided by any country which you choose from a list a While cursor point to Location press the SELECT knob to confirm b Turn the SELECT knob to the region you wanted press it to confirm c ...

Страница 11: ...vorite option 3 Press the SELECT knob to confirm and then step by step to your expecting program Get Access Code and FAQ Solutions 1 After your radio connected to network turn the SELECT knob to Help and then press it to confirm Note at this step you can also listening radio FAQ solutions 2 While cursor point to Get access code press the SELECT knob to confirm then you get it ...

Страница 12: ... the various additional features and services offered by the Frontier internet Radio Portal J 5 After above setting is done in order to have your radio access your new settings get your radio to power off several minutes is necessary J 6 How to play My favourites Your need two steps a While cursor point to My favourites press the SELECT knob to confirm b Turn the SELECT knob to your favourite stat...

Страница 13: ...ortal J 4 After above setting is done in order to have your radio access your new settings get your radio to power off several minutes is necessary J 5 How to play My added stations Your need two steps a When cursor point to My Added Stations press the SELECT knob to confirm b Turn the SELECT knob to your favourite station and then press it to loading Note Your added stations will show up at my ad...

Страница 14: ...ovided by either internet radio station or broadcaster Reliability of Station This will show the degree of reliability of station which you are listening to Signal Information of Station This shows the digital bit rate and the signal mode Playback Buffer of Station This displays the playback buffer strength of current station Date of Station This displays the date which is provided by the broadcas...

Страница 15: ...ommon UPnP server is Windows Media Player 10 or after Alternatively other UPnP platforms and servers may be used To set up WMP for media sharing perform the following steps 1 Ensure that the PC is connected to the network 2 Ensure that the radio is powered on and connected to the same network 3 In WMP add to the media library the audio files and folders you want to share with your radio Library Ad...

Страница 16: ...firm Repeat Play Mode 1 Press and hold MENU and then turn the SELECT knob to Repeat play Off press this knob to shift Off to On Shuffle Play Mode 1 Press and hold MENU and then turn the SELECT knob to Shuffle play Off press this knob to shift Off to On Clear My playlist Note sometimes you might be considered to fresh your media station list follow below steps it s pretty easy 1 Clear My Playlist c...

Страница 17: ...r DAB Station Note if a wrong operation is conducted you can move back at any time by pressing BACK 1 Press and hold MENU and then press the SELECT knob to enter Station list 3 Turn the SELECT knob to cycle through stations list and then press this knob to confirm Note if no DAB DAB signal is found in your area it may be necessary for you to relocate your radio Dynamic Label Segment DLS This is sc...

Страница 18: ...ion to indicate current station order STATION ORDER DESCRIPTION Alphanumeric Display all stations in alphanumeric order Ensemble List currently broadcasting active stations before inactive ones Valid Remove inactive stations from the station list 2 Turn the SELECT knob to your expecting option press it to confirm Setting Station Presets Your radio can store 3 Internet 3 DAB and 3 FM stations prese...

Страница 19: ...ng the next active station repeat above step 3 b The unit will display the frequency changing until it stops on the next station Scan Setting þ By default FM scans stop at any available station This may result in a poor signal to noise ratio hiss from weak stations þ To change the scan settings to stop only at stations with good signal strength press and hold MENU à Scan setting à Strong stations ...

Страница 20: ...ume levels adjust the output volume level on both the source device and radio is recommended Note AUX IN allows quick and easy connection to the MP3 player or other external sound sources Sleep Function 1 It can be activated from Main menu à Sleep press the SELECT knob to confirm 2 Turn the SELECT knob to define the sleep period off 15 30 45 60minutes 3 When your expecting period is appeared simpl...

Страница 21: ...þ Auto update Update from DAB Update from Network and No update þ Set format Set 24 hour and Set 12 hour þ Set timezone turn the SELECT knob to your location timezone press this knob to confirm þ Daylight savings turn the SELECT knob to ON and then press this knob to confirm it is done Set Time Date Manually 1 While cursor point to Set Time Date press the SELECT knob then turn it to set the date 2...

Страница 22: ...r don t set your radio volume level to zero Mute otherwise when alarm is coming the alarm sound cannot be heard The screen shows active alarms with an icon at the bottom left To check alarms status press STANDBY ON to enter standby mode Turn Alarm off When alarm is coming you can either press STANDBY ON to turn it off or Play Snooze Function Press the SELECT knob to postpone it repeatedly press th...

Страница 23: ...hat is displaying on the second line of the display when listening a radio program ü To browse more information you can press MENU repeatedly Note for this function AUX in mode is out of service System settings Equaliser Note Several preset EQ modes are available also a user defined setting 1 Press and hold MENU to Main menu à System settings à Equaliser press the SELECT knob to confirm Then you c...

Страница 24: ...k profile 3 Press the SELECT knob to confirm to enter setting Language The default language is English 1 It can be activated from Main menu à System settings à Language press the SELECT knob to confirm 2 Turn the SELECT knob to your selecting one and then press it to confirm it is done Factory Reset A factory reset resets all user settings to default values so time date network configuration and p...

Страница 25: ...T knob to confirm Or if you want your radio Auto check please follow 1 It can be activated by pressing and holding MENU à System settings à Software update à Auto check setting press the SELECT knob to confirm 2 Turn the SELECT knob to YES press this knob to confirm Enter Setup Wizard When this unit is started for the first time it runs through a setup wizard to configure settings for date time an...

Страница 26: ...do not want the light bothering you For Power on condition It can be activated from Main menu à System settings à Backlight à Power on level à Low Medium High Setting to high level is recommended For Standby condition It can be activated from Main menu à System settings à Backlight à Standby level à Low Medium High Setting to low level is recommended ...

Страница 27: ...the correct key or password into the Radio Remember that text format keys are case sensitive If when attempting to connect to an encrypted network your Radio displays Wireless error followed by a 5 digit number then please ensure that you enter the correct passphrase for the network If the problem persists then you may need to consult your network configuration 5 If your Radio can connect to the n...

Страница 28: ... 240VAC 50 60Hz please use our provided adapter Dimension 212mm x 123mm x 111mm This symbol on the product or in the instructions means that your electrical and electronic equipment should be disposed at the end of its life separately from your household waste There are separate collection systems for recycling in the EU For more information please contact the local authority or your retailer wher...

Отзывы: