background image

19 


Water Tank & Dispenser Maintenance 

Every three months, follow the steps below to maintain the water tank and dispenser. 

Note: If detergent is used to clean any part of the dispenser or water tank, flush the system 

five or six times by filling the water tank and empty through the dispenser to remove any 

residue that could remain before use. 


1)


Completely empty the water tank. 

2)


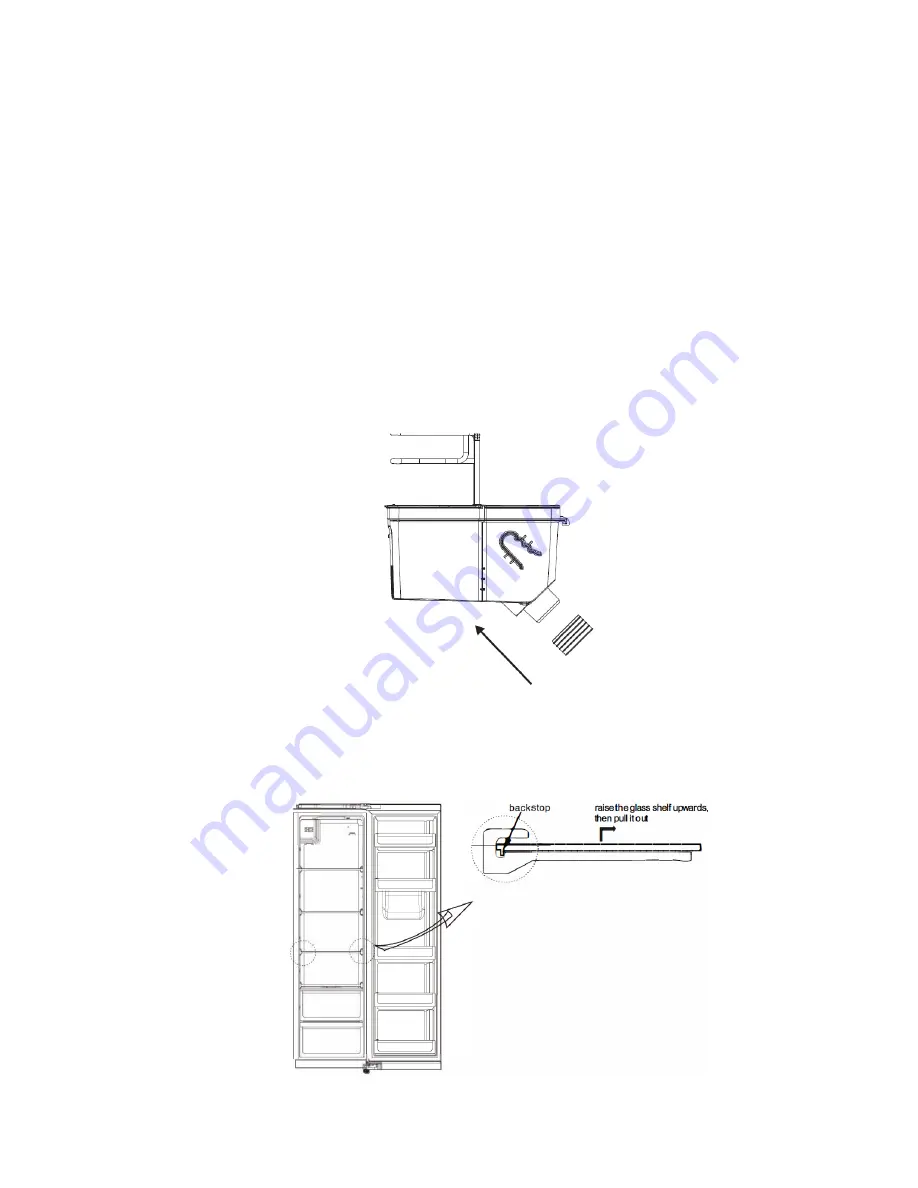
Remove the water tank by gently pulling forward slightly then lifting away at a 45

°


angle (refer the image below). Be careful when disconnecting from the dispenser 

valve. 

3)


Clean the water tank and wipe the dispenser valve. 

4)


Allow the water tank and dispenser valve to dry. 

5)


Replace the water tank by sliding downward into place and then gently push back into 

place. Ensure the water tank is aligned with the dispenser valve and is flush against the 

refrigerator door. 

6)


Flush the water dispenser five or six times by filling and empty the water tank through 

the dispenser before use. 


Cleaning the Glass Shelf 


The innermost part of the refrigerator contacts the shelves backstop. To 

remove the shelves, raise them upward. 


Adjust or clean the shelves according to your requirement. 


Содержание KAMSBSF527A

Страница 1: ...1 527L Side by Side Fridge KAMSBSF527A Quick Start Guide Table of Contents Safety Warnings 2 Overview 8 Operation 10 Cleaning Care 18 Troubleshooting 21 ...

Страница 2: ...ce Keep ventilation openings clear of obstruction Do not use mechanical devices or other means to accelerate the defrosting process other than those recommended by the Kogan Do not damage the refrigerant circuit Do not use electrical appliances inside the food storage compartments of the appliance Please dispose of the refrigerator in accordance with local regulation as it uses flammable gas and r...

Страница 3: ...injury may be caused Note Symbol This is a cautioning symbol Instructions marked with this symbol require special caution Insufficient caution may result in slight or moderate injury or damage to the product This manual contains lots of important safety information which must be read and understood to prevent injury and damage Electricity Related Warnings Do not pull the cord directly when disconn...

Страница 4: ... electrode of the power socket is equipped with a reliable grounding line In the event of gas leakage immediately open any doors and windows Do not unplug the refrigerator and other electrical appliances considering that spark may cause a fire Vacate the area and seek assistance from safety personnel Do not use electrical appliances on top of the appliance ...

Страница 5: ...id danger Always take caution when closing the doors of the refrigerator to prevent injury Please be gentle when closing the refrigerator door to avoid falling items Do not pick up foods or containers with wet hands in the freezer when the refrigerator is running especially metal containers in order to avoid frostbite Do not allow children near the refrigerator there is risk of suffocation falling...

Страница 6: ... to successive starts Placement Warnings Do not put flammable explosive volatile or highly corrosive items in the refrigerator to prevent damage to the product or personal harm Do not place flammable items near the refrigerator to avoid fires The refrigerator is intended for domestic use such as for the storage of foods It is not intended to be used for other purposes such as the storage of blood ...

Страница 7: ...or an extended period of time in temperatures that the refrigerator is not designed Never exceed the storage time recommended by the food manufacturer for any kind of food and particularly for commercially quick frozen food The precautions are necessary to prevent an undue rise in the temperature of the frozen food while defrosting the refrigerating appliance such as wrapping the frozen food in se...

Страница 8: ...8 Overview 1 Freezer door rack 2 Freezer glass shelf 3 Freezer compartment drawer 4 Refrigerator glass shelf 5 Vegetable crisper 6 Refrigerator door rack ...

Страница 9: ...9 1 Freezer door rack 6 Door rack 2 Freezer glass shelf 7 Water tank Dispenser 3 Freezer storage drawer 8 Large door rack 4 Refrigerator glass shelf 9 In door easy twist ice maker 5 Vegetable crisper ...

Страница 10: ...k icon 2 Buttons A Temperature adjustment of freezer compartment B Temperature adjustment of refrigerating compartment C Mode function setting D Lock unlock controls 3 Operation 1 Lock Unlock In the unlocked state long press the button for 3 seconds to enter into the locked state In the locked state long press the button for 3 seconds to enter into the unlocked state ...

Страница 11: ...ear one beep Setting scope is between 2 C and 8 C Every time you click the button the temperature will change by 1 C After adjusting the digital tube will keep blinking for 5 seconds New temperature setting will take effect after locking the control panel 6 Temperature Setting of Freezing Chamber Click the temperature adjusting button of the freezing chamber The freezer compartment temperature wil...

Страница 12: ...water should be used in the water tank It is strongly recommended not to use anything other than water in the tank Example carbonated soft drinks milk juice etc Do not fill the water tank past the maximum point as indicated If the dispenser is not flowing as expected check the water tank is securely in place and flush against the door Ensure all piping is correctly in place Drain the water tank co...

Страница 13: ...ply move the cup or glass away from the dispenser lever and the water will stop flowing automatically as the lever returns to its original position In door Ice Making To make ice cubes fill the in door ice maker tray with clean drinking water using the supplied measuring cup Be careful when opening closing the door until the water in the tray is frozen To remove the cubes from the tray gently pres...

Страница 14: ...light Do not place the freezer in moist or watery places to prevent rust or performance issues Do not spray or wash the refrigerator do not put the refrigerator in moist places where it s easy to be splashed with water so as not to affect the electrical insulation properties of the refrigerator The refrigerator should be placed in a well ventilated indoor place The ground should be flat and sturdy...

Страница 15: ...ration Before levelling the refrigerator must be disconnected from power Before adjusting the levelling feet precautions must be taken to prevent any personal injury 2 Schematic Diagram of Levelling feet 3 Adjusting Procedures a Turn the feet clockwise to raise the refrigerator b Turn the feet counter clockwise to lower the refrigerator c Adjust the right and left feet based on the procedures abov...

Страница 16: ...use a wrench to loosen the locking nut and to rotate the adjusting nut anti clockwise to raise the height of the door Once the doors are aligned tighten the locking nut by rotating it anti clockwise When the fridge door is high Open the door and use a wrench to rotate the adjusting nut clockwise to lower the height of the door Once the doors are aligned tighten the locking nut by rotating it anti ...

Страница 17: ...heating ducts and out of the direct sunlight Let hot foods cool to room temperature before placing in the appliance Overloading the appliance forces the compressor to run longer Foods that freeze too slowly may lose quality or spoil Be sure to wrap foods properly and wipe containers dry before placing them in the appliance This cuts down on frost build up inside the appliance Appliance storage bin...

Страница 18: ... the power is turned on Do not use hard brushes steel wool wire brushes abrasives such as toothpastes organic solvents such as alcohol acetone banana oil etc boiling water acid or alkaline items to clean refrigerator Doing so may damage the fridge surface and interior Do not rinse with water so as not to affect the electrical insulation properties Please unplug the refrigerator for defrosting and ...

Страница 19: ...he image below Be careful when disconnecting from the dispenser valve 3 Clean the water tank and wipe the dispenser valve 4 Allow the water tank and dispenser valve to dry 5 Replace the water tank by sliding downward into place and then gently push back into place Ensure the water tank is aligned with the dispenser valve and is flush against the refrigerator door 6 Flush the water dispenser five o...

Страница 20: ...ance If the fridge is not going to be used for an extended period The fridge should be unplugged and then cleaned The doors should be left open to prevent odour Moving Before the refrigerator is moved take all objects inside out of the fridge Fix the glass partitions vegetable holder freezing chamber drawers etc with tape and tighten the levelling feet Close the doors and fix them with tape During...

Страница 21: ...efrigerator is tilted Loud noise Check whether the floor is level and whether the refrigerator is placed on a stable platform Check whether the levelling feet are adjusted correctly Door seal is not tight Remove foreign matters on the door seal Heat the door seal and then cool it for restoration or blow it with an electrical drier or use a hot towel for heating Water pan overflows There is too muc...

Страница 22: ... To prevent possible harm to the environment or human health from uncontrolled waste disposal recycle it responsibly to promote the sustainable reuse of material resources User manual is subject to change without notice For the latest version of your user manual please visit https www kogan com usermanual ...

Отзывы: