background image

11 


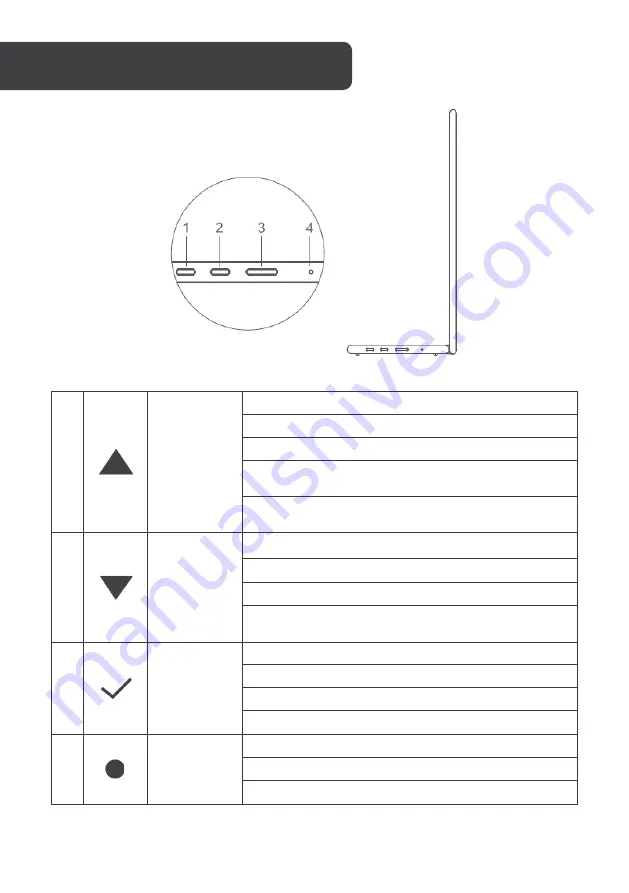
Up button 

Press to open Quick Menu. 
Press to open Brightness menu from Quick Menu. 
Press this button to navigate OSD menu.  
When in an adjustment screen, use both up and down 

buttons to adjust the amounts. 
Long-press this button to enter the volume adjustment 

screen. 


Down button 

Press to open Quick Menu. 

Press to open OSD menu from Quick Menu. 
Press this button to navigate OSD menu.  
When in an adjustment screen, use both up and down 

buttons to adjust the amounts. 


Power button 

Long-press to turn on / off. 
Press to open Quick Menu. 
Press to open Input Source list from Quick Menu. 
Press to Confirm when in an OSD menu. 


LED Indicator 

Solid blue indicates power on. 
Flashing blue indicates standby mode. 
Solid red indicates Power Saving mode. 


         EXTERNAL CONTROLS


Содержание KAMN15TFULA

Страница 1: ...15 6 TOUCHSCREEN FULL HD IPS LED PORTABLE USB C MONITOR 1920 x 1080 KAMN15TFULA ...

Страница 2: ...s 4 Product overview 5 Base adjustment 6 Connection options 7 Guide to connections 10 External Controls 11 Operation 12 Power Saving Mode 15 Display Data Channel 15 Specifications 16 Troubleshooting 17 Cleaning maintenance 19 CONTENTS ...

Страница 3: ...ooms lacking adequate ventilation Do not position the monitor in unsafe locations If the monitor falls it may be damaged and may injure nearby people Unplug the monitor if it is not going to be used for an extended period Do not place heavy objects on the monitor its power cord or any connected cable Do not open the back panel of the monitor as it contains a high voltage current even when not plug...

Страница 4: ...4 15 6 Touchscreen LED Portable Monitor USB C Power Adapter Power Plug Mini HDMI Cable USB C Cable User Guide COMPONENTS ...

Страница 5: ...ortable Monitor F Mini HDMI port B Up button G Primary USB C port full function C Down button H Secondary USB C port charging only D Power button I 3 5mm headphone jack E LED indicator J Left and Right speakers PRODUCT OVERVIEW ...

Страница 6: ...6 The portable monitor comes equipped with an adjustable base featuring a full 180 range allowing it to be completely flat 180 upright 90 and any other configuration between 0 180 BASE ADJUSTMENT ...

Страница 7: ...HDMI to Mini HDMI cable between the computer and the portable monitor while also connecting the monitor directly to an external power adapter supplied via USB For this you can use either the primary or secondary USB C ports CONNECTION OPTIONS Note When connecting the monitor and laptop through full function USB C port one cable solution the brightness of the monitor will be automatically set low t...

Страница 8: ...ally set low You can adjust the brightness and volume of the monitor according to the output power of the mobile phone When connected to an external power supply through the secondary USB C port the display will provide power to the mobile phone through the external power supply The brightness of the monitor will automatically adjusted when connecting with external power Note If using a power bank...

Страница 9: ...er adapter supplied via USB For this you can use either the primary or secondary USB C ports Note When connecting a device using HDMI to ensure the smooth transmission of the signal be sure to connect the power cable first then connect the HDMI Notes The touchscreen can only be achieved through USB C port The HDMI port cannot support touchscreen The touchscreen function may vary across different d...

Страница 10: ...ng USB C port to adapter Adapter Laptop HDMI Mini HDMI No Charging USB C port to adapter Adapter Smartphone USB C Primary USB C Yes Charging USB C port to adapter Adapter USB C compatible gaming console USB C Primary USB C No Charging USB C port to adapter Adapter Other gaming consoles HDMI Mini HDMI No Charging USB C port to adapter Adapter GUIDE TO CONNECTIONS ...

Страница 11: ...tton Press to open Quick Menu Press to open OSD menu from Quick Menu Press this button to navigate OSD menu When in an adjustment screen use both up and down buttons to adjust the amounts 3 Power button Long press to turn on off Press to open Quick Menu Press to open Input Source list from Quick Menu Press to Confirm when in an OSD menu 4 LED Indicator Solid blue indicates power on Flashing blue i...

Страница 12: ...wn button volume decrease Quick Menu Brightness 1 Press any key to enter the quick menu 2 Using the Up button select Brightness from the menu 3 Use the Up and Down buttons to adjust the brightness between 0 100 4 Press Power button to confirm and exit the menu or wait 3 seconds without pressing any button Input source 1 Press any key to enter the quick menu 2 Using the power button open Input Sour...

Страница 13: ... to open the Navigation OSD You can use the OSD to adjust the picture quality OSD setting and general settings Press Up and Down buttons to navigate the OSD menus and Power button to confirm selection Scene Setting Select the appropriate preset scene for your usage and use power button to confirm Picture Setting The Picture setting menu includes many options to adjust the colour and picture qualit...

Страница 14: ...djust the volume manually or select Audio Mute to disable the audio OSD Setting Language Setting Set the OSD menu language OSD Exit Time Adjust the delay before turning the off the OSD menu OSD Transparency Select the transparency when using gaming mode The transparency can be 20 40 60 80 or Off Input source select USB C or Mini HDMI input source Reset Reset all settings to the factory defaults ...

Страница 15: ...nnected to a computer The recovery time from Power Saving mode back to standard Power On is around 3 seconds To make installation easier if your system supports the DDC protocol the monitor is able to plug play The DDC is a communication protocol through which the monitor automatically informs the host system about its capabilities for example supported resolutions and corresponding timing The mon...

Страница 16: ...7M Contrast Ratio 800 1 Native Aspect Ratio 16 9 Panel Manufacturer BOE Panel Type IPS Refresh Rate 60Hz Resolution 1920 x 1080 Size 15 6 Viewing Angle 178 H x 178 V Features Low Blue Light Yes Inputs HDMI 1 4 1 USB Type C 2 Outputs Headphone Jack Yes Power Power Consumption Typical 8W Standby Consumption 0 5W SPECIFICATIONS ...

Страница 17: ...urce is selected through the input source menu Check the power switch Long press 5 seconds to start the monitor Check if the power cord is properly connected to the monitor Red LED Check if the video signal cable is properly connected at the back of the monitor Check if the video cable connector pins are bent or broken Check if the computer system is switched on Missing pixels spots and light leak...

Страница 18: ...tor light is blue Check the signal source Make sure the computer or phone is not in sleep mode Check that the signal cable is properly inserted Reconnect the signal cable if necessary Restart your computer or phone The picture does not fill the entire screen Since the resolution of the same screen of the mobile phone can be re scaled aspect ratio the display can be displayed in full screen Compute...

Страница 19: ... possible use a dedicated screen cleaning tissue or solvent for electrostatic coating Do not use benzene thinner ammonia abrasives or compressed air If you find white powder when you unpack your monitor wipe it off with a cloth Be careful when operating the monitor as dark monitors are easier to scratch and leave visible scratches than light monitors CLEANING MAINTENANCE ...

Страница 20: ...ation We hope that this user guide has given you the assistance needed for a simple set up For the most up to date guide for your product as well as any additional assistance you may require head online to help kogan com ...

Отзывы: