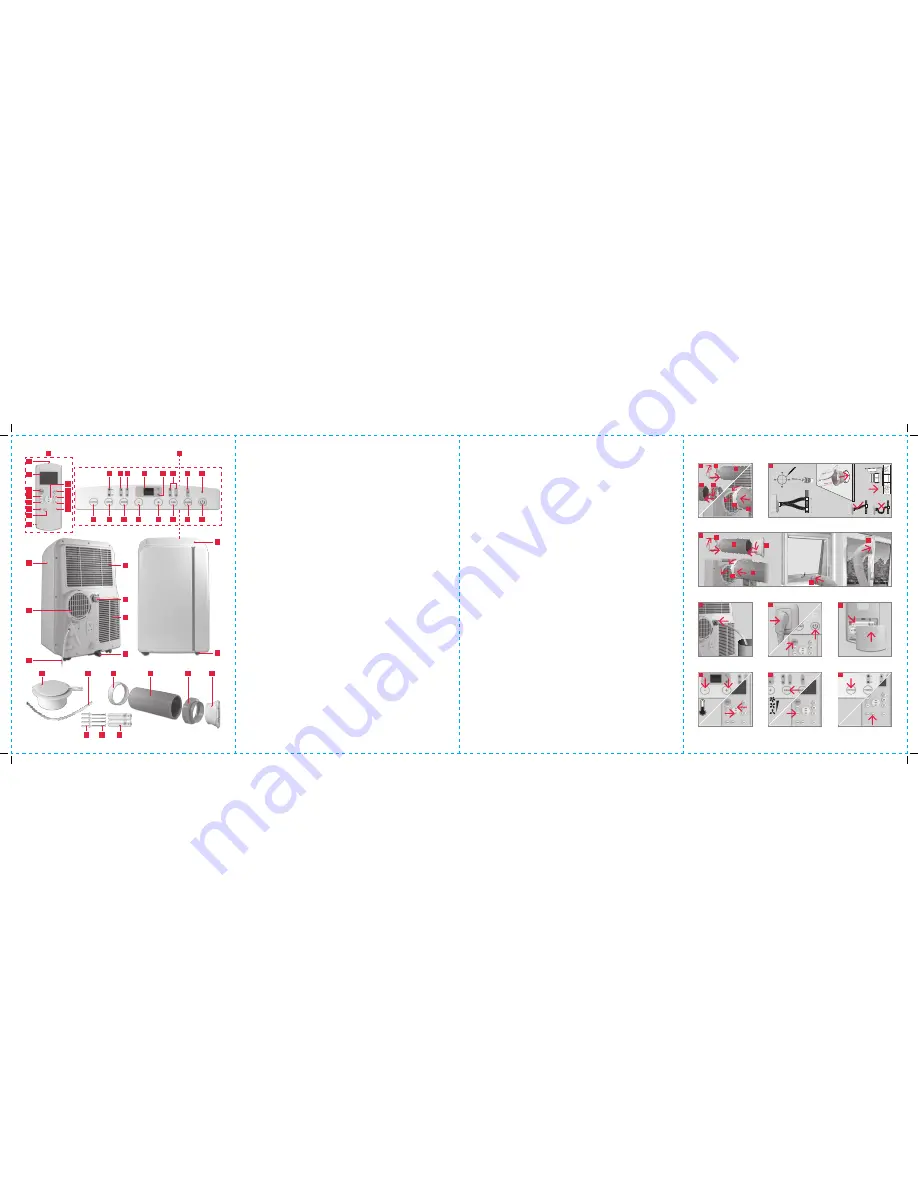
Koenic KAC 3231 Скачать руководство пользователя страница 2

16

15

14

13

12

11

10

8

2

1

A

I

3

12

13

9

10

11

4
5
6

B

J

K

E

G

H

F

D

C

8

7

5

4

7 6

1

2

3

9

N

L

M

O

P

Q

5

6

2 3

7

– 30°C
– 17°C

2 3

8

+

4

R

S

T

1

N

N

O

O

O

P

2

max 

120 cm

min 

30 cm

2 3

9

3

N

O

Q

Q

Q

N

O

IM_KAC3231_161201_V06_HR.indb   2

1/12/16   4:21 PM

Содержание KAC 3231

Страница 1: ...nic online com DE Gebrauchsanweisung EN User manual IM_KAC3231_161201_V06 Portable Air Conditioner KAC 3231 Deutsch 3 18 English 19 33 D O N O T P R I N T 16 23 23 10 1 2 11 AUTO auto COOL DRY 12 14 2...

Страница 2: ...8 2 1 A I 3 12 13 9 10 11 4 5 6 B J K E G H F D C 8 7 5 4 7 6 1 2 3 9 N L M O P Q 5 6 23 7 30 C 17 C 23 8 4 R S T 1 N N O O O P 2 max 120 cm min 30 cm 23 9 3 N O Q Q Q N O IM_KAC3231_161201_V06_HR in...

Страница 3: ...esultierenden Gefahren verstehen Kinder d rfen nicht mit dem Produkt spielen Reinigung und Benutzer Wartung d rfen nicht von Kindern ohne Beaufsichtigung durchgef hrt werden Wenn die Netzanschlussleit...

Страница 4: ...ie das Produkt nicht in explosiven Umgebungen entstehend aus einer entflammbaren Mischung aus Luft brennbaren D mpfen D nsten Nebeln oder Staub Verwenden Sie keine Aerosol Spr hdosen in der N he des P...

Страница 5: ...en Sie die Anschlussleitung fern von hei en Oberfl chen und stellen Sie sicher dass niemand dar ber stolpern kann F hren Sie keine Finger oder Gegenst nde in das Innere des Produktes ein und blockiere...

Страница 6: ...en bei Kontakt mit Augen oder Mund sofort unter flie endem Wasser ab und suchen Sie umgehend rztliche Hilfe auf Waschen Sie betroffenen Hautstellen mit reichlich Wasser und Seife Reinigen Sie die Kont...

Страница 7: ...it aus Zerlegen ffnen oder zerkleinern Sie Batterien nicht Schlie en Sie Batterien nicht kurz Bewahren Sie diese niemals so auf dass sie sich gegenseitig kurzschlie en oder durch metallische Objekte k...

Страница 8: ...gungen feststellbar sein kontaktieren Sie umgehend Ihre Verkaufsstelle Reinigen Sie das Produkt nach dem Auspacken siehe Abschnitt Reinigung und Pflege Lieferumfang 1 x Klimaanlage 1 x Fernbedienung 1...

Страница 9: ...er Luftfilter G Oberer Ablauf H Oberer Luftfilter I Bedienfeld 1 Betriebsindikator 2 Schlafmodusindikator 3 Ventilatorindikator 4 Beriebskontrollanzeige 5 Anzeige 6 Auto Cool Modus Indikator 7 Entfeuc...

Страница 10: ...auf eine Seite des Abluftschlauchs Verbinden Sie den Abluftschlauchadapter mit dem Luftauslass des Produktes Abb 2 Verwenden Sie den Wandauslassanschluss als Schablone um das Bohrmuster auf die Wand z...

Страница 11: ...ammierten Modi und der Temperatur Hinweise Abh ngig von dem eingestellten Betriebsmodus wird das Wasser nach au en geleitet oder in einem internen Tank gesammelt Entw ssern Sie das Produkt entsprechen...

Страница 12: ...pressor startet und stoppt um die eingestellte Tempera tur zu halten die L ftergeschwindig keit und die Temperatur k nnen eingestellt werden Dry Ent feuch tungs modus entfeuchtet den Raum mit dem L ft...

Страница 13: ...hang mit der gegenteiligen Zeiteinstellung Bet tigen Sie die Zeitschaltuhr Einstelltaste TIMER oder die spezifische TIME ON OFF Taste der Fernbedienung um jeweils einen Zeitpunkt f r Auto Ein oder Aut...

Страница 14: ...sser vollst ndig abgelaufen ist Stecken Sie den Netzstecker in eine geeignete Steckdose Das Produkt ist bereit zum Einschalten Hinweis Die Kontrollleuchten leuchten auf wenn die Zeitschaltuhr aktivier...

Страница 15: ...n Im Innern dieses Produktes befinden sich keine Teile die vom Benutzer repariert oder gewartet werden k nnen Wenden Sie sich an eine qualifizierte Fachkraft um das Produkt berpr fen und gegebenenfall...

Страница 16: ...ehlerhaft siehe unten Fernbedienung funktioniert nicht Batterien ersch pft Batterien auswechseln Produkt au erhalb der Reichweite oder Signale von Hindernis unterbrochen Fernbedienung ann hern und Hin...

Страница 17: ...tecker ziehen und wieder einstecken E2 Fehler des Verdampfer Temperatur Sensors Produkt in Standby schalten Netzstecker ziehen und wieder einstecken E4 Fehler der Bedienfeld Kommunikation Produkt in S...

Страница 18: ...rsonal hinzuziehen Energieverbrauch 1 0 kWh pro 60 Minuten basiert auf Standard Testergebnisse Der tats chliche Energieverbrauch h ngt davon ab wie das Ger t verwendet und wo es aufgestellt wird Schal...

Страница 19: ...er maintenance shall not be made by children without supervision If the supply cord is damaged it must be replaced by the manufacturer its service agent or similarly qualified persons in order to avoi...

Страница 20: ...ambient temperature for operation stated in the technical data Do not attempt to modify the product in any way Only use attachments and accessories recommended by the manufacturer Ensure the rated vo...

Страница 21: ...ing attachments cleaning work and when not in use WARNING RISK OF ELECTRIC SHOCK Protect the electrical parts against moisture Do not immerse such parts in water or other liquids to avoid electrical s...

Страница 22: ...ies recommended for this product refer to technical data Observe the polarity and when inserting batteries Pay attention to the markings on the product and the battery Remove batteries from the produc...

Страница 23: ...ery contents be incomplete or damaged contact your sales outlet immediately After unpacking please refer to chapter Cleaning and care Content 1 x Portable Air conditioner 1 x Remote Control 1 x Wall d...

Страница 24: ...Lower air filter G Upper drain outlet H Upper air filter I Control panel 1 Power indicator 2 Sleep mode indicator 3 Fan speed indicator 4 Power management indicator 5 Display 6 Auto Cool mode indicat...

Страница 25: ...spacing on the wall Drill the holes with a suitable power tool Free the holes from dust and mount the wall duct using supplied screws and plugs Connect the wall connector to the wall adaptor Window i...

Страница 26: ...re or timer TEMP Decrease value of temperature or timer MODE MODE Mode selection button FAN FAN Fan speed selection button SLEEP SLEEP Sleep mode on off SWING SWING Fan outlet oscillation on off LED D...

Страница 27: ...nd stops in order to maintain the set temperature fan speed and set temperature can be adjusted Dry Dehu midify ing mode dehumidifies the room with the fan fan speed and set temperature cannot be adju...

Страница 28: ...tched standby after 1 hour and on again after another 1 hours set the auto off time to 1 0 h and the auto on time to 2 5 h during operation To have the product switched on after 8 hours and standby af...

Страница 29: ...e when full Note The adjusting increments are 0 5 hours up to 10 hours then 1 hour up to 24 hours The respective indicator will be lit when a time is set Switching the product on or into standby manua...

Страница 30: ...might be harmful to the surfaces Fig 13 Remove the air filters Clean the air filters in warm water below 40 C and neutral detergent Fig 14 Let them dry thoroughly before re attaching Do not open the...

Страница 31: ...ulty see below remote control not working batteries exhausted replace batteries product out of range or signals disrupted by obstacle move the remote control closer and clear obstructions other electr...

Страница 32: ...stem Protection and error codes Code Cause Solution P1 internal water tank full drain through lower outlet E1 room temperature sensor error switch the product into standby unplug and re plug E2 evapor...

Страница 33: ...efrigerant circuit yourself or disassemble the product yourself and always ask a professional Energy consumption 1 0 kWh per 60 minutes based on standard test results Actual energy consumption will de...

Страница 34: ...CN3 CN1 CN2 REMOTE BOARD CN2 CN15 CN7 Y G OPTIONAL REMOTE BOARD REMOTE BOARD P7 M UP FAN Y G DOWN FAN M Y G OPTIONAL CN1 TRANSFORMER EL SU YELLOW POWER BOARD CN2 CN1 BLACK BLUE 4 VAVLE BLACK BLUE RED...

Отзывы: