background image

83

82

83

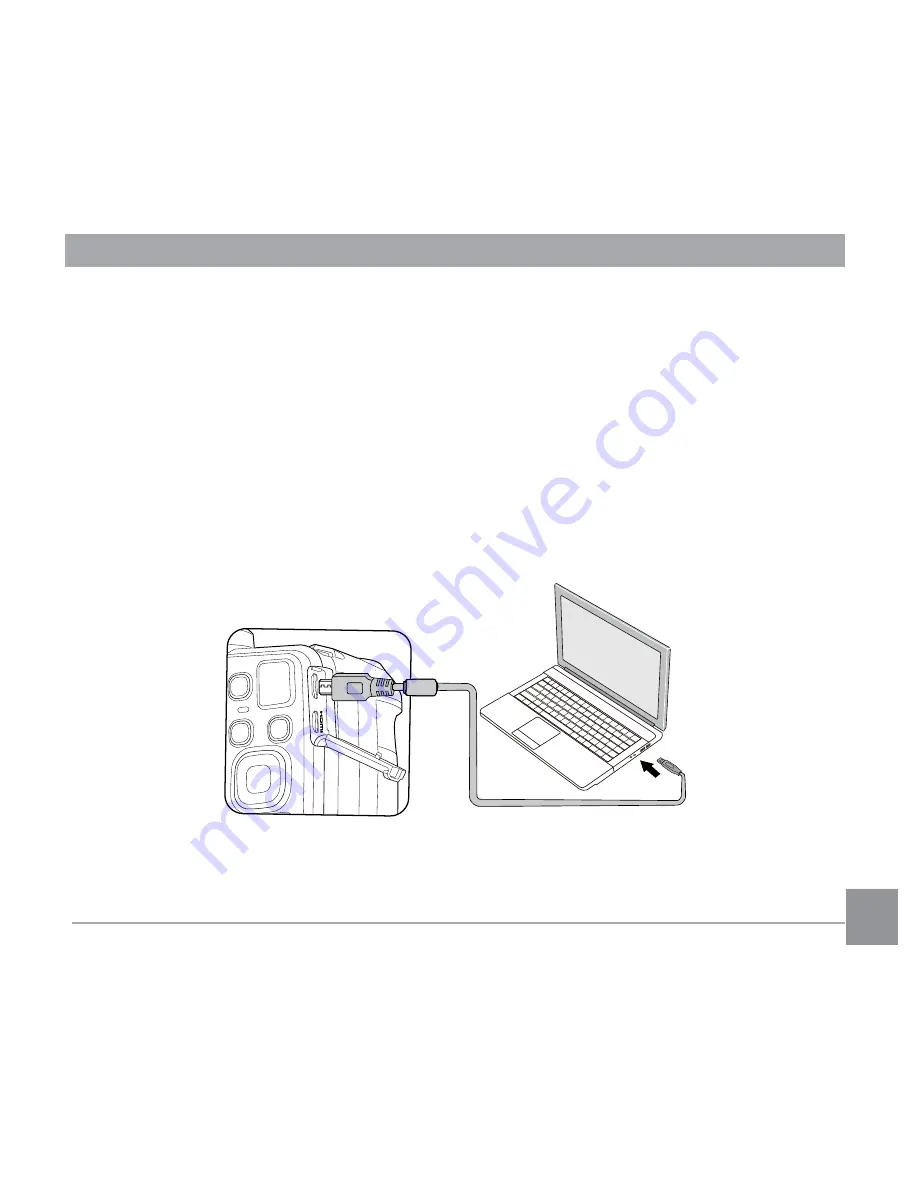
Transferring files to your computer

The computer will automatically detect the camera as a removable drive. Double-click the My 
Computer icon on the desktop to locate the removable drive and to copy folders and files in the 
drive to a directory on your PC as you would copy any typical folder or file.

Follow the steps below to connect the camera to a computer.
1.  Make sure the computer is turned on.
2.  Connect one end of the supplied micro USB cable to the USB/AV OUT port on your camera.
3.   Connect the other end of the micro USB cable to an available USB port on your computer.
4.   After the transmission is complete, disconnect the micro USB cable according to the instructions 

specifying how to safely remove USB devices.

Содержание PIXPRO AZ365

Страница 1: ...User Manual...

Страница 2: ...and 2 this device must accept any interference received including interference that may cause undesired operation For Customers in Europe CE mark indicates that this product complies with the Europea...

Страница 3: ...identification purposes only and are properties of their respective owners This manual provides you with instructions on how to use your new KODAK PIXPRO Digital Camera Every effort has been made to e...

Страница 4: ...period time Turn the camera off remove the battery and the memory card and dry it within 24 hours if water accidentally comes in contact with the camera When you take the camera from a cold place to...

Страница 5: ...oins to avoid short circuiting discharging excessive heat or possible leakage Do not attempt to disassemble the battery Do not expose the battery to water Always keep the battery contacts dry Do not h...

Страница 6: ...Store it in a dry environment Format the memory card using the camera before you use it or insert a new one We suggest buying only well known name brand memory cards to ensure peak performance Do not...

Страница 7: ...pose the LCD screen to water In a humid environment only wipe it with a soft and dry cleaning cloth If the LCD screen is damaged pay particular attention to the liquid crystal in the screen If any of...

Страница 8: ...Time after the first power on 17 Resetting your Language 18 Resetting Date Time 19 MODE OVERVIEW 20 Display Setting 20 LCD Screen Display 21 Overview of the screen icons in photo shooting mode 21 Over...

Страница 9: ...Exposure Compensation 44 ISO 45 Shutter Adjustment 45 Aperture Adjustment 46 Using Quick Recording 46 i Button Function Menu 47 PLAYBACK 48 Viewing Photos and Videos 48 Thumbnail View 49 Using Zoom Pl...

Страница 10: ...e Metering 62 Video Quality 63 OIS 63 Movie Setting Menu 64 Digital Zoom 65 Custom Settings 65 Playback Menu 66 Playback 67 HDR 67 Touch up 68 Rotate 69 Resize 70 i button playback function 71 Playbac...

Страница 11: ...mputer 83 Video System 84 Set Eye Fi Card Connection Mode 85 Supported HDMI Connections 86 Connecting HDMI Ready TV 86 Connecting to a PictBridge Compatible Printer 87 Setting the USB Mode 87 Connecti...

Страница 12: ...sed along with the following accessories If anything is missing or appears to be damaged please contact your retailer Accessories Included Micro USB cable Warranty card Neck strap AA Alkaline battery...

Страница 13: ...12 Install lens cap and neck strap...

Страница 14: ...tton Strap eyelet Exposure compensation button Continuous shot button Power switch AF assist beam Self timer lamp Mode dial Flash lamp 10 Flash button 1 Microphone 12 Speaker 13 Lens 1 2 3 11 12 13 4...

Страница 15: ...20 AF button Up button 2 Flash button Right button 22 button 23 Display button 24 Battery cover switch 25 Battery cover 26 Playback button 2 Tripod socket 28 Macro button Left button 29 SET button 30...

Страница 16: ...15 2 Insert the battery into the battery slot in the correct position as shown in the following diagram 1 Open the battery cover according to Installing Battery and Memory Card 1 2 3...

Страница 17: ...ry card SD SDHC is optional and not included in all camera packaging If you have to purchase a memory card select one with storage capacity between 4GB and 32GB to ensure correct data storage To remov...

Страница 18: ...rn the camera on for the first time the language selection screen appears 2 Press the arrow buttons to select your desired language 3 After you press the button to confirm the selection the Date Time...

Страница 19: ...button to select and press the button to enter the menu 3 Press the up down arrow button to select and press the button or right arrow button to enter the menu 4 Press the up down arrow button to sel...

Страница 20: ...ton to select and press the button or right arrow button to enter the menu 4 Press the up down arrow button to select Date Time and press the button or right arrow button to enter the menu 5 Press the...

Страница 21: ...Displays the camera parameters on screen 0 3 EV 400 ISO 1234 SD 16M 1 50 00 56 00 F3 0 F3 0 Full Camera parameters with Grid and Histogram 0 3 EV 400 ISO 1234 SD 1 50 16M 00 56 00 F3 0 F3 0 Off Does n...

Страница 22: ...00 ISO 00 56 00 SD 16M 1 50 23 25 F3 0 F3 0 x1 0 x1 0 1 Shooting Mode Icons Auto Mode Face Beautifier Program AE Panorama Mode Shutter priority Scene Mode Aperture priority Custom Settings Manual Mode...

Страница 23: ...Image stabilization 18 Focus Frame 19 Expo Metering AiAE Spot Center 20 AF Mode Single AF Multi AF Object Tracking 21 Self Timer Self timer Off Self timer 2 sec Self timer 10 sec Self timer Smile 22 F...

Страница 24: ...he Zoom Lever 5 Memory Card Built In Memory 6 Battery Status 7 Color Effect 8 Video Quality 9 Remaining Recording time 10 Exposure Compensation EV value 11 Image stabilization 12 Focus Frame 13 Eye Fi...

Страница 25: ...emory space indicating the current number of photos and total number of photos 10 Eye Fi ON with signal 4 Memory Card Built in Memory 11 Red Eye Reduction 5 Battery Status 12 HDR 6 Zoom Magnification...

Страница 26: ...etting allows you to choose a specific shutter speed so the camera will adjust the aperture automatically to ensure correct exposure Aperture priority Allows you to choose a specific aperture and the...

Страница 27: ...best possible results Follow these steps 1 Turn the power switch to turn on the camera 2 Turn the mode dial to 3 Compose your picture in the LCD screen and press the Shutter button halfway down to foc...

Страница 28: ...ress the left right arrow button to select an adjustment item 3 Press the up down button to adjust the parameters 4 Press the button to confirm the settings and enter the shooting screen When Program...

Страница 29: ...Aperture Priority When selecting Aperture Priority mode you can adjust the aperture size EV value and ISO value Selecting a large aperture opening will emphasize the point of focus and show a blurry b...

Страница 30: ...utton and press the up down button to select 3 Press the left right arrow button to select Face Beautifier effects and press the button to confirm and return to photo shooting mode 1234 0 3 EV 400 ISO...

Страница 31: ...e Shutter button to capture the image Save Cancel 4 When you finish shooting the first photo two target icons will display on the LCD screen at left and right sides Move the camera to the right until...

Страница 32: ...ct in the panoramic mode please keep moving horizontally and reduce the shake in the process of camera movement In Panorama mode up to 4 photos can be captured when the image size is set at 2MP You ca...

Страница 33: ...y Landscape For landscapes and outdoor shots Vivid reproduction of green and blue Portrait Most suitable for capturing people with focus on their face Snow For snow scenes Reproduce natural clear whit...

Страница 34: ...owing scenes Icon Mode Name Landscape Mode Portrait Mode Night Portrait Backlit Portrait Night Landscape Mode Macro Mode Auto Mode To use ASCN 1 Turn the mode dial to SCN and select ASCN mode 2 Hold t...

Страница 35: ...or people and night scenes Backlit Portrait When the sun or any other light source is behind you will automatically adjust the foreground exposure to produce the best pictures possible Night Landscape...

Страница 36: ...s to select a scene and press the button to enter the shooting screen 3 As shown in the above figure press the button and choose whether to continue the mode setting Or Go to setting CS mode Rotating...

Страница 37: ...t the parameters in in restart or all modes Please enter the Custom Settings menu and select Yes after setup Otherwise the parameter settings are not retained in the case of switching on off or mode s...

Страница 38: ...the camera to zoom in or out of the subject while taking pictures Using the Zoom Function BASIC OPERATION 0 3 EV 400 ISO 1234 00 56 00 SD Zoom Indicator When the Optical Zoom reaches the threshold as...

Страница 39: ...des Single AF The focus frame appears on the center of the LCD screen to focus on the subject Multi AF The camera automatically focuses the subject in a wide area to find the focus point Object Tracki...

Страница 40: ...s the left arrow button to enter the Marco Menu 2 Press the left right to select the following 2 modes Macro Off Select this option to disable Macro Macro On Select this option to make focusing on the...

Страница 41: ...ds after the Shutter Button is pressed Self timer 10 sec A single picture is shot 10 seconds after the Shutter Button is pressed Self timer Smile Press the Shutter Button and a picture will be taken i...

Страница 42: ...following 6 modes Force Off Flash is turned off Flash Auto Camera flash goes off automatically based on existing light conditions Force Flash The flash will engage with each shot even if there is enou...

Страница 43: ...Menu AWB AWB 2 Press the left right to select the following 8 modes AWB Daylight Cloudy Fluorescent Fluorescent CWF Incandescent Manual WB Fully press the shutter button to detect the white balance va...

Страница 44: ...elect the following 4 modes Single Continuous Shot 3 Shots Time Lapse Take pictures based on the preset interval 30sec 1min 5min 10min 3 Press the button to confirm the settings and exit the menu 4 Pr...

Страница 45: ...button to select the setting options F3 0 F3 0 1 50 100 ISO 1 50 100 ISO 2 0 EV 2 0 EV 3 Press the up down button to adjust the option values 4 Press button to complete the setting and enter shooting...

Страница 46: ...50 0 7 EV 400 ISO 0 7 EV 400 ISO The camera s ISO settings include automatic 80 100 200 400 800 1600 and 3200 Shutter Adjustment For shutter speed the camera may automatically set the aperture value...

Страница 47: ...opening will keep both the background and main object in clear focus Adjustable in Mode F3 0 F3 0 100 ISO 1 0 EV 1 0 EV 100 ISO 1 50 1 50 Using Quick Recording In shooting mode press the Recording sho...

Страница 48: ...n to select the Image Color Setting Menu 2 Press the left right arrow button to select the Image Color Setting options Normal There are 7 Image Color options in photo shooting mode Normal Vivid Sepia...

Страница 49: ...al memory or on the memory card 3 To play a selected video clip press the button to enter the Movie Playback Mode An operation guide appears on the screen when playing back a video Press the appropria...

Страница 50: ...n the screen the picture is displayed in horizontal position W Zoom Out T Zoom In 1 Slide the Zoom Lever to switch between 3x3 and 4x4 thumbnails 2 Press the arrow buttons to select a picture or video...

Страница 51: ...peration 5 Press the arrow buttons to navigate and select a part of the image to be zoomed in 6 Press the button to return the image to its original scale Movie images cannot be magnified When playing...

Страница 52: ...ode 2 Press the left right arrow button to select the photos and videos to be deleted 3 Press the down arrow button and the deletion screen is displayed 4 Press the up down arrow button to select Dele...

Страница 53: ...k screen 2 Press button to enter the slide option except for video file 3 Press the left right button to select slideshow playing or Cancel to return to the playback screen Slideshow 4 Press the butto...

Страница 54: ...s about each setting Expo Metering Exposure Metering Use this setting to select the target size of the camera s field of view to be metered There are 3 options AiAE Artificial Intelligence AE targets...

Страница 55: ...mber of recorded pixels is the better the image quality becomes As the number of recorded pixels lessen you will be able to record more images on a memory card OIS This mode can help reduce photo blur...

Страница 56: ...ing to control wide dynamic image range when taking static pictures Photos with extreme contrast of bright and dark areas will still maintain distinguishable detail and depth Use of tripod is recommen...

Страница 57: ...tifier mode Face Beautifier Mode has 3 effects Effect 1 Skin Soften Effect 2 Skin Soften Eye Brightening Effect 3 Skin Soften Eye Brightening Eye Enlargement Scene Select the scene mode under the SCN...

Страница 58: ...57 Shooting menu in the shooting mode Optional Not optional Options Shooting Modes 16M...

Страница 59: ...wn arrow button to select the item to be set and press the button or right arrow button to enter the menu Photo Shooting Setting Menu 5 Press the up down arrow buttons to select an option and press th...

Страница 60: ...Assist Beam In a darker environment AF Assist Beam can be turned on for better focus Digital Zoom Turn on or off the digital zoom Date Imprint Include a Date Time stamp on the photo image Off Date Da...

Страница 61: ...photo is displayed on the LCD screen based on the selected time There are 4 options Off 1 sec 2 sec 3 sec Custom Settings Custom Settings stores the current photo shooting mode and its parameters The...

Страница 62: ...61 Face Detection For detecting and focusing on faces to make all faces as clear as possible in photo mode There are 2 options Off On...

Страница 63: ...set and press the button to confirm Expo Metering Exposure Metering Use this setting to select the target size of the camera s field of view to be metered Expo Metering AiAE There are 3 options AiAE A...

Страница 64: ...Recording time 4GB About 1 1280x720 30 Class 6 58 minutes 2 1280x720 15 Class 4 61 minutes 3 640x480 30 Class 4 69 minutes The longest recording time is 29 minutes at one time When recording in higher...

Страница 65: ...elect and press the button to enter the menu Press SET To Enter Menu 3 Press up down arrow button to select and press the button or right arrow button to enter the menu 4 Select the items to be set an...

Страница 66: ...stom Settings Custom Settings stores the current movie shooting mode and its parameters The stored mode and parameters are directly invoked in Custom Settings mode Digital Zoom Turn on or off the digi...

Страница 67: ...the up down arrow button to select the playback to be set and press button to enter 3 Press the left right arrow buttons to select an option and press the button to confirm Normal Mode Press SET To Co...

Страница 68: ...he setting The Date Folder is displayed in date order based on camera s Date Time Settings HDR With the HDR function pictures that are overexposed may be corrected to optimize the highlights and lowli...

Страница 69: ...In Playback Mode press the left right arrow button to select the photos to be edited 2 Press the button select the settings and press the button to display the settings screen 3 Press the left right...

Страница 70: ...combined Rotate You can use this setting to change the orientation of the picture 1 In Playback Mode press the left right arrow button to select the photos to be edited 2 Press the button select the s...

Страница 71: ...ton select the settings and press the button to display the settings screen 3 Press the left right arrow button to select 1024 or 640 or select Cancel to return to the playback Screen Resize to 1024x7...

Страница 72: ...t right arrow button to select the photos to be edited 2 Press the button to select the Image Color Setting Menu 3 Press the left right button to select the corresponding menu or Cancel to return to t...

Страница 73: ...tton to select and press the button or right arrow button to enter the menu 4 Press the up down arrow button to select the item to be set and press the button or right arrow button to enter the menu 5...

Страница 74: ...he up down arrow buttons to select an option and press the button to confirm Protect To prevent any pictures or videos from being accidentally erased use this setting to lock one or all of the files T...

Страница 75: ...gs screen There are 3 sub menus available One Delete one photo or video Date Folder Delete all photos in the Date Folder All Delete all photos or videos 3 Press the up down arrow buttons to select an...

Страница 76: ...prompt appears Select to change and save the picture Select to cancel changes and return to the trim prompt screen The image cannot be clipped trimmed again once it has been clipped to 640X480 DPOF D...

Страница 77: ...t the item to be set and press the button or right arrow button to enter the menu 5 Press the arrow buttons to select an option and press the button to confirm Refer to the following pages for more de...

Страница 78: ...confirm Power Saver LCD power off time Turn off time Auto 3 min 5 min Normal 1 min 3 min Best 30 s 1 min Language Refer to the Reset your language section on page 18 World Time The Zone setting is a...

Страница 79: ...to enter the menu 2 Press the up down arrow button to select an option LCD Brightness Normal 2 2 1 1 Normal 3 Press the button to confirm Battery Type Please choose the right type of battery before u...

Страница 80: ...own arrow button to select and press the button or right arrow button to enter the menu 3 Press the up down arrow button to select Format and press the button or right arrow button to enter the menu 4...

Страница 81: ...nd press the button to confirm If there is no card available in the camera this function will not be displayed File Numbering After you take a picture or video clip the camera will save it with a sequ...

Страница 82: ...to enter the menu 4 When there is a new firmware version in the memory card select Yes to update Reset Use this setting to restore the camera to its original default settings 1 Press the button press...

Страница 83: ...you to ensure that the camera is correctly configured to connect with a PC 1 Press the button press the up down arrow button to select and press the button to enter the menu 2 Press up down arrow but...

Страница 84: ...as you would copy any typical folder or file Follow the steps below to connect the camera to a computer 1 Make sure the computer is turned on 2 Connect one end of the supplied micro USB cable to the U...

Страница 85: ...r the menu 2 Press up down arrow button to select and press the button or right arrow button to enter the menu 3 Press the up down arrow button to select TV System and press the button or right arrow...

Страница 86: ...u 2 Press up down arrow button to select and press the button or right arrow button to enter the menu 3 Press the up down arrow button to select Eye Fi and press the button or right arrow button to en...

Страница 87: ...able with high resolution output terminal which should be purchased separately to connect the camera to the television which meets HDMI standard 2 The camera will be automatically detected by the TV 3...

Страница 88: ...USB Mode The camera s USB port can be set to connect with either a PC or a Printer the following steps will ensure that the camera is correctly configured to connect with a Printer 1 Press the button...

Страница 89: ...the USB port on the printer If the camera is not connected to a PictBridge compatible printer the following error message will appear on the LCD screen The error message above will also appear if the...

Страница 90: ...er to the following sections for more detailed information on each setting Print with Date If you have set the date and time on your camera the date and time will be recorded and saved with each photo...

Страница 91: ...cel to cancel printing Print without Date Use this setting to print the photos without dates on them 1 In the PictBridge menu select Print without Date and the screen as shown below appears 2 Press th...

Страница 92: ...Cancel to cancel printing Print Index You can print all photos in the camera via this function 1 In the PictBridge menu select Print Index and the screen as shown below appears 2 Select Yes and press...

Страница 93: ...page 75 1 In the PictBridge menu select Print DPOF Images and the screen as shown below appears 2 Select Yes and press the button to confirm select Cancel to cancel printing Exit Select Exit to exit t...

Страница 94: ...ivalent 24mm Wide 864mm Tele F number F3 0 Wide F6 6 Tele Lens Construction 11 groups 15 elements Optical Zoom 36x Focusing Range Normal Wide 50cm Tele 200cm Macro 1 6cm Wide Only Anti Handshake Optic...

Страница 95: ...File Format Still Image Exif 2 3 JPEG Movie MOV Image H 264 Audio Linear PCM Monaural Shooting Modes Auto Mode Program AE Shutter priority Aperture priority Manual Mode Face Beautifier Panorama Mode...

Страница 96: ...AE AiAE Center Weighted Average Spot Fixed to Center of Frame Face AE Exposure Control Method Program AE AE Lock Available Shutter Prior AE Aperture Prior AE Exposure Compensation 2EV in 1 3 Step Inc...

Страница 97: ...ified and Traditional Japanese Korean French Spanish Portuguese Thai Indonesia Vietnamese Italian German Dutch Russian Polish Swedish Danish Finnish Norwegian Greek Turkish Hungarian Croatian Czech Ar...

Страница 98: ...lens from functioning properly Turn off the camera and restart it to reset the lens Built in memory error An error occurs in internal memory Format the internal memory Improper alignment Please try a...

Страница 99: ...y connection Write Protect The memory card is locked Unlock the write protect switch of the memory card Card Full Indicates that the memory card is full Insert a new SD memory card or delete unwanted...

Страница 100: ...continue Use an SD memory card with Class 4 or higher No Red Eye Detected Red eyes have not been detected in the image The message will disappear after 2 seconds This image cannot be edited The file f...

Страница 101: ...of the file to be viewed is not supported or the file is corrupted so it cannot be properly read You may be able to play it back on another brand of camera or on your computer No Picture When you pre...

Страница 102: ...high magnification above 15X optical zoom Images and video files cannot be saved The memory card is full The memory card is locked Use another memory card or delete unnecessary files Unlock the memor...

Страница 103: ...nce Cannot write to the memory card The memory card has been locked Release the write lock of the memory card or replace with another card Too many movies to process The number of pictures or folders...

Страница 104: ...used under license from Kodak 2014 by JK Imaging Ltd All rights reserved JK Imaging Ltd 1411 W 190th Street Suite 550 Gardena CA 90248 USA JK Imaging Europe 71 Clarendon road Watford WD17 1DS UK www...

Отзывы: