background image

Doing more with your camera

www.kodak.com/go/support

 28

Taking panoramic pictures

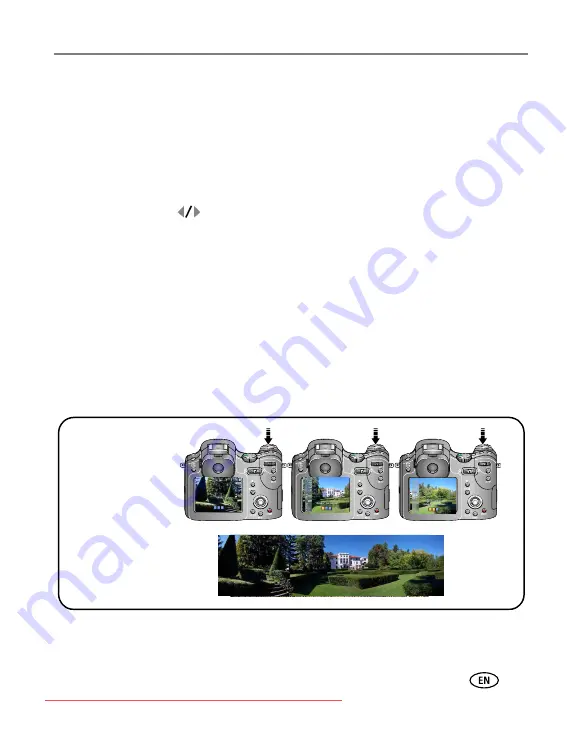
Use panorama to “stitch” up to 3 pictures into a panoramic scene.

NOTE:  For best results, use a tripod. Individual pictures are saved only when panorama capture is cancelled 

before stitching occurs. (Picture size is set to 3.1 MP for each picture. Exposure and white balance 
are set with the first picture. The flash is set to Off.)

1

Turn the Mode dial to SCN.

2

Move the Joystick 

 to highlight Panorama Left-Right or Panorama Right-Left 

(depending on the direction you want to pan), then press the OK button.

3

Take the first picture.

After a quickview, the EVF/LCD displays the liveview and an “overlay” from the first 
picture.

4

Compose the second picture. Make the overlay from the first picture cover the 
same portion in the new picture. (You may press the Delete button to delete each 
panorama picture you took.)

5

If you are taking only 2 pictures, press the OK button to stitch them together. 

After you take 3 pictures, the pictures are automatically stitched together.

NOTE:  For printing options, visit the 

Kodak EasyShare

 Gallery at 

www.kodakgallery.com

.

1

2

3

Take 2 or 3
pictures.

Get 1
panoramic picture.

Downloaded from ManualsCamera.com Manuals

Содержание P712 - Easyshare 7.1MP Digital Camera

Страница 1: ...asyShare P712 zoom digital camera User s guide www kodak com For interactive tutorials www kodak com go howto For help with your camera www kodak com go p712support Downloaded from ManualsCamera com M...

Страница 2: ...All screen images are simulated Kodak and EasyShare are trademarks of Eastman Kodak Company Schneider Kreuznach and Xenar are trademarks of Jos Schneider Optische Werke GmbH used under license by East...

Страница 3: ...13 Flash button 4 LED indicator 14 Focus button 5 Shutter button 15 Strap post 6 Mode Power switch 16 Speaker 7 Exposure metering button 17 Microphone 8 Program button 18 USB A V Out 9 Drive button 1...

Страница 4: ...atus button 4 LCD screen 13 Review button 5 EVF LCD toggle button 14 Joystick OK button press in 6 Diopter dial 15 Slot for optional SD or MMC card 7 EVF Electronic Viewfinder 16 Share button 8 Zoom l...

Страница 5: ...s 5 Taking a picture 5 Using optical zoom 10 Using the flip up flash 11 Using an external flash unit 11 Reviewing pictures and videos 12 Protecting pictures and videos from deletion 16 3 Transferring...

Страница 6: ...command dial for rapid setting changes 40 Using the histogram 41 Using highlight shadow clipping 41 Changing picture taking settings 42 Editing functions for Still and Video 53 RAW file development 55...

Страница 7: ...x 77 Camera specifications 77 Storage capacities 81 Power saving features 84 Accessories 85 Important safety instructions 86 Battery information 88 Upgrading your software and firmware 89 Additional c...

Страница 8: ...1 www kodak com go support 1 Setting up your camera Attaching the lens cap and strap Downloaded from ManualsCamera com Manuals...

Страница 9: ...Purchase these and other accessories at a dealer of Kodak products or visit www kodak com go p712accessories Loading the battery CAUTION We recommend that you use a Kodak Li Ion rechargeable digital c...

Страница 10: ...Take pictures and videos Favorites View your Favorites see page 66 Setting the language and date time first time Move 1 Language Date Time a Language then press OK 2 Press OK to accept for previous ne...

Страница 11: ...first time format it in this camera before taking pictures see page 49 CAUTION A card can only be inserted one way forcing it may cause damage See page 81 for storage capacities Purchase SD or MMC ca...

Страница 12: ...ress the Shutter button halfway to set the AE AF 2 Auto or green successful red failed failed focus failed exposure AE AF indicator EVF LCD Use the Diopter to adjust the sharpness of the Viewfinder 1...

Страница 13: ...approximately 5 seconds While the picture or video is displayed you can To view pictures and videos anytime see page 12 Press OK to play pause video Move the Joystick If you press no buttons the pict...

Страница 14: ...ress the Shutter button halfway When the framing marks turn green focus is accomplished 2 If the camera is not focusing on the desired subject or if the framing marks disappear release the Shutter but...

Страница 15: ...uto and SCN Status icons Highlight Shadow clipping No icons Status icons No icons PASM and C modes Status icons Status icons histogram and camera settings Highlight Shadow clipping No icons Status ico...

Страница 16: ...ISO Battery indicator flashing exhausted Camera mode Exposure compensation Shutter speed Aperture Album name Date stamp Flash compensation File type AF mode Focus mode Drive mode Flash mode Picture s...

Страница 17: ...release the Shutter button Using digital zoom Use digital zoom in any Still mode to get an additional 5X magnification beyond optical zoom Combined zoom settings are from 12X to 60X NOTE To enable Ad...

Страница 18: ...You can use the camera s built in flash as well to provide extra fill flash 1 Slide off the Hot shoe cover 2 Mount the flash unit to the Hot shoe 3 Turn on the external flash unit The external flash u...

Страница 19: ...Kodak EasyShare camera or printer dock or Kodak 5 volt AC adapter See www kodak com go p712accessories 1 2 View previous next Press Review Press again to exit Press OK to view single pictures 3 View...

Страница 20: ...highlight a picture To remove a picture from the set press Set again To deselect the entire set press review or turn off the camera 10 of 20 selected pictures 2 to scroll Press Set to select a pictur...

Страница 21: ...ideos www kodak com go support 14 Magnifying a picture during review Use the Zoom lever to magnify your pictures W T Return to 1X OK Magnify 1X 10X View other parts of the picture Downloaded from Manu...

Страница 22: ...t tag number of prints Protect Picture number Image storage location Review mode Album name Battery indicator Scroll arrows Email tag Date stamp Selected Total number Video number Review mode Favorite...

Страница 23: ...age location The picture or video is protected and cannot be deleted The Protect icon appears with the protected picture or video CAUTION Formatting internal memory or an SD or MMC card deletes all in...

Страница 24: ...ed pictures and videos from your current storage location You can scroll to verify selected pictures ALL deletes all pictures and videos from your current storage location NOTE To delete protected pic...

Страница 25: ...desktop then click the Install icon 4 Follow the on screen instructions to install the software Windows OS select Complete to automatically install the most commonly used applications Select Custom t...

Страница 26: ...a 2 Plug the labeled end of the USB cable into the labeled USB port on your computer See your computer user s guide for details 3 Plug the other end of the USB cable into the labeled USB port on the c...

Страница 27: ...card into a printer with an SD or MMC card slot See your printer user s guide for details Make prints at an SD or MMC card capable Kodak picture maker picture kiosk Contact a location prior to visiti...

Страница 28: ...cable for your camera connect the camera to the printer See your printer user s guide for details Printing pictures NOTE Raw and TIFF files are not directly printable see page 55 1 Turn the Mode swit...

Страница 29: ...k com go dockcompatibility Purchase camera docks printer docks and other accessories at a dealer of Kodak products or www kodak com go p712accessories Current Picture Press to choose a picture Choose...

Страница 30: ...Use this mode For Mode Switch Capture and Favorites Capture Taking pictures and videos Favorites Viewing your favorites see page 66 Choose the mode that best suits your subjects and surroundings Use...

Страница 31: ...sure compensation flash compensation and ISO speed Aperture priority mode is primarily used to control depth of field the range of sharpness NOTE The aperture setting may be affected when using optica...

Страница 32: ...dial and Set button to select and adjust settings see page 38 Press the Menu button to change other settings Custom Saving settings in PASM mode C1 is a user created mode that lets you save settings i...

Страница 33: ...elf Assures proper focus and minimizes red eye Sport Subjects that are in motion Shutter speed is fast Landscape Distant subjects Flash does not fire unless you turn it on Auto focus framing marks pag...

Страница 34: ...ts in bright light Text Documents Manner Museum Quiet occasions like a wedding or lecture Flash and sound are disabled Party People indoors Minimizes red eye Snow Bright snow scenes Beach Bright beach...

Страница 35: ...eft depending on the direction you want to pan then press the OK button 3 Take the first picture After a quickview the EVF LCD displays the liveview and an overlay from the first picture 4 Compose the...

Страница 36: ...pending on the zoom position The close up distances are Wide angle 3 9 35 4 in 10 90 cm Telephoto 35 4 in 6 6 ft 90 cm 2 0 m Landscape Distant subjects Auto focus framing marks are unavailable Flash i...

Страница 37: ...ace camera on a tripod or flat surface Shutter Delay 2 sec A 2 second delay allows for a steady auto shutter release on a tripod Self timer 2 shot Capture 2 pictures one picture taken after 10 seconds...

Страница 38: ...pressed When the Shutter button is released only the last 5 pictures are saved 4 pictures in RAW Capture an event when the precise timing is uncertain e g a child blowing out birthday candles Exposure...

Страница 39: ...ompression see page 44 Quality mode Resolution Compression Quantity 7 1 MP 3072 x 2304 RAW 4 TIFF 0 Fine 8 Standard 14 Basic 22 6 3 MP 3 2 3072 x 2048 TIFF 0 Fine 9 Standard 16 Basic 24 5 0 MP 2592 x...

Страница 40: ...es Low contrast scenes subject is wearing clothing that is the same color as the background Patterned subject or scene building windows subjects with horizontal stripes animal in a cage person in a fo...

Страница 41: ...ou can program this button in Capture and Review The button is a shortcut to your favorite settings For example if you frequently adjust the White balance settings you can program this button to bring...

Страница 42: ...after program setup allows for direct access to these review functions without navigating the menu Shortcut menu selections Flash button AF control Focus button AF focus zone Picture size Sharpness Fi...

Страница 43: ...backlit when the light is behind the subject In low light hold the camera steady or use a tripod Redeye Once so the subject s eyes become accustomed to the flash then fires again when the picture is t...

Страница 44: ...the main subject sharp good for landscapes and well lit conditions Smaller f numbers are good for portraits and low light conditions The highest and lowest aperture numbers may be affected by optical...

Страница 45: ...pen a setting Turn the Command dial to adjust the setting then press Set to close 3 Press the Menu button to change other settings see page 42 4 Take a picture Using exposure compensation with exposur...

Страница 46: ...emphasis on the center of the screen Center Spot similar to Center weighted except the metering is concentrated on a smaller area of the subject centered in the viewfinder Ideal when you need an exac...

Страница 47: ...nd dial for rapid setting changes Use the Command dial in combination with other buttons for rapid setting changes You can also use the Command dial to adjust manual settings in PASM modes see page 38...

Страница 48: ...you can view the clipped areas of the picture to see detail in highlights and shadows that correspond to underexposure and overexposure It s normal to have some highlight and shadow clippings because...

Страница 49: ...ick to highlight a menu tab Capture for general picture taking settings of stills Video for video camera settings Setup for customizing your camera settings Capture for advanced picture taking setting...

Страница 50: ...up to 20 x 30 in 51 x 76 cm pictures are highest resolution and largest file size 6 3 MP 3 2 ideal for printing 4 x 6 in 10 x 15 cm prints without cropping Also for printing up to 20 x 30 in 51 x 76...

Страница 51: ...hics applications NOTE For file type RAW and TIFF are unavailable in Auto and SCN modes If you set the file type to RAW or TIFF in PASM then change to Auto or SCN the file type defaults to Standard Co...

Страница 52: ...w QVGA Video Length Choose a video duration This setting remains until you turn off the camera Continuous default as long as there is room on the card or internal memory or until you press the Shutter...

Страница 53: ...a If not the camera uses internal memory Internal Memory the camera always uses internal memory even if a card is installed Set Album Still Video Choose Album names This setting remains until you chan...

Страница 54: ...uickview Change Quickview default to on or off For more information see page 6 On default Off Advanced Digital Zoom Choose how digital zoom is deployed Continuous no pause between optical and digital...

Страница 55: ...common format PAL used in Europe and China External Flash Choose an external flash setting External flash only Camera and Ext flash default EVF LCD Stand By Select when you would like the EVF LCD scre...

Страница 56: ...card Cancel exits without making a change Internal Memory deletes everything in internal memory including email addresses album names and favorites formats the internal memory Calibrate Imager Checks...

Страница 57: ...eep hues seen in sunsets Tungsten corrects the orange cast of household light bulbs Ideal for indoor pictures under tungsten or halogen lighting without flash Fluorescent corrects the green cast of fl...

Страница 58: ...ng is kept across PASM and independently in C1 C2 and C3 until you change it Multi Zone default evaluates 25 zones 5x5 to give an even picture focus Ideal for general picture taking Center Zone evalua...

Страница 59: ...a person against a brightly lit night background Lets you capture the background correctly and reduce the red eye Rear Sync synchronizes at the end of the shutter The flash fires just before the shut...

Страница 60: ...ptions Make Picture make a still picture from a single frame of a video There may be limitations to the size you can print because of the small picture size much smaller than minimum picture size Acti...

Страница 61: ...the internal memory or on a card Follow steps 1 4 of Editing functions previous page 1 2 to highlight Crop then press OK to select the desired 3 cropping format then press OK Press the Zoom lever to a...

Страница 62: ...pture menu on page 42 NOTE Pictures taken at the 6 3 MP 3 2 quality setting are displayed at a 3 2 aspect ratio with a black bar at the top and bottom of the screen See Picture Size page 43 Options fo...

Страница 63: ...Menu button to access review functions View Slide Show Album Copy Protect Raw File Develop only RAW Edit Video Date Display only Video Redeye Reduction only JPEG Multi up 1 2 Press Review Press again...

Страница 64: ...then press the OK button 3 Choose an option then press OK 4 Follow the screen prompts A multi up picture is created The original video is saved 5 Press the Menu button to exit the menu Option Video fr...

Страница 65: ...n 3 Move to highlight an option PICTURE or VIDEO copies the current picture or video EXIT returns to the Review menu SELECTED copies previously selected pictures and videos from your selected storage...

Страница 66: ...ight Slide Show then press the OK button 3 Move to highlight your option then press the OK button Each picture and video is displayed once To interrupt the Slide Show press the OK button Changing the...

Страница 67: ...inted NOTE Ensure that the Video Out setting NTSC or PAL is correct see page 48 The slide show stops if you connect or disconnect the cable while the slide show is running 1 Connect an audio video cab...

Страница 68: ...yed on the screen A plus after the album name means more than one album is selected 7 Press the Menu button to exit the menu Third transfer to your computer When you transfer the tagged pictures or vi...

Страница 69: ...the picture you want is displayed press the OK button To add the pictures to more than one album repeat steps 4 and 5 for each album The album name appears with the picture A plus after the album nam...

Страница 70: ...IFF files are not printable 1 Press the Share button Move the Joystick to locate a picture 2 Move to highlight Print then press the OK button 3 Move to highlight Picture Video Selected or All then pre...

Страница 71: ...n your computer Use Kodak EasyShare software to create an email address book on your computer Then copy up to 32 email addresses to the camera s internal memory For details click the Help button in th...

Страница 72: ...you send them to the addresses you specified For details click the Help button in the Kodak EasyShare software Tagging pictures as favorites You can preserve your favorite pictures in the Favorites s...

Страница 73: ...con appears in the status area To remove the tag repeat Step 2 Press Share again to exit 3 Transfer pictures to your computer 1 To enjoy full functionality install and use the EasyShare software that...

Страница 74: ...tton All pictures stored in the Favorites section of internal memory are removed Favorites are restored the next time you transfer pictures to the computer 4 Press the Menu button to exit the menu Pre...

Страница 75: ...re button 3 Highlight Print or Email then press the OK button 4 Move to highlight Picture Video Selected or All then press the OK button 5 Move to highlight an album folder then press the OK button NO...

Страница 76: ...on or does not retract Confirm that the battery in camera is charged Turn camera on and off again Lens doesn t extend in Favorites If problem still exists get help see page 75 EVF LCD screen is black...

Страница 77: ...full Transfer pictures to the computer page 19 delete pictures from the camera page 17 or card change image storage location or insert a new card Error message appears on EVF LCD screen Follow action...

Страница 78: ...port page 19 If using an EasyShare dock check all cable connections Make sure the camera is seated on the dock Make sure the EasyShare software is installed page 18 Pictures do not transfer to compute...

Страница 79: ...s the Shutter button completely down to take the picture Use P mode to adjust the Exposure and Flash Compensations page 37 Use P mode page 37 and Selectable Zone see AF Zone on page 51 Picture is too...

Страница 80: ...to take the picture Clean the lens page 89 Make sure camera is not in Close up mode if you are outside of the close up focus specification Make sure camera is not in Telephoto mode if you are closer...

Страница 81: ...Cannot locate desired picture Use the Direct print menu to change the image storage location The Direct print menu interface turns off Press any button to redisplay the menu Cannot print pictures Ensu...

Страница 82: ...ra www kodak com go howto Software Get information on EasyShare software www kodak com go easysharesw or click the Help button in the EasyShare software Get help with the Windows operating system and...

Страница 83: ...00798 631 0024 Thailand 001 800 631 0017 China 800 820 6027 Netherlands 020 346 9372 Turkey 00800 448 827073 Denmark 3 848 71 30 New Zealand 0800 440 786 UK 0870 243 0270 Indonesia 001 803 631 0010 No...

Страница 84: ...0 pixels Displays Color display 2 5 in 6 4 cm color hybrid LCD 480 x 240 115 K pixels Color viewfinder Electronic EVF LCD and EVF not simultaneous Optical 237 K pixels Brightness adjustment 5 levels P...

Страница 85: ...electable Zones Exposure compensation 2 0 EV in 1 3 EV steps Exposure bracketing 2 0 EV 3 or 5 images with selectable 1 3 2 3 and 1 0 EV steps Exposure control AE or selectable Exposure Metering Compe...

Страница 86: ...Last Time Lapse Video capture VGA 640 x 480 30 fps QVGA 320 x 240 30 fps Image file format Still JPEG EXIF 2 21 fine standard basic compression file organization DCF Still RAW file organization Kodak...

Страница 87: ...timer error warning sound modes White balance Auto Pre set Daylight Tungsten Fluorescent Cloudy Open Shade Sunset Click WB WB1 WB2 WB3 Auto power off Selectable 3 default 5 10 15 or 30 minutes Color...

Страница 88: ...MP 6 3 MP 3 2 5 0 MP 3 1 MP 1 2 MP 32 MB internal memory 6 7 8 13 34 32 MB SD MMC 6 7 9 14 35 64 MB SD MMC 13 14 18 29 71 128 MB SD MMC 26 30 37 59 145 256 MB SD MMC 52 58 72 115 282 512 MB SD MMC 10...

Страница 89: ...ternal memory 16 18 22 36 83 32 MB SD MMC 17 19 23 37 86 64 MB SD MMC 34 39 48 75 176 128 MB SD MMC 70 79 97 153 356 256 MB SD MMC 137 154 190 299 693 512 MB SD MMC 283 317 392 616 1429 Number of RAW...

Страница 90: ...MC 1 1 2 3 8 64 MB SD MMC 2 3 4 6 16 128 MB SD MMC 6 6 8 13 34 256 MB SD MMC 11 13 16 26 66 512 MB SD MMC 24 27 33 54 137 Minutes seconds of video VGA 640 x 480 QVGA 320 x 240 32 MB internal memory 32...

Страница 91: ...CD Stand By and Auto Power Off in Setup on page 48 If no action for The camera To turn it back on 15 30 seconds 1 2 minutes EVF LCD screen turns off Press any button 3 5 10 15 or 30 minutes Enters aut...

Страница 92: ...protects lens Kodak 5 volt AC adapter Easy way to extend battery life Plug your camera in while downloading or viewing your pictures Kodak performance series digital camera case Stylish but rugged fo...

Страница 93: ...ic shock or injury If using this product in an airplane observe all instructions of the airline CAUTION Do not disassemble this product there are no user serviceable parts inside Refer servicing to qu...

Страница 94: ...sture fire or extreme temperature Remove battery when the product is stored for an extended period of time In the unlikely event that battery fluid leaks inside the product contact your local Kodak Cu...

Страница 95: ...it the following activities that quickly deplete battery power Reviewing your pictures on the camera screen see page 12 Using the camera EVF screen as a viewfinder see page 48 Excessive use of the fla...

Страница 96: ...ak com go p712downloads Additional care and maintenance If the camera has been subjected to inclement weather or you suspect water has gotten inside the camera turn off the camera and remove the batte...

Страница 97: ...or as well as any necessary adjustments and or replacement parts Such repair or replacement is the sole remedy under this warranty If replacement parts are used in making repairs these parts may be re...

Страница 98: ...quipment cost of substitute equipment facilities or services or claims of your customers for such damages resulting from the purchase use or failure of the product regardless of cause or for breach of...

Страница 99: ...ed by turning the equipment off and on the user is encouraged to try to correct the interference by one or more of the following measures 1 reorient or relocate the receiving antenna 2 increase the se...

Страница 100: ...3 du Canada Waste Electrical and Electronic Equipment labeling Korean Class B ITE English translation As this equipment has obtained EMC registration for household use it can be used in any area inclu...

Страница 101: ...If this is used near a radio or television receiver in a domestic environment it may cause radio interference Install and use the equipment according to the instruction manual MPEG 4 Use of this produ...

Страница 102: ...ation 93 auto focus framing marks 7 power down 84 auto exposure AE 33 auto flash 36 auto focus AF 33 auto white balance 50 B backlight 26 basic picture compression 44 batteries extending life 88 batte...

Страница 103: ...tor dock ii continuous AF 45 51 continuous shooting 30 31 contrast 51 copy pictures card to memory 58 memory to card 58 to computer via USB cable 18 copy to custom 52 custom 25 custom exposure mode 52...

Страница 104: ...metering modes center spot 39 center weighted 39 multi pattern 39 selectable zone 39 external flash i 48 external video device viewing pictures videos 60 F favorites 23 removing 67 settings 67 taggin...

Страница 105: ...46 indicator LED i information about pictures videos 49 installing battery 2 SD MMC card 4 software 18 internal memory choosing a storage location 46 storage capacity 81 ISO 37 ISO speed 78 J joystick...

Страница 106: ...ure 52 fireworks 27 flower 27 manner 27 manual 25 night landscape 26 night portrait 26 party 26 27 29 30 portrait 26 program 24 self portrait 26 snow 27 sport 26 sunset 26 text 27 multi pattern 39 mul...

Страница 107: ...ter dock 20 program button i 24 program button capture 47 program button review 47 program button direct access to sub menus 34 protecting pictures videos 16 putting yourself in the picture 30 Q quick...

Страница 108: ...46 liveview 47 picture quality 35 43 44 picture taking mode 23 video length 47 48 video out 48 video quality 45 white balance 50 setup mode using 46 share button ii sharpness 51 shutoff auto 84 shutte...

Страница 109: ...e 50 turning camera on and off 3 U upgrading software firmware 89 URLs Kodak web sites 75 USB universal serial bus transferring pictures 18 USB cable model U 8 19 USB port i V VCCI compliance 93 video...

Страница 110: ...103 www kodak com go support Index Z zoom combined 78 digital 10 optical 10 zoom lever ii 10 Downloaded from ManualsCamera com Manuals...

Отзывы: