background image

2

A-61818  April  2014 

The information in this guide provides procedures for using the TWAIN/
TWAINDSM Data source as well as descriptions of the features. The 
same features should be available on the user interface of the scanning 
application you are using (e.g., 

Kodak

 Capture Software).

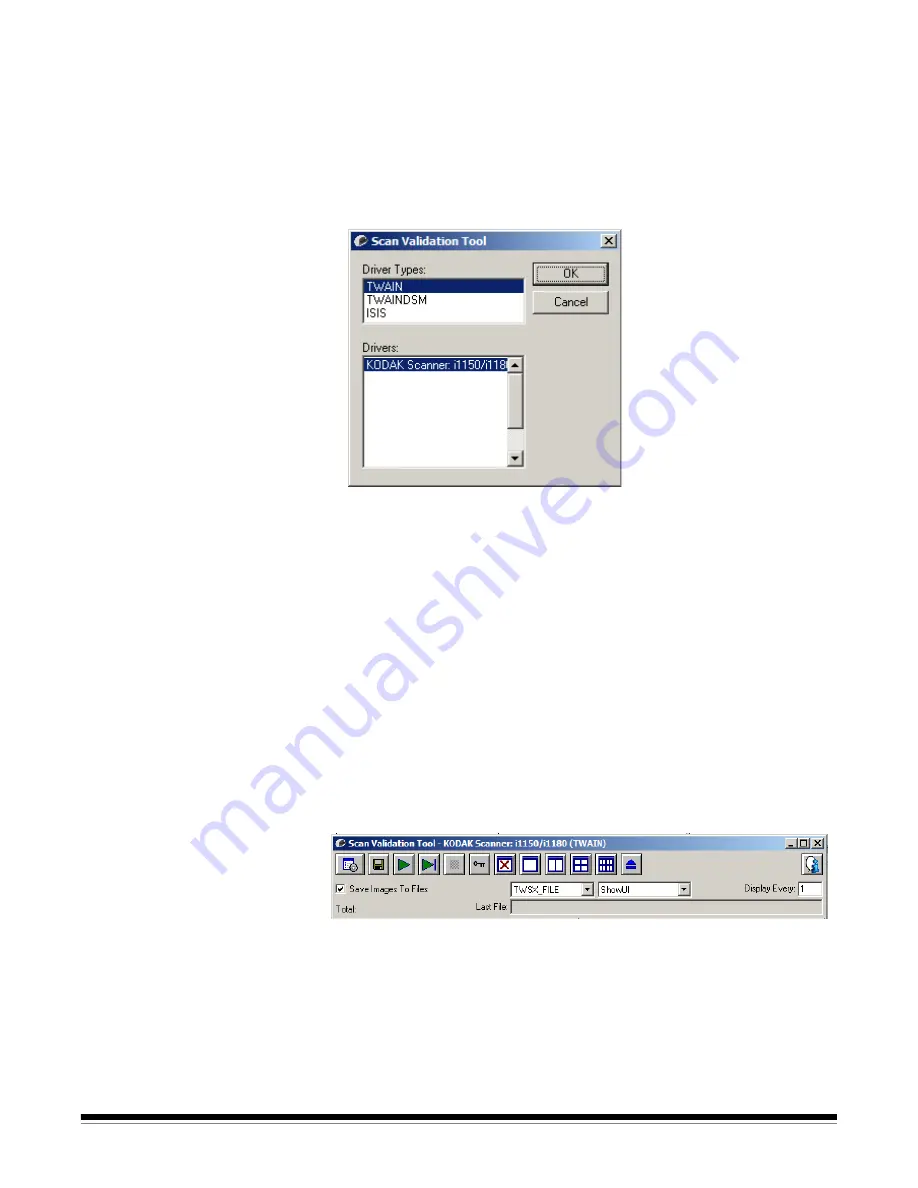
Starting the SVT 
Diagnostics/Scan 
Validation tool

1. Select 

Start>Programs>Kodak>Document Imaging>SVT 

Diagnostics

. The Driver Choice window will be displayed. 

2. Select 

TWAIN/TWAINDSM

 (or 

ISIS

) for the Driver Type and the 

Kodak Scanner i1100 Scanner 

as the Driver. 

Driver Types include:

TWAIN

 — uses the TWAIN interface via the Windows-provided 

twain_32.dll. This option is only available if twain_32.dll exists in 
the Windows folder.

• TWAINDSM 

— uses the TWAIN interface via the TWAIN Working 

Group’s 2.x Data Source Manager (DSM). This option is only 
available if TWAINDSM.dll exists in the Windows Systems folder.

ISIS

 — uses the ISIS interface. this option is only available if 

PIXDFLTN.DLL exists in the Windows 32-bit Systems folder.

NOTE: The TWAIN data source and ISIS driver are not available 

for the 64-bit version of the Scan Validation Tool.

3. The Scan Validation Tool dialog box will be displayed.

Содержание i24x0

Страница 1: ......

Страница 2: ...ng multiple images for each side of a document 34 Creating different settings for each side of a document 36 Creating a new Setting Shortcut 37 Changing Image Settings 39 The Device Settings window 40...

Страница 3: ...Type and the Kodak Scanner i1100 Scanner as the Driver Driver Types include TWAIN uses the TWAIN interface via the Windows provided twain_32 dll This option is only available if twain_32 dll exists i...

Страница 4: ...ctory to store scanned images and their file names This option is only available when Save Images To Files is selected Start Scanning scans the documents in the input tray Scan One Page scans only one...

Страница 5: ...of electronic images This can be done by using the TWAIN data source Kodak provides in concert with your scanning application The TWAIN data source is the part of the capture system which links the sc...

Страница 6: ...d settings by clicking the Advanced Image Setup icon Device Settings the Device button is located on the Image Settings window When you select Device you will have access to the General and Multifeed...

Страница 7: ...5 For each option you want to use make the appropriate selections you want the scanner to perform when scanning 6 If you want to see the effect your options will have Place a representative document i...

Страница 8: ...tments click through the tabs on the Device Settings window to get familiar with features that are available See the section entitled The Device Settings window for information about these features 5...

Страница 9: ...rovides a listing of the Setting Shortcuts currently set up The supplied shortcuts are Default the scanner s default settings Black and White Perfect Page Document Color Perfect Page Document Color Ph...

Страница 10: ...hat have been made to the selected Setting Shortcut This is only available for shortcuts you have modified e g are in italics and appended with changed Restore displays the Restore window allowing you...

Страница 11: ...to the selected Setting Shortcut From this window you can also access the Device settings and Diagnostics windows Preview initiates a scan and then displays the Image Settings window with the scanned...

Страница 12: ...cludes the following tabs General Size Adjust Enhance and Detect Side allows you to select which side and image to configure e g Front Back Both Color 24 bit etc All image settings will be applied to...

Страница 13: ...accurate representation of the actual image The image that is displayed in the preview area is a good representation of what the final image will look like NOTE Depending on your document content you...

Страница 14: ...t mouse button Move place the mouse cursor within the outline to adjust the location of the outline Corner place the mouse cursor over one of the corner graphics to adjust two sides at the same time S...

Страница 15: ...type of content on your documents Text with Graphics the documents contain a mix of text business graphics bar graphs pie charts etc and line art Text the documents contain mostly text Photograph the...

Страница 16: ...le image NOTE The Group 4 and JPEG options are only available for Scan as Black and White 1 bit Quality if you choose JPEG compression select one of the quality options This option is not applied to t...

Страница 17: ...ardless of size If a document is fed crooked it will not be straightened Manually Select the scanner will return an image based on the area you specify with the Outline options It is suggested that yo...

Страница 18: ...f commonly used paper sizes Selecting an item in this list will automatically set the size of the outline to that paper s size Custom will be displayed when the outline size does not match any sizes i...

Страница 19: ...the scanner will analyze the content of each document to determine how it was fed and will rotate the image to the proper orientation If the scanner cannot determine how the document was fed it will r...

Страница 20: ...oduce the highest quality image This option allows scanning of mixed documents with varying quality e g faint text shaded backgrounds color backgrounds and when scanning with consistent document sets...

Страница 21: ...he default is 90 NOTE This is not available for Conversion quality Best and Conversion quality Normal Filters Noise none Lone Pixel reduces random noise by converting a single black pixel to white whe...

Страница 22: ...ill only be visible when the option is turned on If all of the settings do not fit on the screen a scroll bar will appear giving you access to all settings Brightness and Contrast none Automatic autom...

Страница 23: ...lor Balance is not available for Grayscale images Sharpen increases the contrast of edges within the image none Normal High Exaggerated Foreground Boldness using this option for documents or forms whe...

Страница 24: ...of your document The types of holes that are filled include round rectangular and irregularly shaped e g double punched or those having a slight tear that could have occurred when the document was rem...

Страница 25: ...of the original document Streaks may be caused by contaminants on your documents e g dirt dust or frayed edges or by not following the recommended cleaning procedures for your scanner On turns streak...

Страница 26: ...t of content that the scanner will consider to be blank Any image that has more content than this value will be considered non blank and will be given to the scanning application The values range from...

Страница 27: ...t is less than this value will be considered blank and will not be given to the scanning application The values range from 1 to 1000 KB 1 KB equals 1024 bytes Barcode allows you to configure the scann...

Страница 28: ...ure NOTE The Two Sided and One Sided Back options are only available for duplex scanner models Different settings per side by default the settings you select apply to both sides of the image Turn this...

Страница 29: ...pply to the back NOTE The Different settings per side option is only available for duplex scanner models Combine front and back images typically for a document one image is created for the front side...

Страница 30: ...f you select One Based on Document Content from the Images per side option the Content Settings tab will be displayed Images to Configure indicates which electronic images you need to configure NOTE T...

Страница 31: ...uring documents that are primarily black text with small logos or contain small amounts of highlighted text or small colorful photos Medium documents requiring more color as compared with the Low opti...

Страница 32: ...r amount the amount of color that needs to be present in a document before it will be saved as either color grayscale As the value of Color amount increases more color pixels are required Valid values...

Страница 33: ...that closely describes your desired output 2 Select Settings to display the Image Settings window 3 Select the Advanced Image Setup icon on the Image Settings window to display the Advanced tab 4 Sele...

Страница 34: ...bit 10 Select Side Both Color 24 bit NOTE Make any other adjustments to the color image settings on the rest of the tabs on the Image Settings window 11 Select Side Both Black and White 1 bit NOTE Ma...

Страница 35: ...s your desired output 2 Select Settings to display the Image Settings window 3 Select the Advanced Image Setup icon on the Image Settings window to display the Advanced tab 4 Select Input document is...

Страница 36: ...n the list 8 Select Done to return to the Image Settings window NOTE You will notice that the Side option now has two entries Both Color 24 bit and Both Black and White 1 bit 9 Select Side Both Color...

Страница 37: ...o display the Advanced tab 2 Select Input document is Two Sided 3 Turn on the Different settings per side option 4 Select Images per side One 5 Select Done to return to the Image Settings window NOTE...

Страница 38: ...hortcut that most closely describes the desired image output 2 Determine if you want to capture an electronic image of the front of your document back of your document or both sides of your document a...

Страница 39: ...r select a different predefined Setting Shortcut or make additional changes on the rest of the tabs on the Image Settings window 7 Define the desired Device settings by selecting Device on the Image S...

Страница 40: ...nt the scanner to perform when scanning 6 If you want to see the result of your options Place a representative document in the input tray of the scanner Select Preview to perform a preview scan NOTES...

Страница 41: ...indow Preview initiates a scan and then displays the Image Settings window with the scanned image placed in the preview area The image displayed is a sample based on your current shortcut settings OK...

Страница 42: ...can documents from the input tray Flatbed scanner will scan from the flatbed NOTE Automatic and Flatbed options are only available if you had the flatbed accessory attached when the scanning applicati...

Страница 43: ...ed documents none Minimum select this option if the scanner is stopping too frequently on documents that you do not want it to detect NOTE Documents may become more damaged before detection occurs Nor...

Страница 44: ...east aggressive setting and is less likely to detect labels poor quality thick or wrinkled documents as multi fed documents Medium use if your job set has varying document thicknesses or labels attach...

Страница 45: ...ocument will be generated Verify that the paper path has been cleared and restart the scan session from the scanning application Stop Scanning leave paper in path scanning will stop immediately i e ma...

Страница 46: ...ice to display the Device Settings window 4 Before making any adjustments browse through the tabs on the Device Settings window to get familiar with options that are available 5 For each option you wa...

Страница 47: ...ached when the scanning application connected to the scanner Done returns you to the Device Settings window Diagnostics General tab The General tab allows you to perform a scanner test and displays th...

Страница 48: ...l GMT displays the Greenwich Mean Time of the scanner Corresponding local time displays the scanner s Greenwich Mean Time in the PC s local time zone Refresh icon redisplays the current scanner time C...

Страница 49: ...ect you must restart your application Logging saves the communications between the scanner and a scanning application The options are Off On or Custom Images Received From Scanner saves the images rec...

Страница 50: ...support personnel When selected a Save As window will be displayed Description enter a brief description of problem reason for saving the logs Folder the location to save the logs Browse displays the...

Страница 51: ......

Отзывы: