


August 1, 2003
1F1976
4-1
4
Entering Exam Data
Introduction
This section tells you how to enter patient data manually. If you are searching
for a patient that has already been submitted in the RIS, see
in this chapter to query for the patient.
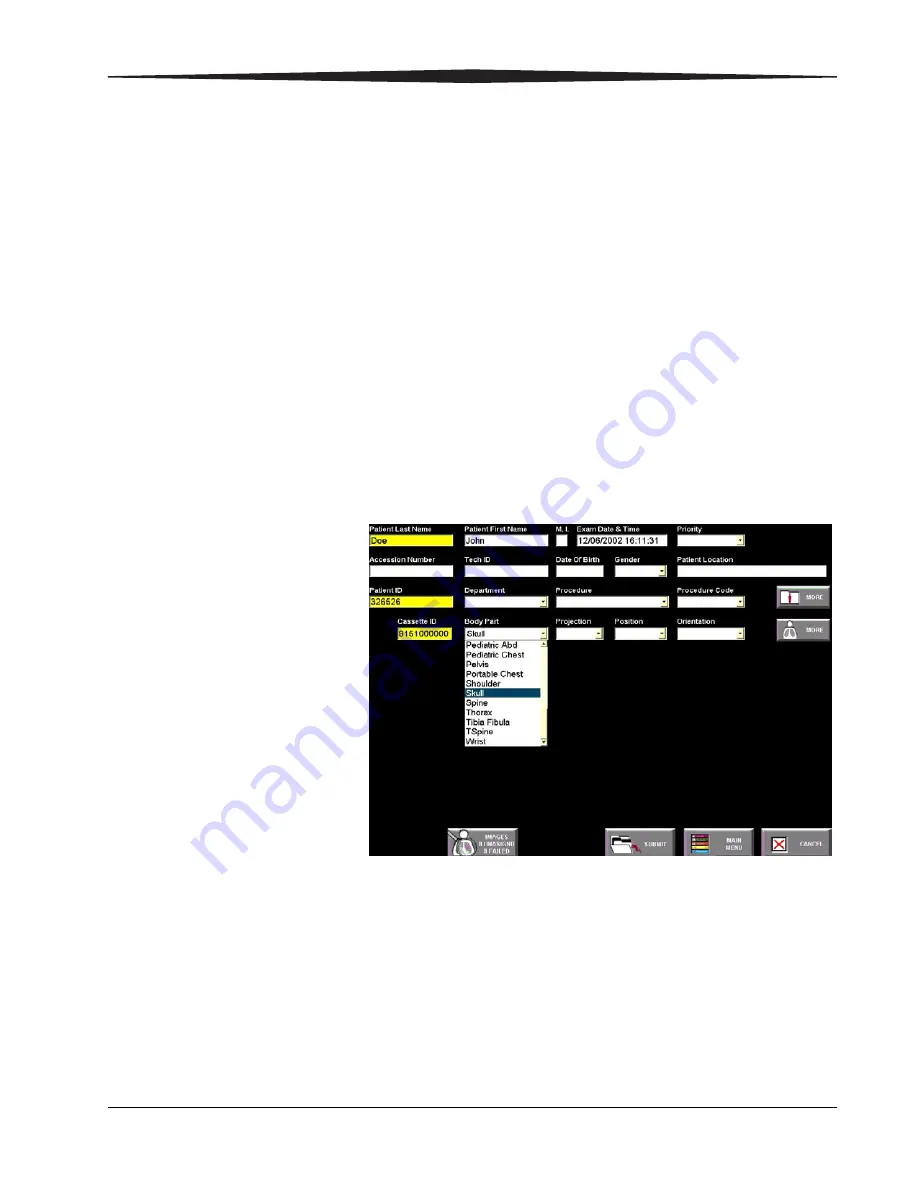
You can enter Patient and Exam Information at the ROP using the touch
screen or at the CR 500 System using drop-down menus accessed by the
mouse and the keyboard. Enter the Patient and Exam Information required
for a Patient Exam Cassette (PEC) Record using the Patient Input screen. The
arrow in each field means there is a drop-down menu of choices for that
field. Click the arrow and select the correct choice from the list.
You must complete the yellow mandatory fields to validate a PEC Record. Your
Key Operator configures the fields required for your system. Complete the
remaining optional information if it is available.
There are three types of patient entries:
•
New Patient—
when the patient information has never been entered in
the CR System or the HIS/RIS system.
•
Trauma—
quick data entry for emergency conditions.
•
Existing Patient—
when information for the patient already exists in the
CR System or the HIS/RIS system.
Содержание DirectView CR 500 System
Страница 1: ...Kodak DirectView CR 500 System User s Guide H195 0016AC...
Страница 10: ...viii August 1 2003 Table of Contents...
Страница 14: ...1 4 1F1976 August 1 2003 Safety and Related Information Labels H195_0001DC...
Страница 15: ...Safety and Related Information August 1 2003 1F1976 1 5 H195_0002DC...
Страница 16: ...1 6 1F1976 August 1 2003 Safety and Related Information H195_0003DC...
Страница 28: ...2 6 1F1976 August 1 2003 Overview...
Страница 36: ...3 8 1F1976 August 1 2003 Operation and Workflow...
Страница 46: ...4 10 1F1976 August 1 2003 Entering Exam Data...
Страница 52: ...5 6 1F1976 August 1 2003 Scanning Viewing and Managing Images Reject Images...
Страница 80: ...5 34 1F1976 August 1 2003 Scanning Viewing and Managing Images...
Страница 92: ...6 12 1F1976 August 1 2003 Maintaining Image Quality...
Страница 97: ...Troubleshooting August 1 2003 1F1976 7 5 Clear Pending Images...
Страница 108: ...8 10 1F1976 August 1 2003 Maintaining Equipment and Cassettes...
Страница 121: ...Key Operator Functions August 1 2003 1F1976 9 13 System Configuration Menu Screen 2 System Configuration Menu Screen 3...
Страница 173: ...Key Operator Functions August 1 2003 1F1976 9 65 RPDES IP Address 3 Add the workstation IP address 4 Select Save Changes...
Страница 188: ...9 80 1F1976 August 1 2003 Key Operator Functions Bar Code Samples Program Keyboard Country Save Number 0 Number 1...
Страница 189: ...Key Operator Functions August 1 2003 1F1976 9 81 Number 2 Number 3 Number 4 Number 5...
Страница 190: ...9 82 1F1976 August 1 2003 Key Operator Functions Number 6 Number 7 Number 8 Number 9...
Страница 191: ...Key Operator Functions August 1 2003 1F1976 9 83 Number A Number B Number C Number D...
Страница 192: ...9 84 1F1976 August 1 2003 Key Operator Functions Number E Number F Code 39 Full ASCII On Code 39 Full ASCII Off...
Страница 193: ...Key Operator Functions August 1 2003 1F1976 9 85 Manual Trigger Automatic Trigger Add One Suffix Add One Prefix...
Страница 194: ...9 86 1F1976 August 1 2003 Key Operator Functions Clear All Suffix Clear All Prefix Test...
Страница 202: ...9 94 1F1976 August 1 2003 Key Operator Functions...
Страница 218: ...10 16 1F1976 August 1 2003 Remote Operations Panel...
Страница 226: ...B 4 1F1976 August 1 2003 Printing Exceptions...
Страница 235: ......


