background image

6-2


Serial Cable Connection

The camera can connect to a computer using the serial cable included in your 
camera package. In order to connect the DC200/DC210, you need to find an 
available serial (COM) port on your PC. Most PCs come configured with two 
serial communication ports labeled COM1 and Com2, or A and B. These COM 
ports are usually labeled on the back of your PC. If they are not labeled, see your 
computer’s user guide for a diagram that illustrates all your external ports on the 
back of your PC.

For more information on serial cable connection, refer to “Resolving 
COM Port Connectivity problems for IBM-Type PCs, with KODAK 
Digital Cameras” section in the readme file on the DC200/DC210 
software CD, or click “Service and Support” on the Kodak Web site at 
http://www.kodak.com. 

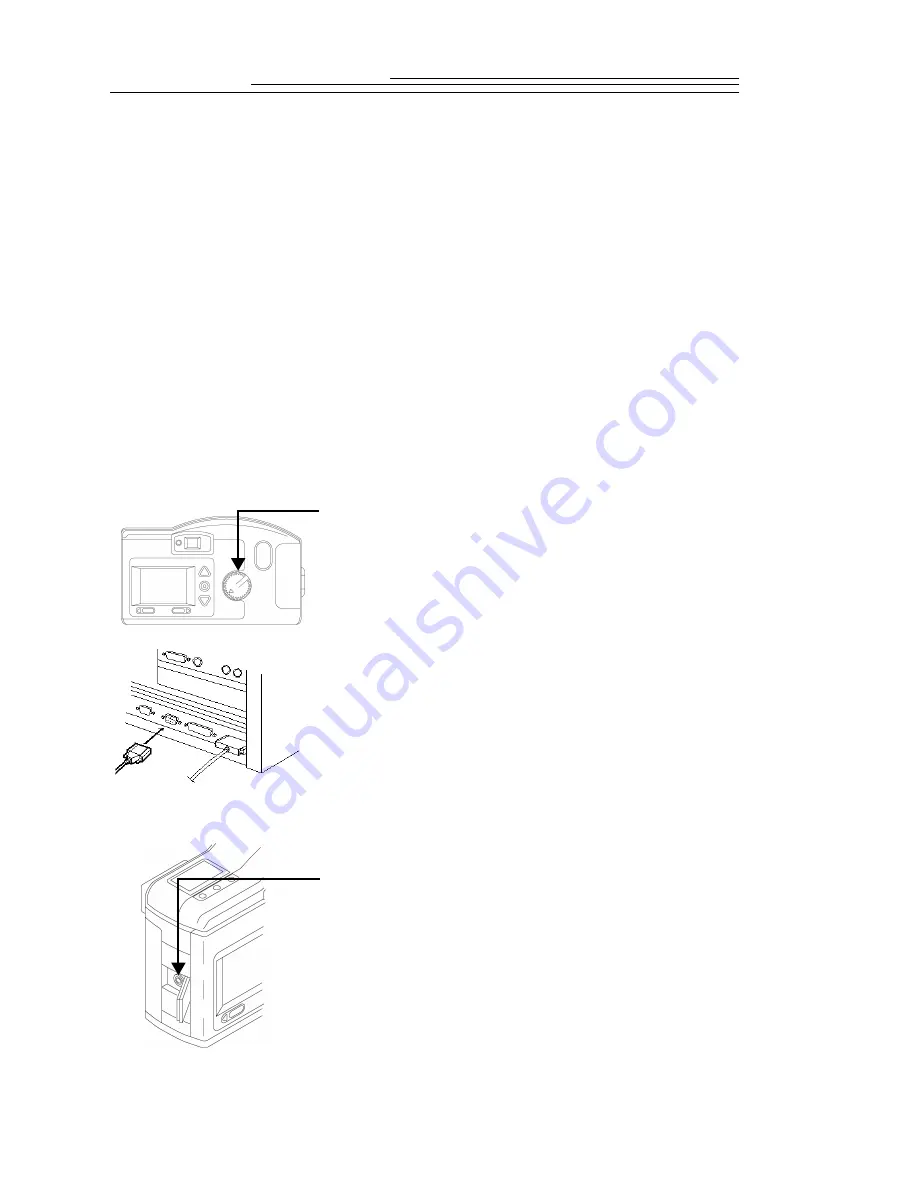
To connect to your computer with a serial cable:

To cancel connection: turn the Mode dial to another setting or turn the 
camera off. 

1

Set the Mode dial to Connect.

2

Plug one end of the serial cable into a COM port 
on the back of your PC.

If your computer has a 25-pin port, you need 
to use an optional 9-pin adapter (available at 
your local computer store) and attach it to 
the port before attaching the serial cable to 
the computer.

3

Open the serial port on the side of your camera. 

4

Plug the other end of the serial cable into the 
camera’s serial port.

5

Turn on the camera.

Содержание DIGITAL SCIENCE DC200

Страница 1: ... SCIENCE DC210 Plus Zoom DC200 Cameras User s Guide for the cameras KODAK Installation Software KODAK DC200 DC210 Mounter Software and KODAK Acquire TWAIN Software Visit Kodak on the World Wide Web at www kodak com ...

Страница 2: ...ademarks of Eastman Kodak Company The FlashPix format is defined in a specification and test suite developed and published by Kodak in collaboration with Microsoft Hewlett Packard and Live Picture Only products that meet the specification and pass the test suite may use the FlashPix name and logo ...

Страница 3: ...Camera 1 3 Capturing a Picture 2 1 Camera Power 2 1 Take a Picture 2 2 Preview 2 2 Delete One Picture 2 3 Exposure Compensation 2 4 Exposure Lock 2 5 Status Display 2 6 Pictures Remaining 2 6 Self Timer 2 7 Memory Card 2 7 Close Up DC210 Only 2 8 Flash 2 9 Resolution 2 10 Quality 2 11 Batteries 2 12 Zoom DC210 Only 2 14 General Maintenance and Safety 2 15 ...

Страница 4: ...ightness 4 9 Format Memory Card 4 10 Video Out 4 11 Language 4 12 About 4 13 Installation Software 5 1 WINDOWS System Requirements 5 1 Installing the Software 5 1 Connect 6 1 Checking Serial Port Availability 6 1 Infrared Connection DC210 Only 6 1 Serial Cable Connection 6 2 Mounter Software 7 1 Installation 7 1 Camera Communication Settings 7 1 Overview 7 2 Using Mounter Software 7 2 Setting and ...

Страница 5: ...ormation 8 4 Preferences Settings 8 5 Tips and Troubleshooting 9 1 Communicating with the Computer 9 1 Monitor Adjustment 9 1 Printing 9 2 Troubleshooting 9 3 Accessories 10 1 AC Adapter 10 1 Memory Cards 10 2 Memory Card Reader 10 2 Inkjet Media 10 3 Serial Connection Kit for MACINTOSH Systems 10 3 Battery Charger 10 3 Camera Bag 10 4 Infrared Connection DC210 Only 10 4 Where to Get Help 1 Softwa...

Страница 6: ...egulatory Information warranty1 Warranty Time Period warranty1 Warranty Repair Coverage warranty1 Limitations warranty2 Application Support warranty3 How to Obtain Service warranty3 Regulatory Information warranty4 ...

Страница 7: ... different functions on the camera Capture takes previews or deletes a picture and adjusts the exposure Review review or delete pictures Preference adjust camera settings Connect camera communicates with your computer The DC210 has all of the features of the DC200 plus infrared remote connection to compatible devices 2X zoom lens 29 to 58mm to zoom in on subjects and a close up option to set the f...

Страница 8: ... 1 64 ft 0 5 m to infinity telephoto 3 28 ft 1 m to infinity close up 8 in 20 cm Sensitivity ASA ISO rating equivalent to 140 Accessary Lens Thread 37 mm DC200 only Viewfinder Real image Color 24 bit millions of colors Tripod Socket 25 in Storage external memory only ATA Compatible Compact Flash Card Power 4 AA batteries Shutter Speed 1 2 to 1 362 sec File Format FlashPix or JPG Lens optical quali...

Страница 9: ...ions throughout this user s guide are of the DC210 unless otherwise stated Camera Front Camera Top Viewfinder Flash Self Timer Infrared Flash Sensor Light Sensor Transceiver LIght Lens DC210 Only SHUTTER POWER Status Display FLASH SELF TIMER CLOSE UP DC210 only ...

Страница 10: ...1 4 Camera Back Camera Bottom Camera Side Viewfinder Ready Light LCD Screen DO IT Mode Dial ZOOM DC210 Only Battery Door Card Tripod Socket EJECT Card Door Serial Video Out AC Adapter ...

Страница 11: ...tatus Display Camera Power To turn the camera on off If you are not using an AC power adapter and your camera is idle for approximately 5 minutes it automatically turns off To turn the camera on again press the camera s power button Press the POWER button The green Ready light on the back of the camera and the Status Display screen turns on or off If the camera is turned off while a picture is bei...

Страница 12: ...es Remaining number on the Status Display blink rapidly as the camera processes the picture You do not need to hold the camera still while the green Ready light is blinking but you will not be able to take another picture until it stops 1 Set the Mode dial to Capture 2 Turn the camera on 3 Press the DO IT button The LCD displays the subject that is viewed from the viewfinder with the icons of acti...

Страница 13: ...icture taken in Capture mode To exit press a button until NO is highlighted and then press the DO IT button 1 Set the Mode dial to Capture 2 Turn the camera on 3 Take a picture The picture is displayed on the LCD 4 Press the button The delete screen appears in the LCD The picture must be showing on the LCD screen to activate the delete screen 5 Press a button until the correct delete option is hig...

Страница 14: ...he CCD in your camera Below shows how changes in EV can effect your pictures If your pictures are too dark increase the exposure compensation setting light decrease the exposure compensation setting To change Exposure Compensation To reset the Exposure setting automatically resets to 0 0 EV when the camera is turned off 1 Set the Mode dial to Capture 2 Turn the camera on 3 Press the button The LCD...

Страница 15: ...ets when the camera is turned off 1 Set the dial to Capture 2 Turn the camera on 3 Press the button two times The Exposure Compensation screen appears followed by the Exposure Lock screen Press the button a third time to exit the exposure menu 4 Press a button until ON is highlighted 5 Press the DO IT button The Take a Picture screen appears 6 Center the area you want to lock the exposure on in th...

Страница 16: ...ge the Pictures Remaining icon When the card s memory is full the Status Display indicates Full You must delete existing pictures or change memory cards to capture additional pictures To save pictures transfer them to your computer before deleting them For more information on how to move or delete pictures see Delete One Picture on page 2 3 Delete One or All Pictures on page 3 2 or the software ch...

Страница 17: ...d will not operate without a memory card The Card Status icon changes automatically to indicate if there is a memory card inserted in the camera You may not select or change this icon 1 Set the Mode dial to Capture 2 Turn the camera on 3 Press the SELF TIMER button The Self Timer icon appears on the Status Display 4 Place the camera on a flat steady surface or tripod 5 Press the SHUTTER button The...

Страница 18: ...sh setting is not available when Close Up is on To accurately capture the picture in Close Up the Preview option automatically starts when the CLOSE UP button is pressed See Preview on page 2 2 for detailed information To deactivate the Preview option press the DO IT button 1 Open the card door 2 Hold the memory card with the connecting end pointed at the camera 3 Push the card all of the way into...

Страница 19: ...ears on the Status Display 4 View the subject on the LCD display to accurately capture the picture Auto flash fires automatically when the SHUTTER button is pressed and the camera determines that there is not enough light This is the default setting Auto Red eye works the same as auto flash except the flash fires once before the picture is taken to reduce the chance of red eye and then flashes a s...

Страница 20: ...when taking pictures The number of pictures the DC200 DC210 is able to store will vary accordingly The Resolution setting is indicated on the Status Display using the following icons The Resolution setting is changed using the Preferences mode See Resolution on page 4 3 for more information 1 Set the Mode dial to Capture 2 Turn the camera on 3 Press the FLASH button to scroll through and select th...

Страница 21: ...ting is changed using the Preferences mode See Quality on page 4 2 for more information Best you can store approximately 4 pictures per 1 MB of storage at this Quality setting and when the Resolution is set to High Use this setting when image quality is very important for maximum picture quality especially for larger sized or zoom prints Better you can store approximately 6 pictures per 1 MB of st...

Страница 22: ...t to run camera and need to be replaced Pictures on memory cards are not lost if batteries are depleted 1 Place your thumb on the battery door 2 Slide the battery door away from the camera 3 Insert the batteries as indicated on the battery cover and close the battery door Remove the batteries if the camera will not be used for an extended period of time This extends battery life and prevents camer...

Страница 23: ...s in a variety of conditions Ni MH batteries are designed for high demand devices like digital cameras and do not exhibit the memory effects seen with other rechargeable technologies Kodak offers Ni MH rechargeable batteries with charger as an optional accessory Refer to catalog number 152 7068 U S and Canada 852 2344 Europe 867 9953 UK 870 8141 Asia 910 7632 Japan If you elect to use alkaline bat...

Страница 24: ...to 58mm To activate the zoom The camera s default lens position is Wide Angle All other lens positions are considered TelePhoto settings Wide Angle TelePhoto 1 Set the Mode dial to Capture 2 Turn the camera on 3 Press the ZOOM button The subject will appear closer or farther away when you look through the viewfinder and press the ZOOM button ...

Страница 25: ...diately turn the camera off wait a few minutes until the camera cools and then remove the batteries Cleaning the lens and back LCD screen 1 Blow gently on the lens or LCD screen to remove dust and dirt 2 Moisten the lens or LCD screen by breathing lightly on it 3 Wipe the lens or LCD screen gently with a soft lint free cloth or an untreated lens cleaning tissue Do not use cleaning solutions unless...

Страница 26: ......

Страница 27: ... a slide show from the camera on your TV View Pictures To view pictures To exit press the buttons to highlight the Overlay icon Press DO IT to turn off the Overlay screen The main Review screen reappears 1 Set the Mode dial to Review 2 Turn the camera on The Overlay screen appears on the LCD screen with the last picture taken Use the buttons to scroll through pictures To continuously scroll hold d...

Страница 28: ... space on the memory card you must delete the images in the model of camera that captured those images 1 Set the Mode dial to Review 2 Turn the camera on The last picture taken appears on the LCD screen The Overlay screen is turned on 3 Press a button until the Delete icon is highlighted 4 Press the DO IT button The delete screen appears on the LCD 5 Press a button until the appropriate picture is...

Страница 29: ...re stops and the Overlay screen reappears 1 Set the Mode dial to Review 2 Turn the camera on The last picture taken appears on the LCD screen The overlay screen is turned on 3 Press a button until the appropriate picture is highlighted on the filmstrip 4 Press a button until the Magnify icon is highlighted 5 Press the DO IT button The LCD displays a magnified view of the selected picture Use the a...

Страница 30: ...2 Insert the video output cable into the video out connection on the side of your camera 3 Connect the other end of the cable to the video in connection on your TV 4 Turn on the camera and TV 5 Set the Mode dial to Review 6 Set the TV to the correct video setting The pictures that are stored on the memory card appear on the TV screen You may need to adjust the Video Out preference on the camera Se...

Страница 31: ...e adjusted or activated The Preferences screens illustrated below display the current setting of each icon Quality File type Format memory card Resolution Quickview Video out Template Date Time Language Date stamp LCD brightness About Quality Resolution File type Quickview Date time LCD brightness Format memory card Current Setting About Template Date stamp Video out Language ...

Страница 32: ...elected This setting does not change when the camera is turned off 1 Set the Mode dial to Preferences 2 Turn the camera on The LCD displays the Preferences screen 3 Press a button until the Quality icon is highlighted 4 Press the DO IT button The LCD displays the main Quality screen The current setting is checked ü 5 Press a button until the appropriate option is highlighted 6 Press the DO IT butt...

Страница 33: ... another setting is selected This setting does not change when the camera is turned off 1 Set the Mode dial to Preferences 2 Turn the camera on The LCD displays the Preferences screen 3 Press a button until the Resolution icon is highlighted 4 Press the DO IT button The LCD displays the main Resolution screen The current setting is checked ü 5 Press a button until the appropriate option is highlig...

Страница 34: ...te The template is only visible after the picture has been taken with the camera in either Review mode or in Capture mode with Quickview activated See Quickview on page 4 7 or chapter 3 Review on page 3 1 for details To cancel Template press a button until OFF is highlighted and then press the DO IT button The Template setting is maintained until another setting is selected This setting does not c...

Страница 35: ...te Stamp setting is maintained until another setting is selected This setting does not change when the camera is turned off 1 Set the Mode dial to Preferences 2 Turn the camera on The LCD displays the Preferences screen 3 Press a button until the Date Stamp icon is highlighted 4 Press the DO IT button The LCD displays the main Date Stamp screen The current setting is checked ü 5 Press a button unt...

Страница 36: ...etting is selected This setting does not change when the camera is turned off 1 Set the Mode dial to Preferences 2 Turn the camera on The LCD displays the Preferences screen 3 Press a button until the File Type icon is highlighted on the second Preferences screen 4 Press the DO IT button The LCD displays the main File Type screen The current setting is checked ü 5 Press a button until the appropri...

Страница 37: ...ighlighted and then press the DO IT button The Quickview setting is maintained until another setting is selected This setting does not change when the camera is turned off 1 Set the Mode dial to Preferences 2 Turn the camera on The LCD displays the Preferences screen 3 Press a button until the Quickview icon is highlighted on the second Preferences screen 4 Press the DO IT button The LCD displays ...

Страница 38: ...the camera when the camera is on the Date Time may be deleted and must be reset 1 Set the Mode dial to Preferences 2 Turn the camera on The LCD displays the Preferences screen 3 Press a button until the Date Time icon is highlighted on the second Preferences screen 4 Press the DO IT button The LCD displays the main Date Time screen with the current date and time listed 5 Press a button to highligh...

Страница 39: ...f 1 Set the Mode dial to Preferences 2 Turn the camera on The LCD displays the Preferences screen 3 Press a button until the LCD Brightness icon is highlighted on the second Preferences screen 4 Press the DO IT button The LCD displays the main LCD Brightness screen 5 Press a button to adjust the brightness of the LCD screen to the appropriate level The brightness of the LCD screen changes as the s...

Страница 40: ... is highlighted and then press the DO IT button The card is not formatted and the main Preferences screen reappears 1 Set the Mode dial to Preferences 2 Turn on the camera The LCD displays the Preferences screen 3 Press a button until the Format Memory Card icon is highlighted on the third Preferences screen 4 Press the DO IT button The LCD displays the main Format Memory Card screen 5 Press a but...

Страница 41: ...intained until another setting is selected This setting does not change when the camera is turned off 1 Set the Mode dial to Preferences 2 Turn on the camera The LCD displays the Preferences screen 3 Press a button until the Video Out icon is highlighted on the third Preferences screen 4 Press the DO IT button The LCD displays the main Video Out screen The current setting is checked ü 5 Press a bu...

Страница 42: ...tton The Language setting is maintained until another is selected This setting does not change when the camera is turned off 1 Set the Mode dial to Preferences 2 Turn the camera on The LCD displays the Preferences screen 3 Press a button until the Language icon is highlighted on the third Preference screen 4 Press the DO IT button The LCD displays the main Language screen The current setting is ch...

Страница 43: ... over the lifetime of the camera total number of flashes fired over the lifetime of the camera To view the About screen 1 Set the Mode dial to Preferences 2 Turn the camera on The LCD displays the Preferences screen 3 Press a button until the About icon is highlighted on the third Preferences screen 4 Press the DO IT button The LCD displays the About screen 5 Press the DO IT button to return to th...

Страница 44: ......

Страница 45: ...matically loading your software take a few minutes to fill out and send in the DC200 DC210 product registration card This allows you to receive information regarding software updates and registers some of the products included with the camera Close all other applications before starting the Installation software 1 Place the DC200 DC210 CD into your CD ROM drive If Auto Run is turned on in WINDOWS ...

Страница 46: ...k on the YES button to accept the software license agreement If you do not accept the license you will not be able to install the software 7 Select which software you wish to install and click on the NEXT button 8 Select the name of the Program Folder and click on the NEXT button If necessary type a new folder name or select from the Existing Folders list ...

Страница 47: ...DC200 DC210 software if your computer does not recognize that the camera is attached and turned on you may need to adjust the serial port and speed settings Use the software s Preferences or Properties window to adjust the camera communications settings 9 Verify the settings and then click on the NEXT button A progress screen appears while the software is installed 10Select the preferred restart o...

Страница 48: ......

Страница 49: ...g Serial Port Availability If your computer cannot communicate with the DC200 DC210 you may need to adjust the serial port and speed settings Adjust the settings using the KODAK Mounter Software chapter 7 or KODAK TWAIN Software Chapter 8 or follow the instructions on the Kodak Web site at http www kodak com Infrared Connection ÑDC210 Only The camera can connect to a computer using an infrared tra...

Страница 50: ... Port Connectivity problems for IBM Type PCs with KODAK Digital Cameras section in the readme file on the DC200 DC210 software CD or click Service and Support on the Kodak Web site at http www kodak com To connect to your computer with a serial cable To cancel connection turn the Mode dial to another setting or turn the camera off 1 Set the Mode dial to Connect 2 Plug one end of the serial cable i...

Страница 51: ...rd drive For more detailed information on working with WINDOWS 95 WINDOWS 98 or WINDOWS NT refer to that Software s user guide Installation If you accepted the default installation settings when you installed the software from the DC200 DC210 CD see Chapter 5 Installation Software Mounter software is already installed If it is not installed complete the instructions in Chapter 5 and select the Mou...

Страница 52: ...k on the Memory Card icon to view the picture files Double click on a picture file to open it into a registered software application Transferring Pictures to your Computer Mounter software allows you to transfer picture files from the memory card to a new location on your computer using the drag and drop method Camera icon displays the DC200 DC210 camera Memory Card icon displays picture files sto...

Страница 53: ...the Camera icon The Memory Card icon appears 3 Double click on the Memory Card icon The Memory Card window appears listing individual picture files 4 Open the folder that the picture files will be dragged into 5 Click on the picture file to highlight it and while holding the mouse button down drag the picture file to the new location The picture file appears in the new location To select and move ...

Страница 54: ...to view the properties window To open the Camera Memory Card Properties window 1 Double click on the Camera icon in the My Computer window 2 Click on the Memory Card icon with the right mouse button 3 Select Properties from the pop up menu The Memory Card Properties window appears and displays To exit click on the OK or CANCEL button Resolution setting High or Standard Quality setting Good Better ...

Страница 55: ...le click on the Camera icon in the My Computer window 2 Double click on the Memory Card icon 3 Click on the Picture File icon with the right mouse button 4 Select Properties from the pop up menu The Picture File Properties window appears and displays To exit click on the OK or CANCEL button Resolution setting High or Standard Quality setting Good Better or Best Picture size in bytes Date and time ...

Страница 56: ...rties from the pop up menu The Camera Properties window appears with the Camera Setting tab open Select the COMMUNICATIONS SETTINGS button to adjust the serial port and speed See Communication Settings on page 7 8 for more details To exit click on the OK button to apply the changes and exit the window To exit the window without making any changes click on the CANCEL button 3 Click on the appropria...

Страница 57: ...pears Select the DELETE SELECTED PICTURES or DELETE ALL PICTURES button to delete picture files See Delete on page 7 9 for more details To exit click on the OK button to apply the changes and exit the window To exit the window without making any changes click on the CANCEL button 3 Click on the Capture tab The Capture tab appears 4 If necessary click on the buttons to adjust the Exposure compensat...

Страница 58: ... continue to adjust the serial port speed on COM1 and the other COM ports until it is recognized Once your computer can communicate with your camera gradually increase speed to optimize transfer picture time To exit click on the OK button to apply the changes and exit the window To exit the window without making any changes click on the CANCEL button 3 Click on the COMMUNICATIONS SETTINGS button 4...

Страница 59: ...s using the Camera icon Simply double click on the Camera icon then double click on the Memory Card icon Click once on the picture file that you wish to delete From the File pulldown menu select Delete To exit click on the OK button to apply the changes and exit the window To exit the window without making any changes click on the CANCEL button 3 Click on the Capture tab 4 Click on the DELETEALL P...

Страница 60: ......

Страница 61: ...ed the default installation settings when you installed the software from the DC200 DC210 CD see Chapter 5 Installation Software TWAIN software is already installed If it is not installed complete the instructions in Chapter 5 and select the TWAIN software option Camera Communication Settings If your computer does not recognize that the camera is attached and turned on you may need to adjust the s...

Страница 62: ...0 Zoom Acquire TWAIN 5 Pull down the File menu and select TWAIN Acquire The TWAIN software main window appears Overview The following is the main window of TWAIN software More detailed information is offered in the following sections Select appropriate button to camera or computer retrieve pictures from your Picture viewing area Select Preferences Select Transfer to transfer pictures to change ser...

Страница 63: ...n your computer 2 Select the picture file from the File Selection area The picture file is highlighted To select multiple files at one time hold down the CONTROL or SHIFT key and click on the picture files Check Show Thumbnail to preview the picture file 3 Click on the ADD TO LIST button The picture file is listed in the transfer window You may also select Remove from List to remove a picture file...

Страница 64: ... Click on a picture to select it To select multiple pictures hold down the Control or Shift key and click on the pictures 6 Click on the TRANSFER button The picture is displayed in the previously opened TWAIN compliant software window Click on the in the upper left corner of the picture to open the Picture Information window The Picture Information window appears and displays Name of the picture f...

Страница 65: ...n the appropriate COM port until it is recognized Once your computer can communicate with your camera gradually increase speed to optimize transfer picture time To exit click on the OK button To exit the window without making any changes click the CANCEL button 1 Click on the PREFERENCES button The Preferences window appears 2 If necessary click on the arrows and adjust the serial port if your com...

Страница 66: ......

Страница 67: ... Software Chapter 8 or follow the instructions on the Kodak Web site at http www kodak com Monitor Adjustment Your monitor display settings may need to be adjusted to view pictures from the camera 1 Double click on the My Computer icon 2 Double click on the Control Panel icon 3 Double click on the Display icon and click on the Settings tab 4 From the Color Palette field select the highest availabl...

Страница 68: ...ult your local computer dealer for more information Remember these few tips when it comes time to print your document color printing takes more time The more complex your document is increases the printing and drying time color printing is more memory intensive than black and white If your computer gives you an insufficient memory message you may need to close some applications change some setting...

Страница 69: ... is jagged or inappropriately colored Monitor is not set correctly Adjust your monitor display settings See MonitorAdjustment on page 9 1 Memory Card Problem Cause Solution The DC200 DC210 does not recognize your memory card The memory card may not be ATA compatible Memory cards must be ATA compatible to work with the camera The memory card may contain compression or stacker software Reformat any ...

Страница 70: ...our computer s modem and or operating system s user s guide Camera power is off Turn the camera on Camera is not connected to serial cable or cable is not connected to the computer s COM port Connect serial cable to camera and COM port See Serial Cable Connection on page 6 2 Infrared port is not responding Check the computer s infrared connection Be sure that the camera is on Port settings in soft...

Страница 71: ...ady light turns on Mode dial is not set to Capture Set the Mode dial to Capture Ready light is blinking Camera is processing picture Wait until Ready light stops blinking before attempting to take another picture The Status Display reads Full The memory card is full Transfer pictures to your computer or insert a memory card that has available memory Camera is connected to the computer Disconnect c...

Страница 72: ... to have an effect Move so there is no more than 10 feet 3 m between the camera and the subject The subject is in front of a bright light Change your position so the light is not behind the subject Picture is too light The flash is not needed Change to automatic flash See Flash on page 2 9 The subject is too close when the flash was used Move so there is at least 1 6 ft 0 5 m between the camera an...

Страница 73: ...5 Subject too close when taking picture Stand at least 2 23 ft 68m with DC200 at least 8 in 20 cm in close up 3 28 ft 1m in telephoto 1 64 ft 0 5 m with DC210 Subject or the camera moved while the picture was taken Hold camera steady until the picture is taken The subject is too far away for the flash to be effective Move so the subject is less than 10 ft 3 m away LCD Messages Message Cause Soluti...

Страница 74: ...t read memory card Memory card is corrupted Insert a new or reformat the memory card Cannot establish connection The camera cannot communicate with the computer Change the COM port settings to Auto Search or to a specific COM port See Serial Cable Connection on page 6 2 Camera needs service The camera is malfunctioning Have the camera serviced ...

Страница 75: ... your computer The adapter powers the camera but does not charge the batteries WARNING Only use the AC adapter designed for the DC200 DC210 Use of any other adapter may void the warranty and can cause camera failure fire electric shock or injury 1 Insert the AC adapter into the AC power adapter connection on the side of your camera 2 Connect the other end of the adapter into the power outlet 3 Tur...

Страница 76: ...your camera These removable reusable cards come in a variety of MB sizes that make storing sharing and manipulation of pictures easy Used with card adapters memory cards become compatible with PCMCIA slots on laptop computers Memory Card Kodak Item Number Number of Pictures 4 MB 196 4956 14 4 MB card with adapter 821 6822 14 10 MB card 863 3828 36 10 MB card with adapter 849 2399 36 20 MB card 146...

Страница 77: ...n 145 6979 Photographic quality paper photo weight 15 sheet 8 5x11 in 158 5199 Photo paper photo weight 50 sheet 8 5x15 in 121 5904 Photo paper photo weight 50 sheet 11x17 in 877 0356 Photographic quality paper photo weight 15 sheet 210x297 mm 134 2013 Photo paper photo weight 50 sheet 297x420 mm 829 5370 Photographic quality paper letter weight 15 sheet 8 5x11 in 815 0443 Photographic quality pap...

Страница 78: ...age for more details on setting up an infrared transceiver connection Additional information on accessories for your DC200 DC210 are available from World Wide Web http www kodak com go accessories http www kodak com go shop USA only Faxed product information by calling 1 800 508 1531 USA only Your computer or Kodak dealer Not all accessories are available in all countries The camera bag with adjus...

Страница 79: ...ia World Wide Web http www kodak com America Online keyword KODAK CompuServe GO KODAK Kodak Internet listserv photo cd info kodak com or ftp kodak com Faxed Information Kodak offers automated support for digital imaging products and services Product information can be faxed to you by calling U S 1 800 508 1531 Canada 1 800 295 5531 Europe 44 131 458 6962 U K 44 0 131 458 6962 in Tips and Troublesh...

Страница 80: ...utside the U S Canada and Europe call the number on the following pages that is associated with your location Country Help number Fax Argentina 54 1 808 300 54 1 808 3328 Australia 1 800 674 831 61 3 9353 2488 Austria 0 660 7348 44 131 458 6962 Belgium 0800 72247 44 131 458 6962 Brazil 0 800 15 0000 55 12 331 8571 Caribbean 78 7 757 5500 78 7 757 8760 Chile 56 2 697 2000 56 2 697 0310 China Shangh...

Страница 81: ...131 458 6962 New Zealand 0800 500 135 64 9 302 8637 Norway 800 1 1848 44 131 458 6962 Panama 52 3 678 6200 52 3 678 6210 Peru 51 1 224 8610 51 1 224 8605 Philippines 63 2 810 0331 63 2 816 6718 Portugal 351 1 4149 500 351 14194 321 Russia 7 095 929 9166 7 095 929 9170 Singapore 65 470 9875 65 479 8397 South Africa 27 11 804 2852 27 11 804 5013 Spain 900 98 4485 44 131 458 6962 Sweden 020 793169 44...

Страница 82: ......

Страница 83: ... does not function properly during the warranty period due to defects in either materials or workmanship Kodak will at its option either repair or replace the equipment without charge subject to the conditions and limitations stated herein Such repair service will include all labor as well as any necessary adjustments and or replacement parts If replacement parts are used in making repairs these p...

Страница 84: ...NG MAINTENANCE OR REPACKAGING INSTRUCTIONS OR FAILURE TO USE ITEMS SUPPLIED BY KODAK SUCH AS ADAPTERS AND CABLES KODAK MAKES NO OTHER WARRANTIES EXPRESS IMPLIED OR OF MERCHANTABILITY OR FITNESS FOR A PARTICULAR PURPOSE FOR THIS EQUIPMENT OR SOFTWARE REPAIR OR REPLACEMENT WITHOUT CHARGE ARE KODAK S ONLY OBLIGATION UNDER THIS WARRANTY KODAK WILL NOT BE RESPONSIBLE FOR ANY SPECIAL CONSEQUENTIAL OR IN...

Страница 85: ...h the equipment If the original packaging has been discarded or is not available packing will be at the owner s expense The repaired or replaced unit will be shipped from Kodak within five business days from the date of the camera receipt at the service center Unless a specific Kodak warranty is communicated to the purchaser in writing by a Kodak company no other warranty or liability exists beyon...

Страница 86: ...or more of the following measures 1 reorient or relocate the receiving antenna 2 increase the separation between the equipment and the receiver 3 connect the equipment to an outlet on a circuit different from that to which the receiver is connected 4 consult the dealer or an experienced radio TV technician for additional suggestions Any changes or modifications not expressly approved by the party ...

Страница 87: ... C Camera Accessories 10 1 Connecting to a Computer 6 1 Getting Help or Information 1 2 Modes 1 1 Mounter Software 7 1 7 2 7 4 7 5 7 6 7 7 7 8 7 9 Package Contents 1 2 Parts 1 3 1 4 Power 2 1 Properties 7 6 Specifications 1 2 Troubleshooting 9 1 9 2 9 3 9 4 9 5 9 6 9 7 9 8 Turning On and Off 2 1 TWAIN Software 8 1 8 2 8 3 8 4 8 5 Camera Bag See Accessories Camera Parts Back 1 4 Bottom 1 4 Front 1 ...

Страница 88: ...s 1 2 Troubleshooting 9 1 9 2 9 3 9 4 9 5 9 6 9 7 9 8 Turning On and Off 2 1 TWAIN Software 8 1 8 2 8 3 8 4 Delete Icon 3 1 Deleting a Picture Deleting a Picture From the Memory Card 3 2 Deleting a Picture Using Mounter Software 7 9 Deleting All Pictures From the Memory Card 3 2 Deleting all Pictures Using Mounter Software 7 9 Deleting the Current Picture 2 3 Deleting a Picture in Capture Mode 2 3...

Страница 89: ... in Review Mode 3 1 Memory 10 2 Memory Bar Display 3 1 Memory Card CompactFlash logo 2 8 Deleting a Picture From Using Mounter Software 7 9 Deleting Pictures From 3 2 Formatting 4 10 Full 2 6 Inserting and Removing 2 7 Memory Card Reader 10 2 Memory Cards 10 2 Problems 9 3 Properties 7 4 Viewing Available Memory 3 1 Viewing Pictures On 3 1 Memory Card Icon 2 7 Modes Capture 2 1 Connect 6 1 Prefere...

Страница 90: ...uirements for Installing Software 5 1 Requirements System 5 1 Resolution 2 10 Setting 4 3 Review Display Delete Icon 3 1 Filmstrip Icon 3 1 Magnify Icon 3 1 Memory Bar 3 1 Overlay Icon 3 1 Review Mode 3 1 S Screen Brightness 4 9 Self Timer 2 7 Serial Connection 6 2 MACINTOSH Kit 10 3 Serial Port Checking Availability 6 1 Serial Port and Port Speed Adjusting Using TWAIN Software 8 5 Adjusting With ...

Страница 91: ... Problems 9 3 Screen and Print Colors Do Not Match 9 2 The Camera and Computer Cannot Communicate 9 1 Windows DC200 DC210 Communication Problems 9 3 9 4 Turning the Camera On and Off 2 1 TWAIN Software 8 1 Adjusting Port and Port Speed 8 5 Starting 8 2 Transferring Pictures 8 3 8 4 Viewing Picture Information 8 4 V Video Ouput Format 4 11 Viewing a Slide Show on TV 3 4 Viewing Picture Information ...

Отзывы: