Kobian CyperPix E550V Скачать руководство пользователя страница 31


-29-


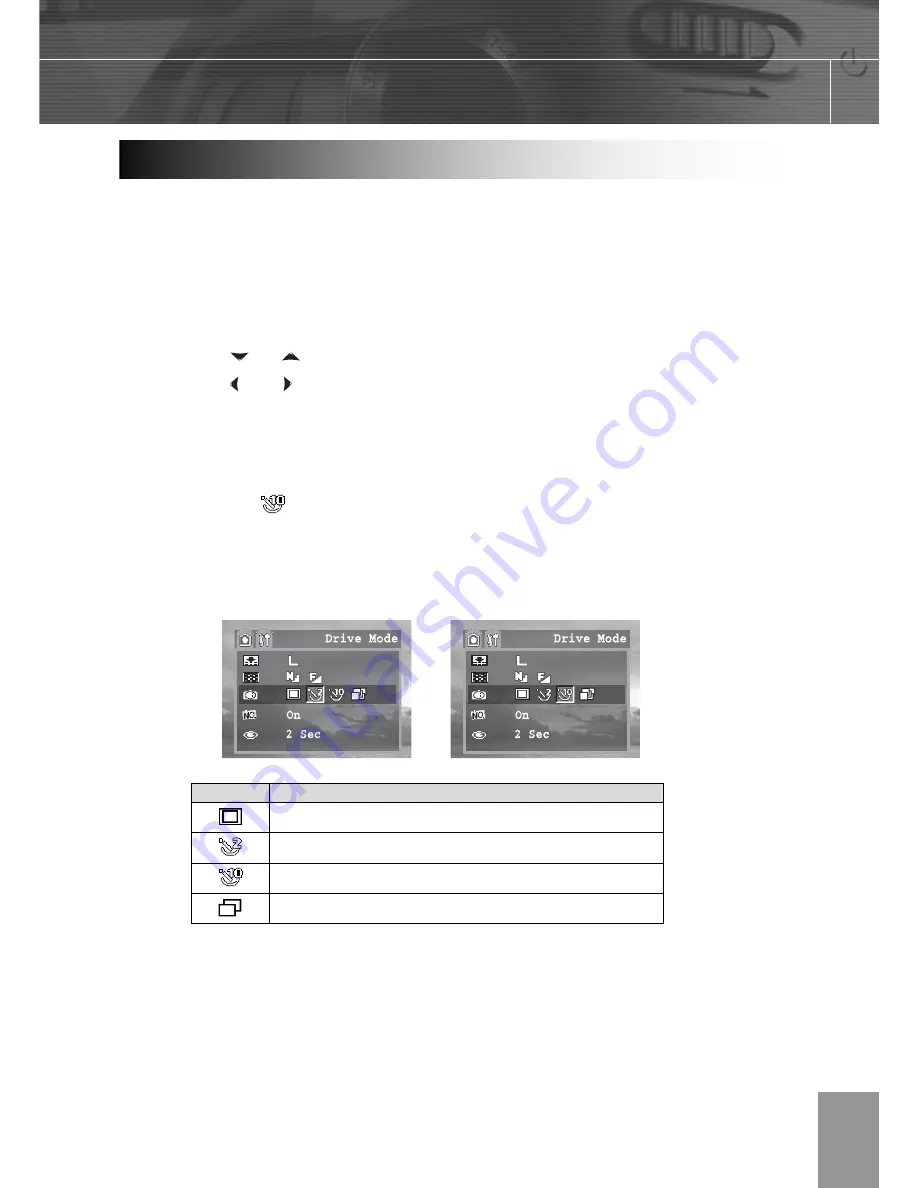
You can take pictures with the self-timer in any shooting mode. 

Use the self-timer to set a delay from the time the shutter button is pressed to the time 

the image is shot. 
 
1.


Press the 

MENU

 button. 

2.


Press the 

 or    arrow to select 

Drive Mode

3.


Press the   and   to select 

Single shoot, 2 sec self-timer, 10 sec self-timer, 

Continuous shooting. 


4.


Press the 

MENU

 button to close the menu window. 

5.


Shoot the image. 

If you select 

, the self-timer starts sounding and blinking after the shutter button 

is pressed all the way. The self-timer sounds and the blinking gets faster two 
seconds before the shutter activates. 


Setting 

Description


Single shoot 


Two seconds 


Ten seconds 


5 images at one shot 

Setting the Self-Timer

Содержание CyperPix E550V

Страница 1: ...rnal or SD Card Memory 13 Turning the Power On Off 14 Setting the Date and Time 14 Print Date 15 Setting the Language 15 Setting the Beep Sound 15 Auto Power Off Settings 16 TV Out Signal Set Up 16 Setting LCD Brightness 17 Folder Format 18 Quick View 18 Selecting Menus and Settings 19 3 Basic Functions Previewing a Picture 21 Setting the LCD Display Mode 21 Shooting Mode 21 Playback Mode 22 Infor...

Страница 2: ...lash Memory Images to a Memory Card 44 7FileNames Printing About File and Folder Numbers 45 Folder File Capacity 45 File Number Reset 46 DPOF Print Settings 47 Selecting Images for Printing 47 Resetting the Print Settings 48 8Making Connections Viewing Images on a TV 49 Selecting the Video Output Signal Mode 50 Downloading Images to a Computer 50 Downloading Directly from an SD Card 51 Connecting ...

Страница 3: ... contact your dealer immediately if any of the items below are missing or damaged USB Cable Camera TV out cable Soft Case Li ion Rechargeable Battery Pack Strap User Manual Software Installation CD ROM Compact Power Adapter Quick Start Guide 1 ...

Страница 4: ... 32 MB RAM z USB port z CD ROM drive z 800x600 pixels 16 bit color display compatible monitor Macintosh z Power Mac G3 or later z Mac OS 9 0 9 1 9 2 and OS X z Minimum 64 MB RAM z USB port z CD ROM drive z 800x600 pixels 16 bit color display compatible monitor Specifications are subject to change without prior notice 2 ...

Страница 5: ...wet hands Never use the camera in the rain or snow Moisture creates the danger of fire and electric shock z Keep the camera and its accessories out of the reach of children and animals to prevent accidents or damage to the camera z If you notice smoke or a strange odor coming from the camera turn the power off immediately and unplug the AC adapter from the power outlet Take the camera to the neare...

Страница 6: ...will not occur in a particular installation If this equipment does cause harmful interference to radio or television reception which can be determined by turning the equipment off and on the user is encouraged to try to correct the interference by one or more of the following measures z Reorient or relocate the receiving antenna z Increase the separation between the equipment and receiver z Connec...

Страница 7: ...g the directions indicated inside the battery cover Slide the battery cover closed 3 Install theSD Card p 12 Turn off the camera Slide the SD card slot battery cover in the direction of the arrow to open the cover The SD card slot is located beneath the battery compartment Insert the SD card with the label facing up and the arrow pointing in 4 Turn on the Camera Power p 14 Slide the power switch t...

Страница 8: ...en the camera has finished adjusting its settings the auto focus indicator will appear Press the shutter button all the way 7 View the Recorded Image p 26 The recorded image appears in the LCD monitor for approximately 2 seconds Press to view the captured photo To delete the file press Press and to select YES or NO press OK to confirm the choice Press again return to shooting mode ...

Страница 9: ...ront Macro Protect Operation lamp Power switch Viewfinder Zoom Out button Flash Erase Up button Right button Down button Left button Zoom In button button button Battery cover LCD screen Replay OK Quick Function button Rear Shutter button Mode dial 5 0 Top 7 ...

Страница 10: ...g theWrist Strap The illustration shows how to attach the wrist strap to your camera 8 Don t swing the camera when carrying it by the wrist strap UsingtheSoft Case z Store the camera in the included soft case when not in use z Slide the camera in the case with the LCD screen facing down as illustrated ...

Страница 11: ...own button Left button Moving thecursorontheLCDmonitorup and down Press the MENU button Press the or to select a menu item on the LCD monitor Moving the cursor onthe LCD monitor left and right Press the MENU button Press the or to select a menu item on the LCD monitor Confirming a menu selection Press the OK button Press the MENU button to close the menu window 9 ...

Страница 12: ...er into a power outlet 3 A green light indicator is on that mean charging is on the way BatteryStatusSymbols The following icons indicate the battery status on the LCD monitor These icons will not appear while the camera is powered with a compact power adapter Sufficient battery charge Low battery Replace or recharge battery The charge indicator will light red while the battery pack is charging It...

Страница 13: ...d Install the Battery Pack into the camera as follows Use the Compact Power Adapter instead of the Battery Pack to power the camera for extended periods 1 Slide the battery cover in the direction of the arrows 2 Insert the battery pack with the positive and negative poles matching the directions indicated inside the battery cover When the indicator on the right side of the viewfinder is blinking g...

Страница 14: ... automatically switches to AC power adapte powered r operation when the adapter is plugged into the camera 3 Use an AC adapter that meets the camera s power specification DC 5V Using an incorrect AC power adapter may result in permanent damage to the camera Installing an SD Card 1 Turn off the camera 2 Slide the SD card slot battery cover in the direction of the arrow to open the cover 3 Insert th...

Страница 15: ...lect the Setup Menu 4 Press the or arrow to select Format then press the OK button 5 Press the and arrow to select Yes or No 6 Press the OK button to confirm the selection 7 Press the MENU button to close the menu window 13 1 Please note that forma ting an SD ca d erases all the data it contains t r including protected images and other file types Please check the contents of the SD card before for...

Страница 16: ...e Mode dial is set to Playback mode Turning the Power On Off Setting the Date and Time 1 Turn on the camera 2 Press the MENU button 3 Press the arrow to select the Setup Menu 4 Press the or arrow to select Date Time then press the OK button 5 Set the date and Time 6 Press the and arrow to select a field to change 7 Press the and arrow to set the values 8 Press the OK button 14 9 Press the MENU but...

Страница 17: ...e on off 5 Press the MENU button to close the menu window Setting the Language 1 Press the MENU button 2 Press the arrow to select the Setup Menu 3 Press the or arrow to select Language then press the OK button 4 Press the and to select a Language 5 Press the MENU button to close the menu window Setting the Beep Sound 1 Press the MENU button 2 Press the arrow to select the Setup Menu or 15 3 Press...

Страница 18: ...ess the arrow to select POWER SAVE 4 Press the and to set auto power off values off 1 min 10min 5 Press the MENU button to close the menu window TV Out Signal Set Up 1 Press the MENU button 2 Press the arrow to select the Setup Menu or 3 Press the arrow to select TV OUTPUT 4 Press the and to set the video output signal standard NTSC PAL 16 5 Press the MENU button to close the menu window ...

Страница 19: ... 4 Press the and to set the LCD Brightness level 5 Press the MENU button to close the menu window Folder Format 6 Press the MENU button 7 Press the arrow to select the Setup Menu or 8 Press the arrow to select FOLDER FORMAT 9 Press the and to set the folder format type standard date 10 Press the MENU button to close the menu window 17 ...

Страница 20: ... arrow to select Quick View 3 Press the and to set the Quick View values Off 2 sec 10 sec 4 Press the MENU button to close the menu window 1 With the 2 sec to 10 sec options the image will appear for the time selected even if the shutter button is released Quick View 2 You can continue to display the image as long as the shutter button is held down regardless of the Review setting 18 ...

Страница 21: ...26 Drive Mode p 29 File No Reset On Off p 46 Quick View 10 sec 2 sec Off p 18 Camera Menu Auto Digital Zoom On Off p 24 Mode A S M p 34 Resolution p 26 Quality p 26 Drive Mode P 29 EV 2 1 7 1 3 1 0 0 7 0 3 0 0 0 3 0 7 1 0 1 3 1 7 2 0 p 34 White Balance p 35 ISO AUTO p 35 File No Reset On Off p 46 Quick View 10 sec 2 sec Off p 18 Camera Menu A S M Advanced Mode Digital Zoom On Off p 24 19 ...

Страница 22: ... Power Save Off 1 10 min p 16 Beep On Off p 15 TV Output NTSC PAL p 16 Folder Format Standard Date p 18 Print Date On Off p 15 Format Media Formatting Internal or SD Card Memory p 13 Language English Traditional Chinese Simplified Chinese Japanese Korean Deutsch Français Nederlands Italiano Español Portugues Russian p 15 Setup Menu Date Time Sets the date and time p 14 20 ...

Страница 23: ...deo clip 2 The image automatically appears on the LCD screen with information about camera settings 3 Press again return to shooting mode Setting the LCD Display Mode Pressing the DISPLAY button switches the LCD screen display mode Pressing the DISPLAY button cycles the LCD screen to the next mode each time the button is pressed Shooting Mode On with Information On No Information Off AUTO S 21 ...

Страница 24: ...Compression Setting Playback Mode Simple Display No Information Display Information with exposure settings data Display information without exposure settings data The LCD monitor displays information in Shooting or Playback mode such as the camera settings remaining image capacity and shooting date time Shooting Mode Information Displayed on the LCD Monitor ...

Страница 25: ...te Balance ISOSpeed Compression Setting Shooting Time Date DisplayImage Total FileNumber Playback Mode The Zoom can be adjusted from 7 7 23 1 mm 37 111 mm when converted to 35 mm film format Telephoto Wide Angle Press W to zoom out for a wide angle shot Press T to zoom in for a telephoto shot Using the Zoom Feature ...

Страница 26: ...s up to 12 0 X 1 Press the MENU button 2 Press the arrow to select the Setup Menu or 3 Press the arrow to select digital zoom 4 Press the and to set digital zoom on off 5 Press the MENU button to close the menu window Using the Mode Dial Use the mode dial to switch between the camera s available working modes at any time Auto mode A S M Advanced mode Movie mode 24 ...

Страница 27: ...of the shutter when the shutter activates 1 The beep does not sound if the beeper setting is turned off in the setup menu 2 Please note that camera shake becomes a factor at low shutter speed If the camera shaking hand icon appears in the LCD monitor secure the camera to a tripod before shooting 3 When the shutter button is pressed half way down check the exposure value that appears on the LCD mon...

Страница 28: ...t the purpose of the image you are about to shoot 1 Press MENU 2 Press the or arrow to select image resolution and quality 3 Press the and to select a value 4 Press the MENU button to close the menu window Resolution Purpose Large 2560 1920 fine normal Print large prints Medium 1 2048 1536 fine normal Print on small size paper Medium 2 1280 960 fine normal Send images by e mail Small 640 480 fine ...

Страница 29: ...low light conditions slow shutter speed provides better lighting of the background that is out of range of the flash Slow Red Eye Combine the red eye reduction function and slow sync function 1 Press the button to switch between flash modes 2 The selected flash mode appears on the LCD monitor 3 You can switch between settings by pressing the button 4 Shoot the image SettingtheRed eyeReduction Func...

Страница 30: ...ode to shoot close up of subjects in the range of 10 cm at the wide angle end and 16 cm at the telephoto end 1 Press the DISPLAY button to turn the LCD monitor on 2 Press the MACRO button 3 The icon appears on the LCD monitor 4 Shoot the image Mode Auto Advanced Mode A S M Video Macro available Yes Yes Yes 1 Distances referred to measure the distance between the camera lens surface and the subject...

Страница 31: ...the and to select Single shoot 2 sec self timer 10 sec self timer Continuous shooting 4 Press the MENU button to close the menu window 5 Shoot the image If you select the self timer starts sounding and blinking after the shutter button is pressed all the way The self timer sounds and the blinking gets faster two seconds before the shutter activates Setting Description Single shoot Two seconds Ten ...

Страница 32: ...shoot 1 Press the MENU button 2 Press the or arrow to select Drive Mode 3 Press the and to select Continuous shooting 4 Press the MENU button to close the menu window 5 Shoot the image 6 Press the shutter button halfway to lock the focus 7 Press the shutter button all the way to shoot Continuous Shooting ...

Страница 33: ...rn the mode dial to A S M advanced mode 2 Press the MENU button 3 In the camera setup mode Press the or arrow to select mode 4 Press the and to set the camera mode to A aperture priority Mode 5 Press the MENU button to close the menu window 6 The aperture will appear on the LCD monitor Press the and button to select a aperture value 7 Shoot the image Aperture Setting Display The larger the apertur...

Страница 34: ...elect mode 4 Press the and to set the camera mode to S Shutter speed priority Mode 5 Press the MENU button to close the menu window 6 The shutter speed will appear on the LCD monitor Press the and button to select a shutter speed 7 Shoot the image ShutterSpeed Display For slower speeds quote marks indicate the decimal place so 2 indicates 2 seconds 1 The correct exposure has been set if the shutte...

Страница 35: ...ial to A S M advanced mode 1 Press the MENU button 2 In the camera setup mode Press the and arrow to select mode 3 Press the and to set the camera mode to M Manual Mode 4 Press the MENU button to close the menu window The shutter speed and aperture will appear on the LCD monitor If either the shutter speed or aperture displays in red you can Press the and button to select a value When the setting ...

Страница 36: ...pensation setting to compensate for certain light conditions including backlighting indirect indoor lighting and dark backgrounds 1 Turn the Mode dial to A S M advanced mode 2 Press the MENU button 3 In the camera menu press the or arrow to select EV then press the OK button 4 Press the and to set the exposure compensation value Available settings are 2 0 1 7 1 3 1 0 0 7 0 3 0 0 0 3 0 7 1 0 1 3 1 ...

Страница 37: ...dvanced mode 2 Press the MENU button 3 In the camera menu press the or arrow to select white balance then press the OK button 4 Press the and to set the white balance value then press the OK button 5 Press the MENU button to close the menu window Change the ISO speed when shooting in dark places or when you want to shoot with a faster shutter speed You can choose from the following speeds AUTO 100...

Страница 38: ...ial to video mode The LCD monitor displays the maximum recording time in seconds 2 Press the shutter button all the way 3 Press the shutter button all the way to stop recording the movie 4 The camera stops recording automatically when the memory capacity has been reached Higher ISO speeds increase the image noise To take clean images use as low an ISO speed as possible The white movie icon turns r...

Страница 39: ...d it from www apple com On the Macintosh platform QuickTime is generally bundled with Mac OS 8 5 or later operating system 1 In movie mode the resolution is set to 320 240 pixels Video resolution cannot be changed 2 If the indicator on the left side of the viewfinder blinks green after a shot this indicates that the movie is being written to the SD card You cannot shoot again until it stops blinki...

Страница 40: ...sten White Balance Fluorescent ISO AUTO 100 200 400 L 2560 1920 M1 2048 1536 M2 1280 960 Resolution S 640 480 Fine Quality Normal Auto Force On Force Off Red Eye Slow Flash Slow Red Eye Macro On Off Self timer On Off Optical Zoom Digital Zoom Functions Available in Each Camera Mode ...

Страница 41: ...he previous image and to move to the next image Press again return to shooting mode Images can be magnified up from 1 times to 4 times 1 Press to view the captured photo 2 Press T to magnify the image 3 Press the or arrows to move the magnified area around the image 4 Press W to zoom out to the original full sized image Press the DISPLAY button to show the data for the displayed image page 22 Pres...

Страница 42: ...mages 4 The selected image is highlighted 5 Press the or to select an image 6 Press the telephoto T button to display the selected image in full screen size Erase files that you don t want to keep to make more memory space available You can erase individual files or all files when the camera is in playback mode ErasingImages Individually 1 Press to view the captured photo or video clip 2 The last ...

Страница 43: ...OK to confirm the choice 5 Press again return to shooting mode Erasing AllUnprotectedImages 1 Press to view the captured photo or video clip 2 The last recorded image or video clip appears on the LCD monitor 3 Press the MENU button 4 Press the arrow to select ERASE ALL 5 Press and to select YES or NO press OK to confirm the choice 6 Press the MENU button to close the menu window ...

Страница 44: ...ow mode all images can be displayed one by one in an automated slide show 1 Press to view the captured images 2 The last recorded image appears on the LCD monitor 3 Press MENU button 4 Press the arrow to select SLIDE SHOW then press the OK button 5 Press the or to select SET or PLAY Select PLAY and press OK The slide show begins automatically starting from the first picture To remove the protectio...

Страница 45: ...played or continues to display until stopped Period Sets the duration that each image in a slide show is displayed The options are 3 to 10 seconds 15 seconds 30 seconds 1 Press to view the captured images 2 The last recorded image appears on the LCD monitor 3 Press MENU button 4 Press the arrow to select SLIDE SHOW then press the OK button 5 Press the or to select SET or PLAY Select SET and press ...

Страница 46: ...n installed SD memory card 1 Press to view the captured photo or video clip 2 The last recorded image or video clip appears on the LCD monitor 3 Press the MENU button 4 Press the arrow to select Copy card 5 Press and to select YES or NO press OK to confirm the choice 6 Press the MENU button to close the menu window Copying Flash Memory Images to a Memory Card ...

Страница 47: ... 0999 the camera creates a new folder by adding one to the current folder number For example if the current folder is 100V4 8 00 the new folder is named 101V4 8 00 If the highest folder number is 999 and the highest file number exceeds 0999 the camera will display the warning message FILE NUMBER OVER If FILE NUMBER OVER appears follow one of the two methods below 1 Format the memory The folder num...

Страница 48: ... the next number 1 Turn the Mode dial to A S M advanced mode 2 Press the MENU button or 3 In the camera menu press the arrow to select File No Reset 4 Press the and to select on or off 5 Press the MENU button to close the menu window 46 1 Set ing the File No Reset to OFF is useful fo avoiding file name t r duplication when images are downloaded to a computer File Number Reset 2 If the memory card ...

Страница 49: ...ge or video clip appears on the LCD monitor Use to move to the previous image and to move to the next image And set a print order 1 Press MENU button or 2 In the Playback menu press the arrow to select Print 3 Press OK to enter the PRINT setting menu 4 Press the or arrow to confirm the print index ON OFF Print Index Order Reset Off On 5 Press the arrow to select Order then press OK to enter print ...

Страница 50: ...ress the arrow to select RESET then press OK to clear all DPOF settings Print Clear all setting OK Cancel 3 Press MENU to return to main playback menu 48 The Digital Print Order Format DPOF set ing is only supported fo photos t r stored on an SD card If you are using internal memory please copy images from internal memory to SD card ...

Страница 51: ...UT USB terminal on the camera 3 Plug the other end of the AV cable to the video in jack on the TV 4 Turn on the TV and switch it to VIDEO mode 5 Turn on the camera Everything that would normally appear on the camera s LCD monitor such as photo and video clip playback slide shows and image or video capture appears on the TV 49 The camera s LCD monitor turns off automatically during video output Vie...

Страница 52: ...is set the output image will not display properly Selecting the Video Output Signal Mode Downloading Images to a Computer Download images taken with the camera to a computer in one of the following ways 1 Directly from the SD card 2 Connect the camera to a computer with the USB cable You must install the software and USB driver bundled on the Software Installation CD ROM before connecting the came...

Страница 53: ...the computer s PC card slot 2 Double click the icon of the drive with the SD card 3 Copy images from the card into a folder of your choice on the hard disk Connecting the Camera to a Computer with a USB Cable software installation CD ROM before connecting the camera to the computer Connect the supplied USB interface cable to the computer s USB port and the camera s DIGITAL terminal 1 You do no nee...

Страница 54: ...d in the folder named DCIM Understanding Camera Memory and Storage Internal Memory The digital camera is equipped with internal memory If an SD card is not installed in the camera all photos recorded by the camera will be stored in the internal memory If an SD card is installed photos and video clips are stored on the SD card Optional SD Memory Card Photos video clips and other information recorde...

Страница 55: ... ROM into the CD ROM drive 2 The model selection screen appears If it does not appear double click My Computer and find the CD ROM drive then double click the menu 3 Click Camera Driver on the model selection screen The InstallShield Wizard screen appears 4 Click Next When the Warning Information screen appears click OK The USB driver installation starts When the installation is completed the scre...

Страница 56: ...t use Windows XP ME 2000 98SE 98 on your computer to use this software 1 Start up your computer and insert the software installation CD ROM into the CD ROM drive 2 The model selection screen appears If it does not appear double click My Computer and find the CD ROM drive then double click the menu 3 Click Roxio PhotoSuite 5 0 SE on the model selection screen Follow the on screen instructions to in...

Страница 57: ... Click Next to continue with the installation 5 The Software License Agreement window appears To accept the license click Yes to continue If you disagree with the terms of the license click No to exit the installation program 55 ...

Страница 58: ...ed For most users C Program files is the most appropriate choice 7 Click Next to begin copying files from the CD ROM to the computer hard drive 8 The Release Notes window appears Click Next to continue 56 9 The Ready to Install the Program window appears Click Install ...

Страница 59: ...PhotoSuite 5 0 SE Roxio PhotoSuite 5 0 SE gives you the ability to edit crop and print the photos you download to your computer from the digital camera Refer to the application help documentation for information on using the software To start this program click Start Program Roxio PhotoSuite 5 57 ...

Страница 60: ...deo AF Lock Green 9 9 3 Video Recording Green 500 500 9 w Flash Red 9 9 9 4 Still AF AE AWB Lock w o Flash Green 9 9 9 5 Capture Still Image Green 130 130 9 9 6 Saving Image Green 130 130 9 9 w Flash Red 9 9 7 Self timer Capture 10 2 sec w o Flash Green 9 9 8 Self timer Capture 2 sec Self timer 125 125 9 9 1 4 sec Self timer 500 500 9 9 5 8 sec Self timer 250 250 9 9 Record 9 Self timer Capture 10...

Страница 61: ...s set to OFF Set the flash to any mode except off The camera was moving when the image was captured Hold the camera steady when shooting picture Image is blurry or out of focus The subject was beyond the range within which the camera can focus Turn the Macro mode on if the subject is within 10 cm zoomed out or 16 cm zoom in don t use Macro mode when shooting distant subjects Image is not displayed...

Страница 62: ...ronic shutter Optical Zoom 3 continues Digital Zoom Preview mode 4 0 5 per step Playback mode 4 scrollable Image File Format Still EXIF 2 2 compatible format JPEG compression DCF compatible Support DPOF White Balance Auto Day light Shade tungsten fluorescent Aperture priority Yes Shutter priority Yes Start up Time Less than 2 sec Picture Storage Internal 16 MB embedded flash memory External SD mem...

Отзывы: