background image

BAC-9300 Series Controller

Installation Guide

NOTE: 

The black terminals are for power. The 

green terminals are for inputs and 

outputs. The gray terminals are for 

communication.

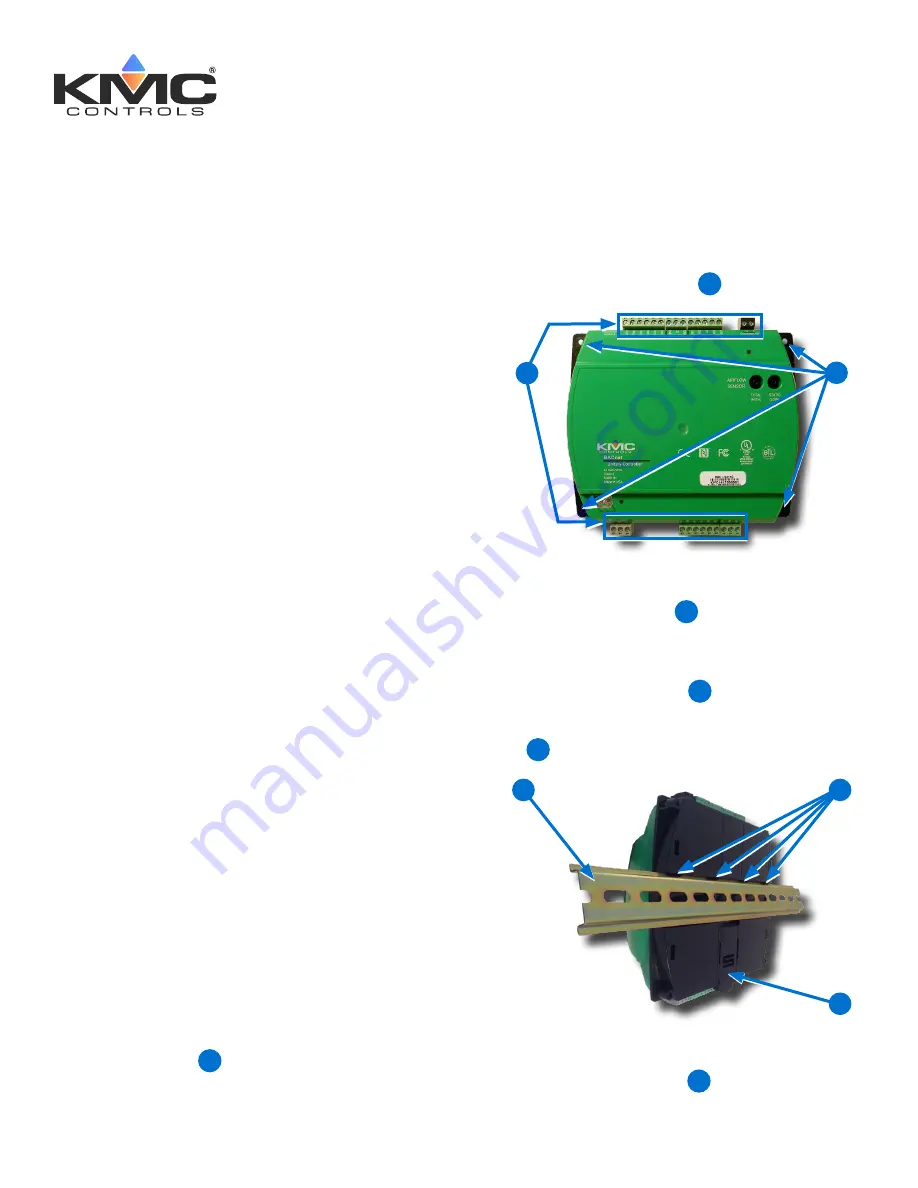
2.  Screw a #6 sheet metal screw through each 

corner of the 

controller


2

.

1

2

On a DIN Rail

1.  Position the 

DIN rail


3

 so that when the 

controller is installed the color-coded terminal 

blocks are easy to access for wiring.

2.  Pull out the 

DIN Latch 

4

 until it clicks once.

3.  Position the controller so that the top 

four tabs


5

 of the back channel rest on the DIN rail.

4

5

3

4.  Lower the controller against the DIN rail.

5.  Push in the 

DIN Latch


6

 to engage the DIN 

rail.

INTRODUCTION

Complete the following steps to install a KMC 

Conquest™ BAC-9300 Series Unitary Controller. 

For controller specifications, see the 

data sheet

 at 

kmccontrols.com

. For additional information, see 

the 

KMC Conquest Controller Application Guide

.

MOUNT CONTROLLER

NOTE: 

Mount the controller inside a metal 

enclosure for RF shielding and physical 

protection.

NOTE: 

To mount the controller with 

screws

 on 

a flat surface, complete the steps in 

On 

a Flat Surface on page 1

. Or to mount 

the controller on a 35 mm 

DIN rail


(such as integrated in an 

HCO-1103


enclosure), complete the steps in 

On a 

DIN Rail on page 1

.

On a Flat Surface

1.  Position the controller so the color-coded 

terminal blocks


1

 are easy to access for 

wiring.

KMC Controls, 19476 Industrial Drive, New Paris, IN 46553  

/

  877.444.5622  

/

  Fax: 574.831.5252  

/


www.kmccontrols.com

CONTENTS

Introduction .............................................. 1
Mount Controller ........................................ 1
Connect Sensors and Equipment .................. 2
Connect (Opt.) Pressure Flow Sensor ............ 3
Connect (Opt.) Ethernet Network .................. 3
Connect (Optional) MS/TP Network............... 4
Connect Power .......................................... 4
Power and Communication Status ................. 4
MS/TP Network Isolation Bulbs .................... 5

Configure/Program the Controller

 ................. 6

Sample (BAC-9311) Wiring

 .......................... 7

Input/Output Objects/Connections ................ 8
Replacement Parts ....................................10
Important Notices .....................................10

Содержание BAC-9300 Series

Страница 1: ...formation see the KMC Conquest Controller Application Guide MOUNT CONTROLLER NOTE Mount the controller inside a metal enclosure for RF shielding and physical protection NOTE To mount the controller with screws on a flat surface complete the steps in On a Flat Surface on page 1 Or to mount the controller on a 35 mm DIN rail such as integrated in an HCO 1103 enclosure complete the steps in On a DIN ...

Страница 2: ...relevant installation guide for additional details 7 1 Plug an Ethernet patch cable 7 connected to an STE 9000 Series or STE 6010 6014 6017 sensor into the yellow ROOM SENSOR port 8 of the controller NOTE The Ethernet patch cable should be a maximum of 150 feet 45 meters CAUTION On Conquest E models do NOT plug a cable meant for Ethernet communications into the Room Sensor port The Room Sensor por...

Страница 3: ...nformation NOTE On newer models the Room Sensor port is yellow 8 instead of black to help differentiate it from the black Ethernet ports NOTE For more information see Sample BAC 9311 Wiring on page 7 and the YouTube video KMC Conquest Wiring BAC 9300 Series Unitary Controllers 14 CAUTION Do NOT connect 24 VAC to the analog outputs UO7 UO10 and GNDs NOTE Use 24 VAC only with triac outputs BO1 BO6 w...

Страница 4: ... the amber COMM LED remain OFF check the power and cable connections to the controller CONNECT OPTIONAL MS TP NETWORK 1 For BAC 93x1 93x1C models only connect the BACnet network to the gray BACnet MS TP terminal block 15 15 NOTE Use 18 gauge AWG shielded twisted pair cable with maximum capacitance of 51 picofarads per foot 0 3 meters for all network wiring Belden cable 82760 or equivalent A Connec...

Страница 5: ...etwork 22 21 Amber ETHERNET LED 22 The amber Ethernet LED flashes when the controller is communicating with a 100BaseT Ethernet network The amber Ethernet LED remains OFF when the powered controller is communicating with the network at only 10 Mbps instead of 100 Mbps NOTE If both the green and amber Ethernet LEDs remain OFF check the power and network cable connections MS TP NETWORK ISOLATION BUL...

Страница 6: ...mate K factor from the chart in the Appendix K Factors for VAV section in the KMC Conquest Controller Application Guide For instructions on VAV balancing With an STE 9000 series NetSensor see the VAV Airflow Balancing with an STE 9xx1 section of the KMC Conquest Controller Application Guide With a BAC 5051E Router see its application and installation guide With KMC Connect or TotalControl see the ...

Страница 7: ...E For Ethernet models connect the controller to the network with a standard Ethernet patch cord NOTE Analog inputs accept 1K or 10K sensors 0 12 VDC or 4 20 mA NOTE For more wiring examples see the wiring diagrams that are part of the application library in KMC Connect Converge or TotalControl Early models shown in the drawings had different terminal locations Follow the terminal labels not locati...

Страница 8: ...ff BO5 Binary Heating Valve On Off BO6 Binary Output 6 BO6 Binary Output 6 AO7 and BO4 are controlled simultaneously AO8 and BO5 are controlled simultaneously AO7 and BO4 are controlled simultaneously AO8 and BO5 are controlled simultaneously BAC 9301 HPU BAC 9311 HPU Inputs Inputs AI1 Space Sensor on Room Sensor port AI1 Space Sensor on Room Sensor port AI2 Space Setpoint Offset on port AI2 Space...

Страница 9: ...tage 2 BO3 Cool Stage 2 BO4 Binary Output 4 BO4 Binary Output 4 BO5 Heating Stage 1 BO5 Heating Stage 1 BO6 Heating Stage 2 BO6 Heating Stage 2 BAC 9311 VAV Inputs AI1 Space Sensor on Room Sensor port AI2 Space Setpoint Offset on port AI3 UI3 Discharge Air Temperature AI4 UI4 Analog Input 4 AI5 UI5 Analog Input 5 AI6 UI6 Analog Input 6 AI7 UI7 Analog Input 7 AI8 UI8 Primary Damper Position AI9 Pri...

Страница 10: ...amages direct or incidental arising out of or related to the use of this document The KMC logo is a registered trademark of KMC Controls Inc All rights reserved TEL 574 831 5250 FAX 574 831 5252 EMAIL info kmccontrols com REPLACEMENT PARTS HPO 0055 Replacement Network Bulb Module for Conquest Controllers Pack of 5 HPO 9901 Conquest Hardware Replacement Parts Kit NOTE HPO 9901 includes the followin...

Отзывы: