background image

After connecting to gas, check for leaks using soapy 

solution, never a naked flame.  

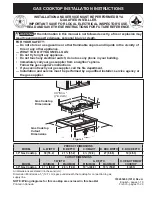
Inlet connection region for flexible hose

Gas Connection 

Install in accordance with relevant gas standards and/or codes of 

practice applicable.   

Connect the elbow fitting to the appliance gas manifold 

connection, and check that seals between the elbow and 

manifold connection are in place and in good condition.   

For Natural gas: connect the natural gas appliance

regulator (pictured opposite) with integral test point using

approved gas thread tape or compound to the elbow

fitting.

For Universal LPG: connect the brass test point adaptor

(pictured opposite) using approved gas thread tape or

compound to the elbow fitting.

Ensure the supply connection point, test point and natural gas 

regulator  adjustment  screw  (for  Natural  gas  installation)  are 

accessible  for  testing  and/or  adjustment  with  the  cooktop  in 

the installed position.  

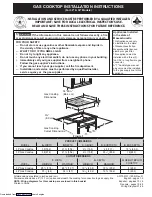
Where  a  flexible  hose  assembly  is  used,  ensure  it  is 

approved to AS/NZS 1869, Class B. Any hose assembly 

used  must  be  restrained  from  accidental  contact  with 

the flue outlet of an under bench oven. 

This hose assembly shall be suitable for connection to a 

fixed consumer piping outlet located as follows:

Cooktops at a point 800 mm to 850 mm above the floor 

and in the region outside the width of the appliance to a 

distance of 250 mm. 

20

Flexible Hose: If installing with a hose assembly, it must comply with AS/NZS


1869,10mmID,class B or D,no more than 1mm long and installed in 

accordance with AS/NZS 5601.1.

Ensure that the hose does not contact the hot surfaces of the 

cooktop

,


oven,


dishwasher or any other appliance that may be installed 

underneath or next to the hotplate.


The hose should not be subjected to 

abrasion, kinking or permanent deformation and should be able to be inspected 

along its entire length with the cooktop in the installed position. Unions 

compatible with the hose fittings must be used and all connections tested for 

gas leaks.


The supply connection point sh

ould 

be accessible with the appliance 

installed.

WARNING: Ensure that the hose assembly is restrained from accidental contact 

with the flue outlet of an underbench oven.

Gas Connection

Содержание GCT9012

Страница 1: ...cooking collection Instructions for use and warranty details DV RRNWRS 0RGHO 1R GCT9012...

Страница 2: ...esults carefully read the instructions on how your new appliance is to be installed Correct installation will avoid delays and unnecessary service call costs Once installation is complete please read...

Страница 3: ...ns Installation Child and People Safety During Use Cleaning and Service Environmental Information Description of the Appliance How to Use the Appliance Safety and Energy Saving Advice Cleaning and Mai...

Страница 4: ...ual as follows 3 If there is a possible gas leak take the following actions Neglect of this mark may result in severe personal injury or death Safety Instructions Please take the time to read this Use...

Страница 5: ...t damaged and that the connection cord is in perfect condition Otherwise contact the dealer before installing the appliance The adjacent furniture and all materials used in the installation must be ab...

Страница 6: ...signed to be operated by adults Children can injure themselves by pulling pans or pots off the appliance This appliance is not intended for use by children or other persons whose physical sensory or m...

Страница 7: ...is not designed to operate from an external timer or separate remote control system 6 Only use the appliance for preparing food in contact with water Do not operate this appliance with wet hands Do n...

Страница 8: ...high ame setting Foods for frying should be as dry as possible Frost on frozen foods or moisture on fresh using the appliance R QRW XVH D WHD WRZHO RU VLPLODU PDWHULDOV LQ SODFH RI D SRW KROGHU 6XFK...

Страница 9: ...ce it should be disconnected from the main power supply and cooled You should not use a steam jet or any other high pressure cleaning equipment to After installation please dispose of the packaging wi...

Страница 10: ...n 11 1kW 860 510 90 Continuous Ignition Type G1 2 thread 2W 220 240Vac 50Hz 60Hz Stainless Ignition device Gas Connection Electric supply Burner Feature Dimension W D H Top Plate Steel Rapid 1 Semi ra...

Страница 11: ...on each burner which is designed to stop the flow of gas to the burner head in the event of the flame going out Injector The minimum setting is at the end of the anti clockwise rotation of the contro...

Страница 12: ...p the control knob depressed the automatic ignition for the burner will operate You should hold down the control knob for 15 seconds after the flame on the burner has lit If after 15s the burner has n...

Страница 13: ...urner Do not place anything eg flame tamer or an asbestos mat between a pan and the pan support as serious damage to the appliance may result Do not place excessive weight on the cooktop and do not hi...

Страница 14: ...rly wipe over the top plate using a soft cloth well rung out in warm water to which a little washing up liquid has been added Dry the top plate thoroughly after cleaning Thoroughly remove salty foods...

Страница 15: ...oak them in hot water and a little detergent or washing up liquid After cleaning and washing them wipe and dry them carefully Make sure that the ame holes are clean and completely dry Wipe the xed par...

Страница 16: ...OGQ W EH EHQW RU EORFNHG E DQ RWKHU DSSOLDQFHV KHFN WKH GLPHQVLRQV RI WKH DSSOLDQFH DV ZHOO DV WKH GLPHQVLRQV RI WKH JDS WR EH FXW LQ WKH NLWFKHQ XQLW 7KH SDQHOV ORFDWHG DERYH WKH ZRUN VXUIDFH GLUHFWO...

Страница 17: ...ontal surface is lower than 400 mm then it must be at least 50 mm away from the outer edges of the hob 50 mm clearance around the appliance and between the hob surface and any combustible materials Yo...

Страница 18: ...for the worktop then fully tighten the screws C to secure the hob into position A SEALING STRIP C SCREW B BRACKET 17 Remove the pan supports the burner caps and burner heads carefully turn the applian...

Страница 19: ...are shown below Some are optional Replacement of gas type fitting Tool Open end wrench Steps for operation A Disassemble with a wrench the gas type fittings from main gas tube When you disassemble as...

Страница 20: ...ust be possible and the gas hose must be replaced before the end of its service life indicated on the hose Before leaving Check all connections for gas leaks with soap and water DO NOT use a naked fla...

Страница 21: ...ass B Any hose assembly used must be restrained from accidental contact with the flue outlet of an under bench oven This hose assembly shall be suitable for connection to a fixed consumer piping outle...

Страница 22: ...on 21 Wok burner Rapid burner Semi rapid Auxiliary rapid 10 8MJ h 6 3MJ h 3 6MJ h 0 88 0 68 0 53 1 50 1 12 0 83 12 96MJ h 0 97 1 60 Heat input and orifice size mm Gas type pressure Propand 2 75kPa Nat...

Страница 23: ...HG WR WKH WHUPLQDO ZKLFK LV PDUNHG ZLWK WKH OHWWHU RU E WKH HDUWK V PERO 5 When the power cord is damaged it must be replaced by the manufacturer customer service agent or similarly qualified personne...

Страница 24: ...rol knob and make further adjustments to the gas flow testing it again once the adjustment has been made Repeat this process for each one of the gas taps be tightly screwed in Refit the control knob 7...

Страница 25: ...ners caps carefully The holes in the burner head are clogged Clean the burner head The burners are incorrectly assembled Assemble the burners correctly The ignition safety device is contaminated with...

Страница 26: ...chased and no charges or refunds will be made based on the replacement product or part cost difference and iv is only applicable when the Product is used and operated in accordance with the Manufactur...

Страница 27: ...edit card may be required prior to the commencement of such services 17 Extra charges will be payable by the customer should the Product not be readily accessible without special equipment such as but...

Страница 28: ...ns Cooktops Steam ovens Microwave ovens Built in espresso coffee machines Rangehoods Freestanding ovens Refrigerators Freezers Beverage Serving Cabinets Water Dispensers Vacuum Cleaners Register your...

Отзывы: