background image

ENGLISH

WARRANTY AND SERVICE


|  

13

A limited three year warranty extends to 

the purchaser and any succeeding owner 

for Commercial Blender Bases operated in 

Puerto Rico. During the warranty period, all 

service must be handled by an Authorized 

KitchenAid Service Center. Please bring 

the Commercial Blender Base, or ship 

it prepaid and insured, to the nearest 

Authorized Service Center. Call  

toll-free 

1-855-845-9684

 to learn the 

location of a Service Center near you.  

Your repaired Commercial Blender Base  

will be returned to you prepaid and 

insured.

We’re so confident the quality of our 

products meets the exacting standards 

of the KitchenAid brand that, if your 

Commercial Blender Base should fail 

within the first three years of ownership, 

KitchenAid Canada will replace your 

Commercial Blender Base with an 

identical or comparable replacement. Your 

replacement unit will also be covered by 

our three year limited warranty. Please 

follow these instructions to receive this 

quality service.
If your Commercial Blender Base should fail 

within the first three years of ownership, 

take the Commercial Blender Base or 

ship collect to an Authorized KitchenAid 

Service Centre. In the carton include your 

name and complete shipping address 

along with a copy of the proof of purchase 

(register receipt, credit card slip, etc.). Your 

replacement Commercial Blender Base will 

be returned prepaid and insured. If you 

are unable to obtain satisfactory service 

in this manner call our toll-free Customer 

eXperience Centre at 

1-800-807-6777

.

Or write to us at:  

Customer eXperience Centre  

KitchenAid Canada 

200 - 6750 Century Ave. 

Mississauga, ON L5N 0B7

We’re so confident the quality of our 

products meets the exacting standards  

of KitchenAid that, if your Commercial  

Blender Base should fail within the first  

three years of ownership, KitchenAid 

will arrange to deliver an identical or 

comparable replacement to your door  

free of charge and arrange to have your 

original Commercial Blender Base returned 

to us. Your replacement unit will also be 

covered by our three year limited warranty. 

Please follow these instructions to receive 

this quality service.

If your Commercial Blender Base should fail 

within the first three years of ownership, 

simply call our toll-free Customer 

eXperience Center at 

1-855-845-9684


Monday through Friday, 8 a.m. to 8 p.m. 

(Eastern Time). Give the consultant your 

complete shipping address. (No P.O. Box 

numbers, please.)
When you receive your replacement 

Commercial Blender Base, use the carton 

and packing materials to pack up your 

original Commercial Blender Base. 

WARRANTY AND SERVICE

KITCHENAID COMMERCIAL BLENDER BASE WARRANTY  
FOR PUERTO RICO

HASSLE-FREE REPLACEMENT WARRANTY — CANADA

HASSLE-FREE REPLACEMENT WARRANTY — 50 UNITED STATES 
AND DISTRICT OF COLUMBIA

W10851732C_ENv01.indd   13

9/14/16   11:49 AM

Содержание KSBC1B0

Страница 1: ...KSBC1B0 ...

Страница 2: ...ord not shown Motor horsepower for the blender motor was measured using a dynamometer a machine that laboratories routinely use to measure the mechanical power of motors Our 3 5 peak horsepower HP motor reference reflects the horsepower output of the motor itself and not the Blender s horsepower output in the blender jar As with any blender the power output in the blender jar is not the same as th...

Страница 3: ... Unplug from outlet when not in use before putting on or taking off parts and before cleaning 5 Avoid contact with moving parts 6 Do not operate the Blender with a damaged cord or plug or after appliance malfunctions or is dropped or damaged in any manner Return appliance to the nearest Authorized Service Center for examination repair or electrical or mechanical adjustment If the supply cord or pl...

Страница 4: ...or other than intended use 13 Always operate Blender with cover in place 14 When blending hot liquids or ingredients ingredient measuring cup should remain in place over the lid opening Always start on lowest speed and slowly ramp to desired speed when blending hot liquids or ingredients SAVE THESE INSTRUCTIONS This product is designed for commercial use ELECTRICAL REQUIREMENTS Voltage 120 V Frequ...

Страница 5: ...n fruits This cycle is recommended for such drinks as Margaritas Daiquiris and blended ice coffee drinks 0 22 LOW When Low speed is selected the Blender will run continuously on low until the Start stop switch is pressed or after 6 minutes elapse N A MEDIUM When Medium speed is selected the Blender will run continuously on medium until the Start stop switch is pressed or until 6 minutes elapse N A...

Страница 6: ...ry and clean Be sure the power switch on the back of the blender base is in the OFF O position and the cord is also fully plugged into the back of the Blender Then plug the Blender into a grounded 3 prong outlet 2 The main power switch is on the back of the blender base Flip the POWER switch to the ON I position The status indicator light above the Start toggle button will begin to flash indicatin...

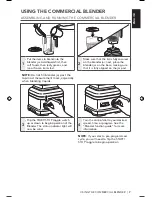
Страница 7: ...NG AND RUNNING THE COMMERCIAL BLENDER NOTE Do not fill blender jar past the top most measurement mark especially when blending liquids 1 Put the items to blend into the blender jar Add liquids first then soft foods then leafy greens and ice or frozen items last 2 Make sure that the lid is fully secured on the blender jar next place the blender jar on the base making sure that it is fully aligned o...

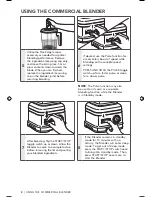
Страница 8: ...PRESS AND HOLD the PULSE toggle switch up for a faster pulse or down for a slower pulse 7 After blending flip the START STOP toggle switch up or down Allow the Blender to come to a complete stop before removing the lid and pouring your blended ingredients 8 If the Blender remains in standby mode for 10 minutes with no activity the Blender will enter sleep mode To get out of sleep mode press the ST...

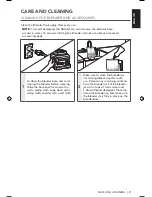
Страница 9: ...e any remaining contents from the blender jar Fill the blender jar with 2 cups of warm water and 1 drop of liquid detergent Place the lid on the blender jar and make sure the blender jar is fully in place on the blender base CARE AND CLEANING CLEANING THE BLENDER AND ACCESSORIES Clean the Blender thoroughly after every use NOTE To avoid damaging the Blender do not immerse the blender base or cord ...

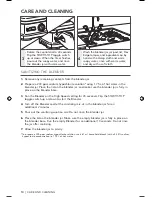
Страница 10: ...g solution mix Do not rinse the blender jar 6 Place the lid on the blender jar Make sure the empty blender jar is fully in place on the blender base Run the empty Blender for an additional 10 seconds Do not rinse the jar after sanitizing 7 Allow the blender jar to air dry To prepare a 200 ppm sodium hypochlorite solution use 6 67 ml household bleach with a 5 25 sodium hypochlorite concentration in...

Страница 11: ...lending After 6 minutes of run time the Blender will automatically shut off and go into Sleep mode and the LED light will turn off You can wake the Blender back up using the toggle switches START STOP or Pulse High Pulse Low If the Blender stops in less than 6 minutes it is possible there is an internal error with the Blender Contact an authorized service center for assistance 4 If the ingredients...

Страница 12: ...sulting from accident alteration misuse or abuse B Replacement parts or repair labor costs for Blender operated outside the 50 United States and District of Columbia C Replacement of the jar or base unit due to cosmetic issues DISCLAIMER OF IMPLIED WARRANTIES LIMITATION OF REMEDIES IMPLIED WARRANTIES INCLUDING TO THE EXTENT APPLICABLE WARRANTIES OF MERCHANTABILITY OR FITNESS FOR A PARTICULAR PURPO...

Страница 13: ...er receipt credit card slip etc Your replacement Commercial Blender Base will be returned prepaid and insured If you are unable to obtain satisfactory service in this manner call our toll free Customer eXperience Centre at 1 800 807 6777 Or write to us at Customer eXperience Centre KitchenAid Canada 200 6750 Century Ave Mississauga ON L5N 0B7 We re so confident the quality of our products meets th...

Страница 14: ...m to 8 p m Eastern Time Give the consultant your complete shipping address No P O Box numbers please When you receive your replacement Commercial Blender Jar use the carton and packing materials to pack up your original Commercial Blender Jar KITCHENAID COMMERCIAL BLENDER JAR WARRANTY FOR PUERTO RICO HASSLE FREE REPLACEMENT WARRANTY 50 UNITED STATES AND DISTRICT OF COLUMBIA We re so confident the ...

Страница 15: ...co Consult your local KitchenAid dealer or the store where you purchased the Commercial Blender for information on how to obtain service For service information in Canada Call toll free 1 800 807 6777 Or write to Customer eXperience Centre KitchenAid Canada 200 6750 Century Ave Mississauga ON L5N 0B7 ARRANGING FOR SERVICE AFTER THE WARRANTY EXPIRES OR ORDERING ACCESSORIES AND REPLACEMENT PARTS 201...

Страница 16: ...moteur du mélangeur a été évaluée à l aide d un dynamomètre un appareil de laboratoire couramment utilisé pour mesurer la puissance des moteurs La référence de notre moteur de 3 5 chevaux vapeur HP indique la puissance de sortie en HP du moteur lui même et non la puissance en HP appliquée au récipient par le mélangeur Comme pour tout mélangeur la puissance appliquée dans le récipient ne correspond...

Страница 17: ... proximité d enfants 4 Débrancher l appareil lorsqu il n est pas utilisé avant d y ajouter des pièces ou d en enlever et avant de le nettoyer 5 Éviter tout contact avec les pièces en mouvement 6 Ne pas faire fonctionner le mélangeur si le cordon ou la prise de l appareil est endommagé si l appareil fonctionne mal s il est tombé ou s il a été endommagé d une quelconque façon Retourner l appareil au...

Страница 18: ...eil pour un autre usage que celui pour lequel il est conçu 13 Toujours utiliser le mélangeur avec le couvercle en place 14 Le bouchon de couvercle avec tasse à mesurer devrait toujours rester en place lorsqu on mélange des liquides ou des ingrédients chauds Lors du mélange de liquides ou d ingrédients chauds toujours commencer à faible vitesse et augmenter doucement jusqu à atteindre la vitesse dé...

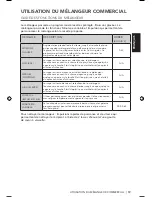
Страница 19: ...quiris et cafés glacés 0 22 LOW BAS Lorsque la vitesse basse est sélectionnée le mélangeur fonctionnera en continu à vitesse lente jusqu à ce que quelqu un appuie sur la touche Start stop mise en marche arrêt ou après 6 minutes d utilisation N A MEDIUM MOYENNE Lorsque la vitesse moyenne est sélectionnée le mélangeur fonctionnera en continu à vitesse moyenne jusqu à ce que quelqu un appuie sur la t...

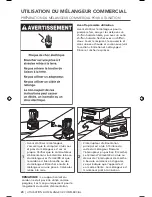
Страница 20: ...mmutateur d alimentation situé derrière la base du mélangeur est fermé O et que le cordon est bien branché au dos du mélangeur Brancher ensuite le mélangeur sur une prise à 3 alvéoles reliée à la terre 2 L interrupteur d alimentation principal est situé à l arrière du socle du mélangeur Basculer l interrupteur en position I marche Le témoin d alimentation situé au dessus de l interrupteur de march...

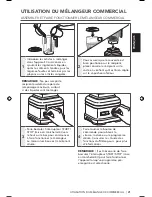
Страница 21: ...ler l interrupteur START STOP mise en marche arrêt vers le haut ou le bas pour commencer à faire fonctionner le mélangeur Le témoin lumineux est maintenant allumé 4 Faire tourner le bouton de commande pour obtenir la vitesse la durée ou le programme désiré Consulter le Guide des fonctions du Mélangeur pour plus d informations ASSEMBLER ET FAIRE FONCTIONNER LE MÉLANGEUR COMMERCIAL REMARQUE Ne pas r...

Страница 22: ...upteur PULSE d impulsion à bascule pour une pulsation plus rapide ou vers le bas pour une pulsation plus lente 7 Après avoir mélangé faire basculer l interrupteur START STOP mise en marche arrêt vers le haut ou le bas Permettre au mélangeur d arrêter complètement avant d enlever le couvercle et de verser les ingrédients 8 Si le mélangeur reste en mode attente pendant 10 minutes sans activité il se...

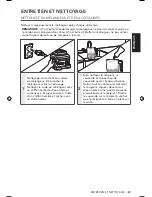
Страница 23: ...ation Retirer tout le contenu restant dans le récipient Ajouter deux tasses d eau tiède et une goutte de savon à vaisselle dans le récipient Mettre le couvercle sur le récipient vérifier que le récipient est bien en place sur le socle ENTRETIEN ET NETTOYAGE NETTOYAGE DU MÉLANGEUR ET DES ACCESSOIRES Nettoyer soigneusement le mélangeur après chaque utilisation REMARQUE Afin d éviter d endommager le ...

Страница 24: ...bol mélangeur 6 Placez le couvercle sur le récipient du mélangeur Assurez vous que le mélangeur pot vide est entièrement en place sur la base du mélangeur Exécutez le Blender vide pendant 10 secondes supplémentaires Ne pas rincer le pot après désinfection 7 Laisser le récipient du mélangeur à l air sec Pour préparer une solution à 200 ppm d hypochlorite de sodium Ajouter 6 67 ml d eau de javel ave...

Страница 25: ...ération de mélange Après 6 minutes d utilisation le mélangeur se ferme automatiquement et se met en mode veille le témoin lumineux à DEL se ferme Réactiver le mélangeur en utilisant un interrupteur à bascule START STOP marche arrêt ou Pulse H L impulsion forte faible Une erreur interne peut arrêter le mélangeur avant 6 minutes Communiquer avec le centre de service autorisé pour obtenir de l aide 4...

Страница 26: ...tion ou abus B Les frais des pièces de rechange ou de main d œuvre pour le mélangeur commercial lorsqu il est utilisé à l extérieur des 50 États des États Unis et du district fédéral de Columbia C Le remplacement de la base ou du récipient pour des raisons cosmétiques CLAUSE D EXONÉRATION DE RESPONSABILITÉ AU TITRE DES GARANTIES IMPLICITES LIMITATION DES RECOURS LES GARANTIES IMPLICITES Y COMPRIS ...

Страница 27: ...ment par carte de crédit etc Votre base de rechange de mélangeur commercial sera retournée port payé et assurée Si le service que vous obtenez de cette manière n est pas satisfaisant appelez sans frais notre centre eXpérience clientèle au 1 800 807 6777 Ou écrivez nous à Customer eXperience Centre KitchenAid Canada 200 6750 Century Ave Mississauga ON L5N 0B7 Nous sommes tellement certains que la q...

Страница 28: ...r votre adresse de livraison complète au représentant ne pas utiliser de numéro de C P À la réception du récipient de rechange du mélangeur commercial utiliser le carton et les matériaux d emballage pour emballer la pièce d origine GARANTIE DU RÉCIPIENT DU MÉLANGEUR COMMERCIAL KITCHENAID POUR PORTO RICO GARANTIE DE REMPLACEMENT SANS DIFFICULTÉ POUR LES 50 ÉTATS DES ÉTATS UNIS ET LE DISTRICT FÉDÉRA...

Страница 29: ...oir comment obtenir un dépannage Pour des informations concernant toute intervention de dépannage au Canada Composer sans frais le 1 800 807 6777 Ou écrire à l adresse suivante Customer eXperience Centre KitchenAid Canada 200 6750 Century Ave Mississauga ON L5N 0B7 OBTENIR UN DÉPANNAGE UNE FOIS LA GARANTIE EXPIRÉE OU COMMANDER DES ACCESSOIRES ET DES PIÈCES DE RECHANGE 2016 Tous droits réservés Kit...

Страница 30: ...mómetro una máquina que los laboratorios utilizan habitualmente para medir la potencia mecánica de los motores La referencia a nuestro motor de 3 5 caballos de fuerza HP máximos refleja la salida de potencia del motor en sí y no la salida de potencia de la licuadora en la jarra de la licuadora Como con cualquier licuadora la salida de potencia en la jarra de la licuadora no es igual a la potencia ...

Страница 31: ...s 1 Lea todas las instrucciones 2 Para protegerse contra el riesgo de choque eléctrico no ponga la licuadora en contacto con el agua ni en ningún otro líquido 3 Es necesario supervisar cuidadosamente a los niños cuando usen cualquier aparato o cuando éste se use cerca de ellos 4 Desenchufe del tomacorriente cuando no se esté en uso antes de colocar o quitar partes y antes de la limpieza 5 Evite to...

Страница 32: ...del recipiente mientras mezcla para así evitar la riesgo de lesiones graves a personas o daños a la licuadora Puede usarse una espátula o un raspador además del pisón de borde flexible que se proporciona pero se debe utilizar solamente cuando la licuadora no esté funcionando 10 Las cuchillas son filosas Manipúlelas con cuidado 11 KitchenAid recomienda no usar accesorios incluidos los frascos de li...

Страница 33: ...nto del aparato por una persona responsable 3 Los niños deben supervisarse para asegurar que ellos no empleen el aparato como juguete 4 Tenga cuidado si el líquido caliente se vierte dentro del procesador de alimentos o licuadora ya que este puede expulsarse fuera del aparato debido a un vapor repentino 5 Este aparato se destina para utilizarse en aplicaciones de uso doméstico y similar como los s...

Страница 34: ...l enchufe no encaja en el contacto de pared póngase en contacto con un electricista competente No modifique el enchufe de ninguna manera No use un adaptador No use un cable eléctrico de extensión Si el cable de suministro eléctrico es demasiado corto haga que un electricista o técnico de servicio competente instale un contacto cerca del electrodoméstico ...

Страница 35: ...ritas Daiquiris y bebidas con café helado 0 22 LOW BAJA Cuando se selecciona la velocidad baja la licuadora funcionará continuamente a baja velocidad hasta que se presione Start Stop Encendido Apagado o después de transcurridos 6 minutos N A MEDIUM MEDIA Cuando se selecciona la velocidad media la licuadora funcionará continuamente a velocidad media hasta que se presione Start Stop Encendido Apagad...

Страница 36: ... parte posterior de la base de la licuadora esté en la posición O Apagado y que el cable también esté totalmente enchufado en la parte posterior de la licuadora Después enchufe la licuadora en un tomacorriente de 3 terminales con descarga a tierra 2 El interruptor de encendido principal está en la parte posterior de la base de la licuadora Mueva el boton I O Encendido Apagado a la posición I Encen...

Страница 37: ...re la base de la jarra 3 Presione el interruptor alternador START STOP Encendido Apagado hacia arriba o hacia abajo para comenzar a hacer funcionar la licuadora La luz indicadora de estado quedará encendida fija 4 Gire el perilla de control hasta la velocidad el tiempo o el programa que desee Para obtener más información vea la Guía de funciones de la licuadora CÓMO ARMAR Y HACER FUNCIONAR LA LICU...

Страница 38: ...ANTENGA PRESIONADO el interruptor alternador PULSE modo de Pulso hacia arriba para pulsar más rápido o hacia abajo para pulsar más despacio NOTA La función Pulse modo de Pulso también se puede usar sola como función de licuado independiente mientras la licuadora está en modo en espera 7 Después de licuar mueva el interruptor alternador START STOP Endendido Apagado hacia arriba o hacia abajo Espere...

Страница 39: ... todo contenido restante de la jarra de la licuadora Llene la jarra de la licuadora con 2 tazas de agua tibia y 1 gota de detergente líquido Coloque la tapa en la jarra de la licuadora y asegúrese de que la jarra esté completamente en su lugar sobre la base CUIDADO Y LIMPIEZA LIMPIEZA DE LA LICUADORA Y LOS ACCESORIOS Limpie la licuadora minuciosamente después de cada uso NOTA Para evitar dañar la ...

Страница 40: ...rra está completamente en su lugar en la base de la licuadora 3 Ejecutar l licuadora en el ajuste de alta velocidad durante 35 segundos Da la vuelta al START STOP Endendido Apagado de interruptor de palanca hacia arriba o hacia abajo para iniciar la licuadora 4 Apague la licuadora y dejar que la mezcla desinfectante sentarse en el vaso de la licuadora durante otros 2 minutos 5 Derramar la mezcla d...

Страница 41: ...ientes de una receta no se procesan Es posible que a veces se forme un hueco de aire alrededor de la cuchilla y haga que los ingredientes no lleguen a la cuchilla Detenga la licuadora retire la jarra de la base y use una espátula para reorganizar los ingredientes dentro de la jarra Para ciertas recetas pruebe de agregar más líquido 5 Si se produce un derrame de la jarra de la licuadora Desenchufe ...

Страница 42: ... no pagará por A Daños causados por accidente alteración uso indebido o abuso B Piezas de repuesto o costos de mano de obra de reparación para licuadoras que se usen fuera de los 50 estados de Estados Unidos y del Distrito de Columbia C Reemplazo de la jarra o de la unidad base debido a problemas estéticos EXCLUSIÓN DE GARANTÍAS IMPLÍCITAS LIMITACIÓN DE RECURSOS LAS GARANTÍAS IMPLÍCITAS INCLUIDAS ...

Страница 43: ... su dirección de envío completa No use números de apartados postales Cuando reciba la base de la licuadora comercial de reemplazo use la caja y el material de embalaje para embalar la base de la licuadora comercial original GARANTÍA KITCHENAID PARA LA BASE DE LA LICUADORA COMERCIAL EN PUERTO RICO GARANTÍA DE REEMPLAZO SIN DIFICULTADES EN LOS CINCUENTA ESTADOS DE ESTADOS UNIDOS Y EL DISTRITO DE COL...

Страница 44: ...e Proporcione al asesor su dirección de envío completa No use números de apartados postales Cuando reciba la jarra de la licuadora comercial de reemplazo use la caja y el material de embalaje para embalar la jarra de la licuadora comercial original GARANTÍA KITCHENAID PARA LA JARRA DE LA LICUADORA COMERCIAL EN PUERTO RICO GARANTÍA DE REEMPLAZO SIN DIFICULTADES EN LOS CINCUENTA ESTADOS DE ESTADOS U...

Страница 45: ...re cómo obtener servicio Para obtener información acerca del servicio en Canadá llame sin cargo al 1 800 807 6777 O bien escriba a Customer eXperience Centre KitchenAid Canada 200 6750 Century Ave Mississauga ON L5N 0B7 CÓMO OBTENER SERVICIO TÉCNICO DESPUÉS DE QUE EXPIRE LA GARANTÍA O CÓMO PEDIR ACCESORIOS Y PIEZAS DE REPUESTO Para México y Latinoamérica Para más información acerca de su garantía ...

Страница 46: ......

Страница 47: ......

Страница 48: ...e du batteur sur socle sont des marques de commerce aux É U et ailleurs Utilisé sous licence au Canada 2016 Todos los derechos reservados KITCHENAID y el diseño de la batidora con base son marcas registradas en EE UU y en otros países Usado en Canadá bajo licencia PRODUCT QUESTIONS OR RETURNS QUESTIONS SUR LE PRODUIT OU LES RETOURS PREGUNTAS SOBRE EL PRODUCTO O DEVOLUCIÓNES USA 1 800 541 6390 Kitc...

Отзывы: