CAUTION: Unplu
g before insertin
g of removing parts
Heavy D
uty
Solid State Sp
eed Cont
rol
KitchenAid
St. Joseph, M
ichigan USA
Off Stir 2
4 6 8 10
Deutsch
R-6
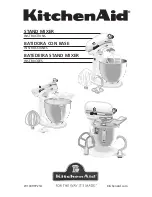
Motorkopf
Mixerhöhen-
einstellungsschraube
(nicht abgebildet)
Schüsselhe-
begriff (nicht
abgebildet)
Schnappverschluss und
Schüsselstift (nicht abgebildet)
Zusatz-
geräteknopf
Zusatzgerätenabe
Passstifte
Drahtschläger
Flachschläger
Teighaken
Geschwindigkeits-
kontrollhebel
Schüsselhalter
Schläger-
welle
4,3-Liter-
Edelstahl-
schüssel
Ausstattung Ihrer Küchenmaschine (Modell 5KSM5)