background image

7

Tones

Tones are audible signals, indicating the following:

One tone

Valid pad press

Oven is preheated

Function has been entered

Three tones

Invalid pad press

Four tones

End-of-cycle

Reminder, repeating each minute after the end-of-cycle tones

All Tones (combination oven models only)

All of the above tones are preset on, but can be turned off.

To Turn Off/On: 

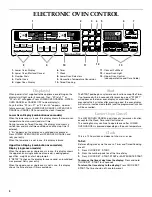
Press and hold STOP TIME for 5 seconds. A 

tone will sound and “Snd oFF” will appear on the lower oven 
display for 3 seconds. Repeat to change back to “Snd on”.

Tone Volume

The volume is preset at high, but can be changed to low.

To Change: 

Press and hold the number pad “7” for 5 seconds. A 

tone will sound and “Snd Lo” will appear on the lower oven 
display for 3 seconds. Repeat to change back to “Snd HI”.

REMINDER TONES

The Timer and Timed Cooking reminder tones are preset on, but 
can be turned off. Reminder tones do not include end-of-cycle 
tones. On combination oven models, if “All Tones” have been 
turned off, the reminder tones cannot be independently turned 
on.

Timer

To Turn Tones Off/On: 

Press and hold TIMER SET · START until 

a tone sounds. Repeat to turn back on.

Timed Cooking (combination oven models only)

To Turn Tones Off/On: 

Press and hold COOK TIME until a tone 

sounds and the lower oven display returns to inactive mode 
(blank). Repeat to turn back on.

Fahrenheit and Celsius

The temperature is preset in Fahrenheit, however it can be 
changed to Celsius.

To Change:

 Press and hold BROIL · MAXI · · ECONO for 5 

seconds. A tone will sound and “C°” will appear on the display for 
3 seconds. Repeat to change back to Fahrenheit.

When in Fahrenheit, “°F” follows the oven temperature.

When in Celsius, only “°” follows the oven temperature.

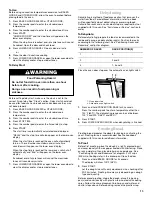
Timer

The Timer can be set in minutes and seconds or hours and 
minutes and counts down the set time. The Timer does not start 
or stop the oven.

To Set:

1.

Press TIMER SET · START.

Press again to switch between MIN/SEC and HR/MIN.

If no action is taken after one minute, the display will return to 
the time of day mode.

2.

Press the number pads to set length of time.

3.

Press TIMER SET · START or EASY MINUTE START.

If not pressed within 5 seconds, the display will return to the 
time of day mode and the programmed function will be 
cancelled.

When the set time ends, "END" will appear in the display and 
if enabled, end-of-cycle tones will sound, then reminder 
tones will sound every minute.

4.

Press TIMER CANCEL anytime to cancel the Timer and/or 
stop reminder tones.

*Remember, do not press the Off Cancel pads because the 
respective oven will turn off.

The time can be reset during the countdown by repeating the 
above steps.

Control Lock

The Control Lock shuts down the control panel pads to prevent 
unintended use of the oven(s).

When the control is locked, only the CLOCK SET · START, TIMER 
SET · START and TIMER CANCEL pads will function.

The Control Lock is preset unlocked, but can be locked.

To Lock/Unlock Control: 

Before locking, make sure the oven(s), 

Timer and Timed Cooking are off. Press and hold the number pad 
3 CONTROL LOCK until “CONTROL LOCK” and a picture of a 
lock appear on the display, about 3 seconds. Repeat to unlock 
and remove “CONTROL LOCK” from the display.

Oven Temperature Control

IMPORTANT:

 Do not use a thermometer to measure oven 

temperature because opening the oven door and element or 
burner cycling may give incorrect readings.

The oven provides accurate temperatures; however, it may cook 
faster or slower than your previous oven, so the temperature 
calibration can be adjusted. It can be changed in Fahrenheit or 
Celsius.

A minus sign means the oven will be cooler by the displayed 
amount. No sign means the oven will be warmer by the displayed 
amount. Use the following chart as a guide.

To Adjust Oven Temperature Calibration:

1.

Press and hold BAKE until the lower oven display shows the 
current calibration, for example, “0° CAL COOK TEMP”, if not 
yet adjusted or about 5 seconds.

2.

Press BAKE to increase and BROIL · MAXI · · ECONO to 
decrease the temperature in 5

°

F (3

°

C) amounts. The 

adjustment can be set between 35°F (21

°

C) and

-35°F (-21

°

C).

3.

Press START.

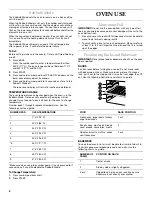
ADJUSTMENT °F 
(ADJUSTMENT °C)

COOKS FOOD

 5° to 10°F (3° to 6°C)

...a little more

 15° to 20°F (9° to 12°C)

...moderately more

 25° to 35°F (15° to 21°C)

...much more

-5° to -10°F (-3° to -6°C)

...a little less

-15° to -20°F (-9° to -12°C)

...moderately less

-25° to -35°F (-15° to -21°C)

...much less

Содержание 4453218A

Страница 1: ... parts accessories or service call 1 800 422 1230 In Canada for product related questions call 1 800 461 5681 for parts accessories installation and service call 1 800 807 6777 or visit our website at www kitchenaid com or www kitchenaid com canada Table of Contents 2 MODELS KEHC309 KEHC379 YKEHC309 4453218A ...

Страница 2: ...acks and Bakeware 8 Bakeware 9 Meat Thermometer 9 Oven Vent 9 Baking and Roasting 9 Convection Baking 10 Convection Roasting 10 Maxi and Econo Broiling 11 Convection Broiling 11 Convect Full Meal 12 Convection Temperature Conversion 12 Dehydrating 13 Proofing Bread 13 Temperature Probe 14 Timed Cooking 15 OVEN CARE 15 Self Cleaning Cycle 15 Cleaning 16 Oven Lights 17 Oven Door 17 TROUBLESHOOTING 1...

Страница 3: ...e using the oven User Servicing Do not repair or replace any part of the oven unless specifically recommended in the manual All other servicing should be referred to a qualified technician Storage in Oven Flammable materials should not be stored in an oven Do Not Use Water on Grease Fires Smother fire or flame or use dry chemical or foam type extinguisher IMPORTANT SAFETY INSTRUCTIONS Use Only Dry...

Страница 4: ...ng the Oven Remove broiler pan and other utensils The California Safe Drinking Water and Toxic Enforcement Act requires the Governor of California to publish a list of substances known to the State of California to cause cancer birth defects or other reproductive harm and requires businesses to warn of potential exposure to such substances WARNING This product contains a chemical known to the Stat...

Страница 5: ... Guide 2 Oven Vent 3 Broil Element not shown 4 Convection Element and Fan behind grid in back of oven 5 Bake Element hidden in floor panel 6 Oven Door Window 7 Electronic Oven Control 8 Automatic Oven Light Switch 9 Oven Lock Latch 10 Temperature Probe Jack 11 Model and Serial Number Plate on right mounting rail Parts and Features not shown Oven Lights Third Oven Rack Temperature Probe Broiler Pan...

Страница 6: ...is not in use this display shows the time of day or Timer countdown Start The START pad begins any lower oven function except the Timer If not pressed within 5 seconds after pressing a pad START will appear on the lower oven display as a reminder If not pressed within 5 minutes after pressing a pad the oven display will return to inactive mode blank and the programmed function will be cancelled Lo...

Страница 7: ...3 Press TIMER SET START or EASY MINUTE START If not pressed within 5 seconds the display will return to the time of day mode and the programmed function will be cancelled When the set time ends END will appear in the display and if enabled end of cycle tones will sound then reminder tones will sound every minute 4 Press TIMER CANCEL anytime to cancel the Timer and or stop reminder tones Remember d...

Страница 8: ...n using the number pad 6 it is only pressed for 1 second since it can also disable the Sabbath Mode To Change Temperature 1 Press number pad from chart 2 Press START OVEN USE AluminumFoil IMPORTANT Do not line the oven bottom with any type of foil liners or cookware because permanent damage will occur to the oven bottom finish Do not cover entire rack with foil because air must be able to move fre...

Страница 9: ...ill turn off in 2 minutes They will come back on once the door is closed To Bake or Roast Before baking and roasting position the racks according to the Positioning Racks and Bakeware section When roasting it is not necessary to wait for the oven to preheat before putting food in unless recommended in the recipe 1 Press BAKE optional Press the number pads to enter a temperature other than 350 F 17...

Страница 10: ... set temperature is reached and the oven is preheated if enabled one tone will sound 3 Press LOWER OVEN CANCEL when finished cooking ConvectionRoasting 1 Broil elements 2 Convection fan 3 Bake element hidden in floor panel During convection roasting the bake and broil elements cycle on and off in intervals to maintain the oven temperature while the fan constantly circulates the hot air If the lowe...

Страница 11: ...k better at lower broiling temperatures Position food on the grid in the broiler pan then place it in the center of the oven rack with the longest side parallel to the door It is not necessary to wait for the oven to preheat before putting food in unless recommended in the recipe Close the door 1 Press BROIL MAXI ECONO Once for Maxi twice for Econo Press the number pads to enter a temperature othe...

Страница 12: ...or Press START to save and immediately begin cycle ConvectionTemperatureConversion Convection temperatures and times differ from those of standard cooking The oven can automatically reduce standard recipe temperatures and times for convection cooking The conversion may not be exact because foods are grouped in general categories To ensure optimal cooking results the oven will prompt a food check a...

Страница 13: ...moves the water from food For additional information refer to a book written specifically about dehydrating or preserving foods Dehydration racks and an oven door stop are required but not supplied with this oven See Assistance or Service section to order To Dehydrate Before dehydrating prepare the food as recommended in the recipe and arrange on dehydration rack s Position the racks according to ...

Страница 14: ...ll shut off automatically and End will appear on the lower oven display If enabled end of cycle tones will sound then reminder tones will sound every minute 4 Press LOWER OVEN CANCEL or open the lower oven door to clear the display and or stop reminder tones 5 Always unplug and remove the temperature probe from the oven when removing food To Change Probe Temperature Oven Setting 1 Unplug the probe...

Страница 15: ...OVEN CANCEL or open the lower oven door to clear the display and or stop reminder tones OVEN CARE Self CleaningCycle IMPORTANT The health of some birds is extremely sensitive to the fumes given off during the Self Cleaning cycle Exposure to the fumes may result in death to certain birds Always move birds to another closed and well ventilated room Self clean the oven before it is heavily soiled Hea...

Страница 16: ...atically calculated and displayed The door will automatically lock and DOOR LOCKED DELAY and the stop time will also appear on the display The door will not unlock until the oven cools When the start time is reached the lower oven will automatically turn on When the cycle is complete and the oven cools End will appear on the lower oven display and DOOR LOCKED will disappear 5 Press any pad or open...

Страница 17: ...oor There is no need to remove the oven door for normal use However it can be done if necessary Before removing or replacing make sure all controls are off and the oven is cool The oven door is heavy Use both hands do not lift or carry the door by the handle and another person to help is suggested Use care not to damage the outer finish To Remove 1 Open the oven door all the way 2 Insert short end...

Страница 18: ...l for service See Assistance or Service section Self Cleaning cycle will not operate Is the oven door open Close the oven door all the way Has the function been entered See Self Cleaning Cycle section On some models has a delay start Self Clean cycle been set See Self Cleaning Cycle section Has a delay start been set See Timed Cooking section On double oven models is one oven self cleaning When on...

Страница 19: ...chenAid designated service company in your area you can also look in your telephone directory Yellow Pages For further assistance If you need further assistance you can write to KitchenAid with any questions or concerns at KitchenAid Brand Home Appliances Customer Interaction Center c o Correspondence Dept MD 8020 553 Benson Road Benton Harbor MI 49022 2400 Please include a daytime phone number in...

Страница 20: ...od or use of products not approved by KitchenAid or KitchenAid Canada 5 Repairs to parts or systems resulting from unauthorized modifications made to the appliance 6 Replacement parts or repair labor costs for units operated outside the United States or Canada 7 In Canada travel or transportation expenses for customers who reside in remote areas 8 Any labor costs during the limited warranty period...

Отзывы: