

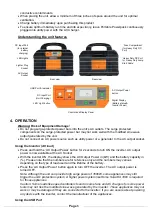

Page 7
The USB Port on the system provides standard 5V 2.1A power to power up USB powered
handheld devices. The USB Port will automatically turn ON when a USB cable is plugged into the
port. Unplugging the USB cable will turn off the USB output.
Reminder: Unplug the USB Cable from the unit when the USB port is not in use.
Using the 12V Lighter Plug Socket
The 12V Lighter Plug Socket on the unit provides standard 12VDC maximum 15A current to power
up 12V appliances. This port is protected by an auto-reset fuse. When the internal fuse is tripped,
unplug the load from the port and wait for 5 minutes to allow the auto-rest fuse to recover. This
port can also be used to charge the internal battery by using the provided DC to DC cable and
connect it to the vehicle’s 12V lighter plug socket.
Using the LED Light
Press ‘Light’ button once to turn on the LED Light. Press again to turn the LED Light off.
Checking the Battery Status
When the inverter is OFF, Pressing the ‘AC Output Power’ button once will show the estimated
battery capacity (in %) on the display. The capacity shown on display is for reference use only.
The numbers may vary depending on the lifetime of the battery.
Charging the unit
Important: Please recharge the unit after each use.
Using the provided AC Charger:
•
Plug the provided AC Charger to any AC Source.
•
Connect the DC Plug from the AC Charger to the ‘DC Input Port’ of the unit. The charging
process will start automatically. The unit will be fully charge in about 15 hours.
•
During the charging process with inverter OFF, the display shows battery capacity (in %) and
will show ‘FUL’ when it is fully charged.
Note: The Inverter can still be turned ON during the charging process. During this mode, the
display will repeatedly show ‘Chg’ and battery capacity - in% (indicating battery charging is in
progress) and then AC output power in kW (indicating inverter is power ON).
Using the provided DC to DC Cable through the 12V Lighter Plug Socket in Vehicles:
Warning: Risk of explosion, fire or burns. The unit can only be charge through the lighter plug
on a 12V vehicle system only. Charge through a 24V vehicle system will damage the unit and
the internal battery of the unit may explode and catch fire.
Note: Charging the unit through the unit’s ‘Lighter Plug Socket’ will not have any indicator (‘Chg’
or battery capacity) shown on the Digital Display.
•
Please verify the Lighter Plug system in your vehicles is a 12V system.
•
Connect one end of the DC to DC cable to the Lighter Plug Socket on the unit.
•
Connect the other end of the cable to the vehicle’s 12V Light Plug Socket.
•
Start your engine and it will start charging the battery automatically.
•
The battery will be fully charger in about 4 hours. The charger time depends on the
Reminder: Please recharge the unit after each use and you can leave the AC Charger plugged
into the unit continuously to keep the unit in fully charge condition.
Jump Starting a Vehicle or Boat Engine
You can use the supplied ‘Heavy Duty Jump Start Cable’ to jump-start a vehicle or boat engine
that has 12V starting battery.
Warning: Fire hazard. Never allow red and black clamps to touch each other or another
common metal conductor. This could cause damage to the unit and/ or create a sparking /
explosion hazard. Always disconnect the clamps from the unit and from the vehicle after use.
Jump-start cable clamps’ connection to the vehicle’s battery terminals must be positive to
positive (red clamp to battery “+”) and negative to negative (black clamp to battery”-”). A reverse
polarity connection (positive to negative) may cause damage to the unit, create a
sparking/explosion hazard and/or damage the jump-start vehicle.
Warning: Risk of explosion, fire or burns. The battery terminals exposed at the ‘Heavy Duty


