Kioti DK55 Скачать руководство пользователя страница 102

10-18   DK55

069OA28A

069OA27A

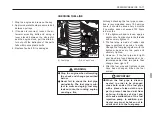
Check to ensure the radiator hoses are
free from damage and are tightened prop-
erly every 200 hours or every 6 months,
whichever comes first.

1. If the hose clamps are loose or water

l e a k s   f r o m   h o s e ,   t i g h t e n   c l a m p s
securely.

2. If the radiator hoses are swollen,

h a r d e n e d ,   c r a c k e d ,   o r   o t h e r w i s e
damaged, you must replace the hose.

It is a good practice to replace the radia-
tor hoses once every two years.

PRECAUTION AT OVERHEATING

Take the following actions in the event
the coolant temperature be nearly or
more than the boiling point, what is called
“Overheating”.

1. Stop the machine operation in a safe

place and keep the engine unloaded
idling.

2. Don’t stop the engine suddenly, but

stop it after about 5 minutes of un-
loaded idling.

3. Keep yourself well away from the

machine for further 10 minutes or while
the steam blown out.

4. Checking that there is no danger of

burn, get rid of the causes of over-
heating according to the manual, see
“Troubleshooting” section, and then,
start the engine again .

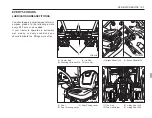
CHECKING RADIATOR HOSE AND
CLAMP

(1) Radiator Hose 1

(2) Radiator Hose 2

(1) Power Steering Oil Line

1. Check to see that all hydraulic lines

a n d   h o s e   c l a m p s   a r e   t i g h t   a n d
undamaged.

2. If damage is found you should replace

the hose or clamp at once.

POWER STEERING LINE

Содержание DK55

Страница 1: ...ll be happy to help you Please feel free to contact DAEDONG USA INC Throughout this manual you will see text in italics preceded by the words DANGER WARNING CAUTION or IMPORTANT Such text has the foll...

Страница 2: ...SAFETY IS INVOLVED where the symbol appears Please read the messages and follow the instructions carefully ABBREVIATION 4WD API ASAE SAE ISO PTO ROPS RPM SMV ABBREVIATIONS LIST DEFINITION Four Wheel D...

Страница 3: ...w Plugs Low Temperature Start Aid Parking Brake Battery Charging Condition Engine Oil Pressure Turn Signal Power Take Off Clutch Control Off Position Power Take Off Clutch Control On Position Differen...

Страница 4: ...Seat mounting and adjust ment 22 All electrical cables termi nals and wires 11 Upper link draw bar and pin in position 12 Wheel to rim clamp bolts and lock nuts for tightness 13 Wheel disc to hub nuts...

Страница 5: ...ks are to be performed with the tractor at nor mal operating temperature 1 Lights and instruments for proper operation 2 Fluid and oil leaks 3 Maximum no load speed and idle speed adjustments and fuel...

Страница 6: ......

Страница 7: ...ACTOR 3 SPECIFICATIONS 4 INSTRUMENT PANELAND CONTROLS 5 OPERATING 6 THREE POINT HITCH DRAWBAR 7 HYDRAULIC UNIT 8 WHEELS TIRESAND TREAD 9 MAINTENANCE 10 PERIODIC SERVICE 11 STORAGE 12 TROUBLESHOOTING 1...

Страница 8: ......

Страница 9: ...BEFORE OPERATING THE TRACTOR OPERATING THE TRACTOR DRIVING THE TRACTOR PARKING THE TRACTOR OPERATING THE PTO USING 3 POINT HITCH SERVICING THE TRACTOR CAUTION LABELS 1SAFETY PRECAUTIONS...

Страница 10: ...cidents 2 Only allow properly trained and quali fied persons to operate the tractor 4 Replace all missing illegible or dam aged safety decals See list of decals on page 1 21 5 Keep safety decals free...

Страница 11: ...the other drivers know what you are doing 13 Do not start engine by shorting across starter terminals 14 Never start engine while standing on the ground 15 Do not permit anyone but the opera tor to r...

Страница 12: ...commended by KIOTI for most applications Check operator s manual and discus your local dealer NOTE Always use seat belt when the trac tor is equipped with a ROPS Never use the seat belt when tractor i...

Страница 13: ...r wheels 1 Apply the parking brake the lift con trol lever in the down position and the transmission levers in neutral before starting the tractor 2 Avoid accidental contact with the gear shift levers...

Страница 14: ...drawbar Never hitch to axle housing or any other point ex cept drawbar such arrangements only increase the risk of serious per sonal injury or death due to a tractor upset 7 If the front of the tracto...

Страница 15: ...ator s manual to learn safe oper ating procedures and keep these pre cautions in mind 11 Know your equipment and its limita tions 12 When using an implement be sure to install the proper ballast weigh...

Страница 16: ...ling on the road 2 Always slow the tractor down before turning Turning at high speed may tip the tractor over 3 Observe all local traffic and safety regulations 4 Turn the headlights on Dim them when...

Страница 17: ...gn is clean and visible Use hazard lights as required 1 PTO Shaft cover 2 PTO Shaft cap OPERATING THE PTO 1 Wait until all moving components have completely stopped before getting off the tractor conn...

Страница 18: ...sure to install the proper counterbalance weight on the front of the tractor USING 3 POINT HITCH Before servicing the tractor park it on a firm level surface set the parking brake place the gear shif...

Страница 19: ...radiator cap while cool ant is hot When cool slowly rotate cap to the first stop and allow suffi cient time for excess pressure to es cape before removing the cap completely If the tractor has a cool...

Страница 20: ...oard 3 Magnifying glass 2 Hydraulic line 13 Escaping hydraulic fluid under pres sure has sufficient force to penetrate skin causing serious personal injury Before disconnecting hydraulic system make s...

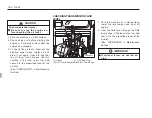
Страница 21: ...SAFETY PRECAUTIONS 1 13 CAUTION LABELS 069O130A ROPS...

Страница 22: ...1 14 DK55 069O131A CABIN...

Страница 23: ...SAFETY PRECAUTIONS 1 15 3 T4837 52121 4 T4818 52142 5 T2325 50743 6 T4625 52351 7 T4625 52361 1 T4689 52191 2 T4837 51181...

Страница 24: ...1 16 DK55 8 T4625 53191 9 T2241 50702 10 T2445 50724 11 T4837 51092 13 T4818 52132 12 T2615 54111...

Страница 25: ...SAFETY PRECAUTIONS 1 17 15 T4817 52201 14 T2625 55111...

Страница 26: ...2SERVICING OF TRACTOR...

Страница 27: ...d your tractor or your local authorized KIOTI dealer When in need of parts be prepared to give your dealer both the tractor and en gine serial numbers The tractor serial number is located on the left...

Страница 28: ...3SPECIFICATIONS...

Страница 29: ...crankcase Engine coolant Transmission case Front axle case Engine Capacities 45 2 HP 55 HP 4A220T Indirect injection vertical water cooled turbocharged 4 cycle diesel engine 4 87 92 4mm 3 425 3 638in...

Страница 30: ...erential 3 073 mm 120 9 in 3 266 mm 128 6 in 1 760 mm 69 3 in 2 485mm 97 8 in 2 470mm 97 2 in 1 920 mm 75 6 in 445 mm 17 5 in 1 461 mm 57 5 in 1 370 1 564 mm 53 9 61 6 in 9 5 20 PR 14 9 28 PR DK55 Dim...

Страница 31: ...2 U S gal Power steering pump 16 3 min 4 3 U S gal SAE Category l 2 1 200 kg 2645 5 lbs Valve 2EA Port 4EA SAE 1 3 8 6 splines 540 1000 rpm 2 865 mm 112 7 in Swing draw bar Clevis type DK55 Hydraulic...

Страница 32: ...SWITCHES CONTROLS HYDRAULIC UNIT ASSURE SAFE OPERATION 4INSTRUMENT PANEL AND CONTROLS...

Страница 33: ...01A SWITCHES 1 Key Switch 2 Hazard Lamp Switch 3 Light Switch 4 Cooling Water Temp Meter 5 Turning Signal Indicator 6 Tacho Hour Meter 7 Turning Signal Indicator 8 Fuel Gauge 9 Engine Stop Switch 10 P...

Страница 34: ...y Switch A Start B Heat C On D Acc E Off TURN SIGNAL HEAD LIGHT SWITCH 1 Turn Signal Light Switch 2 Head Light Switch A Right B N C Left To indicate a right turn turn signal light switch one click to...

Страница 35: ...Whether engine is not stop with key switch or stop the engine in emergency situation pull this switch The PTO switch must be placed to the neutral positions before starting the engine Otherwise the e...

Страница 36: ...PTO ON Indicator 6 Coolant Level Warning Lamp 7 Hydraulic System Warning Lamp 8 Engine Oil Pressure Warning Lamp 9 Battery Charge Warning Lamp 10 Glow Plug Indicator 11 Parking Brake Indicator 12 Mai...

Страница 37: ...r Meter 2 Engine Revolution Meter 1 Temperature Gauge Fuel gauge indicates the amount of fuel Be careful to refill the fuel tank before it becomes empty Once the fuel tank be comes empty it will be ne...

Страница 38: ...s up 069O412A COOLANT LEVEL WARNING LAMP Light will illuminate when the engine cool ant is not enough to operate the tractor As soon as the light illuminate stop the engine and investigate the cause I...

Страница 39: ...hts up yellow when certain problems occur in hydraulic system This lamp lights up when the pressure in hydraulic system drops down below a specified value due to high oil tempera ture approx 60 5 C or...

Страница 40: ...M INDICATOR PARKING BRAKE INDICATOR This lamp lights up red when locking the parking brake while depressing the brake pedal Make sure to drive the machine with parking brake unlocked When the key swit...

Страница 41: ...4 10 DK55 This lamp lights up yellow when 4WD switch is in 4WD position At this time the machine drives with 4 wheel drive mode 4WD OPEATION INDICATOR 069O420A...

Страница 42: ...ever 4 Seat Adjusting Lever 5 Clutch Pedal 6 Steering Wheel Tilt Lever 7 Parking Brake Lever 8 Brake Pedal L 9 Brake Pedal R 10 Foot Throttle 11 Joystick Lever 12 Main Shift Lever 13 Shuttle Shift Lev...

Страница 43: ...l of twelve speeds forward and twelve speeds reverse High Middle and Low MAIN SHIFT LEVER HI LO SHIFT LEVER 1 Hi Lo Shift Lever 2 Main Shift Lever The tractor s driven forward or in reverse without th...

Страница 44: ...To prevent the tractor being thrust for ward during rotary tilling hard soil 4 Entering a job location or going over a high bank FRONT WHEEL DRIVE LEVER 1 Front Wheel Drive Lever A Engagement B Disen...

Страница 45: ...and throttle setting FOOT THROTTLE 1 Foot Throttle 1 Before operating the tractor on a road be sure to interlock the right and left pedals as illustrated below It will be very dangerous to use only on...

Страница 46: ...isengaged and be slowly en gaged Never operate the tractor with your foot resting on the clutch pedal Doing so may contribute to premature clutch wear PARKING BRAKE LEVER 1 To set the parking brake In...

Страница 47: ...tial lock at speeds above 8 km h 5 MPH Never use the differential lock when turning the tractor When engaged the differential lock will prevent the tractor from turning IMPORTANT If a rear wheel spins...

Страница 48: ...raulic lift arm which con trols implement height or working depth To lower implement push the lever forward to raise it pull the lever back HYDRAULIC CONTROL LEVER 1 Position Control Lever 3 Stop Bolt...

Страница 49: ...5OPERATING PRE OPERATION OPERATING NEW TRACTOR OPERATING THE ENGINE OPERATING THE TRACTOR...

Страница 50: ...king lights Check accessible wiring harness for any damage Check the seat belt and ROPS for damage Refuel See daily check in the peri odic service section Check all danger and warning labels It is a g...

Страница 51: ...pter 10 For filling wipe the nipple clean so that no dirt and dust may enter with the grease CHECK INFLATION PRESSURE IN TIRES Also inspect if the tires are not too worn or otherwise damaged CHECK THE...

Страница 52: ...afe speed before turning Do not drive the tractor on the road with the implement in motion After the differential lock has been used be sure to see that it has been released When traveling on a road a...

Страница 53: ...tractor to roll over CHECK WHILE OPERATING While driving make the following checks to see that all the parts are functioning normally COOLING WATER WARNING Do not remove radiator filler cap until cool...

Страница 54: ...STOP 1 Do not allow the fuel tank to empty completely 2 Doing so will allow air to enter into the fuel system 3 Should this happen the fuel system must be bled See chapter 10 Should the following abno...

Страница 55: ...e hand throttle rearward and re lease the foot throttle Then the engine speed will drop which will brake the trac tor When traveling the tractor down on a slope never depress the clutch pedal but use...

Страница 56: ...ment de signed for 3 point hitch usage USE OF THE DIFFERENTIAL LOCK Observe the following precautions when applying the differential lock 1 Apply the differential lock moderately Limit its use to the...

Страница 57: ...ch a improper operation IMPORTANT Never use the differential lock when turning the tractor When engaged the differential lock will prevent the tractor from turning SEVEN PIN ELECTRICAL POWER OUTLET A...

Страница 58: ...and services Do not start the engine in a closed storehouse garage or room Exhaust gas is poisonous Be sure to open the doors and windows before starting Check fuel supply Use diesel fuel only Refill...

Страница 59: ...rrect if necessary If operating in freezing temperatures add anti freeze Proper level is indicated in the right figure 1 Drain Cock 1 Body 3 Cap 2 Element 1 Radiator Cap 2 Overflow Pipe Be sure air cl...

Страница 60: ...l in the combustion cham ber is fully heated after starting The lower the ambient temperature the longer the preheating time For the nec essary preheating time refer to the table below 9 Turn the key...

Страница 61: ...peration STOPPING THE ENGINE Reduce engine revolution and apply even foot pressure on both brake pedals De press the clutch pedal and place main gear shift lever and PTO switch in neutral Lower equipm...

Страница 62: ...Use a battery of the same voltage as the disabled tractor to jump start the tractor Make sure the battery is within a safe distance to the tractor so that the jumper cables can reach 2 Engage the park...

Страница 63: ...t it run for a few moments Then start the disabled tractor 9 Disconnect the battery cables in the exact opposite order as they were attached 10 Remove the damp rags and reinstall the vent caps 1 Dead...

Страница 64: ...hange the trac tors oil before you normally would For further details of the oil change and ser vice schedule see maintenance sec tion READ FOR SAFE OPERATION TO ASSURE SAFE OPERATION Please read For...

Страница 65: ...3 POINT HITCH DRAWBAR 6THREE POINT HITCH DRAWBAR...

Страница 66: ...ly by moving the lifting rod 2 After the adjustment is completed se cure with the stopper 3 Correct positioning of the lifting rod to the lower link is shown below Posi tioning varies dependent upon t...

Страница 67: ...2 36 in horizontally Tighter NOTE DRAWBAR ADJUSTING DRAWBAR LENGTH 1 PTO Shaft 3 Drawbar 2 Drawbar Pin 4 Holes WARNING To avoid personal injury Never pull from the top link the rear axle or any point...

Страница 68: ......

Страница 69: ...3 POINT HITCH CONTROL SYSTEM AUXILIARY HYDRAULICS 7HYDRAULIC UNIT...

Страница 70: ...ic mechanism is not adjusted properly Unless corrected the unit will be dama ged Contact your KIOTI Dealer for adjustment This will control the working depth of 3 point implements regardless of the am...

Страница 71: ...st working depth desire for the implement Lower the draft control lever to the point where the implement is at the desired depth This stops the implement from going too deep and causing loss of tracti...

Страница 72: ...the ground to release hydraulic pressure in the hoses 2 Clean the couplers 3 Relieve pressure by moving hydraulic control levers with engine shut off Pull the hose straight from the hydrau lic coupler...

Страница 73: ...C UNIT 7 5 069O708A Out In Out In 1 Lever1 2 Lever2 1 2 Remote control valve lever Lever 1 Push Pull Port A B Pressure Returning Out In Out In Lever 2 Push Pull Port A B Port A B Port C D Coupler size...

Страница 74: ...bilizer so that the implement can move 5 to 6 cm 2 0 to 2 4 in laterally Telescopic stabilizer should be tight enough to prevent excessive implement movement when implement is in raised position with...

Страница 75: ...TIRES TREAD BALLAST 8WHEELS TIRES AND TREAD...

Страница 76: ...arning Never exceed 241 kPa 35 psi when attempting to seat a bead If beads have not been seated by the time the pressure reaches 241 kPa 35 psi deflate the assembly re position the tire on the rim red...

Страница 77: ...he speci fied torque Check all of them frequently and keep them tight IMPORTANT Follow same checking procedure when tractor is first used To decrease the wheel tread dan ger when working on slopes or...

Страница 78: ...uld be in V shape To change the present tread to the de sired tread all of the arrow mark would show the direction of rotation Furthermore the tire mark on the ground should be in V shape Remove rim b...

Страница 79: ...is raised drive slowly over rough ground regardless of how much ballast is used SELECTREARBALLASTCAREFULLY Add weight to rear wheels if needed to improve traction or for stability Amount of rear ball...

Страница 80: ......

Страница 81: ...SERVICE INTERVALS LUBRICANTS 9MAINTENANCE...

Страница 82: ...y electrolyte Oil pressure fuel pipe s inlet screw if loosened Radiator hose s inlet bands if loosened Fuel pipe s change Radiator hose change Hydraulic pipe joint change Steering hose change Toe in D...

Страница 83: ...esel fuel if temperature is below 10 C 14 F Fresh clean water with anti freeze Engine oil API Service Classification above CC SEA 15W 40 1 2 3 4 5 6 68 18 0 U S gal 9 5 2 5 U S gal Multi grade transmi...

Страница 84: ......

Страница 85: ...VICE HOW TO OPEN THE HOOD DAILY CHECK EVERY 50 HOURS EVERY 100 HOURS EVERY 200 HOURS EVERY 400 HOURS EVERY 600 HOURS EVERY 800 HOURS EVERY 1 YEAR EVERY 2 YEARS SERVICE AS REQUIRED STEERING WHEEL ADJUS...

Страница 86: ...th the en gine shut off and the parking brake ON Look around and under the tractor for such items as loose bolts trash build up oil or coolant leaks broken or worn parts CHECKING AND REFUELING 1 Fuel...

Страница 87: ...night NOTE No 2 D is a distillate fuel of lower vola tility for engines in industrial and heavy mobile service SAE J313 JUN87 Grade of Diesel Fuel Oil According to ASTM D975 Distillation Temperatures...

Страница 88: ...ibed level at the oil inlet See LUBRICANTS in Maintenance Section CAUTION To avoid personal injury Be sure to stop the engine be fore checking the oil level CHECKING TRANSMISSION FLUID LEVEL 1 Park th...

Страница 89: ...ULL and LOW marks of recovery tank 2 When the coolant level drops due to evaporation add water only up to the full level In case of leakage add anti freeze and water in the specified mixing ratio up t...

Страница 90: ...ardware before operating tractor 2 Replace if damaged 1 The brake and clutch pedals should be inspected for free travel and smooth operation 2 You should adjust these pedals if an incorrect measuremen...

Страница 91: ...ollowing points every 50 hours or as needed If your tractor is operated in extremely wet muddy or dusty conditions you should lubricate the fittings more often 1 Center Bolt 3 Tie Rod 2 Steering Cylin...

Страница 92: ...hem tight EVERY 100 HOURS CHANGING ENGINE OIL 1 To drain the used oil remove the drain plug at the bottom of the engine and drain the oil completely into the oil pan All the used oil can be drained ou...

Страница 93: ...every sixth clean ing whichever comes first 1 Element 3 Evacuator Valve 2 Cover EVACUATOR VALVE Open the evacuator valve once a week under ordinary conditions or daily when used in a dusty place to ge...

Страница 94: ...roper fan belt tension A deflection of between 7 9 mm 0 28 0 34 in when the belt is pressed in the middle of the span CAUTION To avoid personal injury Be sure to stop the engine be fore checking belt...

Страница 95: ...y 100 service hours it should be done every 6 months if operation does not exceed 100 hours in 6 months 1 If the tightener band is loose apply a slight coat of lubricant onto the threads and securely...

Страница 96: ...l free travel 25 40 mm 0 98 1 57 in on the pedal Keep the free travel in the right and left brake pedals equal 1 Turn Buckle 3 Brake Pedal 2 Lock Nuts 4 Brake Rod A 25 to 40mm 0 98 to 1 57in CAUTION T...

Страница 97: ...k the battery daily and recharge before trouble oc curs 2 The water in the electrolyte evapo rates during recharging Liquid short age damages the battery and exces sive liquid spills over and damages...

Страница 98: ...e terminal and the negative to the negative then re charge in the standard fashion 10 A boost charge is only for emergen cies It partially charges the battery at a high rate and in a short time When u...

Страница 99: ...cell with electrolyte having a specific gravity given in Table 1 up to highest level marked on the battery case side sp gr of Electrolyte for Filling sp gr of Electrolyte for fully charged TEMPERATE O...

Страница 100: ...lter cartridge Allow engine to cool down sufficiently oil can be hot and can burn IMPORTANT To prevent serious damage to the engine use only a KIOTI genuine filter 6 Check temperature of electrolyte i...

Страница 101: ...reinstall the drain plug 1 Drain Plug 3 Remove the oil filter 4 Place a film of clean transmission fluid of the rubber seal of the new filter 5 Tighten the filter firmly until it contacts the mounting...

Страница 102: ...n the boiling point what is called Overheating 1 Stop the machine operation in a safe place and keep the engine unloaded idling 2 Don t stop the engine suddenly but stop it after about 5 minutes of un...

Страница 103: ...mplement lock the park brake and stop the engine 4 Measure distance between tire beads at front of tire hub height 5 Measure distance between tire beads at rear of tire hub height 6 Front distance sho...

Страница 104: ...d level Oil Capacity 38 10 0 U S gals CAUTION To avoid personal injury Allow engine to cool down sufficiently oil can be not and can burn FULE FILTER ELEMENT REPLACEMENT 1 Fuel Filter Ass y 2 Fuel Fil...

Страница 105: ...the filling plug and check plug CHANGINGFRONTAXLECASEOIL Oil Capacity 8 2 2 2 U S gals EVERY 600 HOURS ADJUSTING FRONT AXLE PIVOT If the front axle pivot pin adjustment is not correct front wheel vib...

Страница 106: ...io must be less than 50 Securely tighten radiator cap If the cap is loose or improperly fitted water may leak out and the engine could overheat CAUTION To avoid personal injury Do not remove the radia...

Страница 107: ...ow 0 C 32 F to remove cooling water after operating or to add anti freeze to it 1 There are two types of anti freeze available use the permanent type PT for this engine 2 Before adding anti freeze for...

Страница 108: ...a ter may get into the clutch housing If this happens remove the plug in the clutch housing and drain water Remember to reinstall the plug to avoid serious dam age to clutch Replace the hoses and clam...

Страница 109: ...PTO shaft s rotation will be stopped at this position Also if you need the height higher than the above 23 6 26 in Loosen the bolts 1 and adjust the switch bracket 2 s 2 height toward the above bit b...

Страница 110: ...uld blow replace with a new one of the same capacity 1 Fuse Box REPLACING FUSE IMPORTANT Before replacing a blown fuse determine why the fuse blew and make any necessary repairs Failure to follow this...

Страница 111: ...per Whasher motor Spare Spare Heater Air conditioner Working lamp Flasher Unit Timer relay Inner lamp Horn Spare O O O O O O O O O O O O O O O O O O O O O O O O O O O O O O O O O O O O PROTECTED CIRCU...

Страница 112: ......

Страница 113: ...TRACTOR STORAGE REMOVING THE TRACTOR FROM STORAGE 11STORAGE...

Страница 114: ...so to pivot areas 3 Detach the weights from the tractor body 4 Inflate the tires to a pressure a little higher than usual 5 Change the engine oil and run the en gine to circulate oil throughout the en...

Страница 115: ...ion looking for evidence of oil or water leaks 7 With the engine fully warmed up re lease the parking brake and test the brakes for proper adjustment as you move forward Adjust the brakes as necessary...

Страница 116: ......

Страница 117: ...ENGINE TROUBLESHOOTING TRACTOR TROUBLESHOOTING BATTERY TROUBLESHOOTING 12TROUBLESHOOTING...

Страница 118: ...in proper fuel injection pressure check carefully for loosened fuel cap nut etc Loosen air vent screw over fuel filter and fuel injection pump to eliminate all the air in the fuel system This is cause...

Страница 119: ...eck engine timing Adjusting timing See to WSM DK55 Adjust to proper valve clearance of inlet 0 2 mm 0 008 in exhaust 0 2 mm 0 008 in with engine cold Clean the element every 100 200 hours of operation...

Страница 120: ...f necessary Also check the fuel system for air or leaks If necessary replace with a new nozzle Check amount of engine oil with oil level gauge Check lubricating oil system Check to see if element insi...

Страница 121: ...ter Check pressure switch Check filter base gasket Speed suddenly decreases or increases Unusual sound is heard suddenly Color of exhaust suddenly turns dark Bearing parts are overheated Oil lamp ligh...

Страница 122: ...y charging method until spe cific gravity of 1 26 is reached Repair alternator and replace defective rectifier Charge battery well Wash terminal with hot water and tighten well Replace Replace battery...

Страница 123: ...EXTERNAL NAME OF THE CABIN REAR WINDOW ENTRANCE ON EITHER SIDE INTERNAL ADJUSTMENT SYSTEM 13CABIN if installed...

Страница 124: ...on ei ther side is possible REAR WINDOW 1 Handle Of Rear Window 2 Button If you lightly push rear window while depressing the button on the handle the rear window will automatically open WARNING Some...

Страница 125: ...door stopper Do not leave the doors fully open while driving the tractor INTERNAL ADJUSTMENT SYSTEM 1 Front Wiper Operating Switch 2 Working Light Rear 3 Working Light Front 4 Heater switch 5 Air con...

Страница 126: ...ss the ON direction of the switch wash fluid will spray from the nozzle connected to the wind shield wiper 3 The tank for the washer fluid is equipped on the left side behind the seat WARNING You may...

Страница 127: ...OF THE DIRECTION OF THE WIND The direction of the warm wind can be adjusted forward backward left and right HINTS FOR HEATER USE 1 Please use antifreezing solution suit able for the external temperat...

Страница 128: ...nged or refilled with prescribed amount as the refrigerant In case that the refrigerant or oil is leaking from the system In case that the refrigerant is sud denly released from the system In case tha...

Страница 129: ...enna about 100 in the forward and backward direction of the tractor INDOOR LAMP 1 Indoor Lamp If you press the symbol the indoor lamp will be turned on If you press it again it will be put out SUNROOF...

Страница 130: ...CCESSORIES 1 Cigar Jack 2 Ash Tray 1 Hanger 1 To increase more convenience in the cabin the accessories are attached 2 Cigar jack for vehicle ash tray room mirror and clothes hanger are equipped so th...

Страница 131: ...14INDEX...

Страница 132: ...bels 1 13 Changing engine oil 10 8 Changing front axle case oil 10 21 Changing lubricating oil for new tractors 5 16 Changing transmission fluid 10 19 Check inflation pressure in tires 5 3 Check the b...

Страница 133: ...to open the hood 10 2 How to use the stop bolt 4 17 Hydraulic control lever 4 17 Hydraulic control unit use reference chart 7 6 Hydraulic system warning lamp 4 8 Indoor lamp 13 7 Inflation pressure 8...

Страница 134: ...vals 9 2 Servicing of Tractor 2 1 Servicing the Tractor 1 10 Seven pin electrical 5 9 Shuttle shift lever 4 12 Specifications 3 1 Starting the engine 5 12 Starting the tractor 5 3 Steering wheel adjus...

Страница 135: ...SERVICE RECORD DATE CODE NO DESCRIPTION REMARKS Ref No Hour Meter...

Отзывы: