


KINOVA
®
Gen3 Ultra lightweight robot
User Guide
37
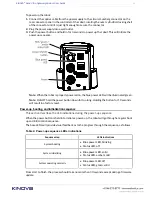
About this task
The robot features a Wi-Fi adapter. This allows the arm to connect to a local Wi-Fi
connection. Once this connection is established, other devices on the same Wi-Fi network
can then connect to the robot wirelessly.
Procedure
1.
On a computer connected to the arm via Ethernet, open the
Web App
and connect to
the
arm.
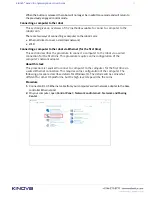
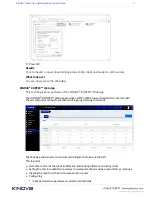
2.
Select Networks in the main navigation panel of the
Web App
to go to the Networks
page.
3.
Select the Wi-Fi tab.
4.
The Wi-Fi tab will list all of the detected Wi-Fi networks. Choose one of the networks, and
click the corresponding
Connect
text button.
Note:
It is not recommended to connect to Wi-Fi networks which are potentially insecure.
Security settings of at least WPA2 are recommended.
5.
A pop-up window will appear to sign in to the network, with information about the signal
strength and security settings. Enter the password for the network and click the CONNECT
button. Take note of the IPv4 address that the robotic arm obtains after clicking the
CONNECT button
6.
On any wireless device connected to the same Wi-Fi network, open a Web browser and type
the IP address that the robot obtained at Step 5 (This address corresponds to the robot's
address on the Wi-Fi network).
7.
At the Login screen, enter the appropriate user name and password, and click the CONNECT
button.
Results
You are now connected to the Web Application through the Wi-Fi network adapter of the
robot. You can now configure, monitor, and control the robot wirelessly.
Warning: A Wi-Fi connection is
not recommended
for 1 kHz (low-level) control of the robot due
to potential latency issues - a wired connection must be used for this purpose.


