background image


 NEVER reach to pick up a work piece, a piece of scrap, or anything else that is in or 

near the grinding path of the wheel. 

 AVOID AWKWARD OPERATIONS AND HAND POSITIONS where a sudden slip 

could cause your hand to move into the wheel. ALWAYS make sure you have good 

balance. 

 NEVER stand or have any part of your body in line with the path of the wheel. 

 DO NOT USE TOOL IF SWITCH DOES NOT TURN IT ON AND OFF. Have defective 

switches replaced by an authorized service center. 

 DO NOT TURN THE MOTOR SWITCH ON AND OFF RAPIDLY. This could cause the 

wheel to loosen and could create a hazard. Should this ever occur, stand clear and allow 
the wheel to come to a complete stop. Disconnect your grinder from the power supply 
and securely retighten the wheel nut. 


WARNING: 

When servicing use only identical replacement parts. Use of any other 

parts may create a hazard or cause product damage. 


 USE ONLY FLANGES furnished with this bench grinder. 

 IF ANY PART OF THIS GRINDER IS MISSING or should break, bend, or fail in any 

way, or should any electrical component fail to perform properly, shut off the power 
switch, remove the machine plug from the power source and have damaged, missing, or 

failed parts replaced before resuming operation. 

 MAKE SURE THE GRINDER IS SECURELY MOUNTED as described in the operating 

instructions before connecting the tool to a power supply. 

 DO NOT OVERTIGHTEN THE WHEEL NUT. Excessive tightening can cause the wheel 

to crack during operation. 

 INSPECT GRINDING WHEEL for visible defects. Check the wheel for cracks. Replace 

defective wheels prior to use. 

 ADJUST distance between wheel and work rest to maintain 1/16 in. or less 

separation, re-adjustment is necessary as the diameter of the wheel decreases with use. 

 ALWAYS EASE THE WORKPIECE AGAINST THE ABRASIVE WHEEL when starting 

to grind. A harsh impact can break the wheel. Use light pressure when starting to grind; 
too much pressure on a cold wheel can cause the wheel to crack.  


SAVE THESE INSTRUCTIONS


4

Содержание 6318-06

Страница 1: ...8 Bench Grinder Item 6318 06 Model TBG818 PLEASE READ AND SAVE ALL INSTRUCTIONS TO ENSURE THE SAFE AND EFFECTIVE USE OF THIS TOOL ...

Страница 2: ...asures SYMBOL MEANING SAFETY ALERT SYMBOL Indicates danger warning or caution May be used in conjunction with other symbols or pictographs DANGER Failure to obey a safety warning will result in serious injury to you or to others Always follow the safety precautions to reduce the risk of fire electric shock and personal injury WARNING Failure to obey a safety warning can result in serious injury to...

Страница 3: ...HILDPROOF with padlocks master switches or by removing starter keys DON T FORCE THE TOOL It will do the job better and safer at the rate for which it was designed USE THE RIGHT TOOL Do not force the tool or attachment to do a job for which it was not designed USE THE PROPER EXTENSION CORD Make sure your extension cord is in good condition When using an extension cord be sure to use one heavy enoug...

Страница 4: ...ter to avoid risk of personal injury KEEP TOOL DRY CLEAN AND FREE FROM OIL AND GREASE Always use a clean cloth when cleaning Never use brake fluids gasoline petroleum based products or any solvents to clean tool INSPECT TOOL CORDS AND EXTENSION CORDS PERIODICALLY and if damaged have repaired by a qualified service technician Stay constantly aware of cord location and keep it well away from the rot...

Страница 5: ... ONLY FLANGES furnished with this bench grinder IF ANY PART OF THIS GRINDER IS MISSING or should break bend or fail in any way or should any electrical component fail to perform properly shut off the power switch remove the machine plug from the power source and have damaged missing or failed parts replaced before resuming operation MAKE SURE THE GRINDER IS SECURELY MOUNTED as described in the ope...

Страница 6: ...nician WARNING Do not attempt to operate this tool until you have read thoroughly and understand completely all instructions safety rules etc contained in this manual Failure to comply can result in accidents involving fire electric shock or serious personal injury Save this operator s manual and review frequently for continuing safe operation and instructing others who may use this tool The opera...

Страница 7: ...ion cord If an extension cord must be used it must be no longer than 25 feet with a minimum wire size not less than 12 AWG 3 This tool has a three wire grounding plug Under no circumstances shall a temporary adapter be used or alterations be made to the plug PERSONAL SAFETY 1 Stay alert watch what you are doing and use common sense when operating a power tool Do not use tool while tired or under t...

Страница 8: ...be kept away from work area 6 Maintain tools with care Keep cutting tools sharp and clean Properly maintained tools with sharp cutting edges are less likely to bind and are easier to control 7 Check for misalignment or binding of moving parts breakage of parts and any other condition that may affect the tools operation If damaged have the tool serviced before using Many accidents are caused by poo...

Страница 9: ...terials until you have carefully inspected the machine identified all loose parts and satisfactorily operated your bench grinder Examine all parts to make sure no breakage or damage has occurred during shipping If all parts have been included proceed to assembly If any parts are damaged or missing do not attempt to assemble Check all loose parts from the box with the list below Assemble according ...

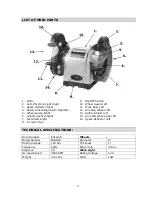
Страница 10: ... 9 ON OFF Switch 10 Wheel Guard Left 11 Work Rest Left 12 Grinding Wheel Left 13 Safety Shield Left 14 Auto ON Work Light Left 15 Spark Deflector Left TECHNICAL SPECIFICATIONS Item Number 6318 06 Wheels Model Number TBG818 Diameter 8 Rating Voltage 120 Vac Thickness 1 Frequency 60Hz Arbor Hole 5 8 in Amperes 3 0 Work Light No Load Speed 3600 RPM Rating Voltage 12 V Weight 48 lbs Watt 10W 9 ...

Страница 11: ...ar safety glasses for personal protection WORK REST The work rests are independently adjustable to compensate for wheel wear Before grinding make certain the work rests are adjusted properly Generally the object being ground is done slightly above center of the grinding wheel Adjust the distance between the wheel and the work rest to maintain 1 16 in 1 6 mm or less separation as the diameter of th...

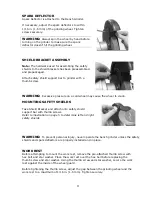
Страница 12: ... crack MOUNTING SAFETY SHIELDS Take Shield Bracket and attach onto safety shield support bar with thumb screws Refer to illustration on page 5 to determine left and right safety shields WARNING To prevent personal injury never operate the bench grinder unless the safety shields and spark deflectors are properly installed and in place WORK REST Before attempting to mount the work rest remove the pr...

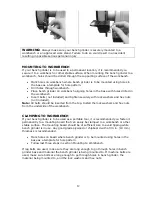
Страница 13: ...t included Note All bolts should be inserted from the top Install the lock washers and hex nuts from the underside of the workbench CLAMPING TO WORKBENCH If your bench grinder is to be used as a portable tool it is recommended you fasten it permanently to a mounting board that can easily be clamped to a workbench or other stable surface The mounting board should be of sufficient size to avoid tipp...

Страница 14: ...st the grinding wheel Keep the tool cool by using either a cooling tray or a pan of water The grinding wheel should rotate into the object being sharpened Note Excessive pressure may damage the tool cause the motor to overheat and prematurely wear down the grinding wheel The following recommendations will help you sharpen specific tools TWIST DRILL BITS Drill bits are best sharpened on a sharpenin...

Страница 15: ...grinding wheel and outer flange are properly seated on the spindle shaft MAINTENANCE WARNING When servicing use only identical replacement parts Use of any other part may create hazard or cause product damage GENERAL Keep the bench grinder clean Remove dust from working parts and beneath the grinder frequently Make sure the bench grinder operates properly Check screws nuts and bolts for tightness ...

Страница 16: ...ull speed Press the dresser slightly against the rotating wheel until you get a bite then move slowly from side to side across the wheel A small bite and many passes is better than a big bite and one pass Work cautiously hold the dresser with force on the work rest Do not use excessive pressure against the grinding wheel Proceed slowly until you master the technique SERVICE CENTER If you have any ...

Страница 17: ... exceed the purchase price paid by the purchaser of the product Under no circumstances shall there be liability for any loss direct indirect incidental special or consequential damage arising out of in connection with use of this product This warranty is valid only in the United States of America This Warranty gives you specific legal rights However you may have other rights that vary from state t...

Страница 18: ...f of purchase Grinding Wheel and light bulbs included with the Bench Grinder will be limited to 90 day warranty with proof of purchase Please fill in your details below and send it together with the product and purchase receipt Please read the Limited Warranty conditions mentioned in this instruction manual Customer Name Street City State ZIP Code Purchase Date Description of Defect PLEASE DETACH ...

Отзывы: