


SET-UP, ADJUSTMENTS & OPERATION
Set-up & Installation
Caution! Do not install the machine in a damp, humid, dirty or badly lit environment.
The bandsaw has been pre-adjusted at the factory. Place the bandsaw on the shop floor. This machine must be installed on a firm, level
surface. Adjust the level of the worktable by adjusting the four leveling feet. If the saw will be used to cut long pieces of stock, allow plenty of
room for the length of the stock.
Cleaning
All unpainted surfaces of the machine are treated with a rust proof grease. Clean all rust protected surfaces with a mild solvent. Do not use
paint thinner, lacquer thinner, gasoline or mineral spirits; these will damage painted surfaces.
Operation
General
Always wear approved safety glasses when using this machine. Before operating the machine, remove neck tie, rings, watches and other
jewelry, and roll sleeves past the elbows. Remove all loose clothing and confine long hair. Non-slip footwear is recommended. Do not wear
gloves when operating the bandsaw.
1) Never use the machine if it is missing any guards or other safety devices.
2) Maintain a balanced stance at all times so that you do not fall or lean against the saw blade or other moving parts.
3) Never leave the machine running. Always make sure it has come to a complete stop before the leaving the machine.
Controls
On/Off Switch
(G-Fig. 6) Located on the right side of the control panel. Press this switch to start or stop the machine.
Hydraulic Feed Rate Control
(F-Fig.6) Located on the bottom left side of the control panel. This dial is the hydraulic cylinder feed control
valve. It is used to set the amount of force that is applied to the saw blade, in combination with the couterbalance force. The feed rate is
proportional to the opening of the valve. Increasing the valve opening (counterclockwise) increases the feed rate; decreasing the valve
opening (clockwise) reduces the feed rate, including a full stop.
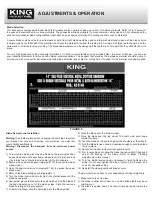
Blade Speeds
(See Speed Chart Fig.7). This bandsaw has four blade speeds. The different speeds are obtained by changing the position of
the motor drive V-belt on step pulleys. Change blade speeds as follows:
Caution!: Change speeds only when the machine is not running.
1) Disconnect the power cord from the power source to prevent accidental motor start-up.
2) Place the saw frame in the rearmost position by pushing down on the saw frame release lever (H-Fig.6) and lock it by turning the
hydraulic
feed rate control
(E-Fig.6) clockwise.
3) Remove the cabinet side panel (diagram# 173) to expose the V-belt and pulleys.
4) Lift the motor by hand to loosen the belt tension.
5) Select the speed using the blade speed chart fixed on the machine (Fig.7). Put the V-belt in the pulley grooves of the pulley for the desired
speed (Refer to Figure 7 for belt locations and the speeds available).
6) Lower the motor to retension the V-belt.
FIGURE 7