King Edward Classic Скачать руководство пользователя страница 5

5.

Replacing Thermal Cut-out

5.1 As 4.1
5.2 Remove fan motor access panel (2 screws)

Remove thermal cut out (2 screws)

Replace with new item

Reverse process

Important

- fibre washers must be replaced between cut-out plate and oven or oven will 

cut out prematurely and disable cooking process.

* Test oven at 

full

temperature and allow to cycle several times, before leaving.  If whole 

oven (including lights) go off, cut-off plate would need bending away from oven - re-
test when cooled.

6.

Replacing Main Oven Fan

6.1 Remove element cover from inside oven

6.2 Unscrew central nut anticlockwise, remove fan blade

6.3 As 5.1

6.4 As 5.2

Replace with new item. (Ensure fibre washers are used between fan motor fixing 
plate and oven wall and also fixing plate and screw heads)

Use stud loc and screws to prevent them from vibrating loose.

Test oven by turning fan switch on, turn thermostat to mid setting (150-200) towards 
neon.  Allow oven to cycle several times, making sure fan blade does not catch on 
element cover

7.

Replacing Fan Oven Element

7.1 As 4.1  

7.2 As 6.4

7.3 Disconnect element connections

7.4 As 6.1

Remove element fixing screws

Replace with new item and reverse process

Test oven

8.

Replacing Thermostat

8.1 As 6.1

8.2 Carefully open slightly, 2 clips holding thermostat sensor.  Move 

in line

with hole, 

capillary passes through.

8.3 As 4.2

8.4 As 4.3

8.5 As 4.4

8.6 Remove control knob and 2 screws from front

8.7 Pull out thermostat and carefully transfer all connections to new item

Replace in reverse order

Test thermostat by turning knob with mid setting (150-200) towards neon.  Wait 
until neon goes out and cycles several times before turning off.

Ensure 

all

operational and safety checks are conducted before leaving machine.

Note

If unsure of any process or difficulty found, please call our Head Office on 01885 489200

Содержание Classic

Страница 1: ...OPERATING INSTRUCTIONS OPERATING INSTRUCTIONS CLASSIC COMPACT OVEN CLASSIC COMPACT OVEN BEDIENUNGSANLEITUNG MODE D EMPLOI GEBRUIKSAANWIJZING PLEASE READ CAREFULLY Rev V10 revised 01 06 2010 ...

Страница 2: ...m the electric supply INSTRUCTIONS FOR USE INSTRUCTIONS FOR USE Take out the wire trays and position the potatoes on them ready for loading Plug the Compact in at the socket Turn the black thermostat knob on the control panel left of the two to the temperature required For jacket potatoes we recommend 190 200 C At this stage the neon light will come on to indicate that the oven is heating up and t...

Страница 3: ...ecome thicker and crunchier if it is cooked for longer at a lower temperature However once the baked potatoes are removed from the oven the skins will become softer as they reduce in temperature Once removed from the very hot temperature of the baking oven and placed into the lower temperature of the holding oven the potatoes will inevitably reduce in core temperature The display oven is intention...

Страница 4: ...00104 6 Top Display area crumb tray C TO CT 7a Main Oven Thermostat Switch control knob 190304 7b Bain Marie temperature control knob 190304 8 Cast Door C700102V 9 Rubber Door Seal 700129V 10 11 Door Catch complete inc stud 500115 12 Top Door Knob 500221 13 Door Hinge Bracket DHB001 14 Bain Marie Element CC9010 15 One sixth gastronorm pot 100mm deep 800110 16 One sixth gastronorm notched lid 80010...

Страница 5: ...ating loose Test oven by turning fan switch on turn thermostat to mid setting 150 200 towards neon Allow oven to cycle several times making sure fan blade does not catch on element cover 7 Replacing Fan Oven Element 7 1 As 4 1 7 2 As 6 4 7 3 Disconnect element connections 7 4 As 6 1 Remove element fixing screws Replace with new item and reverse process Test oven 8 Replacing Thermostat 8 1 As 6 1 8...

Страница 6: ...efore loading will enable you to gain the maximum capacity from your baker but always remember to use a heat pad when placing hot wire trays directly onto a work surface The Bain Marie unit is designed to keep toppings hot whilst being served it is NOT suitable to cook toppings from cold Please ensure therefore that all hot toppings fillings are thoroughly cooked elsewhere before being transferred...

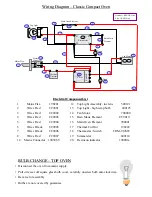
Страница 7: ...ck CC9005 17 Thermal Cut Out 190222 7 Wires Black CC9006 18 Thermostat Switch COM TS SW 8 Wires Red CC9007 19 Simmerstat 600110 10 Mains Connector 190306V 20 Red neon indicator 190001a BULB CHANGE BULB CHANGE TOP OVEN TOP OVEN Disconnect the oven from mains supply Pull or leaver off square glass bulb cover carefully unscrew bulb anti clockwise Reverse for assembly Bulbs are not covered by guarante...

Страница 8: ...ut The whole oven lights elements and fan cycles off and then on again some time later indicating a replacement thermostat is required Yes consult Service Engineer SERVICE SHEET SERVICE SHEET DISCONNECT FROM ELECTRICITY SUPPLY BEFORE COMMENCING SERVICE 1 Replacing top oven bulb Access is gained through top oven door Lever off the glass cover and unscrew bulb Replace cover ensuring cut out in cover...

Страница 9: ...overed by this guarantee Please check your fuses and electricity supply before calling out an engineer as service calls requested in error will be charged at the normal rate Please have the equipment sited where it is easily accessible to the engineer and where there is adequate room to work In the case of an oven please ensure the product has not been used within 6 hours of the engineers visit an...

Отзывы: