background image


12 

- PAN : Moving zoom-in picture to left-right   

- TILT : Moving zoom-in picture to up-down 

        * It doesn’t work for PAN/TILT when the D-ZOOM is on x1.0. 

 GAMMA : Setting GAMMA curve. 

 NEG. IMAGE : Switching to negative color. 

4. MOTION 


Motion  detection  function  allows  more  effective  observation.  When  any  movement  is 

detected, signal is generated. 


ON:  If  ‘MOTION’  function  is  active,  character  of  person  is  flickering  on  right  above 

position when motion is detected on selected area. 


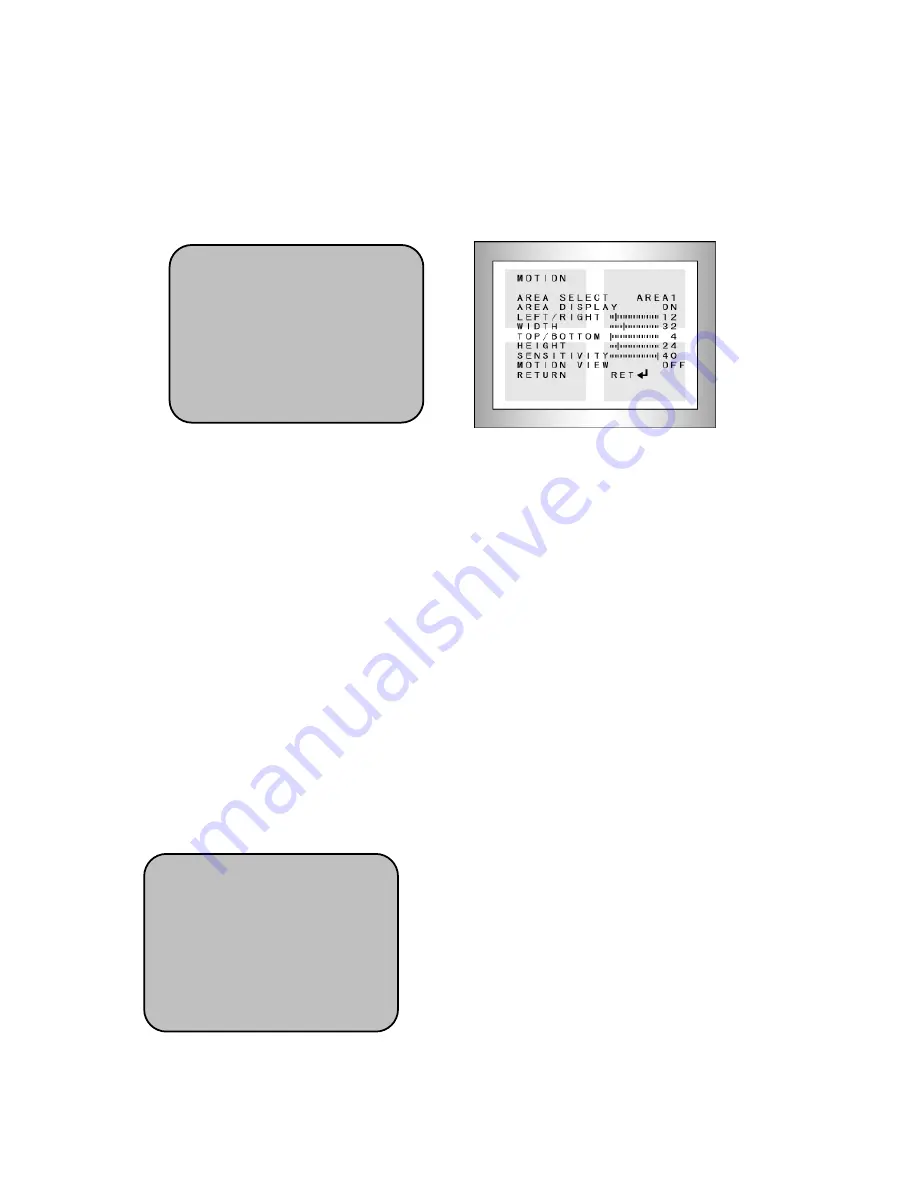
MOTION DETECTION Setting


• AREA SELECT : Select the programmed area. 

• AREA DISPLAY : Turn on and off the programmed motion area. 

• LEFT  /  RIGHT : Move left-right (horizontal) position of the programmed motion area.   

• WIDTH : Adjust horizontal width of the programmed motion area 

• TOP  /  BOTTOM : Move vertical position of the programmed motion area 

• HEIGHT : Adjust vertical height of the programmed motion area 

• SENSITIVITY : Adjust motion sensitivity of the programmed motion area. 

• MOTION VIEW : Turn on and off the display when motion sensitivity detected. 

• RETURN : Save setup value and return to previous menu. 

 OFF : Cancel Motion detection function.   

5. PRIVACY 

You  may  conceal  specific  area  on  the  screen  with 

this  ‘PRIVACY’  function.  Select  ‘ON’  by  pressing 

left/right  button  and  press  ‘SET’  button  to  enter 

‘PRIVACY’ mode. 


-  Select ‘ON’ and press ‘SET’ button for PRIVACY 

setup menu. 


SPECIAL 

1. CAM TITLE                OFF 

2. D-EFFECT               


3. RS485                     


4. MOTION                    OFF 

5. PRIVACY                  OFF 

6. SYNC                        INT 

7. LANGUAGE              ENGLISH 


8. RETURN                  RET 


SPECIAL 

1. CAM TITLE                OFF 

2. D-EFFECT               


3. RS485                     


4. MOTION                    OFF 

5. PRIVACY                  OFF 

6. SYNC                        INT 

7. LANGUAGE              ENGLISH 


8. RETURN                  RET 


Содержание KVDM-580IR(W)

Страница 1: ...IR Day Night IR Vandal Resistant Dome Camera KVDM KVDM KVDM KVDM 580IR 580IR 580IR 580IR W W W W MANUAL...

Страница 2: ...to obtain better picture definition Motion Detection Since the camera detects motion and generates signals without any additional external sensors you can monitor activity more efficiently by connect...

Страница 3: ...ton Used for the menu display This button can be used to confirm settings after changing the value of the selected function or current conditions UP DOWN buttons Used for selecting items by moving the...

Страница 4: ...R OFF INDOOR OUTDOOR EXPOSURE RETURN WHITE BAL ATW AWB AWC SET MANUAL INDOOR OUTDOOR ATW L DAY NIGHT EXT B W COLOR 3DNR OFF ON CAM TITLE D EFFECT FREEZE MIRROR D ZOOM GAMMA MEG IMAGE MOTION OFF ON PRI...

Страница 5: ...down buttons Please select the type of the lens you wish to use by pressing the left or right Button Manual MANUAL lens selection DC DC Auto Iris lens selection Please don t be selected in MANUAL for...

Страница 6: ...x8 x4 x2 selectable 2 BRIGHTNESS When the lens is selected MANUAL it can be adjusted BRIGHTNESS 3 AGC Auto Gain Control OFF Deactivates the AGC function LOW Allows automatic gain control to 14 dB MID...

Страница 7: ...tializing HSBLC area L EFT RIGHT Moving left right in HSBLC area WIDTH Adjusting left right width in HSBLC area T OP BOTTOM Moving up down in HSBLC area H EIGHT Adjusting height of up down in HSBLC ar...

Страница 8: ...K and 20 000 K AWB Select this when the color temperature is between 2 500 K and 9 500 K AWC SET To find the optimal setting for the current luminance environment in this mode set the point the camer...

Страница 9: ...essing the LEFT or RIGHT button COLOR The pictures are always displayed in color IR LED Off EXT This mode allows you to apply a desired filter to external signals CdS B W The pictures are always displ...

Страница 10: ...y using the UP or DOWN button Please select ON by pressing the LEFT or RIGHT button Please press the SET button Up to 15 letters can be used for the ID Please move the cursor to the letter you wish to...

Страница 11: ...n The name will appear at the top left corner Please find the position you wish to display the name by using the 4 directional buttons and then press the SETUP button Please select END and then press...

Страница 12: ...H Adjust horizontal width of the programmed motion area TOP BOTTOM Move vertical position of the programmed motion area HEIGHT Adjust vertical height of the programmed motion area SENSITIVITY Adjust m...

Страница 13: ...phase of multiple cameras using the power synchronization function Line Lock without using a synchronization signal generator INT Internal Synchronization Type L L Power Synchronization Type Line lock...

Страница 14: ...s SHARPNESS Adjust brightness of the video picture BLUE Adjust CB GAIN of the color RED Adjust CR GAIN of the color 8 RESET Reset the camera settings to the factory defaults 9 EXIT Press the SET butto...

Страница 15: ...15 5 Dimensions...

Страница 16: ...2 White Balance ATW AWB AWC Set Manual Indoor Outdoor ATW L BackLight OFF BLC HSBLC Wide Dynamic Range 52dB AGC Low Middle High Off 3D DNR On Off Privacy Zone Motion Detection 8 Area 4 Zone Sharpness...

Отзывы: