background image

Contents

1  Safety  . . . . . . . . . . . . . . . . . . . . . . . . . . . . . . . . . . . . . . . . . . . . 4 


Battery Warnings  . . . . . . . . . . . . . . . . . . . . . . . . . . . . . . . . .  5 


User Requirements and Warnings. . . . . . . . . . . . . . . . . . . . 6 


Care Warnings. . . . . . . . . . . . . . . . . . . . . . . . . . . . . . . . . . . . 6

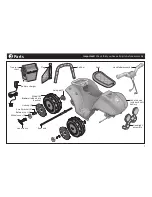
2  Parts  . . . . . . . . . . . . . . . . . . . . . . . . . . . . . . . . . . . . . . . . . . . . .  7

3  Assembly. . . . . . . . . . . . . . . . . . . . . . . . . . . . . . . . . . . . . . . . . . 8 


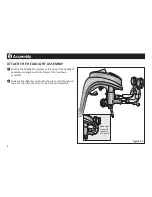
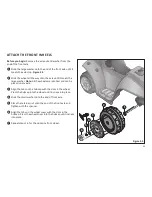
Attach the Front Axle Assembly  . . . . . . . . . . . . . . . . . . . . .  8 


Attach the Headlight Assembly . . . . . . . . . . . . . . . . . . . . . .  8 


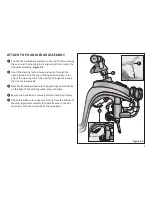
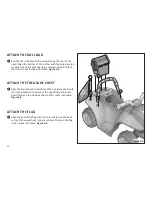
Attach the Handlebar Assembly  . . . . . . . . . . . . . . . . . . . . .  9 


Attach the Rear Wheels . . . . . . . . . . . . . . . . . . . . . . . . . . . . 10 


Attach the Front Wheels  . . . . . . . . . . . . . . . . . . . . . . . . . . .  11 


Attach the Roll bar  . . . . . . . . . . . . . . . . . . . . . . . . . . . . . . . . 12 


Attach the Treasure Chest  . . . . . . . . . . . . . . . . . . . . . . . . . .  12 


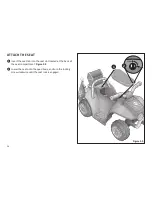
Attach the Flag  . . . . . . . . . . . . . . . . . . . . . . . . . . . . . . . . . . .  12 


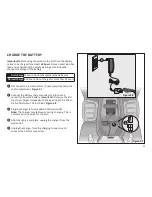
Charge the battery . . . . . . . . . . . . . . . . . . . . . . . . . . . . . . . . 13 


Attach the Seat . . . . . . . . . . . . . . . . . . . . . . . . . . . . . . . . . . .  14

4  Use. . . . . . . . . . . . . . . . . . . . . . . . . . . . . . . . . . . . . . . . . . . . . . . 15 


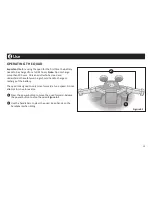
Operating the Quad . . . . . . . . . . . . . . . . . . . . . . . . . . . . . . .  15 


Re-Charge Interval and Time . . . . . . . . . . . . . . . . . . . . . . . . 16 


Battery Storage . . . . . . . . . . . . . . . . . . . . . . . . . . . . . . . . . . . 16 


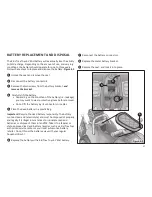
Battery Replacement and Disposal . . . . . . . . . . . . . . . . . . .  17

5  Maintenance  . . . . . . . . . . . . . . . . . . . . . . . . . . . . . . . . . . . . . .  18

6  Troubleshooting Guide . . . . . . . . . . . . . . . . . . . . . . . . . . . . . .  19

7  Services, Repairs and Parts  . . . . . . . . . . . . . . . . . . . . . . . . . .  22

8  Warranty. . . . . . . . . . . . . . . . . . . . . . . . . . . . . . . . . . . . . . . . . . 29  

9  Contact Information . . . . . . . . . . . . . . . . . . . . . . . . . . . . . . . . 24

3

Содержание KT1138 Jake and the Neverland Pirates

Страница 1: ...The vehicle must be assembled by an adult who has read and understands the instructions in this manual Keep the packaging away from children and dispose of all packaging before use Keep instructions for future reference KT1138 Styles and colors may vary Made in China Toddler Quad Disney ...

Страница 2: ...ng enjoyment with our products We appreciate your business Please call us at Kid Trax Toys Consumer Relations with questions or comments at Phone 1 877 741 6154 The Web www kidtraxtoys com Email customerservice kidtraxtoys com Address 4902 Hammersley Road Madison WI 53711 Important Do not return the product to the store Please contact customer service at 1 800 242 6110 for assistance and replaceme...

Страница 3: ...bly 9 Attach the Rear Wheels 10 Attach the Front Wheels 11 Attach the Roll bar 12 Attach the Treasure Chest 12 Attach the Flag 12 Charge the battery 13 Attach the Seat 14 4 Use 15 Operating the Quad 15 Re Charge Interval and Time 16 Battery Storage 16 Battery Replacement and Disposal 17 5 Maintenance 18 6 Troubleshooting Guide 19 7 Services Repairs and Parts 22 8 Warranty 29 9 Contact Information ...

Страница 4: ...ove and dispose of all protective material and poly bags before assembly Be sure to remove all packaging materials and parts from underneath the vehicle body Riding the vehicle without a helmet Riders must always wear a fitted helmet that complies with U S Consumer Product Safety Commission CPSC Standard CFR 1183 Battery posts terminals and related accessories contain lead and lead compounds acids...

Страница 5: ... damage the system Exposed wiring circuitry in the charger may cause electric shock Always keep the charger housing closed The following safety hazards may result in serious injury or death to the user of the vehicle Use of a battery or charger other than the supplied KidTrax Toys 6V rechargeable battery and charger may cause a fire or explosion Only use the supplied Kid Trax Toys 6V rechargeable ...

Страница 6: ...atch supervise Always sit in the seat when using the vehicle Keep your hands hair and clothes away from moving parts Always wear shoes when using the vehicle Only one rider is allowed on the car at a time Children under 18 months cannot use the vehicle Only drive on level ground Do not go near water drop offs or up and down steep slopes Do not drive the vehicle into loose dirt mud sand or fine gra...

Страница 7: ... assembly Vehicle body Includes 6 volt battery Handlebar assembly Hubcap 4 Wheel 4 Note all wheels are identical Treasure chest Roll bar Battery charger Seat Flag Headlight assembly Axle pad 1 Small washer 4 Retainer nut 4 Wheel cover 4 Rear axle Hex wrench ...

Страница 8: ...eadlight assembly so the arms of the headlight assembly are aligned with the tubes of the front axle assembly Slide the headlight assembly into the tubes until the tabs on the arms snap into the slots on the front axle assembly 2 1 Headlight assembly snapped into place ...

Страница 9: ...he top of the quad body Be sure the end of the steering rod is fully inserted through the hole in the front axle assembly Press the handlebar down into the quad body until the tabs on the base of the steering wheel snap into place Be sure the handlebar is securely attached and turns freely Attach the white wire connector coming from the bottom of the steering wheel assembly to the white wire conne...

Страница 10: ...x pad over the protrusions on the gear box Figure 3 4 Slide the wheel all the way onto the axle until it meets the large washer Note All the wheels are identical and can be placed on any axle Align the tabs on the hubcap with the slots in the wheel Press the hubcap into the wheel until in snaps into place Slide the small washer onto the end of rear axle Place the retainer nut onto the end of the r...

Страница 11: ... are identical and can be placed on any axle Align the tabs on the hubcap with the slots in the wheel Press the hubcap into the wheel until in snaps into place Slide the small washer onto the end of front axle Place the retainer nut onto the end of the front axle and tighten with the spanner Align the tabs on the wheel cover with the slots in the hubcap Press the wheel cover into the hubcap until ...

Страница 12: ...ps into place Figure 3 6 ATTACH THE TREASURE CHEST Align the four tabs on the bottom of the treasure chest with the slots located on the back of the quad body and press down firmly on the treasure chest until it snaps into place Figure 3 6 ATTACH THE FLAG Align the end of the flag with the hole located on the back corner of the quad body and press down firmly on the flag until it snaps into place ...

Страница 13: ...m during charging This is normal and not a cause for concern After charging is complete unplug the charger from the wall outlet Unplug the charger from the charging connector and connect the battery connectors First charge 24 hours Do not charge more than 30 hours Normal charge 8 16 hours Do not charge for more than 24 hours CHARGE THE BATTERY Important Before using the quad for the first time the...

Страница 14: ... Open ATTACH THE SEAT Insert the seat tab into the seat slot located at the back of the seat compartment Figure 3 9 Lower the seat onto the quad body and turn the locking screw clockwise until the seat lock is engaged 1 2 ...

Страница 15: ...Only an adult who has read and understands the safety warnings should handle charge or recharge of the battery The quad is designed to only move forward at one speed Do not attempt to move in reverse Press the power button to move the quad forward Release the power button to stop the quad Figure 4 1 Use the handlebars to steer the quad Keep hands on the handlebars when riding 1 2 ...

Страница 16: ...rranty BATTERY STORAGE Do not leave the battery connected in the vehicle for long period of times while not being used This may drain the battery completely and cause permanent damage Disconnect the battery connectors from the battery when the vehicle is not going to be used for a long period of time It is best to leave the battery in the battery compartment when the vehicle is being stored for lo...

Страница 17: ...loves before removal Do not lift the battery by its connectors or cables Place the dead battery in a plastic bag Important Recycle the dead battery responsibly The battery contains lead acid electrolyte and must be disposed of properly and legally It is illegal in most areas to incinerate lead acid batteries or dispose of them in landfills Take it to a federal or state approved lead acid battery r...

Страница 18: ...red Store the vehicle indoors or cover it with a tarp to protect it from the wet weather Keep it away from sources of heat such as stoves and heaters Clean the vehicle with a soft dry cloth To restore shine to plastic parts use a non wax furniture polish Do not use car wax abrasive cleaners or wash the vehicle with soap and water Water will damage the motor electrical system and battery KidTrax To...

Страница 19: ...s damaged Call Consumer Relations at 877 741 6154 for an authorized service center Motor is damaged Call Consumer Relations at 877 741 6154 for an authorized service center Vehicle does not run very long Battery is under charged Check that the battery connectors are firmly plugged into each other when recharging see Battery Recharge Interval and Time 19 The following are examples of potential prob...

Страница 20: ...d and firm surfaces see User Requirements and Safety Warnings Vehicle needs a push to go forward Poor contact of wires or connectors Check that battery connectors are firmly plugged into each other If wires are loose around the motor call Consumer Relations at 877 741 6154 for an authorized service center Dead Spot on motor A dead spot means the electric power is not being delivered to the termina...

Страница 21: ...er Charger not plugged in Check that battery charger is plugged into a working wall outlet Charger is not working lights not glowing Call Consumer Relations at 877 741 6154 for an authorized service center Battery bubbles or gurgles when charging This is normal and not a cause for concern Charger feels warm when recharging This is normal and not a cause for concern 21 ...

Страница 22: ...y Friday Phone 877 741 6154 Email customerservice kidtraxtoys com Web www kidtraxtoys com For service and repairs you will be directed to an authorized service center To order parts have the model and serial number found underneath the seat on the battery cover The following is a list of available replacement parts Wheels Hardware bag for wheel assembly Steering assembly 6 volt KidTrax battery Bat...

Страница 23: ...ed PC service center For personal use only Not for commercial use The original owner shall pay all labor charges connected with the repair or replacement of all parts Under no circumstances does this limited warranty include the cost of shipment or transportation to or from an authorized Kid Trax repair center or Kid Trax retailer Limitation of Damages The warranty and remedies as set forth are ex...

Страница 24: ...mation 24 If you have any questions or comments please contact us at In U S A 2013 Pacific Cycle Inc 4902 Hammersly Rd Madison WI 53711 Customer Service 877 741 6154 customerservice kidtraxtoys com www kidtraxtoys com ...

Отзывы: