background image

4

4 - Play Music 

Press and hold  

to  turn  the  unit  ON  and  enter  music  standby 

mode. 

Press        

to start music playback. Icon “       ” appears on display. 

Note: Use this button to suspend momentarily the playing track. Icon 

“ 

II

  ”  will  appear  on  display.  Press         

again  to  resume  normal 

playback. 

P r e s s        

to  skip  forward  to  the  next  track  or  repeatedly  to  skip 

forward several tracks. Press         

to skip backward to the previous track 

or  repeatedly  to  skip  backward  several  tracks.  Press  and  hold           

or         to search quickly within a track. 

To adjust the volume level, press 

VOLUME

 +/- button. 

In playing or pause mode, press       

for  two  seconds  to  enter  stop 

mode. Music playback stops. Press        

to resume. 

5 - Delete file 

In stop mode, press 

MODE

 for two seconds to enter main menu. 

Press 

or        to select “Delete” icon. Press Mode to enter “Delete” 

mode. 

Press          

or         to select the file (Music/All Music/Voice/All Voice) you 

want to delete. Press 

MODE

, select “yes” and press 

MODE

 to confirm delete; 

select “no” and press 

MODE

 to jump to the next file.

Note: 

“Read-only” music file can not be deleted.


6 - Settings 

Press 

MODE

 for two seconds to enter main menu. 

P r e s s         

or       to select “ Setting” icon. Then press 

MODE

 to confirm 

and enter submenu.


7 - Equalizer


Press         or          to select equalizer mode: Normal, Rock, Jazz, DDB, POP, 

Classic. Press 

MODE

 to confirm your selection. 

8 - Play mode 

Press        or        

to  select  desired  play  mode  :  Normal,  Repeat  one, 

Repeat All, Random, Random All. 

Note: 

Random:  Playback  will  stop  after  all  tracks  have  been  randomly  played. 

Random All: Random play continuously. 

9 - Contrast


Press       or       to adjust LCD contrast. Press 

MODE

 to confirm your 

setting. 

10 - Backlight 

Press      or       to select backlight time : 0 secs, 5 secs, 10 secs, 20 

secs, 30 secs, 40 secs, 50 secs, 60 secs. Press 

MODE

 to confirm your 

selection. 

(Preset = 5 secs)

7

4

To be able to run smoothly with the device, your computer should comply 

with the following minimum requirements:

Pentium III 500MHz or higher recommended 

Macintosh iMac G3 or higher 

Windows 98SE, Me, 2000, or XP 

Mac OS X Version 10.1.5 or higher 

Internet Explorer 4.0 or higher 

Internet access (optional) 

100MB free hard disk space for the software 

64MB RAM (128 MB recommended) 

CD-ROM drive capable of digital audio extraction 

USB port (2.0 recommended) 

Sound card 

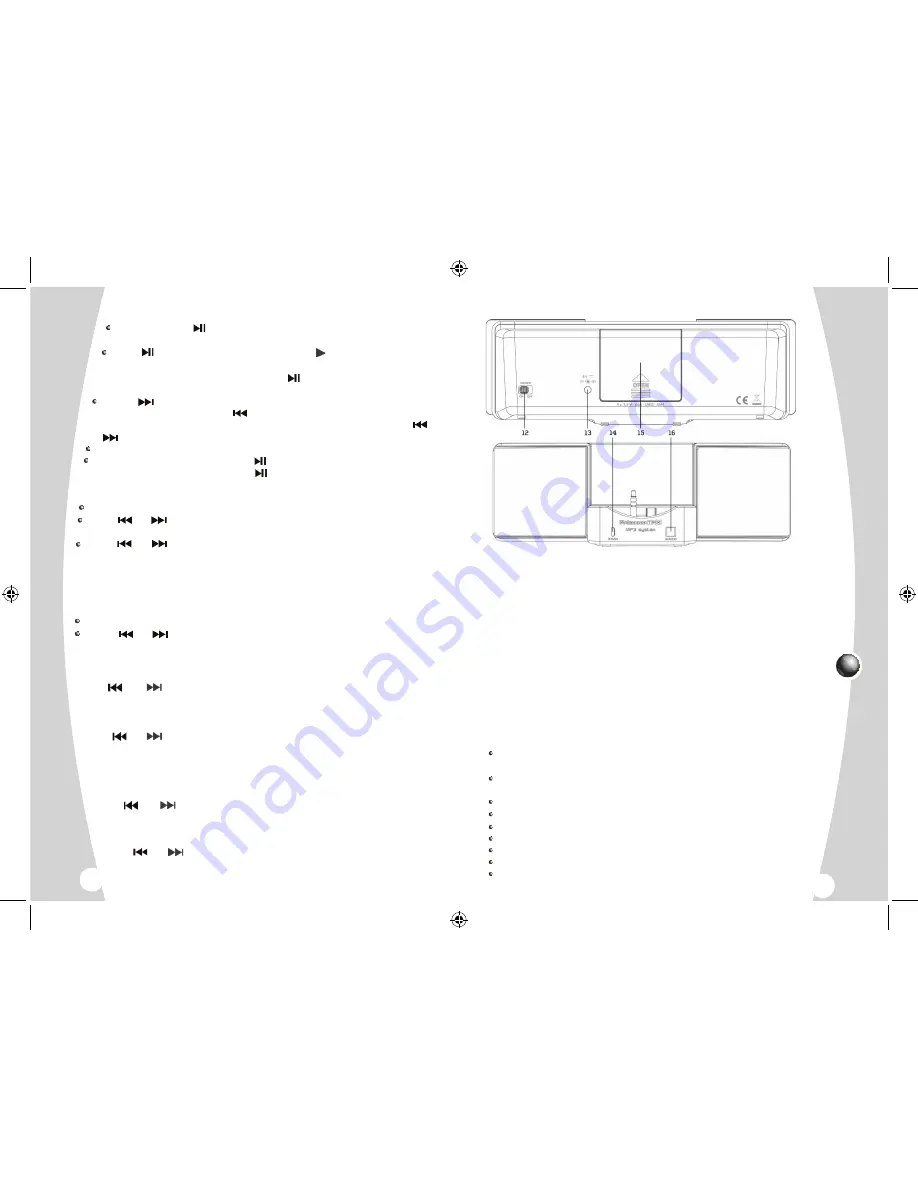
12. Power ON/OFF switch 

13. DC jack

14. Power ON/OFF indicator

15. Battery door

16. Remote Control sensor

System requirements

Содержание Princess MAX

Страница 1: ... reserved Warranty Should you in the unlikely event experience any problems with this product all our products have a six month guarantee In the first instance return the product back to the place of purchase where a replacement will be issued PRODUCED AFTER 13th AUGUST 2005 WASTE ELECTRICAL PRODUCTS SHOULD NOT BE DISPOSED OF WITH HOUSEHOLD WASTE PLEASE RECYCLE WHERE FACILITIES EXIST CHECK WITH YO...

Страница 2: ... batteries to power this product Batteries should be inserted and removed by an adult Only use the type of batteries specified in this user manual or equivalent type We recommend the use of alkaline batteries Keep small batteries out of the reach of young children CAUTION Danger of explosion if battery is incorrectly replaced Replace only with the same or equivalent type of battery Follow the pola...

Страница 3: ...n up the volume so high that you are unable to hear what is around you Insert battery into the player To insert battery open the battery door on back of unit Insert 1 x 1 5V AAA LR03 AM4 batteries into the compartment ensuring they are installed the correct way around The polarities are marked inside the battery compartment Close the door to the battery compartment Note Refer to the power level in...

Страница 4: ... deactivates all buttons functions and eliminates the possibility of accidentally pressing buttons Slide HOLD switch to opposite direction to unlock all buttons Lock icon disappears 17 Lyrics This player supports lyrics function with MP3 playback Lyric file format should be files with extension LRC Lyric file name should be same as the song s name For example Song name Jay Sky mp3 Lyric file name ...

Страница 5: ...conds to enter main menu P r e ss or to select Setting icon Then press MODE to confirm and enter submenu 7 Equalizer Press or to select equalizer mode Normal Rock Jazz DDB POP Classic Press MODE to confirm your selection 8 Play mode Press or to select desired play mode Normal Repeat one Repeat All Random Random All Note Random Playback will stop after all tracks have been randomly played Random Al...

Страница 6: ...n the MTP player The Smart Jukebox Sync feature is fully customisable and allows you to manually or automatically download selected content To select the synchronisation method click the Set Up Sync button located on the WMP 10 Sync tab For more information about Sync feature and other Smart Jukebox features visit the Microsoft Web site at the following URL http www microsoft com windows windowsme...

Отзывы: