Keystone KSTHW08A Скачать руководство пользователя страница 16

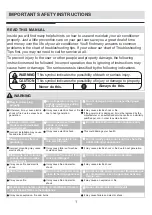
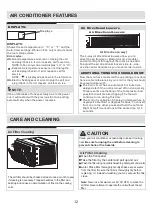
AIR CONDITIONER FEATURES

Displays

O

O

Shows the set temperature in 

"

  C

"

 or 

"

  F

"

 and the

Auto-timer settings.While on Fan only mode,it shows 
the room temperature.

DISPLAYS:

      -

Evaporator temperature sensor error-Unplug the 

       unit and plug it back in.If error repeats, call for 
       service.
       NOTE:  

"


"

is displayed as shown in the left picture. 

HS -

Electric heating sensor error-Unplug the unit and

        plug it back in.If error repeats, call for service.
        

Error codes:
AS-

Room temperature sensor error-Unplug the unit 

       and plug it back in.If error repeats, call for service.
       NOTE:In Fan only mode,it will display

"

LO

"

 or 

"

HI

"

.

If the unit breaks off unexpectedly due to the power 
cut, it will restart with the previous function setting 
automatically when the power resumes. 

DISPLAYS:

NOTE:

Air Directional Louvers

ADDITIONAL THINGS YOU SHOULD KNOW

Now that you have mastered the operating procedure, 
here are more features in your control that you should 
become familiar with.
    The Cool circuit has an automatic 3 minute time 
    delayed start if the unit is turned off and on quickly. 
    This prevents overheating of the compressor and 
    possible circuit breaker tripping.The fan will 
    continue to run during this time.
    The control is capable of displaying temperature in 
    degrees Fahrenheit or degrees Celsius. To convert 
    from one to the other, press and hold the Left and 
    Right Temp/Timer buttons at the same time, for 3 
    seconds.

12

Air Directional Louvers

Air Direction(4- way)

The 4-way air directional louvers allow you to
direct the air flow Up or Down(on some models)
and Left or Right throughout the room as needed. 
To adjust the air directional louvers side-to -side, 
use the center handles as you move it side-to-side.
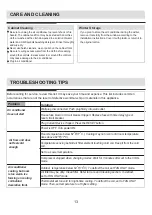
Air Filter Cleaning

CARE AND CLEANING

Air Filter Cleaning


Note: 

Never use hot water over 40 C(104 F) to cl ean th e

a

  i r fil ter. Never attempt to operate the unit without the air

   filter.

Open the front panel.
Take the filter by the center and pull up and out.

Wash the  filter u

  sing l iquid d ishwashing d etergent a nd w

  arm  

water. Rinse filter thoroughly. Gently shake excess water 
from the filter. Be sure the filter is thoroughly dry before 
replacing. Or, instead of washing you may vacuum the filter 
clean.

CAUTION

Clean your air conditioner occasionally to keep it looking 
new. 

Be sure to unplug the unit before cleaning to 

prevent chock or fire hazards.

The air filter should be checked at least once a month to see 
if cleaning is necessary. Trapped particles in the filter can 
build up and cause an accumulation of frost on the cooling 
coils.
     

Содержание KSTHW08A

Страница 1: ...please read this manual carefully and keep it for future reference TABLE OF CONTENTS Installation Instructions 10 4 9 Normal Sounds Important Safety Instructions 1 3 Troubleshooting Tip 13 14 Air Con...

Страница 2: ......

Страница 3: ...Producto...

Страница 4: ...1 866 646 4332 1 866 646 4332 MIDEA AMERICA CORPORATION PRODUCT REGISTRATION CENTER 11800 NW 100 ROAD STE 4 MEDLEY FL 33178 1037...

Страница 5: ...xcess heat generation It may cause electric shock or fire due to heat generation Incorrect grounding may cause electric shock It may cause fire and electric shock It may cause fire It may cause explos...

Страница 6: ...ters maycause failure It contains contaminants and could make you sick Stop operation and close the window in storm or hurricane Do not use strong detergent such as wax or thinner but use a soft cloth...

Страница 7: ...he window is a triple track type with a screen panel included remove the screen completely before installation Be sure the air conditioner has been securely and correctly installed according to the in...

Страница 8: ...d Parts Gather the required tools and parts before starting installation Read and follow the instructions provided with any tools listed here TOOLS NEEDED Flat blade and Phillips screwdrivers Tape mea...

Страница 9: ...harp instruments rubbing alcohol flammable fluids or abrasive cleaners to remove tape or glue These products can damage the surface of your air conditioner Handle the air conditioner gently 1 Remove t...

Страница 10: ...the top channel on top of the air conditioner cabinet lining up the three holes in the top channel with the three holes on top of the air conditioner cabinet 3 Using three pan head Phillips thread cu...

Страница 11: ...to drill one hole through the hole in the middle of top rail and into the window frame Attach cabinet to window with one 10 x 3 4 or 1 2 round head Phillips screw FIG 11 Place two safety locks into t...

Страница 12: ...ront of panel with front panel screws FIG 17 8 Plug into a grounded 3 prong outlet 9 Press RESET on the power supply cord Through the Wall Cabinet Installation Option 1 wood metal or plastic molding W...

Страница 13: ...n to the outside The cabinet should slop at least half a bubble towards the rear 4 Reuse the insulation to seal opening between cabinet and frame 5 Use existing holes in sides and top of cabinet and s...

Страница 14: ...ill be automatically maintained O O O O anywhere between 62 F 17 C and 86 F 30 C If you want the display to read the actual room temperature see To Operate on Fan Only section Sound of Rushing Air At...

Страница 15: ...selected temperature This ends the Sleep mode and the unit will continue to operate as originally programmed The Sleep mode program can be cancelled at any time during operation by pressing the Sleep...

Страница 16: ...during this time The control is capable of displaying temperature in degrees Fahrenheit or degrees Celsius To convert from one to the other press and hold the Left and Right Temp Timer buttons at the...

Страница 17: ...of defective workman ship or materials in this appliance Solution Air conditioner does not start Wall plug disconnected Push plug firmly into wall outlet House fuse blown or circuit breaker tripped Re...

Страница 18: ...ing Water dripping INSIDE when unit is cooling Improper installation Tilt air conditioner slightly to the outside to allow water drainage Refer to installation instructions check with installer Dirty...

Страница 19: ......

Страница 20: ...The design and specifications are subject to change without prior notice for product improvement Consult with the sales agency or manufacturer for details...

Страница 21: ...para instalaci n 4 17 Normales Sonidos 18 Instrucciones importantes de seguridad 1 3 Consejo de soluci n para problemas 21 22 Rasgo de aire acondicionado 18 20 Cuidado y limpio 20 21 Plazo De Garant...

Страница 22: ...ica o incendio por la generaci n del calor La tierra incorrecto podr a causar una descarga el ctrica Podr a causar incendio u descarga el ctrica Podr a causar incendio Podr a causar una explosion ince...

Страница 23: ...ndio y una descarga el ctrica lo cual producir a lesiones Detenga el funcionameinto y cierre la ventana en la tormenta o hurac n No utilice detergente fuerte como cera o algo m s delgado sino usa un p...

Страница 24: ...la inclu do remueva la pantalla completamente antes de la instalaci n Aseg rese de que el aire acondicionado est instalado a una manera segura y correcta seg n las instrucciones de intalaci n en este...

Страница 25: ...aqu HERRAMIENTAS NECESARIAS Destornilladores de cabeza plana y Philips Cinta m trica Nivel Taladro y brocas de 3 16 1 8 3 32 o m s peque as Instalaci n a trav s de la pared Adem s de las herramientas...

Страница 26: ...seche recicle los materiales de empaque Retire residuos de cinta y adhesivos de las superficies antes de instalar el acondicionador de aire Coloque una peque a cantidad de detergente l quido sobre los...

Страница 27: ...aire con los tres orificios del canal superior alineados con los orificios de la parte superior del gabinete del acondicionador de aire 3 Use tres tornillos autoperforantes Philips cabeza plana de 10...

Страница 28: ...s de seguridad en los orificios ubicados en la parte inferior del gabinete y coloque dos tornillos de cierre en los cierres de seguridad del gabinete seg n se muestra Fig 12 1 1 3 Revise que el gabine...

Страница 29: ...e de 3 patas y conexi n a tierra 9 Presione RESET restablecer en el cable de alimentaci n el ctrica Instalaci n del gabinete a trav s de la pared Opci n 1 moldura de madera metal o pl stico Al usar un...

Страница 30: ...clinado al menos media burbuja hacia la parte posterior 4 Reutilice el aislamiento para sellar la apertura entre el gabinete y el bastidor 5 Use los orificios existentes de los lados y la parte superi...

Страница 31: ...o durante el ciclo de ing cool Gurgle silbido ser o do debido a refrigerante pas cantar a trav s del evaporador durante el funcionamiento normal Gorgoteo o siseo puede Hacer ping o conmutaci n Las got...

Страница 32: ...eccionada originalmente Esto termina el modo de sue o y la unidad seguir funcionando seg n lo programado originalmente El programa de modo de reposo se puede cancelar en cualquier momento durante la o...

Страница 33: ...The ventilador continuar funcionando durante este tiempo El control es capaz de mostrar la temperatura en grados Fahrenheit o grados Celsius Para pasar de una a otra mantenga pulsada la Izquierda y D...

Страница 34: ...hura o los materiales de la f brica Soluci n El aire acondicionado no funciona Enchufe de pared desconectado Presione el enchufe con mucha esfuerza en la toma de corriente El fusible domestico estrope...

Страница 35: ...ia Un seco filtro de aire aire limitado Limpie el filtro El sonido del movimiento del aire Es normal Si hace tanto ruido cambie a una opci n de FAN m s baja La temperatura fuera es demasiado alto Elig...

Страница 36: ...y reinstalaci n necesarioS delos costos de los servicios que no sean con respecto al sistema de refrigeraci n Sellado Repuestos de Midea se utilizar n y se justifican nicamente por el per odo restante...

Страница 37: ...1 866 646 4332 GARANTIA DE AIR ACONDICIONADO 16...

Страница 38: ......

Страница 39: ......

Страница 40: ...El dise o y especificaci n se publican sin previo aviso de las mejoras del producto Consulte a la agencia de ventas o el fabricante sobre m s informaciones...

Отзывы: