background image

11

59B

59A

59A

59B

A

B

60

2-1

59A

2

15

15

2

15

50

62

11

2

59B

14

15

14

11

4

12

1

14

15

12

1

3

14

15

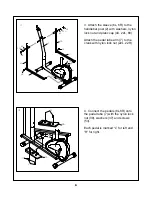
1.  Attach the front stabilizer (3) to the main
frame (1) with carriage bolt, washers and
cap nuts (12,15,14).  

Attach the rear stabilizer (4) to the main
frame (1) with carriage bolt, washers and
cap nuts (12,15,14)

2.  Connect sensor cable (50) to the exten-
sion wire (62).

Secure the handlebar post (2) with screws
and washers (11,15).

2-1.  Guide the cable from the resistance
knob (59A) through the eyelet (see picture
A).  Then pull the resistance knob (59A)
over the gap of the resistance cable (59B)
(see picture B).

5

Содержание DCV5.2H

Страница 1: ...ecautions and instructions in this manual before using this equipment Please save this manual for future reference QUESTIONS Call Our Toll Free Keys Fitness Helpline 1 888 340 0482 5 2 HYBRID OWNER S MANUAL 315 00028 06 05 Rev B ...

Страница 2: ...ID Model DCV5 2H Questions Please call if you need assistance about operating your exercise bike parts are missing parts become worn or need to be replaced 1 888 340 0482 Monday Friday 8 30 5 30 Central Time When requesting information please have the following available Name Model Part Number Description 1 ...

Страница 3: ...e that all users of this exercise bike have read the Owner s Manual and are familiar with warnings and safety precautions This exercise bike has a maximum user capacity of 250 pounds The Discovery exercise unit should only be used on a level surface and is intended for indoor use only It should not be placed in a garage patio or near water Keys recommends an equipment mat be placed under the unit ...

Страница 4: ...ly of DISCOVERY 5 2 Hybrid REMOVE ALL SECURITY TAPE AND WRAPPING BEFORE BEGINNING Pedal Rear Stabilizer Front Stabilizer Mainframe Seat Post Handlebar Post Resistance Knob Handlebar Computer Seat Handlebar 3 ...

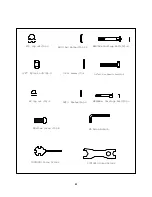
Страница 5: ...15 12 10X26 Washer 37 4 M6 Cap nut 65 4 10X13X14 Screw Driver M8x15mm Screw 11 8 3 8 Nylock nut 39 4 M8 Cap nut 14 4 M6X40mm Carriage Bolt 63 4 17X13X14 Screw Driver M5 Allen Wrench 3 8 x45 Hex Head Screw 53 4 M8X70mm Carriage Bolt 12 4 ...

Страница 6: ...s 12 15 14 Attach the rear stabilizer 4 to the main frame 1 with carriage bolt washers and cap nuts 12 15 14 2 Connect sensor cable 50 to the exten sion wire 62 Secure the handlebar post 2 with screws and washers 11 15 2 1 Guide the cable from the resistance knob 59A through the eyelet see picture A Then pull the resistance knob 59A over the gap of the resistance cable 59B see picture B 5 ...

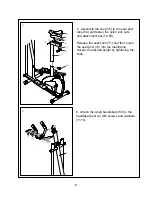
Страница 7: ...6L 6R to the handlebar post 2 with washers nylon lock nut and platic cap 44 22L 68 Attach the pedal tube arm 7 to the crank with nylon lock nut 22L 22R 4 Connect the pedals 8L 8R onto the pedal tube 7 with the nylon lock nut 39 washers 37 and screws 53 Each pedal is marked L for left and R for right ...

Страница 8: ...st tube 54 and fasten the nylon lock nuts and attachment bar 78 58 Release the seat knob 51 and then insert the seat post 70 into the mainframe Secure the desired height by tightening the knob 6 Attach the small handlebars 56 to the handlebar post 2 with screws and washers 11 15 7 ...

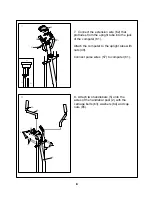
Страница 9: ... that protrudes from the upright tube into the jack of the computer 61 Attach the computer to the upright tube with nuts 49 Connect pulse wires 57 to computer 61 8 Attach two handlebars 5 onto the axles of the handlebar post 2 with the carriage bolts 63 washers 64 and cap nuts 65 ...

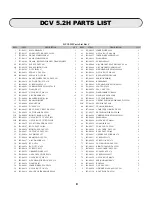
Страница 10: ...9 1 60 302 00647 TENSION KNOB 60 1 20 304 00022 BELT POLY V BELT DCV5 2H 1 61 307 00004 COMPUTER U R H EL DCV5 2 1 21L 330 00028 LEFT CRANK DCV5 2H 1 62 313 00137 EXTENSION WIRE DCV6 0R 1 21R 330 00029 RIGHT CRANK DCV5 2H 1 63 302 00648 CARRIAGE SCREW M6X350 63 4 22L 302 00625 NYLOCK NUT 1 2 X20T 22L 3 64 302 00649 WASHER 64 4 22R 302 00626 NYLOCK NUT 1 2 X21T 22R 3 65 302 00650 NYLOCK NUT M6 65 4...

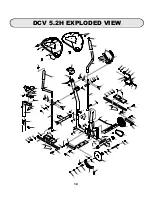
Страница 11: ...49 66 71 75 67 72 72 73 22L 69 44 46 30 32 31 15 29 81 80 35 48 28 47 27 49 48 16 21 15 22L 14 1 15 14 10 33 28 35 4 12 13 34 18 10 14 20 17 11 11 14 15 15 15 45 11 59B 2 60 7 24 6R 24 19 50 23 24 21 22R 81 80 37 39 25 24 8R 59A 60 64 65 63 68 22L 24 44 61 75 11 5 15 40 37 68 43 53 39 36 37 38 1 42 28 41 74 71 67 DCV 5 2H EXPLODED VIEW ...

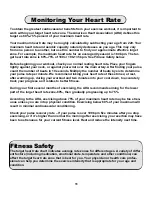
Страница 12: ... rate at these times at rest after warming up during your workout and two minutes into your cool down to accurately track your progress as it relates to better fitness During your first several months of exercising the AHA recommends aiming for the lower part of the target heart rate zone 60 then gradually progressing up to 75 According to the AHA exercising above 75 of your maximum heart rate may...

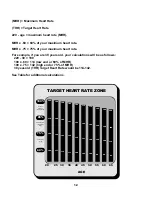
Страница 13: ...low end or 60 of MHR 190 x 75 142 high end or 75 of MHR 30 year old THR Target Heart Rate would be 114 142 See Table for additional calculations 100 85 75 60 Serious athletic training range Cardiovascular conditioning range Fat burning range 20 25 30 35 40 45 50 55 60 65 AGE 200 195 190 185 180 175 170 165 160 155 170 166 162 157 153 149 145 140 136 132 150 146 143 139 135 131 128 124 120 116 120 ...

Страница 14: ... prepay any shipping charges export taxes custom duties and taxes or any other charges associat ed with transportation of the parts or Product In addition you are responsible for insuring any parts or Product shipped or returned You assume the risk of loss during shipment You must present Keys with proof of purchase documents including the date of purchase Any evidence of alteration erasing or for...

Страница 15: ...Keys Fitness Products L P 4009 Distribution Dr Suite 250 Garland Texas 75041 ...

Отзывы: