70
71
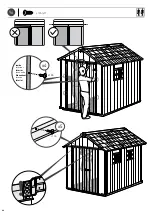
This shed is maintenance free. Paint or varnish are not necessary.
Cet abri ne nécessite aucun entretien. Peindre ou vernir n’est pas nécessaire.
El cobertizo no necesita mantenimiento. Tampoco hay que pintarlo ni barnizarlo.
Dieser Schuppen benötigt keine Wartung. Streichen oder Lackieren ist nicht notwendig.
Dit tuinhuisje is onderhoudsvrij. Het is niet nodig het te schilderen of te lakken.
Questa casetta non richiede manutenzione. Verniciatura non necessaria.
Este abrigo não requer manutenção. A pintura ou o envernizamento não são necessárias.
유지보수가
간편하며
별도의
페인트나
니스
작업이
필요
없습니다
.
MAINTENANCE |
ENTRETIENT
| MANTENIMIENTO |
WARTUNGSARBEITEN
| ONDERHOUD |
MANUTENZIONE
|
MANUTENÇÃO
KETER DUOTECH™ SHEDS - UNIQUE PAINTABLE WALLS
This maintenance-free shed is made of a unique compound which enables the brushed wall-panels to be painted.
The shed can be used in its original color, or the walls can be painted to match your landscape, deck, patio, or outdoor setting.
Prior to painting, refer to the detailed care and maintenance instructions:
• Type of paint: The walls of the shed can be painted with a water-based acrylic paint for exterior use.
Recommended: Solid, light shades, satin or semi-gloss finish. Consult with your color consultant or paint professional when
choosing paint.
• Application: Use a roller to apply the paint on the wall dry surface. Do not paint the beam-like crevices in the walls.
• Do not paint windows, doors or door beam, roof, floor, or any other part of sheds.
Keep in mind: Painting requires maintenance. After some time, repainting may be required.
*For your safety - make sure you follow the paint's care & safety guide prior to application.
ABRIS KETER DUOTECH™ - PAROIS POUVANT ÊTRE PEINTES
Cet abri n’a besoin d’aucun entretien et est fait d’un composé unique permettant de peindre les panneaux muraux brossés.
L'abri peut être utilisé dans sa couleur d’origine, ou les murs peuvent être peints pour
s’harmoniser avec le paysage, la terrasse utilisé, le patio toutefois les éléments extérieurs.
Avant de peindre, consultez les instructions détaillées et le mode d’emploi :
• Type de peinture : les murs de l’abri peuvent être peints avec une peinture acrylique à base d’eau prévue
pour l’extérieur. Recommandation: finitions en teintes unies, tons clairs, satinés ou semi-lustrées.
Suives les indications de votre conseiller ou de votre peinture lors de votre choix.
• Application : utilisez un rouleau pour appliquer la peinture sur la surface bien sèche des murs.
Ne peignez pas les éléments de support dans les murs.
• Ne peignez ni les fenêtres, ni les portes ou le tour de porte, ni le toit, ni le sol, ni aucun autre élément de
l’abri (seulement les murs).
Rappelez-vous : la peinture exige un certain entretien. Après un certain temps, il peut être nécessaire de repeindre.
* Pour votre propre sécurité, suivez bien les instructions d’utilisation de la peinture avant la première application.
COBERTIZOS KETER DUOTECH™ - PAREDES PINTABLES ÚNICAS
Esta caseta que no requiere mantenimiento, está hecha de un compuesto único q ue permite pintar las paredes.
La caseta se puede utilizar con su color original o se pueden pintar las paredes para que combinen con el entorno, el patio o los
alrededores.
Antes de pintarlo, consulte las instrucciones detalladas de cuidado y mantenimiento:
• Tipo de pintura: Las paredes del cobertizo se pueden pintar con una pintura acrílica de base acuosa para uso en exteriores.
Se recomienda: sólida, sombras ligeras, satinada o con un acabado de semibrillo. Consulte con su profesional de pinturas cuando
vaya a elegir una pintura.
• Aplicación: Utilice un rodillo para aplicar la pintura sobre la superficie seca de la pared. No pinte las hendiduras similares a vigas de
las paredes.
• No pinte ventanas, puertas o vigas de la puerta, el suelo o cualquier otra parte del conbertizo
Tenga en cuenta: pintar requiere mantenimiento. Después de algún tiempo podría necesitar otra mano de pintura.
* Para su seguridad, asegúrese de que sigue la guía de cuidado y seguridad de la pintura antes de su aplicación.
KETER DUOTECH™ GARTENHAUS - INDIVIDUELL ANSTREICHBARE WÄNDE
Dieser wartungsfreie Schrank besteht aus einer einzigartigen Verbindung, welches es ermöglicht, die gebürsteten Wandpaneele zu
streichen.
Sie können den Schrank in seiner ursprünglichen Farbe nutzen oder dessen Wände streichen, um ihn der Landschaft, Terrasse oder
Umgebung anzupassen.
Bitte lesen Sie vor dem Streichen die ausführlichen Wartungs- und Pflegehinweise:
• Art der Farbe: Die Wandpaneele können mit einer Acrylfarbe auf Wasserbasis angestrichen werden. Unsere Empfehlung: Solide und
helle Farbtöne mit mattem oder seidenmattem Finish. Sprechen Sie bezüglich Ihrer Farbwahl mit einem Farbberater oder einem
professionellen Maler.
• Applikation: Verwenden Sie eine Farbrollen, um die Farbe auf die trockene Wandoberfläche aufzutragen. Bitte streichen Sie nicht die
Zwischenräume der einzelnen Paneele.
• Fenster, Türen, Türträger, Dach, Boden und jegliche andere Teile des Gartenhauses bitte nicht anstreichen!
Bitte beachten Sie: Streichen erfordert Instandhaltung und Pflege. Daher kann nach einiger Zeit ein Neuanstrich erforderlich sein.
*Achtung: Beachten Sie vor dem Streichen die Pflege- und Sicherheitshinweise der Farbe.
KETER DUOTECH™-TUINHUIZEN - UNIEKE SCHILDERBARE MUREN
Dit onderhoudsvrije tuinhuisje wordt gemaakt van een uniek materiaal, dat de mogelijkheid biedt dat de wanden geverfd kunnen
worden. Het tuinhuis kan worden gebruikt in de originele kleur, of de wanden kunnen worden geschilderd in de kleuren die u wenst voor
uw tuin. Voordat u gaat schilderen, verwijzen we u naar de gedetailleerde aanwijzingen voor verzorging en onderhoud:
• Type verf: de muren van het tuinhuis kunnen met een acrylverf op waterbasis voor buitengebruik worden geschilderd. Aanbevolen:
stevige, lichte tinten, satijnglans of semi-glanzende afwerking. Raadpleeg uw kleurenadviseur of een professionele schilder bij het
kiezen van de verf.
• Toepassing: gebruik een roller om de verf op de droge ondergrond van de muur aan te brengen. Schilder de balkachtige nerven in de
muren niet.
• Schilder de ramen, deuren of de deurpost, het dak of enig ander deel van de schuur niet. Houd er rekening mee dat schilderen
onderhoud behoeft. Na enige tijd moet u het overschilderen.
*Voor uw veiligheid moet u ervoor zorgen dat u de zorg- en veiligheidsinstructies van de verf opvolgt voordat u deze gaat gebruiken.
CASETTA DA GIARDINO KETER DUOTECH™ - PANNELLI VERNICIABILI
DEPOSITO KETER DUOTECH™ - PAREDES ÚNICAS PINTÁVEIS
Questa casetta è realizzata in DUOTECH™, particolare finitura che riproduce, alla vista e al tatto, l’effetto del legno.
La casetta può essere lasciata nel suo colore originario, oppure grazie alle sue caratteristiche uniche, può essere anche verniciata per
adattarsi ai gusti o all’ambiente circostante.
Prima della verniciatura, fare riferimento alle istruzioni dettagliate su cura e manutenzione:
· Tipo di vernice: I pannelli possono essere verniciati con una vernice acrilica per uso esterno. Raccomandiamo una tinta poco diluita,
ombreggiature leggere e rifiniture lucide o semilucide. Consultare un esperto al momento della scelta della vernice più adatta.
· Applicazione: utilizzare un rullo per applicare la vernice sulla superficie asciutta. Non verniciare le rientranze dei pannelli.
· Non verniciare finestre, porte, inserti, pavimento o qualsiasi altro componente diverso dai pannelli.
Avvertenza: la verniciatura richiede manutenzione. Potrebbe essere necessaria una riverniciatura periodica.
Assicurarsi di leggere attentamente la guida per la cura e la sicurezza prima della verniciatura.
Este galpão isento de manutenção é fabricado a partir de um composto exclusivo que permite a pintura dos painéis escovados da
parede.
O galpão pode ser usado em sua cor original, ou as paredes podem ser pintadas para combinar com sua paisagem, terraço, pátio ou
configuração ao ar livre. Antes de pintar, leia as instruções detalhadas sobre os cuidados e a manutenção:
• Tipo de pintura: As paredes do galpão podem ser pintadas com uma tinta acrílica à base de água para uso exterior.
Recomendado: Tons claros, sólidos, acabamento de semi-brilho ou cetim. Fale com o seu consultor de cor ou pintor profissional na
escolha da pintura.
• Aplicação: Use um rolo para aplicar a tinta sobre a superfície seca da parede. Não pinte os cérvices como feixe nas paredes.
• Não pinte janelas, portas ou feixe de porta, telhado, piso, ou qualquer outra parte do palpão
Lembre-se: Pintura requer manutenção. Depois de algum tempo, pode ser necessário pintar novamente.
* Para sua segurança - certifique-se de seguir o guia de cuidados e segurança da tinta antes da aplicação.
Содержание 1921567
Страница 8: ...8 4 sc15 x18 3 x2 sc15 x18 sc15 ...
Страница 16: ...16 18 MOWN x2 sc15 x22 sc15 x 11 x2 ...
Страница 17: ...17 19 1 2 3 ...
Страница 18: ...18 MOMP 20 MOMP x1 90 1 90 MOMP sc15 x1 sc15 ...
Страница 21: ...21 24 sc8 x4 scn8 x4 2 1 sc8 x2 scn8 x2 ...
Страница 22: ...22 25 1 2 3 4 OLP7 x3 OLPW x1 KP x2 x2 2 1 x2 s13b x4 s13b s13b ...
Страница 23: ...23 26 1 2 3 ...
Страница 24: ...24 27 MOMP x1 MOMP 90 90 MOMP sc15 x1 sc15 ...
Страница 26: ...26 FNME x2 sc8 x2 scn8 x2 29 30 sc8 x4 scn8 x4 2 1 FNME 1 2 sc8 scn8 FNME 1 2 sc8 scn8 sc8 x2 scn8 x2 ...
Страница 27: ...27 OLPC x2 KP x2 31 OLPC OLPC s13b x4 32 x2 x2 s13b s13b ...
Страница 28: ...28 34 s13b x4 33 NEPF x2 KP x2 s13b s13b s13b s13b ...
Страница 29: ...29 35 S45b x2 s45b x1 ...
Страница 31: ...31 37 sc15 x6 sc15 x 6 1 1 2 38 NEFM x1 1 2 x2 s45b s45b x2 ...
Страница 32: ...32 1 x2 s45b 39 s45b x2 2 2 1 1 NELR x2 40 ...
Страница 33: ...33 41 OKCL x1 OKCR x1 42 NEUK x1 1 2 OKCL OKCR OKCL OKCR sc7t x1 x2 sc7t x2 ...
Страница 37: ...37 48 47 x2 KP x2 2 1 ...
Страница 38: ...38 MOMB MOMB sc15x5 sc15 50 MOMB x1 sc15 x6 1 2 49 s13b x8 s13b x4 ...
Страница 40: ...40 52 MOFT9 x4 MOFT9 MOFT9 MOFT9 MOFT9 53 sc15 x16 x2 sc15 ...
Страница 41: ...41 MOFT9 MOFT9 MOFT9 MOFT9 MOM11 x2 MOM11 MOM11 sc15 x16 54 sc15 sc15 2 1 sc15 x 5 ...
Страница 42: ...42 55 MOFTD x1 MOFTD 1 2 3 6 5 4 ...
Страница 43: ...43 sc15 x 3 sc15 x 3 57 sc15 x3 sc15 1 2 3 6 5 4 56 sc15 x 1 sc15 x1 1 2 3 6 5 4 ...
Страница 44: ...44 58 MOFT9 MOFT9 x1 1 2 3 6 5 4 sc15 x3 59 sc15 x 3 sc15 x 3 sc15 1 2 3 6 5 4 ...
Страница 45: ...45 60 sc15 x8 sc15 x 8 61 MOFTU x1 MOFTU 1 2 3 6 5 4 1 2 3 6 5 4 ...
Страница 46: ...46 sc15 x1 62 sc15 63 sc15 x8 sc15 x 8 1 2 3 6 5 4 1 2 3 6 5 4 ...
Страница 47: ...47 64 MOFTD x1 MOFTD 1 65 sc15 x1 sc15 1 2 3 6 5 4 1 2 3 6 5 4 ...
Страница 48: ...48 67 sc15 x3 MOFT9 MOFT9 x1 sc15 x 3 2 1 sc15 x 3 66 sc15 x3 1 2 3 6 5 4 1 2 3 6 5 4 ...
Страница 49: ...49 68 sc15 x8 sc15 x 8 1 2 3 6 5 4 MOFTU x1 69 sc15 x1 MOFTU 1 sc15 2 1 2 3 6 5 4 ...
Страница 50: ...50 70 sc15 x9 71 MOBC9 x1 sc15 x4 2 1 sc15 x4 MOBC9 sc15 x 8 1 2 3 6 5 4 3 sc15 2 ...
Страница 51: ...51 72 MOPLS x2 1 2 3 x2 MOPLS 73 1 2 MOB7 x1 MOB7 x1 MOB7 OKEXT x1 OKEXT x1 OKEXT MOB7 x1 OKEXT x1 ...
Страница 52: ...52 75 MOAC x1 sc15 x3 2 1 sc15 x3 74 MOAC x1 sc15 x3 1 2 sc15 x3 ...
Страница 53: ...53 76 sc15 x32 1 77 s45b x8 MOFTC x4 sc15 x8 2 sc15 x2 3 s45b x2 sc15 x10 sc15 x12 sc15 x10 ...
Страница 57: ...57 84 85 NEDSO x2 NEDSI x1 NEDSW x1 NEDOR x1 NEDOL x1 NEDSW NEDSO NEDSO NEDSI NEDOR NEDOL NEDOR NEDOL ...
Страница 58: ...58 87 sc15 x12 86 sc15 x2 sc15 sc15 NUHH x2 sc15 x4 NUHG x2 ...
Страница 59: ...59 88 x8 sc15 x12 89 NEDH x6 s13b x28 s13b x2 sc15 x2 ...
Страница 60: ...60 90 1 x2 3 sc7t x8 sc7t x2 x4 NEDOL NEDOR 2 x4 ...
Страница 61: ...61 91 92 sc7t x4 NUHC x1 NUHD x1 sc8 x1 scn8 x1 NUHB x1 1 sc8 NUHA x1 sc7t x2 ...
Страница 62: ...62 93 3 4 2 sc15 x2 NEMB x2 NUHE x1 sc15 1 1 ...
Страница 63: ...63 s45b x 34 94 S45b x34 ...
Страница 64: ...64 95 ...
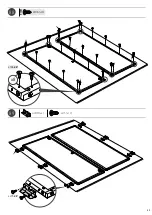
Страница 66: ...66 96 s13b x5 s13b x9 x4 Inside Intérieur Interior Innenseite Binnenkant Interno Interior s13b ...
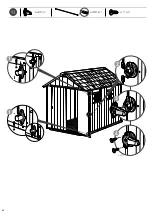
Страница 67: ...67 sc15 x4 97 sc15 x2 ...
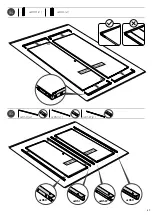
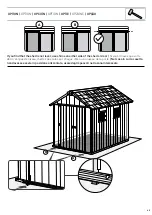
Страница 69: ...69 50mm 6 10mm OPTION OPTION OPCIÓN OPTION OPTIE OPZIONE OPÇÃO ...

