Kessler SECOND SHOOTER PLUS Скачать руководство пользователя страница 10

•  Press ENTER to select RUN.

TIME LAPSE

•  Select SHOOT/MOVE/SHOOT or CONTINUOUS mode:

•  Shoot/Move/Shoot – Camera will only fire when not moving. That is, the camera will 

fire, move to next position, stop and fire.

•  Continuous – Camera will move without stopping and fire throughout the duration of the 

move

If using a 3rd party intervalometer, select Continuous and set the overall run time by 

increasing or decreasing the Photos value. The exposure, delay and photo values will not 

be used.

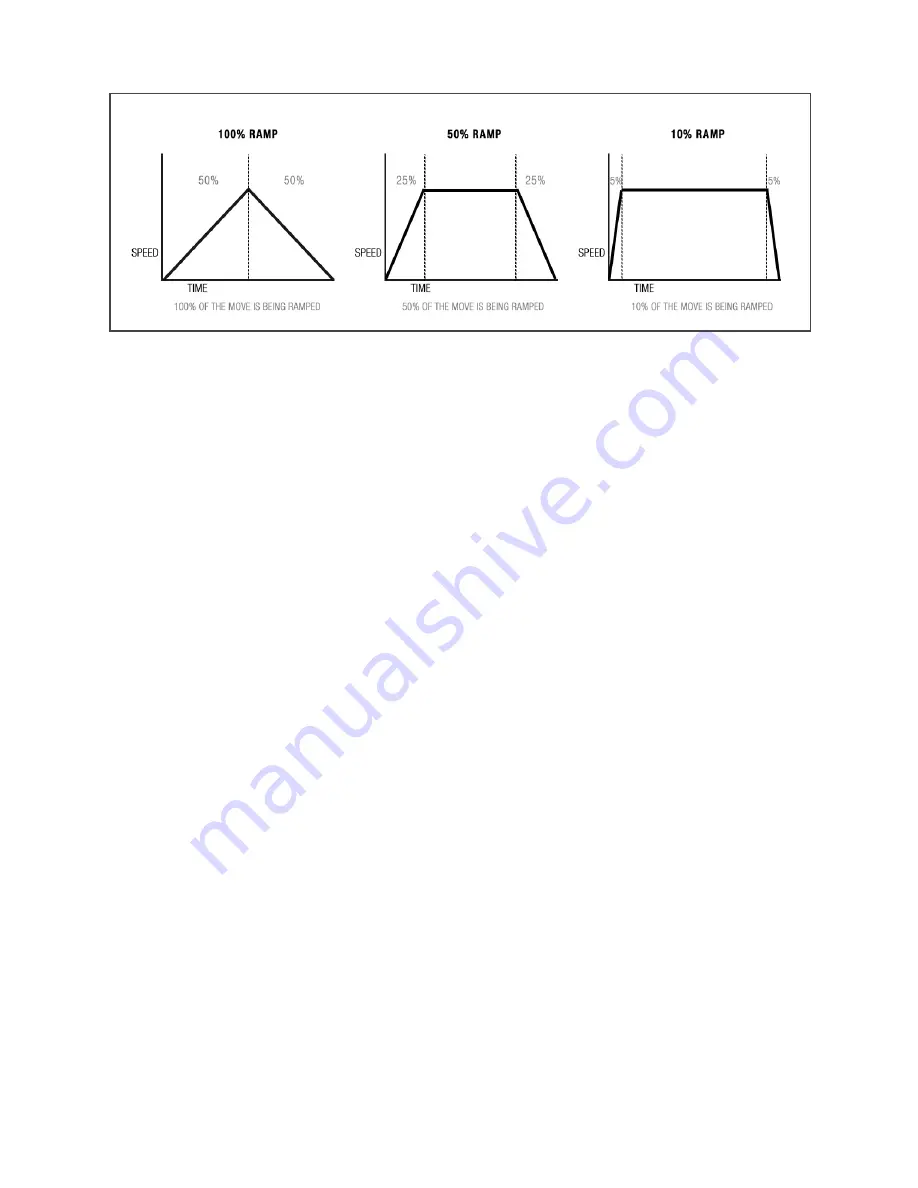
•  Set the RAMP value by selecting with Enter and adjusting with the Up and Down arrows:

•  Ramp – Percentage value indicates the change in speed of the movement over the 

entire move. The frame value to the right shows how many images until the system gets 

up to the top speed or how many images until the camera comes to a stop. 

•  Select START to begin the time-lapse. 

• 

The motors will move into the start position (1st key frame) and the backlight will turn 

off. Press the Shift button to toggle the backlight on/off. Press the Enter button to Pause/

Resume the time lapse move.

STOP MOTION

•  Set values for #PHOTOS & RAMP:

•  #Photos - Indicates the number of photographs taken during the entirety of the move

•  Ramp – Percentage value indicates the change in speed of the movement over the 

entire move. The frame value to the right shows how many images until the system gets 

up to the top speed or how many images until the camera comes to a stop. 

10

Fig. A

Содержание SECOND SHOOTER PLUS

Страница 1: ...Cable or external intervalometer TABLE OF CONTENTS The Controller 2 Getting Started Hardware Set Up Slider Motor 3 Pan Tilt Axis 6 Intervalometer Connect 6 Bridge Mode 7 Powering Up The System 7 Powe...

Страница 2: ...uring timelapse move e Power Port Connect the supplied AC wall power cord or a 12V DC cable for battery power f USB Port Connect the Controller to a computer via the sup plied USB cable to update firm...

Страница 3: ...n on the Slider motor is to be used for storing the extra pulley SMALL PULLEY 2 To remove the pulley installed on the Slider motor simply pull outward away from the motor 3 To install the pulley simpl...

Страница 4: ...er Motor The pre installed belt labeled 110XL on the Slider Motor is to be used in most applications However if using the Small Pulley in conjunction with the Shuttle Pod Shuttle Pod Mini or Pocket Do...

Страница 5: ...8 Mount Slider motor to slider using a Kessler Motor Mount 9 Connect CAT5 cable from Slider motor to the SLIDER port on the Controller This combination requires the pulley from the Motor Mount Kit to...

Страница 6: ...e 3 8 16 Kwik Short Plate 2 Connect CAT5 cable from the side of the Pan base to the PAN port on the controller 3 Connect CAT5 cable from the Tilt axis to the TILT port on the controller 4 Plug in powe...

Страница 7: ...ter controller the arrow buttons on each controller will control the motors connected to that controller To be able to control the motors connected to the slave unit through the master unit double tap...

Страница 8: ...ed with the following menu items PROGRAM MOVE Select PROGRAM MOVE to set up a 2 or 3 key frame move Page 8 10 MANUAL MOVE Select MANUAL MOVE to use the controller to move your axis manually using the...

Страница 9: ...culate the fastest move between keyframes Press ENTER to select RUN Scrubbing Press ENTER while Looping to enter SCRUB mode This feature will allow you to manually advance the position of the Slide Pa...

Страница 10: ...ge in speed of the movement over the entire move The frame value to the right shows how many images until the system gets up to the top speed or how many images until the camera comes to a stop Select...

Страница 11: ...Speed by pressing ENTER Adjust speed with UP DOWN arrows and press ENTER to set Set Ramp Select Ramp by pressing ENTER Adjust ramp with UP DOWN arrows and press ENTER to set Set Cal Limits Select Cal...

Страница 12: ...Disabled select it and press the Enter button your Sec ond Shooter Plus will reboot and will now say WiFi Enabled On your computer or tablet you will now see a WiFi network named 2ndShooter Connect t...

Страница 13: ...g the update firmware process a Disk Not Ejected Properly message appears on the Mac OS X desktop Users may simply close this message without issue As the system restarts confirm the splash screen sho...

Отзывы: