background image

4

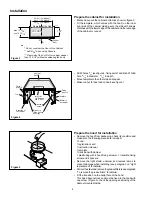
Rearside of the Cabinet***

max 13 3/16" *
min 10 13/16" *

* Do not consider the Door of the Cabinet
** Add 

4/16"

 when using Spacers

CUT-OUT

7 1/2"

*** Rearside of the Cut-Out for cabinet deeper

than 

13 3/16" (without considering the door)

C

   L

Cabinet
Door

22 

1

/

16

" (24" Model)**

28 

7

/

16

" (30" Model)**

34 

7

/

16

" (36" Model)**

Installation

Figure 4

Figure 5

Prepare the cabinet for installation

• Mark and cut-out the cabinet bottom as shown in figure 3.
• Fit the template, which comes with the hood, on the inner

right side of the cabinet making sure the side with arrows
matches with the lower edge of the cabinet and the rear edge
of the cabinet or cut-out.

• Drill  2 holes 

5

/

64

” (see figure 4 - fixing point 1 and 2) and 1 blind

hole 

15

/

64

” in diameter,  

13

/

64

” in depth.

• Move template to the other side and repeat.
• Make cut-out for duct and conduit, see figure 1.

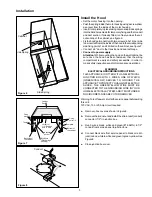
Prepare the hood for installation

• Remove the hood from packaging, check its condition and

make sure the following pieces are included:
1 hood,
1 registration card
1 instruction manual
1 template
1 transition with damper
1 plastic bag with 4 hood fixing 1 transition fixing
screw and 4 spacers.

• Remove the light shield, unscrew and remove lamps to

prevent damage when installing (see paragraph on “Light
replacement” for details).

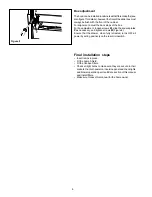
• Pull out the slider and remove the grease filters (see paragraph

“To remove the grease filters” for details).

• Fit the transition on the outlet hole of the hood:

This has a bayonet lock and must be fixed to the hood with
one screw  (Figure 5), check the opening and closing of the
damper mounted inside.

Figure 3

Bottom of
the cabinet

Backside of
the cabinet

Backside
border

cutout for
1/2" Conduit
and 5" Duct

Blind hole
(Side Springs
Housing)

Fixing
point 1-2

Fixing
point 1-2

Cabinet
Door

Template

Template

Содержание Sirocco B81200 Series

Страница 1: ...SIROCCO VENTILATION HOOD OWNER S GUIDE READ AND SAVE THESE INSTRUCTIONS Models B81200 Series ...

Страница 2: ...A RANGE TOP GREASE FIRE OBSERVETHEFOLLOWING a SMOTHER FLAMES with a close fitting lid cookie sheet or metal tray then turn off the burner BE CAREFUL TO PREVENT BURNS If the flames do not go out immediately EVACUATE AND CALL THE FIRE DEPARTMENT b NEVER PICK UP A FLAMING PAN You may be burned c DO NOT USE WATER including wet dishcloths or towels a violent steam explosion will result d Use an extingu...

Страница 3: ...onsshouldhaveanadditionalbackdraft damperinstalledtominimizebackwardcoldairflowandanonmetallic thermal break to minimize conduction of outside temperatures as part of the ductwork The damper should be on the cold air side of the thermal break The break should be as close as possible to where the ducting enters the heated portion of the house A non return smoke damper is supplied mounted on the tra...

Страница 4: ... out for duct and conduit see figure 1 Prepare the hood for installation Remove the hood from packaging check its condition and make sure the following pieces are included 1 hood 1 registration card 1 instruction manual 1 template 1 transition with damper 1 plastic bag with 4 hood fixing screws 1 transition fixing screw and 4 spacers Remove the light shield unscrew and remove lamps to prevent dama...

Страница 5: ...th tape Connect to power supply Attention While mounting the hood on the wall cabinet be sure once the hood has been fastened that the wiring compartment is easily and safely accessible in order to make safety inspections and or maintenance operations WARNING ELECTRICALGROUNDINGINSTRUCTIONS THIS APPLIANCE IS FITTED WITH AN ELECTRICAL JUNCTION BOX WITH 3 WIRES ONE OF WHICH GREEN YELLOW SERVES TO GR...

Страница 6: ...lates P as necessary and tighten screws M Figure 8 Ensure that the drawer when fully retracted turns OFF all power by acting positively on the rear microswitch Final installation steps Insert lamps in place Fit the Lamp Shield Fit the Grease Filters Check all light bulbs to make sure they are secure in their sockets thenturnpoweroninservicepanelandchecklights and blower operation per Use Care sect...

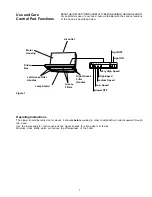
Страница 7: ... strong odors or fumes Minimize cross drafts which will reduce the effectiveness of the hood READTHEINSTRUCTIONSCAREFULLYBEFOREUSINGTHERANGEHOOD For satisfactory use of your hood become familiar with the various functions of the hood as described below Air outlet Motor Housing Slider Box Left Grease Filter Handles Lamp Shield Grease Filters Blower OFF Very High Speed High Speed Medium Speed Low Sp...

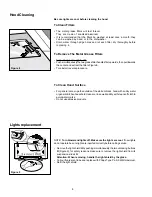
Страница 8: ...an Hood Surface For general care wipe the outside of the white or black hood with sudsy water or general kitchen household cleaners rinse well and dry with clean soft cloth to avoidwatermarks Do not use abrasive products HoodCleaning NOTE Turn blower and lights off Make sure the lights are cool If new lights do not operate be sure lights are inserted correctly before calling service Remove the lig...

Страница 9: ...9 ...

Страница 10: ...10 ...

Страница 11: ...11 ...

Страница 12: ...LI1QVB Ed 05 02 ...

Отзывы: