background image

33

Operations

Ambience effects

DVD 6-channel playback

Using a DVD player or the like equipped with six (5.1) output channels and
the receiver, you can enjoy surround sound playback.
When you try to play a disc other than Dolby Digital such as DTS CD, no
sound is produced or, noise may be heard. To avoid this situation, make
sure that you connect the component to the receiver’s DVD/6ch. INPUT
jacks through a surround processor which can decode the surround
signal you want to listen to.
Connecting a DVD player which can decode the surround signal itself is
also acceptable.

Preparations

• Connect your DVD player to the DVD/6ch jacks of the receiver.
• Turn on all other components that will be used.
• Complete “Preparing for surround sound”.

          ™

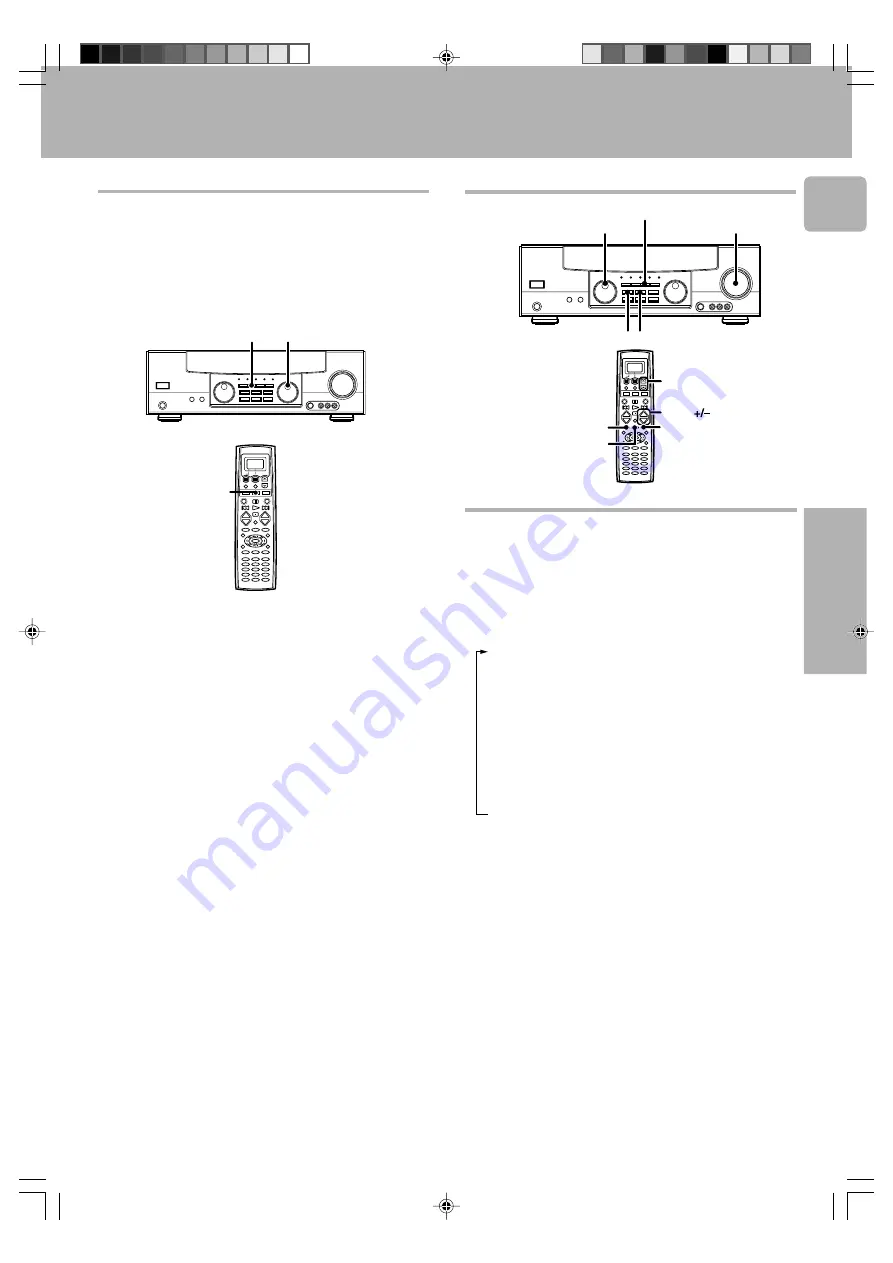
INPUT SELECTOR

INPUT MODE

MOVIE

+

+

1

Use the INPUT SELECTOR to select “DVD/6ch

or MOVIE key

on remote control (if it was registered beforehand) as the
input source.

• If speaker system B is ON when “DVD/6ch” is selected as the input

source, it switches off and speaker system A turns on automatically.

.

• It is not possible to adjust the volume level or sound quality (

SET UP

,

SOUND

) of the channels separately when the receiver is in the DVD/

6ch mode. Adjust the volume with the controls of the DVD player.
For the powered subwoofer, you can adjust the volume of the
subwoofer using the subwoofer’s own volume control.

Select “6ch INPT” by pressing the INPUT MODE key.

2

Start playback of the DVD software.

3

Adjust the volume.

4

Convenient functions

Adjusting the sound

You can make further adjustments to the sound while listening to playback
in the surround mode.

1

Press the SOUND key until the desired item appears in the
display.

Each time you press the button, the menu changes as follows:
Note that some items are not displayed in certain modes.

1

BASS

 (low frequency range sound quality adjustment -PCM and

analog stereo modes only)

2

TREB

 (high frequency range sound quality adjustment -PCM and

analog stereo modes only)

3

(center speaker level adjustment)

4

SR

 (right surround speaker level adjustment)

5

SL

 (left surround speaker level adjustment)

6

SW 

(subwoofer level adjustment)

7

INPUT

 (input level adjustment - analog mode only)

£

8

NIGHT

 (midnight mode ON/OFF-Dolby Digital mode only)

9

CINEMA 

or

 MUSIC

 (Circle Surround mode only)

0

PANORAMA

 (Panorama mode ON/OFF*)

-

DIMENSION

 (Dimension adjustment*)

=

CENTER WIDTH

 (Center width adjustment*)

*Pro Logic II Music mode only

2

Use the MULTI CONTROL knob or 

5

/

 keys to adjust the setting

as desired.

• The adjustment item is displayed for approximately 8 seconds.

+

+

DIMMER/SOUND

VOL.
SUB W.

MULTI CONTROL

SOUND LISTEN MODE

VOLUME

DIMMER

LISTEN M.

5

/

 *510/32-39/EN

3/15/01, 11:44 AM

33

Содержание VR-510

Страница 1: ...odes enable the remote control to control other audio video components In order to effectively use the remote control it is important to read the operating instructions and obtain a proper understanding of the remote control and how to switch its operation modes etc Using the remote control without completely understanding its design and how to switch the operation modes may result in incorrect op...

Страница 2: ... carton and packing materials for future use should you transport or ship the unit in the future Keep this manual handy for future reference Before applying the power Caution Read this page carefully to ensure safe operation Safety precautions Unpacking Accessories FM indoor antenna 1 AM loop antenna 1 THE EXCLAMATION POINT WITHIN AN EQUILATERAL TRI ANGLE IS INTENDED TO ALERT THE USER TO THE PRES ...

Страница 3: ...e front panel or case becomes dirty wipe with a soft dry cloth Do not use thinner benzine alcohol etc for these agents may cause discoloration In regard to contact cleaner Do not use contact cleaners because it could cause a malfunction Be specially careful not to use contact cleaners containing oil for they may deform the plastic component Contents Before applying the power 2 Safety precautions 2...

Страница 4: ...tes a varietyofhighqualityadjustablesoundfields like ARENA JAZZCLUB THEATER STADIUM and DISCO It is compatible with almost any kind of program source DVD 6 channel input If you own a DVD player equipped with 6 channel output this receiver allows you to obtain the full surround sound impact of DVD source material featuring multi channel encoding Since the source signals are digital and each channel...

Страница 5: ...y mode When standby indicator is lit this receiver is in standby mode and consumes a small amount of current for back up This system can be switched on using remote control DSP indicator CLIP indicator 1 POWER key Use to switch the power ON STANDBY STANDBY indicator 2 MULTI CONTROL knob Use to control a variety of settings 3 SET UP key Use to select the speakers settings etc 4 Surround indicators ...

Страница 6: ...V or cable box This key does not change the input selector on the receiver 1 Display 2 Display operation keys Use for operation on the display 3 SHIFT key Use in combination with the MUSIC and MOVIE keys to change the remote control mode without changing the input selector 4 MACRO key Use in combination with the MUSIC MOVIE or TV keys to execute a series of commands automatically MACRO PLAY 5 AV P...

Страница 7: ...reset the microcomputer referring to In case of difficulty o Be sure to adhere to the followings or proper ventilation will be blocked causing damage or fire hazard Do not place any objects impairing heat radiation onto the top of unit CAUTION Input mode settings CD DVD DVD 6ch VIDEO2 and VIDEO3 inputs each include jacks for digital audio input and analog audio input You must select beforehand whi...

Страница 8: ...TEM CONTROL jacks When you connect the unit and the CD or MD player with the digital connection you can enjoy a better sound quality Setting up the system Cassette deck or MD recorder CD player IN OUT Video component 3 head cassette deck or Graphic equalizer IN OUT OUT OUT Record player Moving Coil MC cartridge recordplayercannotbeused directly from the receiver unit Itcanonlybeusedwhen another eq...

Страница 9: ...t with digital audio outputs should be connected to the VIDEO2 or VIDEO3 jacks S Video jacks About the S VIDEO jacks Use the S VIDEO jacks to make connections to video componentswithSVIDEOIN OUT jacks If you use the S VIDEO jacks to connect your video play back components be sure to use the S VIDEO jacks when connecting your monitor and videorecordingcomponents DVD player or LD player OUT OUT Vide...

Страница 10: ...arately PCM OUT CD player Component with DTS Dolby Digital or PCM COAXIAL DIGITAL OUT Optical fiber cable OPTICAL DIGITAL IN AUDIO MD player OPTICAL DIGITAL OUT AUDIO Digital connections Setting up the system The digital in jacks can accept DTS Dolby Digital or PCM signals Connect components capable of outputting DTS Dolby Digital or standard PCM CD format digital signals If you have connected any...

Страница 11: ...nitor TV with component jacks Y OUT CR OUT CR IN Y IN If you have connected the receiver to a video component with COMPONENT jacks you can get a better picture quality than by connecting to the S VIDEO jacks CB OUT Y OUT CR OUT CB OUT When connecting the TV to the COMPONENT jacks be sure to connect all the other components to the COMPONENT jacks Connect to the VIDEO cord 510 07 19 EN 3 15 01 11 40...

Страница 12: ...UT VIDEO 1 OUT IN Setting up the system Connecting a DVD player 6 channel input FRONT OUT L R S VIDEO OUT COAXIAL DIGITAL OUT AUDIO DVD player S VIDEO cord SURROUND OUT L R VIDEO OUT Yellow RCA pin cord CENTER OUT SUBWOOFER OUT If you have connected a DVD player to the receiver with digital connection be sure to read the Input mode settings section carefully 7 To switch the speakers off turn SPEAK...

Страница 13: ...OFER FRONT SPEAKERS SURROUND SPEAKERS 8 16Ω 8 16Ω RED BLUE GREEN GRAY ORANGE Setting up the system Right Front Speakers A Left Right Use the FRONT SPEAKERS B terminals if you want to con nect a second front speaker system Left Be sure to connect both surround speakers Center Speaker Surround Speakers Powered subwoofer Connecting the speakers 510 07 19 EN 3 15 01 11 40 AM 13 ...

Страница 14: ...e speakers or receiver Speaker placement Subwoofer Front speakers Place to the front left and right of the listening position Front speakers are required for all surround modes Center speaker Place front and center This speaker stabilizes the sound image and helps recreate sound motion Be sure to connect a center speaker when using the Dolby 3 Stereo mode Surround speakers Place to the direct left...

Страница 15: ...M B OUT FRONT SURROUND SUB WOOFER CENTER PRE OUT ROOM B ROOM A ROOM B IR RECEIVER Connecting to another room ROOM B Setting up the system Power amplifier This connection allows you to connect your main system to a monitor TV and speaker system located in another area ROOM B Front speakers Main System Monitor TV L R 510 07 19 EN 3 15 01 11 40 AM 15 ...

Страница 16: ... will need to be connected to an external power amplifier as shown in the example below Connecting a speaker cord directly to a PRE OUT jack will not produce any sound from the speaker To use the PRE OUT jacks press only the SPEAKERS A key to the ON position This connection is available for listening in ROOM B Setting up the system Subwoofer Center Speaker Surround speakers Front speakers Power am...

Страница 17: ...u can enjoy a wider remote control signal range by placing the RF antenna and IR receiver away from the receiver IR OUT IR RECEIVER IN LCD REMOTE DC 8V 17mA M O N IT O R ANTENNA RF REMOTE Monitor TV RF antenna AC adapter IR RECEIVER IR 9991 sold separately To AC wall outlet IR IN IR OUT is free IR REPEATER For RF Transmitter select either 1 RF Band 1 or 2 RF Band 2 only For IR Transmitter select R...

Страница 18: ...LAY IN REC OUT PLAY IN MONITOR OUT VIDEO 1 DVD R FM 75Ω GND ANTENNA AM Connecting the antennas AM antenna terminal connections 1 Push lever 2 Insert cord AM loop antenna The supplied loop antenna is for use indoors Place it as far as possible from the receiver TV set speaker cords and power cord and adjust the direction for best reception 3 Release lever AM loop antenna FM indoor antenna FM outdoo...

Страница 19: ...frequency Changing the RF transmission frequency Remote control operation 10 m RF Transmitter RF Remote antenna Operating other component range IR Transmitter IR Transmitter 6 m Important notes Here is list of adjustment which can maximize the operation of your remote control For optimal operation of the remote control Notes 1 The supplied batteries may have shorter lives than ordinary batteries d...

Страница 20: ...ind of combination please do not connect any system control cords Even without system control cords normal operations can be carried out without effecting performance 2 Do not connect system control cords to any components other than those specified by KENWOOD It may cause a malfunction and damage your equipment 3 Be sure the system control plugs are inserted all the way in to the system control t...

Страница 21: ...to the initial display When you are confused about what s being displayed 06 Cable 05 VCR Back Enter The display operation 1 key Back Go back to the previous display Home Go back to the initial display Clr Erase the internal memory The display operation 2 key Enter Enter the selected item Menu Display the menu Setup Go to the setup display Exit Exit from the current operation Sel Select the item D...

Страница 22: ... as the front speakers setting 1 NML THX Center speaker setting mode to the receiver is ON 2 OFF Center speaker setting mode to the receiver is OFF 7 Press the SET UP or display operation 2 Next key to accept the setting The surround speaker setting indication SURROUND scrolls across the display 8 Use the MULTI CONTROL knob or 5 keys to select the appropriate surround speaker setting If you have s...

Страница 23: ...TA NEWS SP A L STEREO The speaker indicator to be adjusted blinks Indication in feet Indication in meters Display when all speakers have been selected LFE C S RS LS TI VOL B CLIP MUTE RDS EON PTY TP TA NEWS L SP A R SW 6 STEREO FM AM MHz kHz PRO LOGIC 3 DOWN MIX DIGITAL S DIRECT MONITOR DSP MEMO ST TUNED AUTO SOUND AUTO LFE S RS LS TI VOL B CLIP MUTE RDS EON PTY TP TA NEWS SP A SW If you change th...

Страница 24: ... is correct for the type of audio signal to be used 7 Selecting MD TAPE Select the source name corresponding to the component connected to the MD TAPE jacks The initial factory setting is TAPE To change the source to MD follow the steps below 1 Use the INPUT SELECTOR knob to select MD TAPE 2 Hold down the AUTO key for more than 2 seconds The source indication changes to MD To return to the origina...

Страница 25: ... or OFF the THX mode The initial factory setting for CD DVD and DVD 6CH selectors is THX ON Each press switches the mode as follows 1 THX ON 2 THX OFF When THX is ON THX indicator lights up FM AM MHz kHz PRO LOGIC DOWN MIX S DIRECT MONITOR DSP MEMO ST TUNED LFE C S RS LS TI VOL B CLIP MUTE RDS EON PTY TP TA NEWS L SP A R STEREO 3 DIGITAL AUTO AUTO SOUND SW Muting the sound The MUTE key lets you mu...

Страница 26: ...ect the source CD DVD DVD 6ch VIDEO2 or VIDEO3 you want to record 2 Set the cassette deck or MD recorder to record 3 Press and hold the DIMMER key for more than 2 seconds to select the A REC or M REC mode 1 Rec mode off The digital input record mode is switched off 2 A REC The digital input signals DTS Dolby Digital or PCM are identi fied automatically and converted into stereo signals that are re...

Страница 27: ...ion you want to store 3 4 Receiving preset stations Enter the number of the preset you want to receive up to 40 1 2 Press the numeric keys in the following order For 15 press 0 5 For 20 press 0 0 If you make a mistake entering a two digit number press the 10 key repeatedly to return to the original display and start again ST lights up when a broadcast is being received in stereo Use the MULTI CONT...

Страница 28: ...ng 01 02 03 38 39 40 Pressing the 4 key does the following 01 02 03 38 39 40 Holding down the or 4 key lets you skip through the presets receiving each preset station at 0 5 second intervals 1 2 Use the MUSIC key to select the tuner as the source Use the 4 keys to select the desired station 4 MUSIC Listening to radio broadcasts 510 27 31 EN 3 15 01 11 43 AM 28 ...

Страница 29: ...ffects This channel delivers separate non directional bass signals to the subwoofer for more dynamic deep bass sound effects DTS has a 1 or LFE channel The indication LFE appears in the display when a signal is being input for this channel Manufactured under license from Digital Theater Systems Inc US Pat No 5 451 942 and other worldwide patents issues and pending DTS and DTS Digital Surround are ...

Страница 30: ... condition listening to sound from various directions of speakers can be very disturbing So it is important to smoothen the flow of sound to suit the home cinema environment Timbre Matching is able to smoothen the flow of sound to the listener who will be able to enjoy the cinema effect at home Adaptive Decorrelation Mono sound track produced form the speaker system comes from only one direction w...

Страница 31: ...rogram source These modes are particularly effective when used with stereo program sources like CD television and FM radio You might enjoy trying the ARENA JAZZ CLUB THEATER STADIUM or DISCO mode the next time you watch a concert or sporting event What s DSP DSP stands for Digital Signal Processor The way a sound is heard in an actual environment depends on a variety of different factors One of th...

Страница 32: ...C PRO LOGIC II surround PRO LOGIC mode The PRO LOGIC indicator lights up 4 3 STEREO 3 STEREO surround 5 CIRCLE SURROUND CS 5 1 surround The CS 5 1 indi cator lights up 6 ARENA DSP Surround ARENA mode The DSP MODE indicator lights up 7 JAZZ CLUB DSP Surround JAZZ CLUB mode The DSP MODE indicator lights up 8 THEATER DSP Surround THEATER mode The DSP MODE indicator lights up 9 STADIUM DSP surround ST...

Страница 33: ...f the DVD player For the powered subwoofer you can adjust the volume of the subwoofer using the subwoofer s own volume control Select 6ch INPT by pressing the INPUT MODE key 2 Start playback of the DVD software 3 Adjust the volume 4 Convenient functions Adjusting the sound You can make further adjustments to the sound while listening to playback in the surround mode 1 Press the SOUND key until the...

Страница 34: ... be scrolled from right to left 2 Use the MULTI CONTROL knob or 5 keys to select PANORAMA ON or OFF 1 ON PANORAMA mode is ON 2 OFF PANORAMA mode is OFF PRO LOGIC S B CLIP SP A R C L SR SL SW AUTO SOUND DIGITAL PRO LOGIC S B CLIP SP A R C L SR SL SW AUTO SOUND DIGITAL PRO LOGIC S B CLIP SP A R C L SR SL SW AUTO SOUND DIGITAL PRO LOGIC S B CLIP SP A R C L SR SL SW AUTO SOUND DIGITAL PRO LOGIC S B CL...

Страница 35: ...ee available settings Select the bright ness level you find most pleasing When using the remote control unit press F SHIFT key then press DIMMER key 96kHz LPCM playback The receiver is compatible with the 96kHz LPCM playback To play a 96kHz DVD set the listen mode to STEREO When 96kHz appears in the display press the LISTEN MODE key the listen mode changes to the STEREO mode SR SL SR SL SR SL LFE ...

Страница 36: ...source selecting display appears When you select Phono in step 4 go to step 0 5 Press the 5 keys to select the source you want to register 6 Each time you press the 5 key the input changes as follows 01 CD 02 Tape 03 MD 04 CD R 05 VCR 06 Cable 07 Satellit 08 TV 09 LD 10 DVD 11 DSS 12 No type 13 Delete Select No type when the desired source does not appear in the display The selected input does not...

Страница 37: ...system control connections Use the MUSIC MOVIE or TV key to select the component you desire Pressing the MUSIC or MOVIE key also changes the input selector on the receiver If you do not want to change the current input press the SHIFT key before step 1 Note Be sure to point the remote control at the remote sensor on the receiver when you want to operate KENWOOD components connected by system contr...

Страница 38: ...g confirming the operation mode The macro play function allows you to set the remote to control several components in succession After completing this setup you can perform a series of operations automatically Enter the setup codes for the components you want to control beforehand Preparing for automatic operations MACRO play 1Make a plan of the macro play you want to Setup The order of the operat...

Страница 39: ... the laser disc Make sure you start the next operation within 8 seconds of complet ing the previous one If more than 8 seconds elapses between any two steps exit the macro programming mode In order to allow verification of the remote control mode the name of the selected input appears in the receiver s display when the MUSIC MOVIE or TV key is pressed When the MUSIC or MOVIE key is pressed the rec...

Страница 40: ...rol unit The remote control code is stored on the key or memory of the remote control unit Storing the remote control code of the other components MUSIC MOVIE TV LEARN Display operation 2 5 2 Press the MUSIC MOVIE or TV key to select the input of the desired remote control unit VCR Video1 Menu Selected input 3 Press the LEARN key 4 Press the desired key of the remote control unit The remote contro...

Страница 41: ... sent for receiving the remote control code Extend1 Waiting Clr Exit 6 From the remote control unit of the other source press the key that you want to store The remote code is sent to the remote control unit Complete appears when finished When it takes for more than 5 seconds or the remote control unit does not receive the remote control code well Error appears in the display In this case start fr...

Страница 42: ... 2 Menu key repeatedly until SetUp appears in the display 3 Press the 5 keys to select Disc Title and press the display operation 2 Enter key The remote control unit starts reading the CD TEXT data disc titles are also read appears during reading 2 3 When Text does not appear select Track Title in the SetUp display and press the display operation 2 Enter key Press the Home key Displaying the CD TE...

Страница 43: ...functions available for each compo nent Some manufacturers use different key combinations to perform similar functions 1 Press the MUSIC MOVIE or TV key to select the component you want to control 2 Press the display operation 2 Menu key so that the Menu display appears 3 Press the 5 keys to select desired item or memory then press the display operation 2 Enter key When you operate by using the ke...

Страница 44: ...LISTEN M BASS BOOST SUB W DIMMER SOUND THX Rewind A Pause A 1 Rewind B REC Recording F SHIFT ENTER Reverse play B ENTER Play B F SHIFT Fast forward B 8 Pause B Fast forward A Play A F SHIFT Reverse play A Stop A 7 Stop B RF REMOTE CONTROL UNIT RC R0812 SHIFT MACRO MUSIC MUTE CH CH VOL VOL TUNING BAND ENTER AUTO MONO F SHIFT REC LEARN RANDOM REPEAT INPUT SEL 2 1 3 5 4 6 8 7 9 0 10 100 11 10 12 DISP...

Страница 45: ...OUND THX MOVIE TV AV POWER SYS POWER Skip down Pause 1 Rewind F SHIFT 1 REPEAT REC Recording F SHIFT F SHIFT 2 RANDOM F SHIFT 5 DISPLAY Numeric keys Select tracks Fast forward Skip up Play Stop RF REMOTE CONTROL UNIT RC R0812 SHIFT MACRO MUSIC MUTE CH CH VOL VOL TUNING BAND ENTER AUTO MONO F SHIFT REC REC MODE LEARN RANDOM REPEAT INPUT SEL 2 1 3 5 4 6 8 7 9 0 10 100 11 10 12 DISPLAY TV SELECT SELE...

Страница 46: ...ISTEN M BASS BOOST SUB W DIMMER SOUND THX Rewind Pause TITLE GUIDE REC Recording F SHIFT F SHIFT 3 INPUT SEL Numeric keys Cursor 5 2 3 MENU Fast Forward Play ENTER Stop CH Channel RF REMOTE CONTROL UNIT RC R0812 SHIFT MACRO MUSIC MUTE CH CH VOL VOL TUNING BAND ENTER AUTO MONO F SHIFT REC REC MODE LEARN RANDOM REPEAT INPUT SEL 2 1 3 5 4 6 8 7 9 0 10 100 11 10 12 DISPLAY TV SELECT SELECT THEME AUDIO...

Страница 47: ...RN CH Fast forward CH Rewind F SHIFT 1 REPEAT F SHIFT F SHIFT 2 RANDOM F SHIFT 5 DISPLAY F SHIFT 7 AUDIO Numeric keys Select tracks Cursor 5 2 3 OSD PAGE MENU Skip up Play ENTER Stop RF REMOTE CONTROL UNIT RC R0812 SHIFT MACRO MUSIC MUTE CH CH VOL VOL TUNING BAND ENTER AUTO MONO F SHIFT REC REC MODE LEARN RANDOM REPEAT INPUT SEL 2 1 3 5 4 6 8 7 9 0 10 100 11 10 12 DISPLAY TV SELECT SELECT THEME AU...

Страница 48: ...0 10 100 11 10 12 DISPLAY TV SELECT SELECT THEME AUDIO FAVORITE EXIT INFO LAST CHANNEL OSD PAGE RETURN PAGE TITLE GUIDE MENU MOVIE TV AV POWER SYS POWER LISTEN M BASS BOOST SUB W DIMMER SOUND THX CH Channel VOL Volume CHANNEL GUIDE F SHIFT 7 AUDIO F SHIFT F SHIFT 8 THEME F SHIFT 10 INFO Numeric keys Cursor 5 2 3 MENU PAGE UP 5 PAGE DOWN F SHIFT 3 INPUT SEL F SHIFT 6 SELECT F SHIFT 9 FAVORITE ENTER...

Страница 49: ...ting the speakers Select a surround mode Adjust the speaker levels using the test tone Insert the audio cord plugs securely into the PHONO jacks Connect the grounding wire to the GND termi nal on the rear panel Set the input mode to digital manual before starting playback of the Dolby Digital source 7 Press the INPUT MODE key to select to digital auto mode 7 Copy guarded video software cannot be r...

Страница 50: ...e remote control mal functions Remedy Replace with new batteries to preserve the currently registered setup information Turn the subwoofer ON Register a setup code or Non IR code at the respective input s fl Press the MUSIC MOVIE or TV keys to select the appropriate operation mode Replace with new batteries Operate the remote control unit within the con trollable range Connect properly referring to...

Страница 51: ...00 Ω Tone control BASS 10 dB at 70 Hz TREBLE 10 dB at 10 kHz DIGITAL AUDIO section Sampling frequency 32 kHz 44 1 kHz 48 kHz 96kHz Input level impedance wave length Optical 15 dBm 21 dBm 660 nm 30nm Coaxial 0 5 Vp p 75 Ω VIDEO section VIDEO inputs outputs VIDEO composite 1 Vp p 75 Ω S VIDEO luminance signal 1 Vp p 75 Ω chrominance signal 0 286 Vp p 75 Ω COMPONENT VIDEO luminance signal 1 Vp p 75 Ω...

Страница 52: ...paces designated on the warranty card and in the space provided below Refer to the model and serial numbers whenever you call upon your dealer for information or service on this product Model __________________ Serial Number ________________________ 510 40 52 EN 3 15 01 12 00 PM 52 ...

Отзывы: