English
English 95
94 English
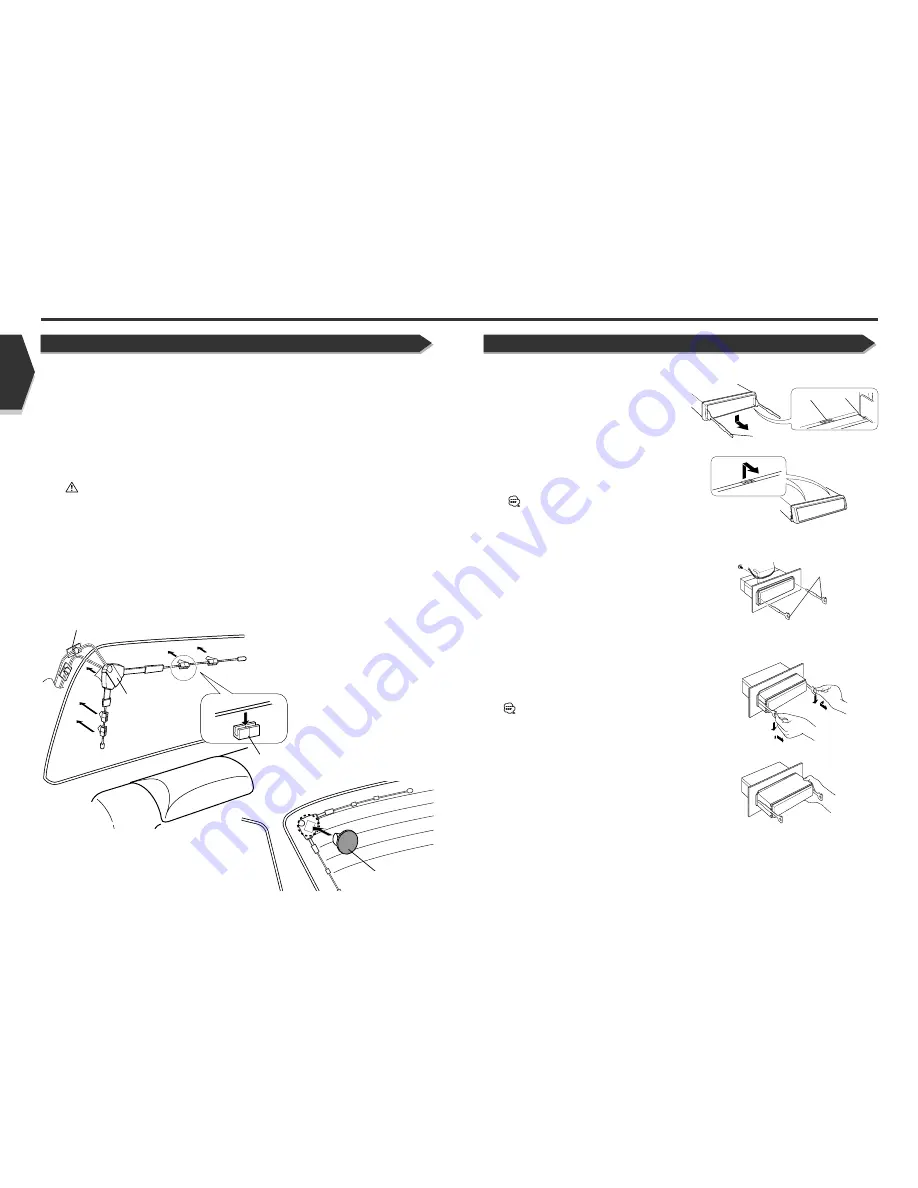
1.
Engage the catch pins on the removal tool
7
and
remove the two locks on the lower level.
Lower the frame and pull it forward as shown in the
figure.
2.
When the lower level is removed, remove the upper
two locations.
The frame can be removed from the top side in the
same manner.
1.
Refer to the section <Removing the Hard Rubber
Frame> and then remove the hard rubber frame.
2.
Remove the Hex-head screw with integral washer (M4
×
6) on the back panel.
3.
Insert the two removal tools
7
deeply into the slots on
each side, as shown.
4.
Lower the removal tool toward the bottom, and pull out
the unit halfway while pressing towards the inside.
Be careful to avoid injury from the catch pins on the
removal tool.
5.
Pull the unit all the way out with your hands, being
careful not to drop it.
Accessory
7
Accessory
7
Catch
Lock
■
Removing the Hard Rubber Frame (escutcheon)
■
Removing the Unit
Removing Monitor/Player Unit
Installation
Attach the antenna to the inner glass surface of the rear window using double-sided tape. Carefully check the
installation location as the tape can only be stuck on once.
If the surface temperature of the glass of the rear window is low, warm it by turning on the power of the rear
defogger.
A cold window glass surface will weaken the adhesive strength of the double-sided tape.
Also, if installation inside the cabin is performed on a day with high humidity or when it is raining, the high humidity
level will weaken the adhesive strength of the double-sided tape.
Do not install the antenna in a location where it may obstruct the field of view during driving, such as on the
windshield.
1.
Check the location where the antenna - is to be attached. Clean off any grease or dirt from the installation location
using the supplied glass cleaner
^
, clean the area with water and allow to dry.
Clean the glass thoroughly as failure to clean the glass can not only weaken the adhesive strength of the double-sided tape, but
may also cause it to come loose.
2.
Remove the protective strips from the antenna parts
$
and the back of the antenna unit
!
.
3.
Attach the double-sided tape of the antenna parts and the antenna unit to the rear windshield glass. Attach the
double-sided tape by firmly pressing down from the top. Secure cables using the supplied clampers
@
or
#
.
4.
Attaching the seal (Accessory
%
) on the outside of a window.
5.
After attaching the antenna with the double-sided tape, allow it to sit undisturbed for 24 hours. Take care not to apply
force to the antenna or allow it to get wet during this time.
6.
Wire the antenna cable to receiver unit.
Rear seat
Rear window
Accessory
$
Accessory
@
or Accessory
#
Accessory
!
Accessory
%
Installing the Antenna Units
Содержание KVT-935DVD
Страница 1: ......


