background image

36   

English

English

   37

CONTENTS

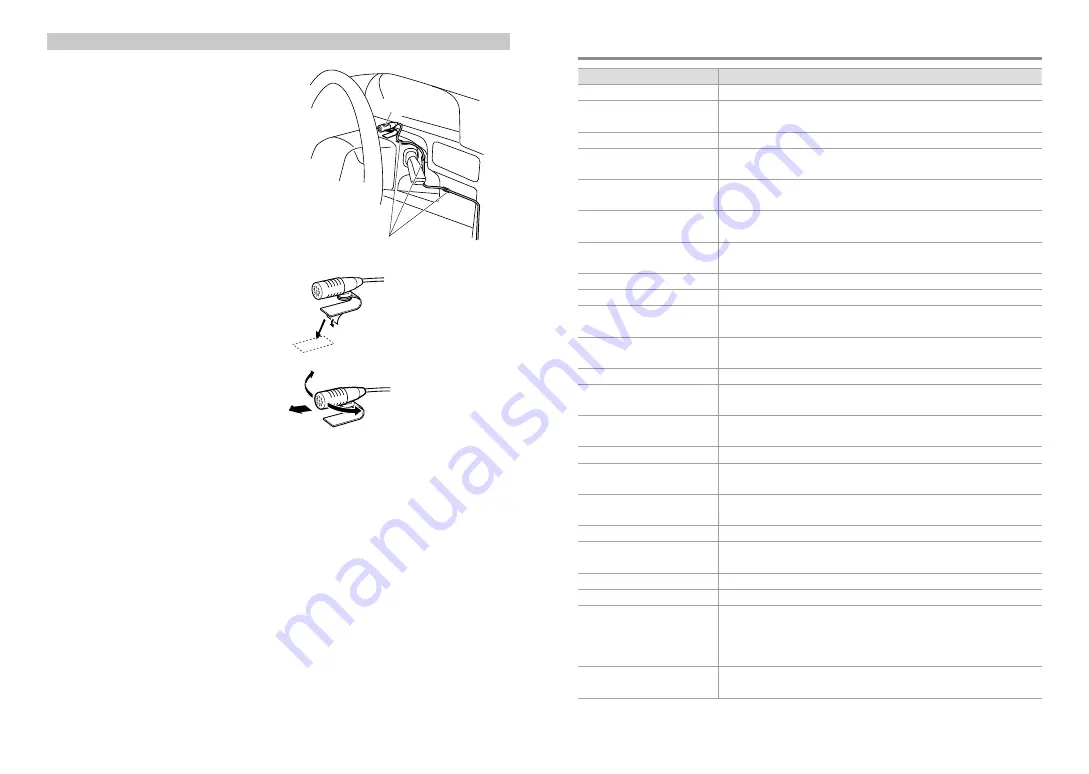
Installing the Microphone Unit 

Check the installation position of the 
microphone 

F

.

Remove oil and other dirt from the 
installation surface.

Install the microphone. 

Wire the microphone cable up to the 
hands-free box with it secured at several 
positions using tape or the like.

Install the microphone as far away as 
possible from the cell-phone.

F

Fix a cable with a commercial 

item of tape.

Peel off the release 

coated paper of 

double-face adhesive 

tape to secure the 

microphone on the 

place shown above.

Turn the microphone 

toward the driver.

Continued to next page

Troubleshooting

Symptom

Remedy/Cause

Sound cannot be heard.

Adjust the volume to the optimum level. / Check the cords and connections.

“PROTECT” appears and no operations 
can be done.

Check to be sure the terminals of the speaker leads are covered with insulating tape properly, 
then reset the unit. If “PROTECT” does not disappear, consult your nearest service center.

The unit does not work at all.

Reset the unit.

Radio reception is poor. / Static noise 
while listening to the radio.

Connect the antenna firmly. / Pull the antenna out all the way.

“IN” flashes.

The CD player is not operating properly. Reinsert the disc properly. If the condition did not 
improve, turn off the unit and consult your nearest service center.

CD-R/CD-RW cannot be played back 
and tracks cannot be skipped.

Insert a finalized CD-R/CD-RW (finalize with the component which you used for recording).

Disc sound is sometimes interrupted. Stop playback while driving on rough roads. / Change the disc. / Check the cords and 

connections.

“NA FILE” appears.

The unit is playing an unsupported audio file.

“NO DISC” appears.

Insert a playable disc into the loading slot.

“TOC ERROR” appears.

The CD is quite dirty. / The CD is upside-down. / The CD is scratched a lot. Try another disc 
instead.

“ERROR 99” appears. 

The unit is malfunctioning for some reason. Press the reset button on the unit. If the “ERROR 
99” code does not disappear, consult your nearest service center.

“COPY PRO” appears.

A copy-protected file is played.

“READ ERROR” appears.

Copy the files and folders for the USB device again. If the error message is still displayed, 
initialize the USB device or use other USB devices.

“NO DEVICE” appears.

No USB device is connected. Connect a USB device, and change the source to USB again.

SD card is not inserted properly. Insert an SD card, and change the source to SD again.

“NO MUSIC” appears.

The connected USB device or inserted SD card contains no playable audio file.

“NA DEVICE” appears.

Connect a supported USB device, and check the connections.

Check that the supported SD card is inserted.

“iPod ERROR” appears.

Reconnect the iPod. / Confirm that the software for the iPod is the latest version. / Reset 
the iPod.

Noise is generated.

Skip to another track or change the disc.

Tracks cannot play back as you have 
intended them to play.

Playback order is determined when files are recorded.

“READING” keeps flashing.

Longer readout time is required. Do not use too many hierarchies and folders.

Elapsed playing time is not correct.

This is caused by how the tracks are recorded.

The number of songs contained 
in “SONGS” category of this unit 
is different from that contained in 
“SONGS” category of iPod.

Podcast files are not counted in this unit as this unit does not support the playback of 
podcast files.

Correct characters are not displayed 
(e.g. album name).

This unit can only display letters (upper case), numbers, and a limited number of symbols.

Содержание KDC-BT47SD

Страница 1: ...abet Search for iPod Selecting App iPod Control Mode Adjust SETTINGS mode settings Getting Started of Bluetooth 16 Easy Pairing function Registering from Bluetooth devices Pairing Operation of Hands Free Phoning18 Making a Call Make a Voice Dialing Call Receiving a Call During a Call Call Waiting Clearing the disconnection message Downloading the Phone Book Listening to a Bluetooth Audio 21 Select...

Страница 2: ... If this unit fails to operate properly press the reset button The unit returns to the factory settings when the reset button is pressed Reset button 1 2 Remote controller KDC BT47SD can also be remotely controlled with an optionally purchased remote controller Maintenance Cleaning the unit Wipe off the dirt on the panel with a dry silicon or soft cloth Failure to observe this precaution may resul...

Страница 3: ...layback also starts iPod SD and CD are selectable only when an iPod is connected an SD card is inserted or a disc is loaded Volume knob turn Adjusts the volume level Selects items Volume knob press Confirms selection Enters FUNCTION settings Start voice recognize of cell phone if pressed and held Selects the FM bands FM1 FM2 FM3 or MW LW when TUNER is selected as the source Enters Music Search mod...

Страница 4: ... between the hour and minute adjustment 7 Hold to finish the procedure Initial settings before operations 1 Press SRC to enter STANDBY mode 2 Press the volume knob to enter FUNCTION mode 3 Turn the volume knob to select INITIAL SET then press to enter 4 Turn the volume knob to make a selection then press to confirm See table below for selection 5 Hold to finish the procedure Item Selectable settin...

Страница 5: ...e Radio Data System network with better reception when the current reception is poor OFF Cancels REGIONAL ON Switches to another station only in the specific region using the AF control OFF Cancels PAR iPod VOICE Press and hold to memorize the current station Press briefly to recall memorized station Item Selectable setting Preset AUTO TP SEEK ON Automatically searches for a station with better re...

Страница 6: ...ing the SD card 1 Press the Release button to Detach the faceplate 2 Push the SD card until it clicks and then remove your finger from the card The card pops up so that you can pull it out with your fingers 3 Reattaching the Faceplate Selecting Repeat Play Press number button 4 REP repeatedly to make a selection Audio CD TRACK REPEAT REPEAT OFF Audio File FILE REPEAT FOLDER REPEAT REPEAT OFF iPod ...

Страница 7: ...ter other than A to Z and 0 to 9 enter only The article a an the of songs name will be skipped during search Selecting App iPod Control Mode Press number button 5 iPod repeatedly to make a selection MODE ON Control iPod from the iPod APP iPod MODE appears on the display MODE OFF Control iPod from the unit You can still control play pause select files fast forward reverse files from the unit Adjust...

Страница 8: ...usic Editor Light ver1 1 refer to the site above or the application help Handling discs Do not touch the recording surface of the disc Do not stick tape etc on the disc or use a disc with tape stuck on it Do not use any accessories for the disc Clean the disk by moving the cloth outward from the center of the disc Clean the disc with a dry silicon or soft cloth Do not use any solvents When removin...

Страница 9: ...me knob 5 Turn the volume knob to select the profile for the device to connect HANDSFREE AUDIO The device can be connected using either a hands free or audio profile HF AUD The device is can be connected using both hands free and audio profiles 6 Press the volume knob to set up the Bluetooth device H A device name The selected Bluetooth device is busy H A device name The selected Bluetooth device ...

Страница 10: ...e volume knob Call Waiting Answering Another Incoming Call with the Current Call Suspended 1 Press the volume knob 2 Turn the volume knob to select ANSWER then press to enter Continuing the Current Call 1 Press the volume knob 2 Turn the volume knob to select REJECT then press to enter Switching between the Current Call and Waiting Call Press the volume knob to switches the calling party Clearing ...

Страница 11: ...be registered for each phone number along with up to 50 characters representing a name 50 Number of alphabetical characters Fewer characters can be input depending on the type of characters To cancel downloading of the phone book data operate the cell phone Listening to a Bluetooth Audio PAR iPod VOICE Preparation You need to register your audio player before using it with this unit page 16 1 Pres...

Страница 12: ...ess to enter Bluetooth mode 2 Turn the volume knob to select SETTINGS then press to enter 3 Turn the volume knob to select PAIRING then press to enter 4 Turn the volume knob to select PHONE SELECT or AUDIO SELECT then press to enter 5 Turn the volume knob to select a Bluetooth device name 6 Press the volume knob to set up the Bluetooth device device name The selected Bluetooth device is busy devic...

Страница 13: ...e number To move to the next digit press To delete the last digit press 4 2 Press the volume knob to register a PIN code AUTO ANSWER OFF Does not answer the phone call automatically 0 Automatically answers the phone call at once 1 8 99 Automatically answers the phone call after lapse of 1 99 seconds RECONNECT ON Automatically reconnects the selected Bluetooth device when radio wave becomes strong ...

Страница 14: ...b to select SMS MESSAGE then press to enter 5 Turn the volume knob to select a message then press to confirm When the USER is selected a message is displayed Press the volume knob again 6 Hold to finish the procedure Creating an original message 1 Press to enter Bluetooth mode 2 Turn the volume knob to select SETTINGS then press to enter 3 Turn the volume knob to select SMS then press to enter 4 T...

Страница 15: ...specified value are cut off SUB W PHASE REVERSE 180 NORMAL 0 Selects the phase angle of the subwoofer output to be in line with the speaker output for optimum performance Selectable only if a setting other than THROUGH is selected for LPF SUBWOOFER Item Selectable setting Preset SUPREME SET ON Creates realistic sound by interpolating the high frequency components that are lost in AAC MP3 WMA audio...

Страница 16: ...n s Remote controller General operation SRC Selects the available sources TUNER BT AUDIO USB or iPod SD CD AUX STANDBY if the power is turned on If the source is ready playback also starts iPod SD and CD are selectable only when an iPod is connected an SD card is inserted or a disc is loaded VOLu d Adjusts the volume level 5 Selects items Enters Music Search mode page 11 ENT 38 Pauses resumes play...

Страница 17: ... Use only the screws provided Install this unit in the console of your vehicle Make sure the faceplate will not hit the lid of the console if any when closing and opening After the installing the unit check whether the brake lamps blinkers wipers etc on the car are working properly Mount the unit so that the mounting angle is 30 or less If the fuse blows first make sure the wires are not touching ...

Страница 18: ...trol terminal when using the optional power amplifier or to the antenna control terminal in the vehicle Max 300mA 12V If no connections are made do not let the wire come out from the tab Wiring harness D Fuse 10A Connecting the ISO connectors on some VW Audi or Opel Vauxhall automobiles You may need to modify the wiring of the supplied wiring harness as illustrated below Wiring connection Connecto...

Страница 19: ...an unsupported audio file NO DISC appears Insert a playable disc into the loading slot TOC ERROR appears The CD is quite dirty The CD is upside down The CD is scratched a lot Try another disc instead ERROR 99 appears The unit is malfunctioning for some reason Press the reset button on the unit If the ERROR 99 code does not disappear consult your nearest service center COPY PRO appears A copy prote...

Страница 20: ...h communication Turn off another Bluetooth device Move another Bluetooth device away from this unit Another Bluetooth device or profile is used for communication The downloading of the Phone book or the SMS disconnects the sound Specifications FM tuner section Frequency range 50 kHz space 87 5 MHz 108 0 MHz Usable sensitivity S N 26 dB 1 μV 75 Ω Quieting sensitivity DIN S N 46 dB 2 5 μV 75 Ω Frequ...

Страница 21: ...ai requisiti essenziali ed alle altre disposizioni pertinenti stabilite dalla direttiva 1999 5 CE Español Por medio de la presente Kenwood declara que el KDC BT47SD cumple con los requisitos esenciales y cualesquiera otras disposiciones aplicables o exigibles de la Directiva 1999 5 CE Português Kenwood declara que este KDC BT47SD está conforme com os requisitos essenciais e outras disposições da D...

Отзывы: