background image

— 6 —

E

nglis

h

40W   4

x

MENU

PWR
 OFF

SCAN

RDM

REP

D.SCN

M.RDM

NAME.S

PTY 

@

VOL ADJ

DISP/TEXT

LOUD

ATT

DISC

TI

1

2

3

4

5

6

4

¢

SRC /

PWR OFF

FM

AM

MENU

  u

ATT / LOUD

SRC

AM

FM

AUDIO

Buttons and Display

Basic operat ions

40W   4

x

MENU

PWR
 OFF

SCAN

RDM

REP

D.SCN

M.RDM

NAME.S

PTY 

@

VOL ADJ

DISP/TEXT

LOUD

ATT

DISC

TI

AM

AUDIO

 MENU

AM

DISP

FM

SRC

4

¢

#1~6

SRC

FM

1

2

3

4

5

6

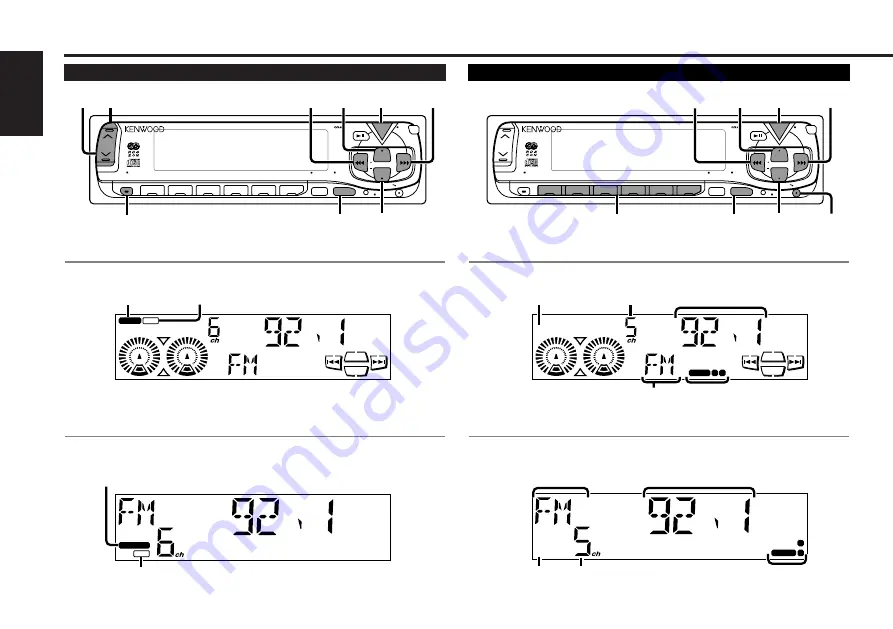
Tuner f eat ures

1 2

LOUD

III

AUTO

ATT

T I

FM

AM

ATT indicator

LOUD indicator

III

1

2

CHANGER

LOUD

AUTO

ATT

T I

for KDC-6 0 6 0 R

for KDC-5 0 6 0 R

ATT indicator

LOUD indicator

ST

1 2

I

AUTO

T I

FM

AM

AUTO indicator

Frequency

ST indicator

Band display

Preset station number

I

ST

1

2

CHANGER

LOUD

AUTO

T I

for KDC-6 0 6 0 R

for KDC-5 0 6 0 R

AUTO indicator

Frequency

ST indicator

Band display

Preset station number

Downloaded from: 

http://www.usersmanualguide.com/

Содержание KDC-5060R

Страница 1: ...KDC 6060R KDC 5060R B64 1077 00 EW COM PACT DIGITAL AUDIO CD RECEIVER INSTRUCTION MANUAL Downloaded from http www usersmanualguide com ...

Страница 2: ...tion with PTY News Timeout Setting 19 Programme Type PTY Function 20 Disc control features Playing CDs 21 Playing Other Disc mode 22 Fast Forwarding and Reversing Disc Play 23 Track Search 23 Disc Search 23 Track Disc Repeat Function 24 Track Scan Function 24 Disc Scan Function 24 Random Play Function 25 Magazine Random Play Function 25 Switching Display for Discs 26 Text Scroll 26 Direct Track Se...

Страница 3: ...much dust or the possibility of water splashing Do not set the removed faceplate or the faceplate case in areas exposed to direct sunlight excessive heat or humidity Also avoid places with too much dust or the possibility of water splashing Do not subject the faceplate to excessive shock as it is a piece of precision equipment To prevent deterioration do not touch the terminals of the unit or face...

Страница 4: ... the terminals on the unit or faceplate get dirty wipe them with a dry soft cloth Cleaning the CD Slot As dust can accumulate in the CD slot clean it occasionally Your CDs can get scratched if you put them in a dusty CD slot Lens Fogging Right after you turn on the car heater in cold weather dew or condensation may form on the lens in the CD player of the unit Called lens fogging CDs may be imposs...

Страница 5: ... such as paint thinner or benzene Checking New CDs for Burrs When playing a new CD for the first time check that there are not any burrs stuck to the perimeter of the disc or in the central hole CDs with burrs stuck on them may not load properly or may skip whilst playing Remove burrs using a ballpoint pen or a similar utensil Do Not Load CD Accessories in Slot Do not use commercially available CD...

Страница 6: ...I AM AUDIO MENU AM DISP FM SRC 4 1 6 SRC FM 1 2 3 4 5 6 Tuner features 1 2 LOUD III AUTO ATT T I FM AM ATT indicator LOUD indicator III 1 2 CHANGER LOUD AUTO ATT T I for KDC 6060R for KDC 5060R ATT indicator LOUD indicator ST 1 2 I AUTO T I FM AM AUTO indicator Frequency ST indicator Band display Preset station number I ST 1 2 CHANGER LOUD AUTO T I for KDC 6060R for KDC 5060R AUTO indicator Freque...

Страница 7: ...UD AUTO NEWS TP PTY REG TA T I for KDC 6060R for KDC 5060R TA indicator TI indicator TEXT indicator TP indicator indicator REG indicator NEWS indicator TA indicator TI indicator PTY indicator TP indicator indicator REG indicator NEWS indicator TEXT 1 I AUTO T I IN DISC FM AM TEXT indicator indicator Mode display Disc number 1 2 CHANGER LOUD AUTO T I IN for KDC 6060R for KDC 5060R Disc indicator Tr...

Страница 8: ...UNE TRACK TUNE 4 TRACK AM DISC FM DISC TUNER CD CD MD CH DIRECT OK u d DNPP 38 1 2 3 4 5 6 7 8 9 0 DEF M NO JKL GHI W XY TUV PRS QZ ABC TUNER TAPE FM PROG CD CD M D CH DIRECT OK DNPP AM Remote control Optional for the KDC 6060R I ST 1 2 CHANGER LOUD AUTO T I Clock display 1 2 LOUD III AUTO ATT ATT T I FM AM for KDC 6060R for KDC 5060R indicator indicator Clock display Graphic display Release butto...

Страница 9: ...the u button to turn up the volume Decreasing Volume Press the d button to turn down the volume Attenuator This function allows you to turn down the volume quickly Turning Attenuator On Off Press the ATT button to switch the attenuator on and off When the attenuator is on the ATT indicator blinks When the attenuator is off the volume returns to the original level Turning down the volume all the wa...

Страница 10: ...hange for each function Example The tuning mode will switch from AUTO 1 to AUTO 2 Pressing the button again switches the setting to manual and MANUAL is displayed Ending the menu mode Press the MENU button 4 3 2 1 CLK ON CLK OFF CLK ADJ Time Adjustment mode entered SYNC ON SYNC OFF DSI ON DSI OFF COL GRN COL AMB GRAP ON GRAP OFF BEEP ON BEEP OFF NEWS OFF NEWS M LO S OFF LO S ON AUTO1 AUTO2 MANUAL ...

Страница 11: ...he Traffic Information function the News Bulletin function with PTY news timeout setting and the Alarm function The News function turns on when the setting is made for the news interruption interval The M display indicates the setting selected for the news interruption timeout interval NOTE Downloaded from http www usersmanualguide com ...

Страница 12: ...obtained TUNER is displayed when the tuner mode has been selected Press either the FM or AM button to select the band Each time you press the FM button the band switches between the FM1 FM2 and FM3 Press the AM button to select the MW and LW bands Auto Seek Tuning Press the button to seek increasing frequencies Press the 4 button to seek decreasing frequencies Preset station seek tuning Press the ...

Страница 13: ... Press the button repeatedly until the monaural reception function appears in the display Press the 4 button to search in the other direction The function setting is indicated by MONO OFF or MONO ON in the display indicating that monaural reception is on or off respectively Switching settings Press either the AM button or FM button The display and setting will change Press the MENU button to end t...

Страница 14: ...lso be preset in FM2 or FM3 When the local seek function is turned whilst auto memory entry takes place stations with poor reception are not stored When the Traffic Information function is on only the local traffic information station frequency will be stored Cancelling Auto Memory Entry During Its Operation Press the MENU button whilst auto memory entry is taking place to stop the process NOTE 4 ...

Страница 15: ... the Displayed Band Pressing the FM button switches between the FM1 FM2 FM3 and AM displays in that order Pressing the AM button switches between the displays in the reverse direction Once the name is displayed for the station you want to listen to Press the OK button Reception starts of the displayed station and the seek mode ends Cancelling mode during input Press the DNPP button The seek mode i...

Страница 16: ... the bulletin Alarm When an emergency transmission announcing disasters etc is sent all current functions are interrupted to allow the warning to be received AF Alternative Frequency Function When poor reception is experienced automatically switch to another frequency broadcasting the same programme in the same RDS network with better reception The indicator lights up when the AF function is turne...

Страница 17: ...ndicator is turned on When a traffic information station is being received the TP indicator will turn on When none is being received the TI indicator will blink on and off When a traffic bulletin begins to be broadcast the TA indicator will turn on and reception will begin at the preset volume If you are listening to a tape or disc when a traffic bulletin begins they will automatically be turned o...

Страница 18: ... display and setting will change If the traffic information station you are tuned to experiences poor reception this function automatically seeks another TP station Press the MENU button to end the menu mode 4 3 2 1 Presetting Volume for Traffic Information New s Preset the volume level to be used for traffic information and news broadcasts Tune into the station for which you want to set the volum...

Страница 19: ...n Each time you press the FM or AM button until the desired setting is displayed Press the FM button to increase the interval and the AM button to decrease it OFF 00M 10M 20M 30M 40M 50M 60M 70M 80M 90M M minutes When you select the news interruption timeout interval the News function turns on and the NEWS indicator lights up When a news bulletin is received the NEWS indicator will blink and recep...

Страница 20: ...e LEISURE 24 Jazz Music JAZZ 25 Country Music COUNTRY 26 National Music NATION M 27 Oldies Music OLDIES 28 Folk Music FOLK M 29 Documentary DOCUMENT Music MUSIC Speech SPEECH 2 NOTE NOTE 1 Speech 1 9 16 23 29 Music 10 15 24 28 You can select the type of programme directly by pressing a preset button The buttons are factory set to the following type of programmes 1 Music 2 Speech 3 News 4 Other Mus...

Страница 21: ...ed near the CD slot The CD stops playing and ejects from the slot Push back on the right side of the faceplate with your hand until it locks Do not attempt to insert a CD into the slot if another one is already there The unit can only play 12 cm 5 inch CDs If you insert an 8 cm 3 inch CD it will get stuck inside and can cause the unit to malfunction When the faceplate has been dropped open it migh...

Страница 22: ... 0 NOTE NOTE 7 When a unit equipped with an O N switch is to be connected please also see the instruction manual of this unit Set the O N switch to N N operation will be set 7 When a unit that is not equipped with an O N switch or the changer switching unit KCA S200 is connected O operation will be set N operation The disc title and track title of the CD text can be displayed The disc name will be...

Страница 23: ...back to the beginning of that track The reverse search is not recycled to the last track on the disc Making a Forward Track Search Press the button to display the desired track number Press once to fast forward to the next track twice to fast forward to the track after that and so forth Play starts at the beginning of the displayed track number for disc changers You cannot make a forward track sea...

Страница 24: ... in the display Stopping to Listen to the Track Being Scanned Press the 38 or SCAN button again to stop the scan and keep on listening to a track normally The track scan function is cancelled when you stop playing a disc The track scan function only scans each track on a disc once NOTE Function of disc changers Disc Scan Function Successively play the beginning of each disc on a changer until you ...

Страница 25: ...p playing a disc NOTE 2 NOTE 1 M agazine Random Play Function Play the tracks on all the discs in the disc changer in random order Press the M RDM button to switch the magazine random play function on and off The display of the disc and track numbers change continuously as the next track is being selected When the disc track has been selected play starts The selected disc track number blinks in th...

Страница 26: ...be displayed Switching between manual scrolling and automatic scrolling is permitted The factory default is manual scrolling To scroll manually Press the DISP button to display the disc title or the track title Holding down the DISP button for one second or more results in one scrolling display of the titles Manual Automatic scroll switching Hold down the MENU button for one second or more MENU is...

Страница 27: ...rect Disc Search Using the remote control make direct input of the disc number that you want to listen to Using the numeric buttons on the remote control enter the number of the disc that you want to listen to The selected disc number blinks in the display for 10 seconds If you make no further input in the 10 second period the number entry mode will automatically be cancelled Input 0 to select dis...

Страница 28: ... can be entered may change as listed below depending on the unit that is connected A press of the 38 button exits the disc name preset mode Operations can be followed again from Step 2 at a time such as this and the characters to be input are selected using the procedure described below NOTE 4 3 2 NOTE 1 Press the DISC or DISC button to display the desired character Besides the alphabet capital le...

Страница 29: ...c name Also note that NO DISC will be displayed when a disc has not been loaded Rapid display forward reverse Press the DISC or DISC button Pressing the DISC button will rapidly display the preset names disc titles in order Pressing the DISC button will rapidly display the preset names disc titles in reverse order When the name appears for the disc you want to play Press the OK button The disc who...

Страница 30: ...and treble tone settings The settings made for a particular source are then recalled automatically whenever you use that source e g FM mode uses the tone settings made for FM AM for AM etc Press the 4 button Look at the table to adjust the mode being displayed Press the AUDIO button to end the control mode 4 3 NOTE 2 1 Table of Audio Control Setting Bass BAS Treble TRE Balance BAL Fader FAD Bass d...

Страница 31: ...ne second or more MENU is displayed and the menu mode is turned on Press the button repeatedly until the Selectable Illumination function appears in the display Press the 4 button to search in the other direction The function setting is indicated by COL GRN or COL AMB in the display indicating that the current colour is green or amber respectively Switching settings Press either the AM button or F...

Страница 32: ...F in the display indicating that the current beep setting is on or off respectively Switching settings Press either the AM button or FM button The display and setting will change Press the MENU button to end the menu mode 4 3 2 1 Sw itching Graphic Display This function permits the graphic display to be switched to one that is linked with the volume level value or to display various modes The init...

Страница 33: ...he Automatic Time Adjustment as mentioned above Hold down the MENU button for one second or more MENU is displayed and the menu mode is turned on Press the button repeatedly until the CLK ADJ appears in the display Press the 4 button to search in the other direction 3 2 1 4 3 2 1 NOTE Hold down either the AM or FM button for two seconds or more to enter the Time Adjustment mode The hour display wi...

Страница 34: ... jolts For that reason keep the faceplate in its special storage case whilst detached Do not expose the faceplate or its storage case to direct sunlight or excessive heat or humidity Also avoid places with too much dust or the possibility of water splashing Reattaching Faceplate Hold the faceplate so that the operation face faces the front toward you and press until it locks The faceplate will be ...

Страница 35: ... is accidentally swallowed 2WARNING 2CAUTION 2 1 To open Keep on slide Pull out All M odes VOL buttons Keep on pressing the u button to turn the volume up keep on pressing the d button to turn the volume down TUNER button Selects the tuner mode CD button Selects the CD mode CD MD CH button Selects the disc control mode The disc control mode will differ depending on the unit that is connected NOTE ...

Страница 36: ...n Name Preset Play mode Disc Control M ode Number letter entry buttons Used to specify the track disc number used in direct track disc searches Used to enter letters during disc name preset TRACK buttons Press the TRACK button to search through the tracks backwards Press the TRACK button to search through the tracks forwards Used to move the cursor whilst entering disc name DISC buttons Press the ...

Страница 37: ... to a power source with constant voltage such as a battery cable the power will not be linked with the ignition i e it will not turn on and off along with the ignition If you want to link the unit s power with the ignition connect the ignition cable to a power source that can be turned on and off with the ignition key If the fuse blows first make sure that the cables have not caused a short circui...

Страница 38: ...ifier or to the antenna control terminal in the vehicle A 7 Pin Red A 4 Pin Yellow Connector A Connector B Fuse Connector Function Guide Pin Numbers for ISO Connectors Cable Colour Functions External Power Connector A 4 A 5 A 6 A 7 A 8 Speaker Connector B 1 B 2 B 3 B 4 B 5 B 6 B 7 B 8 Yellow Blue White Orange White Red Black Purple Purple Black Gray Gray Black White White Black Green Green Black B...

Страница 39: ...e Red Battery cable Yellow A 7 Pin Red A 4 Pin Yellow Unit Vehicle Ignition cable Red Battery cable Yellow A 7 Pin Red A 4 Pin Yellow 1 Default setting The A 7 pin red of the vehicle s ISO connector is linked with the ignition and the A 4 pin yellow is connected to the constant power supply 2 The A 7 pin red of the vehicle s ISO connector is connected to the constant power supply and the A 4 pin y...

Страница 40: ...e Unit Lower the removal tool toward the bottom and pull out the unit halfway whilst pressing towards the inside 4 Pull the unit all the way out with your hands being careful not to drop it 5 Be careful to avoid injury from the catch pins on the removal tool 2CAUTION Catch facing up Refer to the section Removing the hard rubber frame and then remove the hard rubber frame Remove the Hex head screw ...

Страница 41: ...ferring to the section on Connecting Cables to Terminals Radio reception is poor The car antenna is not extended Pull out the antenna all the way The power does not turn on The fuse has blown After checking for short circuits in the cables replace the fuse with one having the same rating The Attenuator function is turned on Turn off the Attenuator function Troubleshooting Guide No ACC position on ...

Страница 42: ...nal on the unit Connect the cable to the disc changer input terminal on the unit The specified disc does not play but another one plays instead The specified CD is very dirty Clean the CD The CD is upside down Load the CD with the labelled side up The disc is loaded in a different slot from that specified Eject the disc magazine and check the number for the specified disc The disc is severely scra...

Страница 43: ...isc magazine Load a disc into the disc magazine The CD is very dirty The CD is upside down The CD is scratched a lot Clean the CD and load it correctly E 04 No disc has been loaded in the disc magazine Load a disc into the disc magazine NO DISC Something is wrong with the disc magazine Or the unit is malfunctioning for some reason Check the disc magazine And then press the reset button on the unit...

Страница 44: ...ter D A 8 Times Over Sampling D A Converter 1 Bit Spindle speed 500 200 rpm CLV Wow Flutter Below Measurable Limit Frequency response 1 dB 10 Hz 20 kHz Total harmonic distortion 1 kHz 0 01 Signal to Noise ratio 93 dB 1 kHz Dynamic range 93 dB Channel separation 85 dB Audio section Maximum output power 40 W 4 Output power DIN 45324 B 14 4V 27 W 4 Tone action Bass 100 Hz 10 dB Treble 10 kHz 10 dB Pr...

Страница 45: ...Downloaded from http www usersmanualguide com ...

Страница 46: ... tv dvd and othes Manual users user manuals user guide manual owners manual instruction manual manual owner manual owner s manual guide manual operation operating manual user s manual operating instructions manual operators manual operator manual product documentation manual user maintenance brochure user reference pdf manual Downloaded from http www usersmanualguide com ...

Отзывы: