background image

68

68

Return to the Top page

SiriusXM Operation

SiriusXM® Basic Operation

Most functions can be controlled from the source control screen.

Before use

•  SiriusXM® Satellite Radio operation requires the connection of the optional SiriusXM Connect Vehicle Tuner and 

service.  To activate the SiriusXM Connect Vehicle Tuner, you will need the Radio ID.

• Make a note of your Radio ID:

 For each SiriusXM Connect Vehicle Tuner, peculiar Radio ID is assigned.  To confirm 

your Radio ID, tune to channel 0.  The letters I, O, S and F are not used in any Radio ID. 
The Radio ID is also located on the label of the SiriusXM Connect Vehicle Tuner.

• How to activate your SiriusXM Service:

 Go to www.siriusxm.com/activatenow or call 1-866-635-2349 to activate 

your SiriusXM Vehicle Connect Tuner. 
To activate SiriusXM Canada service go to www.xmradio.ca and click on “ACTIVATE RADIO” in the top right corner, 
or call 1-877-438-9677

NOTE

•  Set the remote control mode switch to AUD mode before starting operation, see 

Switching the operation mode 

(P.115)

.

•  To use SiriusXM® Satellite Radio, the optional accessory is necessary.

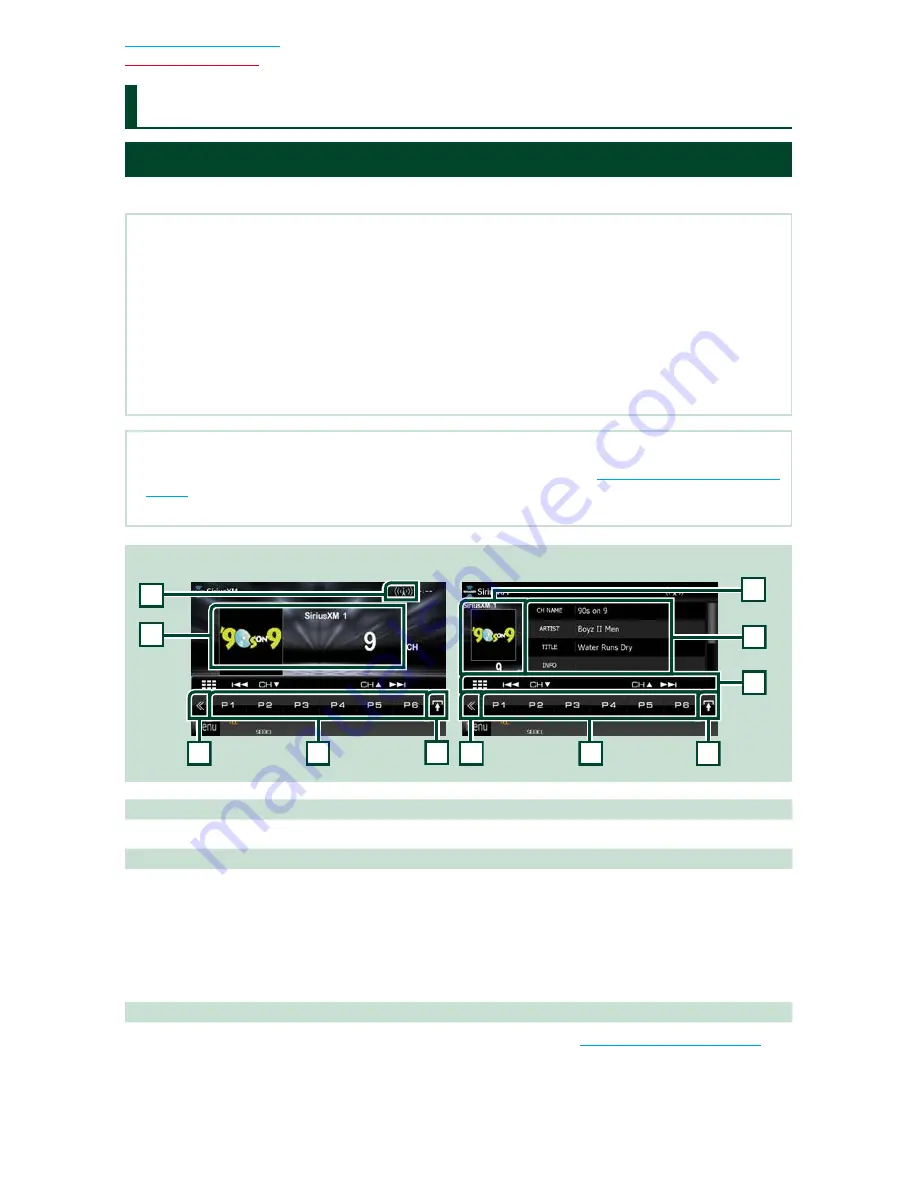
Simple Control screen

List Control screen

7

5

6

8

1

2

2

3

3

4

4

1  Signal Strength indication

Displays the received signal strength of the SiriusXM tuner.

2  Information display/Control switching area

Displays the following information.
• 

[SXM1], etc.

: Band display

• 

Preset #

: Preset number

• 

#CH

: Channel display

• 

Logo

: Channel logo display

Touch to switch between the Simple Control and List Control screen.

3  Multi function key

Touch to switch the multi function menu. For details on the menu, see 

Multi function menu (P.69)

.

S

iriusXM® Operation

Содержание DNX571TR

Страница 1: ...ded below Refer to the model and serial numbers whenever you call upon your Kenwood dealer for information or service on the product Model DNX571TR Serial number US Residence Only Register Online Register your Kenwood product at www Kenwoodusa com You can update the system by connecting a USB device containing an update file For updating the system visit http www kenwood com cs ce Vous pouvez mett...

Страница 2: ...anual on the following website http manual kenwood com edition im385 To refer to the Instruction manual a PC loaded with Microsoft Windows XP Vista 7 8 or Mac OS X 10 4 or later is required in addition to Adobe Reader 7 1 or Adobe Acrobat 7 1 or later The Instruction manual is subject to change for modification of specifications and so forth Be sure to download the latest edition of the Instruction ...

Страница 3: ...If spilled fluid comes in contact with your eyes or on clothing immediately rinse with water and consult a physician Place the battery out of reach of children In the unlikely event that a child swallows the battery immediately consult a physician Ñ Protecting the monitor Put the remote control in a place where it will not move during braking or other operations A dangerous situation could result i...

Страница 4: ... stain off with a cloth moistened with neutral cleaner then wipe it again with a clean soft dry cloth CAUTION Applying spray cleaner directly to the unit may affect its mechanical parts Wiping the front panel with a hard cloth or using a volatile liquid such as thinner or alcohol may scratch the surface or erase screened print Ñ How to reset your unit If the unit fails to operate properly press the ...

Страница 5: ...ture Using the navigation system at extreme temperatures can lead to malfunction or damage Also note that the unit can be damaged by strong vibration by metal objects or by water getting inside the unit CAUTION Failure to avoid the following potentially hazardous situations may result in injury or property damage The navigation system is designed to provide you with route suggestions It does not r...

Страница 6: ...he language used for the control screen and setting items Default is American English en Instruction Manual P 95 After setting touch Enter AV IN SETUP Select the source connect to AV IN Instruction Manual P 101 After setting touch 6 Color Set the screen and button illumination color You can select whether to perform color scan and adjust scanning color Instruction Manual P 98 After setting touch 6...

Страница 7: ... devices iPod connection setup also appears when the unit is reset Ñ Application link setup When you first select Apps as a source the setting screen for the connection with the device installed the apps will appear 1Touch Menu on any screen Top Menu screen appears 2Touch Apps in the Top Menu screen Application link setup screen appears 3Touch CHANGE Select the way to connect with the device insta...

Страница 8: ...power on 5 NAV Displays the navigation screen Pressing for 1 second switches AV out sources 6 Volume knob Turning adjusts volume up or down Pressing switches attenuation of the volume on off Pressing for 1 second displays Graphic Equalizer screen Instruction Manual P 108 1 No Name Motion 7 TEL Displays the Hands Free screen Instruction Manual P 85 Pressing for 1 second displays the Voice Recognitio...

Страница 9: ... of the menu are as follows Displays the SETUP Menu screen Displays the Audio Control Menu screen Displays the control screen of current source Icon feature differs depending on the source Closes the menu Ñ List screen There are some common function keys in the list screens of most sources Scroll Scrolls the displayed text etc Touch keys with various functions are displayed here Displayed keys diffe...

Страница 10: ...r and enter the letters 4Follow your route to the destination NOTICE The speed limit icon feature is for information only and does not replace the driver s responsibility to abide by all posted speed limit signs and to use safe driving judgment at all times Garmin and JVC KENWOOD will not be responsible for any traffic fines or citations that you may receive for failing to follow all applicable traffic...

Страница 11: ...an FM traffic receiver the navigation system can receive and use traffic information When a traffic message is received you can see the event on the map and change your route to avoid the incident You can purchase traffic subscriptions for regions or countries Go to www garmin com kenwood for more information Updating the software Before you can update the navigation system software you must have an SD ca...

Страница 12: ...d iPhone from the cable USB device 1 Connect the USB device with the USB cable To disconnect the USB device 1 Touch G on the screen and disconnect the device from the cable 2Control the music you are listening to on the source control screen The following symbols indicate the keys on the screen The functions of the keys are the same despite the difference of the source you are listening to Z Touch...

Страница 13: ...ting see How to Play Music P 12 2Control the movie picture by touching the screen Each area on the screen has a separate function 1 2 3 3 No Name Motion 1 DVD Displays the DVD menu 1 VCD Displays the Zoom Control screen 2 Disc media Displays the disc menu 3 2 Displays the Source Control screen 3 Searches the next previous content or file Scrolling from center of display to left or right performs fa...

Страница 14: ...eration P 58 and SiriusXM Basic Operation P 68 in the Instruction Manual How to Make a Phone Call You can use your Bluetooth cell phone when paired to this unit NOTE You cannot register the Bluetooth unit when you are using the following sources iPod Bluetooth Audio APPS iHeart Pandora AUPEO 1Register your cell phone to the unit Follow as the procedures shown below For detailed operation see Regis...

Страница 15: ... records 1 Touch incoming calls missed calls or outgoing calls 2 Select the phone number from the list 3 Touch Call using the phonebook 1 Touch 2 Select the name from the list 3 Select the number from the list 4 Touch Call using the preset number 1 Touch Preset to start calling the corresponding phone number 2 Touch Call by voice You can make a voice call using the voice recognition function of th...

Страница 16: ...ion key If you connect the ignition wire to a power source with a constant voltage supply such as with battery wires the battery may be drained If the console has a lid make sure to install the unit so that the front panel will not hit the lid when closing and opening If the fuse blows first make sure the wires aren t touching to cause a short circuit then replace the old fuse with one with the sam...

Страница 17: ...4 Connect the wiring harness wires in the following order ground battery ignition 5 Connect the wiring harness connector to the unit 6 Install the unit in your car 7 Reconnect the terminal of the battery 8 Press the Reset button P 4 9 Perform the Initial Setup See First Step P 6 Non Japanese cars Bend the tabs of the mounting sleeve with a screwdriver or similar utensil and attach it in place Japa...

Страница 18: ...installation Please install this GPS antenna in an area away from any antennas that are used with CB radios or satellite televisions The GPS antenna should be installed at a position that is spaced at least 12 inch 30 cm from cellular phone or other transmitting antennas Signals from the GPS satellite may be interfered with by these types of communication Painting the GPS antenna with metallic pai...

Страница 19: ...When the lower level is removed remove the upper two locations Ñ Removing the unit 1 Remove the trim plate by referring to step 1 in Removing the trim plate 2 Insert the two extraction key accessory 3 deeply into the slots on each side as shown 3 3 Lower the extraction key toward the bottom and pull out the unit halfway while pressing towards the inside NOTE Be careful to avoid injury from the cat...

Страница 20: ...s For best safety be sure to connect the parking sensor Light Green Parking sensor wire Purple White Reverse sensor wire Accessory 2 Accessory 4 Accessory 8 FM AM antenna input Accessory 4 Bluetooth Microphone Accessory 8 GPS Antenna 1 Connect to vehicle s reverse lamp harness when using the optional rear view camera When connecting to an external amplifier connect its ground wire to the car s chas...

Страница 21: ...wire Brown Mute control wire Blue Antenna control wire Blue White Power control wire Connect to the terminal that is grounded when either the telephone rings or during conversation To use the Mute feature you need to hook up this wire to your telephone by using a commercial telephone accessory Depending on what antenna you are using connect either to the control terminal of the motor antenna or to...

Страница 22: ...ect Vehicle Tuner connector 3 4 1 Rear View Camera Input Video Rear View Camera Input Audio AV IN CA C3AV Optional Accessory input RCAM AV IN switchable KCA iP202 3 KCA iP102 0 8m 3 KCA HD100 1 8 m 3 KCA iP103 0 8m 3 Lightning Digital AV Adapter 2 iPod iPhone 2 KCA MH100 1 8 m 3 USB device 2 USB terminal 0 8m Video Output Audio Output Audio Input red white Video Output 1 8m iPod 2 Android smartpho...

Страница 23: ...BlackBerry RIM Research In Motion and related trademarks names and logos are the property of Research In Motion Limited and are registered and or used in the U S and countries around the world Used under license from Research In Motion Limited Adobe Acrobat and Reader are either registered trademarks or trademarks of Adobe Systems Incorporated in the United States and or other countries The terms ...

Страница 24: ... IN CONTRACT STRICT LIABILITY OR TORT INCLUDING NEGLIGENCE OR OTHERWISE ARISING IN ANY WAY OUT OF THE USE OF THIS SOFTWARE EVEN IF ADVISED OF THE POSSIBILITY OF SUCH DAMAGE Ñ Android connection To connect the Android device with this unit the cable sold separately and the profile which your Android device supports are necessary as follows To listen to music and watch video of APPS source MHL devic...

Страница 25: ...Zealand Because Pandora is a third party service the specifications are subject to change without prior notice Accordingly compatibility may be impaired or some or all of the services may become unavailable Some functions of Pandora cannot be operated from this unit For issues using the application please contact Pandora at pandora support pandora com Ñ About iHeartRadio Requirements for using iHea...

Страница 26: ...of labels on or inside the product relating to laser product safety JVC KENWOOD Corporation 2967 3 ISHIKAWA MACHI HACHIOJI SHI TOKYO JAPAN THIS PRODUCT COMPLIES WITH DHHS RULES 21 CFR SUBCHAPTER J IN EFFECT AT DATE OF MANUFACTURE Location Top plate Ñ IC Industry Canada Notice This device complies with Industry Canada licence exempt RSS standard s Operation is subject to the following two condition...

Страница 27: ...isante Contient un module émetteur FCC ID YZP RBFAC21XX Contient un module émetteur IC 7414A RBFAC21XX CALIFORNIA USA This product contains a CR Coin Cell Lithium Battery which contains Perchlorate Material special handling may apply See www dtsc ca gov hazardouswaste perchlorate Información acerca de la eliminación de equipos eléctricos y electrónicos al final de la vida útil aplicable a los país...

Страница 28: ...abile High Definition Link ff iHeartRADIO Siriusxm READY PANDORA 0Bluetooth DYD VIDEO Made for iPod D iPhone KENWOOD PERSONAL RADIO I DOLBY DIGITAL Designed for riJiiil Windows 1M MedlalM Radio I PSD HD2 HD3 Bookmark Diqital Sound Artist Expel iaIC8 L ...

Страница 29: ...cord the serial number found on the back of the unit in the spaces designated on the warranty card and in the space provided below Refer to the model and serial numbers whenever you call upon your Kenwood dealer for information or service on the product Model DNX571TR Serial number US Residence Only Register Online Register your Kenwood product at www Kenwoodusa com Before reading this manual clic...

Страница 30: ...YSTEM In this manual you will learn various convenient functions of the system Click the icon of the media you want to play With one click you can jump to the section of each media iPod USB VCD DVDVIDEO Music CD Disc Media BT Audio Pandora iHeartRadio AUPEO Apps HD Radio SiriusXM ...

Страница 31: ...________ 46 AUPEO Operation___________________ 49 Apps Operation_____________________ 51 USB iPod Setup_____________________ 53 Radio and HD Radio Tuner Operation 58 Radio HD Radio Tuner Basic Operation___ 58 Memory Operation___________________ 61 Selecting Operation__________________ 62 Traffic Information HD Radio tuner only _________________ 64 Receive Mode HD Radio tuner only ____ 64 Bookmark ...

Страница 32: ...___________________ 108 Zone Control________________________ 110 Sound Effect________________________ 111 Listening Position____________________ 112 Remote control 114 Battery Installation___________________ 114 Functions of the Remote control Buttons_ 115 Troubleshooting 118 Problems and Solutions_______________ 118 Error Messages______________________ 119 Resetting the Unit___________________ 12...

Страница 33: ... directly to the unit may affect its mechanical parts Wiping the faceplate with a hard cloth or using a volatile liquid such as thinner or alcohol may scratch the surface or erase screened print Lens fogging When you turn on the car heater in cold weather dew or condensation may form on the lens in the disc player of the unit Called lens fogging this condensation on the lens may not allow discs to...

Страница 34: ...tes the name of panel buttons Indicates the name of touch keys Operation title Introduces the function NOTE Introduces some tips notes etc 30 30 Return to the Top page CD Audio and Visual Files iPod App Operation Search Operation You can search music video or picture files by the following operations NOTE If you use a remote control you can jump directly to the desired track file with entering the...

Страница 35: ...ay be different from the actual panels How to insert a microSD Card 1 Open the 8 microSD card slot cover as the illustration in the right 2 Hold the microSD card with the label facing up and the notched section right and insert it into the slot until it clicks To eject the card Push the card until it clicks and then remove your finger from the card The card pops up so that you can pull it out with...

Страница 36: ...ower on 5 NAV Displays the navigation screen Pressing for 1 second switches AV out sources 6 Volume Knob Turning adjusts volume up or down Pressing switches attenuation of the volume on off Pressing for 1 second displays Graphic Equalizer screen P 109 1 7 TEL Displays the Hands Free screen P 85 Pressing for 1 second displays the Voice Recognition screen P 88 2 8 microSD card slot A microSD card sl...

Страница 37: ...ethod of turning on is different depending on the model Press the MENU button The unit is turned on To turn off the unit Press the MENU button for 1 second If it is your first time turning the unit on after installation it will be necessary to perform Initial setup P 9 1 ...

Страница 38: ...operation see Language setup P 95 AV IN SETUP Select the source connected to AV IN 1Touch SET 2For AV IN Interface touch Rear Camera or AV IN to select the source 3For AV IN Name touch 2 or 3 to select the name For detailed operation see AV Input Setup P 101 Color Set the screen and button illumination color You can select whether to allow color scan operation or select a fixed color for operation...

Страница 39: ... to the Top page Basic Operations OEM SETUP This function requires a commercial adaptor Consult your Kenwood dealer for details Touch Finish NOTE These settings can be set from the SETUP menu See Setting Up P 92 2 ...

Страница 40: ... reads the device and playback starts To disconnect the device Touch 0 on the screen and disconnect the device from the cable iPod Connect the iPod The unit reads the iPod and playback starts NOTE For the details of the necessary cable and adapter to connect with iPod iPhone refer to Music Video Picture Basic Operation P 30 To disconnect the iPod iPhone connected with the cable Touch on the screen...

Страница 41: ...t displayed during video picture playback press the MENU button P 6 Top Menu screen appears NOTE Top Menu screen can be changed by flicking left or right Customizing Top Menu screen You can arrange the position of the source icons as you like 1 Touch and hold the icon which you want to move to go into the customizing mode 2 Drag it where you want to move Customizing mode screen 1 ...

Страница 42: ...e icon of the desired video source Switch the application installed in the iPhone iPod or Android etc Touch the icon of the desired application Switch the Apps source Touch the icon of the desired App source Enter setup mode etc Touch the icon of the desired setup function Display navigation screen or Touch NAV or navigation information Turn off all audio function Touch STANDBY Vehicle information...

Страница 43: ...ntents of the menu are as follows Displays the SETUP Menu screen Displays the Audio Control Menu screen Displays the control screen of current source Icon feature differs depending on the source Closes the menu List screen There are some common function keys in the list screens of most sources Scroll Scrolls the displayed text etc Touch keys with various functions are displayed here Displayed keys...

Страница 44: ...15 Return to the Top page Basic Operations Flick scrolling You can scroll the list screen by flicking the screen up down or right left ...

Страница 45: ...lay the navigation screen Press the NAV button The navigation screen appears Control audio from the navigation screen You can control audio sources while the navigation screen is displayed Also you can view the navigation information while the source control screen is displayed Touch the information bar The navigation screen with audio information appears 1 1 ...

Страница 46: ...urce Displays the navigation and current video picture playback display NOTE The screen switches between playback screen and camera view each time the viewing area is touched Touching the source icon in the bottom of the screen displays the full audio screen To return to the full navigation screen Touch NOTE For details on control keys refer to the instructions in each section 2 ...

Страница 47: ...yed on this unit Touch Menu on any screen Top Menu screen appears Touch OEM Features in the Top Menu screen OEM Features screen appears Displays the control screen of the satellite radio source provided for the vehicle Displays the control screen of the media player source provided for the vehicle Displays the control screen of the Bluetooth Hands Free function provided for the vehicle Displays th...

Страница 48: ...tioner of the vehicle Displays information about the Parking Distance Sensor of the vehicle Displays information about the tire pressures of the vehicle NOTE Displayable screens button names and screen names vary depending on the type of the connected iDataLink and the model of the vehicle For more details access the following URL www idatalink com ...

Страница 49: ...mber display Track Scene VCD track or scene number display Scene is displayed only when Playback control PBC is on 3 7 etc Current play mode display The meanings of each icon are as follows 3 play fast forward 1 fast backward search up 4 search down 7 stop R resume stop 8 pause slow playback slow reverse playback Touch this area to display the disc label name 2 Multi function key Touch to switch t...

Страница 50: ...hing time display Each time you touch the display switches between P play time display and R disc remaining time Confirms the current location See the bar in center DVD only The bar does not appear when the time display is remaining time display 6 Searching area Touch to search the next previous content Scrolling from center of display to left or right performs fast backward or fast forward Each t...

Страница 51: ... DVD only Plays in slow motion forward or backward 7 Stops playback When touched twice the disc is played from the beginning when you play it the next time PBC VCD only Turn Playback control PBC on or off SETUP Touch to display the SETUP Menu screen See Setting Up P 92 AUDIO Touch to display the Audio Control screen See Controlling Audio P 104 REAR Touch to mute the rear speaker ...

Страница 52: ... previous menu Touch Return Enters selected item Touch Enter Enables direct operation Touch Highlight to enter the highlight control mode P 23 Moves the cursor Touch 5 2 3 These keys may not function depending on the disc Highlight control Highlight control lets you control the DVD menu by touching the menu key directly on the screen 1 Touch Highlight in the Menu Control screen 2 Touch desired ite...

Страница 53: ...uch Angle Each time you touch this key picture angle is switched Exits menu control Touch Exit Displays the Menu Control 1 screen Touch Previous Zoom Control For DVD And VCD You can enlarge Playback screen for DVD and VCD 1 For VCD touch illustrated area during playback Zoom Control screen appears NOTE For DVD please refer to DVD play mode setting P 24 to display the Zoom Control screen 2 Perform ...

Страница 54: ...25 Return to the Top page DVD Video CD Operation This function may not be performed depending on the disc NOTE You cannot touch the menu keys directly on the screen when zooming ...

Страница 55: ...nguage See Language setup P 27 Dynamic Range Control Sets the dynamic range Wide The dynamic range is wide Normal The dynamic range is normal Dialog Default Makes the total sound volume larger than other modes This is effective only when you are using Dolby Digital software Angle Mark Sets an angle mark display ON Default An angle mark appears OFF An angle mark does not appear Screen Ratio Sets th...

Страница 56: ...e You cannot setup these items during DVD playback 1 Touch SET of the desired item Menu Language Subtitle Language Audio Language Language Set screen appears 2 Enter the desired language code and touch Enter For language code refer to DVD Language Codes P 129 Sets the entered language and returns to the DVD SETUP screen NOTE To cancel the setup and return to the previous screen touch Cancel To cle...

Страница 57: ...d disc If a disc has no parental lock anybody can play it back even when you have set the parental lock Disc setup Performs setup when using disc media 1 Touch SET of DISC SETUP DISC SETUP screen appears 2 Select an option as follows CD Read Sets the motion of this unit when a music CD is played 1 Default Automatically recognizes and plays back an audio file disc a DVD or a music CD 2 Forcibly pla...

Страница 58: ...29 Return to the Top page DVD Video CD Operation ...

Страница 59: ...ary as follows To listen music and watch video with Lightning connector device Lightning Digital AV Adapter KCA HD100 KCA iP103 Bluetooth profile SPP To listen music with Lightning connector device KCA iP103 To listen music and watch video with 30 pin connector device KCA iP202 To listen music with 30 pin connector device KCA iP102 To listen to music via Bluetooth Bluetooth profile A2DP Bluetooth ...

Страница 60: ...ard search up 4 search down 7 stop R resume stop 8 pause 2 Movie display area Control switching area Touch to switch between the Simple Control and List Control screen 3 Multi function key Touch to switch the multi function menu For details on the menu see Multi function menu P 35 4 Multi function menu Various functions can be performed by using keys in this area For details on the menu see Multi ...

Страница 61: ...ile Scrolling from center of display to left or right performs fast backward or fast forward Each time you touch each area the speed changes standard 2 times 3 times To stop fast backward forward touch center of the display 10 Menu display area disc media only Touch to display the disc menu For details see Movie Control P 42 11 Key display area disc media only Touch to display the last control scr...

Страница 62: ...ch to switch between the Simple Control and List Control screen 3 Multi function key Touch to switch the multi function menu For details on the menu see Multi function menu P 35 4 Multi function menu Various functions can be performed by using keys in this area For details on the keys see Multi function menu P 35 5 Sub function key Touch to display Sub function menu 7 in this table 6 Contents list...

Страница 63: ...he next previous music file Scrolling from center of display to left or right performs fast backward or fast forward To stop fast backward forward touch center of the display This function is not available when there is no music file in the current folder 10 Key display area picture video file only Touch to display the last control screen 11Screen setup display area Touch and hold to display the s...

Страница 64: ...the previous next track file 3 8 38 Plays or pauses 7 music CD and disc media only Stops playback 0 USB device and iPod only Touch to disconnect the device For details see How to Play Media P 11 disc media and USB device only Searches previous next folder picture files in USB device only During picture playback switches to picture display SETUP Touch to display the SETUP Menu screen See Setting Up...

Страница 65: ...1 Music CD and disc media only Fast forward or fast backward USB device and iPod only Plays the previous or next album in Favorite list P 41 or Confirms play time During music CD playback you can also confirm disc remaining time by touching time display Each time you touch the display switches between P track play time display and R disc remaining time Randomly plays all tracks in current folder d...

Страница 66: ...t by touching For disc media you cannot display the list during random play and stop Other search When you want to narrow the list down there are other search ways This function is not available when music CD is the current source 1 Touch in the control screen The search type screen appears 2 Touch desired search way USB device iPod The list sorted in the way you selected appears See the following...

Страница 67: ...tem from the left part of the screen You can select from artist album genre and composer The list corresponding to your selection appears NOTE The list is sorted by the way you selected artist Displays the album list of the artist album Displays all tunes of the current album genre Displays the artists list in which artists belong to the same genre composer Displays the album list of the composer ...

Страница 68: ...u touch a folder its contents are displayed The hierarchy till the current folder is displayed on the left 2 Touch desired item from the content list Playback starts NOTE For operations in the list screen see Common Operations P 14 Picture search USB device only 1 Touch the desired picture The selected picture appears in full screen See number 9 10 in USB device and iPod P 33 for operation of pict...

Страница 69: ...t yet loaded any artworks Touch the key to start loading When Load More Albums appears Some artworks are not loaded Touch the key to load all artworks If you touch the key the track being played may stop and another track may start playback When the key does not available All artworks are already loaded 4 Touch 3 on the selected artwork The first song in the album is played In addition you can cre...

Страница 70: ...is played and the control screen appears NOTE The favorite list is played to the right starting with the selected album To delete the album from the favorite list touch and drag it to the lower line You can change the playing order of the favorite list by dragging the artwork in the list The favorite list mode is canceled in the following situations Playing another album from other list folder lis...

Страница 71: ...e Control You can adjust the movie playback from a disc media 1 In the playback screen touch illustrated area Movie Control screen appears 2 Perform desired operation as follows Changes subtitle language Touch Subtitle Changes audio language Touch Audio Exits the menu Touch Exit ...

Страница 72: ...cation link setup P 56 2 3 3 4 4 5 8 6 2 7 Simple Control screen List Control screen 1 1 Information display Displays text information of current contents that is being played 2 Artwork Control switching area The picture data is displayed if available from current content Touch to switch between the Simple Control and List Control screen 3 Multi function key Touch to switch the multi function menu...

Страница 73: ...mitation is exceeded Thumbs up Registers the current contents as favorite content Bookmark Artist Bookmark an artist in the current contents Bookmark Song Bookmark a song in the current contents NOTE SETUP AUDIO and REAR functions same as iPod Sub function menu The following functions can be performed by using keys in this area Status bar in center Displays the elapsed time since when you select t...

Страница 74: ...rresponds to the station name to help narrow the search Sort the list by registered date Touch ByDate The list is sorted to begin with the last registered station NOTE You can operate Pandora by using the remote control However only playing pausing and skipping are available You cannot select iPod as rear source when you select Pandora as main source in dual zone function Genre list screen You can...

Страница 75: ...as a source the setting screen for the connection with the device installed the apps will appear For the details refer to Application link setup P 56 2 3 4 5 1 1 Artwork switching area The picture data is displayed if available from current content When the picture is not available No Photo is displayed 2 Multi function key Touch to switch the multi function menu For details on the menu see Multi ...

Страница 76: ... on searching see Station search P 47 Saves currently playing station to My Stations Live station only Use the Discovery Tuner to set the variety level of a station For details see Discovery tuner P 48 Custom station only NOTE SETUP AUDIO and REAR functions same as iPod Station search You can list and select station 1 Touch in the control screen The Station Search screen appears Selects the catego...

Страница 77: ...k the station name you want to delete You can uncheck if you touch it again Returns to the first hierarchy of the category list Returns to the previous category list 3 Touch Station Delete screen appears 4 Touch Yes My station selected is deleted Discovery tuner You can set the variety level in a custom station 1 Touch in the control screen The Discovery tuner select screen appears Selects the var...

Страница 78: ...l the most current version When you first select AUPEO as a source the setting screen for the connection with the device installed the apps will appear For the details refer to Application link setup P 56 2 3 4 1 1 Artwork switching area The picture data is displayed if available from current content When the picture is not available No Photo is displayed 2 Multi function key Touch to switch the m...

Страница 79: ...ee Station search P 50 Touching the key Love current song 38 Plays or pauses Skips the current song Touching the key Ban current song NOTE SETUP AUDIO and REAR functions same as iPod Station search You can list and select station 1 Touch in the control screen The Station Search screen appears Selects the category and station Touch the category and station name in the list Returns to the previous c...

Страница 80: ...atisfied the touch keys will not appear but the touch operation from the screen of the unit to the Android device becomes possible The unit and the Android device are connected with KCA MH100 sold separately and over Bluetooth profile HID and SPP Kenwood Smartphone Control is installed on the Android device For details see web site http www kenwood com products car_audio app kenwood_smartphone_con...

Страница 81: ...e Top page CD Audio and Visual Files iPod App Operation 3 Sub function menu iPod touch iPhone only The following functions can be performed by using keys in this area Hides all keys During video file playback only Touch ...

Страница 82: ...P SETUP Menu screen appears 3 Touch Source Source SETUP Menu screen appears 4 Touch USB SETUP iPod SETUP or APP SETUP in the list Each setup screen appears See the following section for each setting USB setup P 53 iPod setup P 54 Application link setup P 56 USB setup 1 Set each item as follows Picture Display Time Selects length of time to display JPEG picture file in the screen Select from Short ...

Страница 83: ...to connect the iPod iPhone with this unit For details on searching see iPod iPhone connection setup P 54 This setting is not available when an iPod is connected iPod iPhone connection setup 1 Touch iPod Connection Setup in the iPod Settings screen iPod connection setup screen appears 2 Touch CHANGE 3 Select the way to connect the iPod iPhone with this unit USB AV IN Select when connecting with KCA...

Страница 84: ...nd adapter to connect with iPod iPhone refer to Music Video Picture Basic Operation P 30 When you select HDMI BT or Bluetooth in step 3 Bluetooth device selection screen will appear Select the iPod iPhone to be connected If a connectable Bluetooth device is not displayed touch Search and do the pairing of the devices ...

Страница 85: ...ch Next Connection setup screen appears 4 Select the way to connect the device with this unit When selecting iPod iPhone USB AV IN Select when connecting with KCA iP202 USB 1Wire Select when connecting with KCA iP103 or KCA iP102 HDMI BT Select when connecting with KCA HD100 and Lightning Digital AV Adapter Bluetooth Select when connecting via Bluetooth only When selecting Android Other HDMI MHL B...

Страница 86: ...e screen will return to APP after you agree the caution For the details of the necessary cable and adapter to connect with iPod iPhone and Android refer to Music Video Picture Basic Operation P 30 When you select HDMI BT HDMI MHL BT or Bluetooth in step 4 Bluetooth device selection screen will appear Select the device to be connected If a connectable Bluetooth device is not displayed touch Search ...

Страница 87: ...n Logo data is displayed if available from current content FM1 etc Band display MHz kHz Frequency display Preset Preset number HD Channel display Touch to switch between the Simple Control and List Control screen 3 Multi function key Touch to switch the multi function menu For details on the menu see Multi function menu P 59 4 Preset key Multi function menu Recalls the memorized station or channel...

Страница 88: ... Selects the preset station Touch for 2 seconds to store the current station into the preset memory Selects the method of searching from preset stations selecting or channel searching For details on search operation see Selecting Operation P 62 TI Sets the traffic information mode on For details see Traffic Information P 64 SEEK Switches the seek mode in the following sequence AUTO1 AUTO2 MANUAL A...

Страница 89: ... traditional main stations are HD2 HD3 Channels providing new original formats on the FM dial Bookmark is a music product discovery feature that enables users to store information about content on the radio and delivers interactive information via QR codes HD Radio broadcasts deliver crystal clear CD like digital audio quality to consumers Visual images such as album art of over the air broadcasts...

Страница 90: ...not operate within 10 seconds 1 Touch Sub function menu appears 2 Touch desired band key 3 Touch in the control screen The multi function menu appears 4 Touch AME in the multi function menu 5 Touch 1 or in the sub function menu Auto memory starts Manual memory You can store the current receiving station or channel in memory 1 Select a station or channel you wish to store in memory 2 Touch P 1 6 in...

Страница 91: ... List Control screen appears 2 Select a station or channel from the list NOTE Touching and then Preset List displays the preset channel list You can also select your desired channel from the list Search by program type You can tune to a station with a specific program type when listening to FM 1 Touch in the control screen The multi function menu appears 2 Touch PTY in the multi function menu TUNE...

Страница 92: ...you touch Mode in the left part of the screen it changes the mode between frequency entering mode and channel entering mode Category Channel search You can specify the desired category and select a channel 1 Touch in the control screen The multi function menu appears 2 Touch in the multi function menu List select screen appears 3 Touch Preset list or Category Channel list The previously used categ...

Страница 93: ...OTE It is necessary to have Traffic Information function set to on in order to have the Traffic Information screen appear automatically The volume setting during reception of traffic information is automatically stored The next time the traffic information is received this unit recalls the volume setting automatically Receive Mode You can set the radio broadcasts receive mode 1 Touch in the contro...

Страница 94: ...nction menu appears 2 Touch Registers a bookmark NOTE Up to 100 bookmarks can be registered to this unit Bookmark list Displaying a list of registered bookmarks and detailed information and QR code of the song 1 Touch in the control screen The multi function menu appears 2 Touch in the multi function menu List select screen appears 3 Touch Bookmark The Bookmark List appears 4 Select the desired bo...

Страница 95: ...l screen The multi function menu appears 2 Touch in the multi function menu List select screen appears 3 Touch Bookmark The Bookmark List appears 4 Touch Delete List The Bookmark Delete List appears 5 Select the bookmark to delete from the list All Select all bookmarks 6 Touch Deletes all the selected bookmark s ...

Страница 96: ...67 Return to the Top page HD Radio Tuner Operation ...

Страница 97: ... 866 635 2349 to activate your SiriusXM Vehicle Connect Tuner To activate SiriusXM Canada service go to www xmradio ca and click on ACTIVATE RADIO in the top right corner or call 1 877 438 9677 NOTE Set the remote control mode switch to AUD mode before starting operation see Switching the operation mode P 115 To use SiriusXM Satellite Radio the optional accessory is necessary Simple Control screen...

Страница 98: ...unes in by entering direct number Touch and enter the desired number For details see Direct search P 72 8 List switching key Touch to switch between the preset list and the information list Multi function menu The functions of each key are as follows P1 P6 Selects the preset channel Touch for 2 seconds to store the current station into the preset memory Selects the method of searching from preset ...

Страница 99: ...eather Jump P 79 Listen to live TuneScan Hear a few seconds of the songs from each of the SmartFavorite music channels on the current preset band See TuneScan P 75 SETUP Touch to display the SETUP Menu screen See Setting Up P 92 AUDIO Touch to display the Audio Control screen See Controlling Audio P 104 REAR Touch to mute the rear speaker ...

Страница 100: ...nds Selecting Operation Preset select You can list and select memorized station or channel Selecting from the multi function menu 1 Touch the desired number from P1 to P6 The unit will tune to the selected station or channel Selecting from the preset list 1 Touch illustrated area List Control screen appears 2 Select a station or channel from the list NOTE For SiriusXM tuner touching and then Prese...

Страница 101: ...el search You can specify the desired category and select a channel 1 Touch in the control screen The multi function menu appears 2 Touch in the multi function menu List select screen appears 3 Touch Category Channel list The previously used category or channel list appears 4 Select the desired content from the list NOTE All the channels in the selected category appear Touching All Channel display...

Страница 102: ...ontent starts an Alert screen appears Jump Touch to display the Alert Content List screen Ignore Touch to cancel the Content alert 2 Select a content from the list NOTE Each time you touched Type switches the sequence of the Content alert list as follows Artist Alert Song Alert GameAlert For how to register artists and songs and turn on off the Team alert function see Multi function menu P 69 For ...

Страница 103: ...ing 38 Plays or pauses CHS CHR Tunes in a station Replay time bar Display recorded capacity and playback position Listen to live Displays a list of recorded data on a program basis BAND Switches the band 2 Touch to display a program list Program list Touching this plays back the displayed program Info Change Touching this allows you to switch among the Artist name Song title Category name and Cont...

Страница 104: ...disable Tune Start see TuneStart P 80 TuneScan TuneScan is a feature that plays samples from the starts of multiple buffered songs from each of the Smart Favorite channels that predominantly play music selections You have easy access to a large sampling of music content and can enjoy hearing a full song when stopping the scan on a song of interest 1 Touch in the control screen The multi function m...

Страница 105: ...arental control P 77 Set up the skip channel select P 78 Set up the Content alerts P 78 Set up the content for Content alerts P 79 Select the city for Content alerts P 79 Set up the TuneStart P 80 Reset to the default settings P 80 Parental code You can set a SiriusXM parental code 1 Touch Change of Parental Code in the SiriusXM SETUP screen Parental Pass Check screen appears NOTE The code number ...

Страница 106: ... Pass Check screen appears NOTE You need to complete Parental code P 76 beforehand To delete the parental lock channel setting touch and hold Unlock All for 2 seconds enter the Parental code number then touch Enter 4 Enter the same code number as you originally input in Parental code P 76 and touch Enter Parental Lock Category Select screen appears 5 Touch the desired category from the list Displa...

Страница 107: ... Displays all the channels in the selected category 3 Touch each channel list and set ON or OFF NOTE Operations in each list screen are same as Parental control P 77 To delete the skip channel setting touch and hold Unskip All for 2 seconds Content alerts setup You can turn on or off the Content alerts function 1 Touch ON or OFF of Content alerts in the SiriusXM SETUP screen Turns the Content aler...

Страница 108: ...p Touching this allows you to switch among the Artist list Song list and Team list cyclically 3 Touch each content list and set ON or OFF NOTE Touch Delete to delete the currently selected content from the Artist list and Song list Available teams were pre registered in the Team list Team s cannot be registered or deleted manually City select for Traffic Weather Jump You can select a city for whic...

Страница 109: ...ration TuneStart 1 Touch ON or OFF of Tune Start in the SiriusXM SETUP screen Turns the Tune start on or off Default is ON Reset 1 Touch Reset of SiriusXM Reset for 2 seconds in the SiriusXM SETUP screen All SiriusXM setting returns to default ...

Страница 110: ...81 Return to the Top page SiriusXM Operation ...

Страница 111: ...cell phones verified for compatibility access the following URL http www kenwood com cs ce bt The units supporting the Bluetooth function have been certified for conformity with the Bluetooth Standard following the procedure prescribed by Bluetooth SIG However it may be impossible for such units to communicate with your cell phone depending on its type Registering And Connecting Bluetooth Unit It ...

Страница 112: ...device If two Bluetooth units are connected this unit will not start the search In this case disconnect one of the Bluetooth units 2 Select the Bluetooth unit to register from the list NOTE If the unit cannot be searched in step 1 you can search the unit again by touching Search in above screen Touch Cancel to cancel searching for the Bluetooth unit 3 Enter PIN code form the cell phone Profile sel...

Страница 113: ...Control screen See Registering the Bluetooth Unit P 83 SETUP Touch to display the SETUP Menu screen See Setting Up P 92 REAR Touch to mute the rear speaker 4 Control switching area Touch to switch between the Simple Control and List Control screen 5 File information Displays the information of the current file 6 Status bar Displays the current play location play time and play mode These items appe...

Страница 114: ...e of your cell phone the following restrictions are placed The phonebook data cannot be downloaded normally Characters in the phonebook are garbled To cancel downloading the phonebook data operate the cell phone 2 Select a dialing method See the following table for each method Select the cell phone to use 1 Touch cell phone name display Call by entering a phone number 1 Touch 2Enter a phone number...

Страница 115: ...one touch Download on top of the phonebook list in this unit to download it from your cell phone The phonebook in this unit will be updated with the latest downloaded data The status icons such as battery and antenna displayed may differ from those displayed on the cell phone Setting the cell phone in the private mode can disable the hands free function Receiving a call 1 Touch to answer a phone c...

Страница 116: ...ice output between cell phone and speaker Call waiting When you receive a call while talking on another call you can answer the newly received call by touching The current call is on hold Each time you touch the caller will change When you touch the current call will end and switch to the call in hold Phone number preset You can register frequently used phone numbers to this unit 1 Enter the numbe...

Страница 117: ...the Garmin Smartphone Link app into your Android smartphone and connect with the unit via Bluetooth SPP you can use some information linked with the navigation such as parking lot fuel price live traffic camera weather forecast and traffic condition Preparation Search for Smartphone Link in the Google play and install the latest version on your Android 1 To enter STANDBY source touch STANDBY icon ...

Страница 118: ...89 Return to the Top page Bluetooth Control ...

Страница 119: ...ll voice and ringing tone and Bluetooth audio player Front Only Outputs from the front speakers All Default Outputs from all speakers Auto Response Sets an automatic response time to pick up an incoming call OFF Default Automatic response is not available 0 99 Set calling ring time second Auto Pairing When set to ON the Apple Auto Pairing function is turned on to automatically register the iPod to...

Страница 120: ... Microphone Level Adjusts the sensitivity of the telephone microphone Default is 15 Noise Reduction Level Reduces the noises generated by surrounding environment without changing the microphone volume Use this setting when the voice of caller is not clear Default is 10 Restore Resets the settings to the default settings Either the time interval for automatic answer set on this unit or the time int...

Страница 121: ...im OFF The display and buttons do not dim SYNC Default Turns the dimmer function on or off when the vehicle light control switch is turned on or off NAV SYNC Turns the dimmer function on or off according to the Navigation Day Night display setting Mode except USB Select screen mode Full Full picture mode Just Justify picture mode Zoom Zoom picture mode Normal Normal picture mode Playback screen on...

Страница 122: ...an be started from the multi function menu 1 Touch Menu on any screen TOP Menu screen appears 2 Touch SETUP 3 Touch System System Menu screen appears See the following section for each setting Set up the user interface P 94 Adjust touch panel P 95 Set up securityl P 96 Set up memory P 96 ...

Страница 123: ... Does not scroll the text automatically Drawer Close Sets whether to close the common menu P 14 automatically Default is Auto TEL Key Longer than 1 Second You can set the operation performed when the TEL key is pressed for 1 second Select from Voice V OFF R CAM Voice Default Displays the Voice Recognition screen P 88 V OFF Turn the display off R CAM Switches to the rear view camera video display A...

Страница 124: ...he following screen appears GUI Language Select Selects the display language used for the control screen and so forth Navigation Language Select Selects the language used for navigation Text Language Select Selects the language used for tag text song information 3 Touch Enter NOTE To cancel the language setup touch Cancel Touch panel adjustment 1 Touch Touch in the System Menu screen Touch Panel A...

Страница 125: ...morized The memorized settings can be recalled at any time For example even when the settings are cleared due to replacement of the battery the settings can be restored 1 Touch SETUP Memory in the System Menu screen SETUP Memory screen appears 2 Follow the instruction on the screen Lock Unlock Locks or unlocks the AV IN SETUP and Audio SETUP settings Yes Memorizes or recalls the settings No Cancel...

Страница 126: ...e current settings Clear Clears the currently memorized settings Cancel Quits memorization recalling of settings Display Setup 1 Touch Menu on any screen 2 Touch SETUP SETUP Menu screen appears 3 Touch Display Display Menu screen appears See the following section for each setting Adjust panel color P 98 Changing background image P 99 ...

Страница 127: ...T or Initialize when Panel Color Scan is set to off Touch Initialize to reset the settings to the default settings 4 Touch the desired color Registering original color You can register your original color 1 Touch Adjust in the Panel Color Coordinate screen Panel Color RGB Coordinate screen appears 2 Use 2 and 3 to adjust each color value 3 Touch the desired preset key for 2 seconds Panel color sca...

Страница 128: ...Background File Select screen appears 4 Select the image to load 5 Touch Enter The selected image is loaded and the display returns to the Background screen NOTE Touching rotates counter clockwise Touching rotates clockwise 6 Touch Change of Background Change in the Background screen 7 Select an image for background and touch Enter NOTE See Playable Media and Files P 122 for readable image specifi...

Страница 129: ...fault is 20 NAV Mute Mutes the volume of rear speakers during voice guidance of the navigation system Default is ON Camera Setup You can set camera parameters 1 Touch Menu on any screen 2 Touch SETUP SETUP Menu screen appears 3 Touch Camera Camera SETUP screen appears 4 Set each item as follows R CAM Interruption Sets a method for switching the display Setting values are ON and OFF ON Switches to ...

Страница 130: ...lt is VIDEO 1 This item can be set when in STANDBY source 2 AV IN1 Name stays Rear Camera when selecting Rear Camera in AV IN Interface AV Output Interface Setup You can select an AV source to be output at the AV OUTPUT port Default is VIDEO1 1 Touch Menu on any screen 2 Touch SETUP SETUP Menu screen appears 3 Touch AV OUT AV OUT Interface screen appears 4 Touch 2 or 3 to set AV OUT to VIDEO1 DISC...

Страница 131: ... this unit 1 Touch Menu on any screen 2 Touch SETUP SETUP Menu screen appears 3 Touch Software Software Information screen appears 4 Confirm the software version Touch Update as necessary NOTE For how to update the software see the relevant update procedure manual which comes with the software ...

Страница 132: ...103 Return to the Top page Setting Up ...

Страница 133: ... screen 2 Touch Audio Audio screen appears See the following section for each setting Setting audio P 104 Controlling audio P 108 Controlling equalizer P 108 Performing zone control P 110 Set sound effect P 111 Set listening position P 112 Setting Audio 1 Touch Audio SETUP Audio SETUP screen appears See the following section for each setting Set up speakers P 105 Set up your car type P 106 Select ...

Страница 134: ...the speaker crossover setup screen You can adjust the crossover setup that was set automatically when you selected the speaker type For details see Crossover network setup P 106 3 Select a speaker size using 2 and 3 The speaker size is different depending on the speaker type and the unit Front OEM 3 1 2 inch 4 inch 4 3 4 inch 5 inch 6 1 2 inch 6 3 4 inch 7 inch 4x6 5x7 6x8 6x9 7x10 Rear None OEM 3...

Страница 135: ...ar speaker is selected on Speaker Select screen LPF FREQ Low Pass Filter adjustment When subwoofer is selected on Speaker Select screen Slope 2 Sets a crossover slope 1 Only when Subwoofer is set to a mode other than None in Speaker Setup 2 Only when LPF FREQ HPF FREQ is set to a mode other than Through in X over Car type setup You can setup the car type and speaker network etc 1 Touch Car Type in...

Страница 136: ...e location from Door On Dash Under Dash Rear Speaker Select the location from Door Rear Deck 2nd Row 3rd Row Minivan Minivan Long DSP select You can select whether using DSP Digital Signal Processor System 1 Touch Bypass or Through of DSP Select in the Audio SETUP screen Bypass There is no effect by DSP Through There is an effect by DSP NOTE When the mode is set to Bypass DSP System cannot be adju...

Страница 137: ...he difference in volume between different sources Subwoofer Level Adjusts the subwoofer volume This setting is not available when subwoofer is set to None See Speaker setup P 105 Bass Boost Sets the amount of bass boost among OFF Level1 Level2 Level3 If you have increased the volume first then reduced the volume using the Volume Offset the sound generated if you suddenly switch to another source m...

Страница 138: ...red Gain level light green boxed area Adjust the gain level by touching the each frequency bar Touching 2 3 5 and can also adjust the level Use 2 and 3 to select a frequency and 5 and to set the level EQ INIT Returns to the previous level which the gain level is adjusted Flat Tone curve becomes flat Bass EXT Bass Extend Settings When turned on the frequency lower than 62 5 Hz is set to the same ga...

Страница 139: ...dual zone function NOTE When the rear speaker sound is switched the audio source that is output at the AV OUTPUT terminal is also switched to the same source When the dual zone function is set to on the following functions are not available Output from the subwoofer Subwoofer Level Bass Boost P 108 Equalizer Control Sound Effect Listening Position P 108 111 112 DSP Bypass Control Speaker Setup Car...

Страница 140: ... You can set sound effects 1 Touch Sound Effect Sound Effect screen appears Drive Equalizer setting The sound quality is automatically adjusted 1 Touch ON or OFF of Drive Equalizer The sound quality is automatically optimized to meet the current volume level ...

Страница 141: ...lect listening position from Front R Right front Front L Left front Front All All front and All using 2 and 3 Position DTA control You can fine adjust your listening position 1 In Position screen touch Adjust 2 Select the speaker you wish to adjust by touching speaker icon 3 Set DTA as follows 2 3 Adjust the settings of the DTA position Gain Touch to adjust the gain of each speaker ...

Страница 142: ...and set 1 Determine the center of the currently set listening position as the reference point 2 Measure the distances from the reference point to the speakers 3 Calculate the differences between the distance of the furthest speaker and other speakers 4 Input the differences calculated in step 3 for individual speakers 5 Adjust gain for individual speakers A sound image will be shifted to the speak...

Страница 143: ...up or heat the battery or place it in an open fire Such actions may cause the battery to leak fluid If spilled fluid comes in contact with your eyes or on clothing immediately rinse with water and consult a physician Place the battery out of reach of children In the unlikely event that a child swallows the battery immediately consult a physician Battery Installation If the remote control operates ...

Страница 144: ... with entering the number corresponding to the content NOTE This operation cannot be performed for USB device and iPod 1 Press the BS button several times until the desired content appears The available contents are different depending on the source DVD Title number Chapter number Play time Item number You may not be able to use this function with some discs or scenes VCD 1 X and 2 X PBC OFF Track...

Страница 145: ...ng twice NAV Displays Main menu 4 OUT IN NAV Zooms in or out the navigation map 5 POSITION AUD DVD Pauses the track or file and resumes playing by pressing twice During radio HD Radio and SiriusXM source in AUD mode switches the seek mode NAV Displays the current position 6 Cursor Key DVD Moves the cursor in the DVD menu NAV Moves the cursor or scrolls the map 7 ENTER AUD DVD Performs the selected...

Страница 146: ...t search mode see Direct search mode P 115 DVD Press 1 2 to fast forward backward Switches the fast forward backward speed each time you press this key Press 4 5 to slow forward backward Switches the slow playback speed each time you press this key DVD only 15 DVD Clears the number 16 BS AUD DVD Switches to the direct search mode For details on the direct search mode see Direct search mode P 115 1...

Страница 147: ...disabled Set the dual zone function to on See Zone Control P 110 Cannot set up the equalizer Cannot set up the crossover network The dual zone function is enabled Set the dual zone function to off See Zone Control P 110 DSP Select is set to Bypass Set DSP Select to Through See DSP select P 107 About audio operations Problem Reason Solution Radio reception is poor The car antenna is not extended Pu...

Страница 148: ...r reducing the temperature of the unit Mecha Error The disc player is malfunctioning Eject the disc and try inserting it again Contact the Kenwood dealer if this indicator continues blinking or the disc cannot be ejected Disc Error An unplayable disc is inserted Change the disc See Playable Media and Files P 122 Read Error The disc is quite dirty Clean the disc See Precautions on handling discs P ...

Страница 149: ...s an older version which the unit can not support The unit may not support the connected iPod model Confirm that the software for the iPod is the latest version See Connectable iPod iPhone P 124 Navigation Error Please turn on power again later The communication error has occurred due to severely cold temperature Turn on power again after warming your car interior Check Application The Aha applica...

Страница 150: ...The unit returns to factory settings NOTE Disconnect the USB device before pressing the Reset button Pressing the Reset button with the USB device connected can damage the data stored in the USB device For how to disconnect the USB device see How to Play Media P 11 When the unit is turned on after resetting the Initial SETUP screen appears See Initial setup P 9 ...

Страница 151: ...nds on authoring conditions DVD RW DVD R DVD RW DVD R DL Dual layer Only video format DVD R DL Double layer DVD RAM CD Music CD 1 CD TEXT CD ROM MP3 WMA AAC MPEG1 MPEG2 playback Multisession is supported Packet write is not supported CD R CD RW DTS CD Video CD VCD Super video CD Photo CD CD EXTRA Only music CD session can be played HDCD CCCD Others Dualdisc Super audio CD Only CD layer can be play...

Страница 152: ...t the first setout is played WMA and AAC of which is covered with DRM cannot be played Although the audio files are complied with the standards listed above the play may be impossible depending on the types or conditions of media or device An online manual about audio files is put on the site www kenwood com cs ce audiofile On this online manual detailed information and notes which are not written...

Страница 153: ...ing is displayed without displaying a folder name etc Changing the browse item will display a correct title etc When the iPod is connected to this unit KENWOOD or is displayed on the iPod to indicate that you cannot operate the iPod Usable USB device You can use a mass storage class USB device on this unit The word USB device appearing in this manual indicates a flash memory device and digital aud...

Страница 154: ...125 Return to the Top page Appendix ...

Страница 155: ...ge Error at the disc player VIDEO Identifies the video file MUSIC Identifies the music file RDM The random function is on REP The repeat function is on C REP The chapter repeat function is on T REP The title repeat function is on VCD 1chLL 2chLL Identifies the left audio output of channel 1 or 2 1chLR 2chLR Identifies the monaural audio output of channel 1 or 2 1chRR 2chRR Identifies the right aud...

Страница 156: ...ile VIDEO Identifies the video file RDM The random function is on A RDM The album random function is on REP The repeat function is on HD Radio reception AUTO1 Seek mode is set to AUTO1 AUTO2 Seek mode is set to AUTO2 MANUAL Seek mode is set to MANUAL HD HD Radio station is being received M S A multicast digital broadcast is being received ANALOG An analog broadcast is being received DIGITAL A digi...

Страница 157: ...as scenes shot from multiple angles you can select a favorite angle 16 9 LB Indicates the type of screen for the image The left mark indicates that a wide image picture 16 9 is displayed on a standard TV set screen 4 3 with a black band at both the top and bottom of the screen letter box Operation regulatory marks With this DVD some functions of this unit such as the play function may be restricte...

Страница 158: ...Cambodian kn Kannada ko Korean ks Kashmiri ku Kurdish ky Kirghiz la Latin lb Luxembourgish ln Lingala lo Laotian lt Lithuanian lv Latvian Lettish mg Malagasy mi Maori mk Macedonian ml Malayalam mn Mongolian mo Moldavian mr Marathi ms Malay mt Maltese my Burmese na Nauru ne Nepali nl Dutch no Norwegian oc Occitan om Afan Oromo or Oriya pa Punjabi pl Polish ps Pashto Pushto pt Portuguese qu Quechua ...

Страница 159: ... kHz Disc Format DVD Video VIDEO CD CD DA Sampling Frequency 44 1 48 96 kHz Quantifying Bit Number 16 20 24 bit USB interface section USB Standard USB 2 0 High Speed File System FAT 16 32 Maximum Power Supply Current DC 5 V 1 A D A Converter 24 Bit Audio Decoder MP3 WMA AAC WAV FLAC Video Decoder MPEG1 MPEG2 MPEG4 WMV H 264 Bluetooth section Technology Bluetooth Ver 3 0 EDR Frequency 2 402 2 480 G...

Страница 160: ...dB Digital FM tuner section Frequency Range step 87 9 MHz 107 9 MHz 200 kHz Frequency Response 3 0 dB 20 Hz 20 kHz S N Ratio 75 dB STEREO Digital AM tuner section Frequency Range step 530 kHz 1700 kHz 10 kHz Frequency Response 3 0 dB 40 Hz 15 kHz S N Ratio dB 75 dB STEREO FM tuner section Frequency Range step 87 9 MHz 107 9 MHz 200 kHz Usable Sensitivity S N 30 dB 7 2 dBf 0 8 μV 75 Ω Quieting Sens...

Страница 161: ...eiver High sensitivity GPS receiver Reception Frequency 1575 42 MHz C A code Acquisition Times Cold 29 seconds typ All satellites at 130 dBm Without aiding Update Rate 1 second continuous Accuracy Position 2 5 meters CEP at 130 dBm Velocity 0 1 meter sec Position Method GPS Antenna External GPS antenna General Operating Voltage 14 4 V 10 5 16 V allowable Maximum Current Consumption 10 A Installati...

Страница 162: ...MHL and the MHL logo are a trademark or registered trademark of MHL LLC Incorporates MHL 2 aupeo is a trade mark of Aupeo Ltd THIS PRODUCT IS LICENSED UNDER THE AVC PATENT PORTFOLIO LICENSE FOR THE PERSONAL USE OF A CONSUMER OR OTHER USES IN WHICH IT DOES NOT RECEIVE REMUNERATION TO ENCODE VIDEO IN COMPLIANCE WITH THE AVC STANDARD AVC VIDEO AND OR DECODE AVC VIDEO THAT WAS ENCODED BY A CONSUMER EN...

Страница 163: ...it www pandora com from the built in browser to download the Pandora application Bluetooth must be built in and the following profiles must be supported SPP Serial Port Profile A2DP Advanced Audio Distribution Profile NOTE In the application on your device log in and create an account with Pandora If you are not already a registered user an account can also be created at www pandora com Internet c...

Страница 164: ...ion on your device Note iHeartRadio is available only in the United States and U S Territories For the best application experience a 3G 4G or Wi Fi connection is recommended Because iHeartAuto is a third party service the specifications are subject to change without prior notice Accordingly compatibility may be impaired or some or all of the services may become unavailable Some functions of iHeart...

Страница 165: ...wing are reproductions of labels on or inside the product relating to laser product safety JVC KENWOOD Corporation 2967 3 ISHIKAWA MACHI HACHIOJI SHI TOKYO JAPAN THIS PRODUCT COMPLIES WITH DHHS RULES 21 CFR SUBCHAPTER J IN EFFECT AT DATE OF MANUFACTURE Location Top plate IC Industry Canada Notice This device complies with Industry Canada licence exempt RSS standard s Operation is subject to the fo...

Страница 166: ...ración local para obtener información sobre el punto de recogida más cercano Un tratamiento correcto del reciclaje y la eliminación de residuos ayuda a conservar los recursos y evita al mismo tiempo efectos perjudiciales en la salud y el medio ambiente Para cumplimiento de la COFETEL La operación de este equipo esta sujeta a las siguientes dos condiciones 1 es posible que este equipo o dispositivo...

Страница 167: ...A INTERFACE Mabll Hlgh LJ flnltlan Link WiHeartRADIO ijilij ij PEI SOkAI L 010 Siriusxm READY IIIDOLBY DIGITAL 0Bluetooth ii DYD VIDEO Made for iPod DliPhone KENWOOD r q Radio PSD tm HD3 ao crnn Digital Sound ArtistExpeo ience ...

Страница 168: ...GPS NAVIGATION SYSTEM DNX571TR GPS NAVIGATION INSTRUCTION MANUAL IM385_Nav_TR_K_En_00 ...

Страница 169: ...earch Bar 16 Changing the Search Area 16 Finding an Address 17 Finding a City 17 Finding an Intersection 17 Finding a Location Using Coordinates 17 Finding a Location by Browsing the Map 18 Find a Location Using Quick Search 18 Saving a Home Location 18 Going Home 18 Editing Your Home Location Information 18 Finding Recently Found Places 18 Clearing the List of Recently Found Places 18 Finding Par...

Страница 170: ... a Traffic Camera 35 Adding a Traffic Subscription 35 Using the Apps 28 About Smartphone Link 28 Downloading Smartphone Link 28 Connecting to Smartphone Link 28 Sending a Location from Your Phone 28 Disabling Calls While Connected 28 About Garmin Live Services 29 Subscribing to Garmin Live Services 29 About ecoRoute 29 Creating a Vehicle Profile 29 Resetting Your Vehicle Profile 29 Calibrating Fue...

Страница 171: ... Security 40 Device and Privacy Settings 40 Restoring Settings 41 Appendix 42 Warning Icons 42 Restriction Warnings 42 Road Condition Warnings 42 Other Warnings 42 Updating the Software 42 Updating the Map Data 43 Custom POIs Points of Interest 43 Installing POI Loader Software 43 Using the POI Loader Help Files 43 Finding Custom POIs 43 Icons Used in This Manual Important precautions are describe...

Страница 172: ......

Страница 173: ...er Content The Map Data and Other Content are collectively the Content The Software Application and Content collectively the Garmin Products are protected under copyright laws and international copyright treaties The Garmin Products are licensed not sold The structure organization and code of the Software and Application are valuable trade secrets of Garmin and or its third party providers The Gar...

Страница 174: ...receding paragraphs you may not use the Garmin Products with any products systems or applications installed or otherwise connected to or in communication with vehicles and which are capable of dispatch fleet management or similar applications where the Content is used by a central control center in dispatching a fleet of vehicles In addition you are prohibited from renting or leasing the Garmin Pr...

Страница 175: ... precise measurement of direction distance location or topography GARMIN MAKES NO WARRANTY AS TO THE ACCURACY OR COMPLETENESS OF THE MAP DATA OR OTHER CONTENT Disclaimer of Warranty GARMIN AND ITS LICENSORS including the licensors service providers channel partners suppliers and affiliated companies of Garmin and its licensors DISCLAIM ANY WARRANTIES EXPRESS OR IMPLIED OF QUALITY PERFORMANCE MERCH...

Страница 176: ...t for the Garmin Product Disclaimer of Endorsement Change of Content Providers Reference to any products services processes hypertext links to third parties or other Content by trade name trademark manufacturer supplier or otherwise does not necessarily constitute or imply its endorsement sponsorship or recommendation by Garmin or its licensors Product and service information are the sole responsi...

Страница 177: ... the laws of Kansas without giving effect to i its conflict of laws provisions or ii the United Nations Convention for Contracts for the International Sale of Goods which is explicitly excluded You agree to submit to the jurisdiction of Kansas for any and all disputes claims and actions arising from or in connection with the Application or Content Any translation of this Agreement from English is ...

Страница 178: ...m Services by accessing such Location Platform Services you agree to application of the Nokia Terms of Service at http here com services terms and the Nokia Privacy Policy at http www nokia com global privacy privacy policy privacy policy ...

Страница 179: ...liates and Garmin Ltd and its subsidiaries make no warranty of fitness or compatibility of the Traffic Data with the Garmin product and no warranty that the Traffic Data will operate properly as integrated and interfaced with the Garmin product In addition HERE or TPTP and their respective affiliates and Garmin Ltd and its subsidiaries make no warranty with regard to the reliability accuracy exhau...

Страница 180: ...E Traffic Data is a commercial item as that term is defined at 48 C F R FAR 2 101 is licensed in accordance with this Agreement and the HERE Traffic Data delivered or otherwise furnished shall be marked and embedded as appropriate with the following Notice of Use and shall be treated in accordance with such Notice Notice of Use Contractor Manufacturer Supplier Name HERE Contractor Manufacturer sup...

Страница 181: ...g audio this displays navigation information Help When You Need It Select Apps Help to view information about using the device Searching Help Topics Select Apps Help Status Bar Icons The status bar is located at the top of the main menu The status bar icons display information about features on the device You can select some icons to change settings or view additional information GPS signal status...

Страница 182: ...the keyboard language mode Select to enter special characters such as punctuation marks Select to change character capitalization Entering a Truck or RV Profile WARNING Entering your vehicle profile characteristics does not guarantee that your vehicle s characteristics will be accounted for in all route suggestions or that you will receive the warning icons in all cases Limitations may exist in th...

Страница 183: ... theaters To search for a business by name enter all or part of the name To search for an address near you enter the street number and street name To search for an address in another city enter the street number street name city and state To search for a city enter the city and state To search for coordinates enter latitude and longitude coordinates 5 Select an option To search using a suggested s...

Страница 184: ... Select Where To Intersections 2 Select a state or province If necessary select State or Country to change the country state or province 3 Enter the first street name and select Next 4 If necessary select the street 5 Enter the second street name and select Next 6 If necessary select the street 7 If necessary select the intersection Finding a Location Using Coordinates Before you can find a locati...

Страница 185: ... interest certain categories may display a Quick Search list that displays the last four destinations you selected 1 Select Where To 2 Select a category or select Categories 3 If applicable select a destination from the Quick Search list 4 If necessary select the appropriate destination Saving a Home Location You can set your home location for the location you return to most often 1 Select Where T...

Страница 186: ...category 4 If necessary select a subcategory 5 Select a destination Finding RV Parks This feature is available on the DNX571TR but is not available in all areas Select Where To RV Parks Finding RV Services This feature is available on the DNX571TR but it is not available in all areas You can find nearby locations that offer repair towing and other services for RVs Select Where To RV Services Setti...

Страница 187: ...to the Favorite select Categories To change the symbol used to mark the Favorite on a map select Change Map Symbol 7 Edit the information 8 Select Done Assigning Categories to a Saved Location You can add custom categories to organize your saved locations Categories appear in the saved locations menu after you have saved more than 12 locations 1 Select Where To Saved 2 Select a location 3 Select 4...

Страница 188: ... Garmin and JVC KENWOOD will not be responsible for any traffic fines or citations you receive for failing to follow all applicable traffic laws and signs An icon displaying the current speed limit may appear as you travel on major roadways Truck speed limits may appear when you are driving in Truck mode based on truck configuration data and applicable laws for the state or province When you are d...

Страница 189: ...g Suggested Routes Before you can use this feature you must save at least one location and enable the travel history feature page 19 Using the myTrends feature your device predicts your destination based on your travel history the day of the week and the time of day After you have driven to a saved location several times the location may appear in the navigation bar on the map along with the estim...

Страница 190: ...cific areas and sections of road You can enable and disable custom avoidances as needed 1 Select Settings Navigation Custom Avoidances 2 If necessary select Add Avoidance 3 Select Add Avoid Area 4 Select the upper left corner of the area to avoid and select Next 5 Select the lower right corner of the area to avoid and select Next The selected area is shaded on the map 6 Select Done Avoiding a Road...

Страница 191: ... Settings Navigation Advanced Detours Taking a Detour Around Specified Areas You can take a detour for a specified distance along your route or detour around specific roads This is useful if you encounter construction zones closed roads or poor road conditions 1 Select a destination and select Go page 16 2 From the map select Detour 3 Select Next 5mi on Route Next 2mi on Route Next 5mi on Route or...

Страница 192: ...ap select the data field in the lower left hand corner 2 Select a type of data to display 3 Select Save Changing the Map Perspective 1 Select Settings Map Vehicle Driving Map View 2 Select an option Select Track Up to display the map in two dimensions 2 D with your direction of travel at the top Select North Up to display the map in 2 D with North at the top Select 3 D to display the map in three ...

Страница 193: ...rn lane change or other maneuver appears in the upper left corner of the map The preview includes the distance to the turn or maneuver and the lane in which you should be traveling if available From the map select to view the next turn on the map Viewing Junctions While navigating a route you can view the junctions on major roadways When you approach a junction in a route the image of that junctio...

Страница 194: ...t Location Information You can use the Where Am I page to view information about your current location This feature is helpful if you need to tell emergency personnel your location From the map select Where Am I Finding Nearby Services You can use the Where Am I page to find nearby services such as hospitals or police stations 1 From the map select Where Am I 2 Select a category Finding Directions...

Страница 195: ...lication store on your supported phone See your phone owner s manual for information on downloading and installing applications Connecting to Smartphone Link Before you can connect to Smartphone Link you must download and install the Smartphone Link application on your phone 1 Start Smartphone Link on your phone 2 See your other Kenwood system manuals and your phone owner s manual for connection i...

Страница 196: ...n prices appears 3 Select a service 4 Select the price 5 Select Subscribe 6 Follow the on screen instructions About ecoRoute The ecoRoute feature calculates your vehicle fuel economy carbon footprint and the fuel price of navigating to a destination and offers tools for improving fuel efficiency The data provided by the ecoRoute feature is only an estimate The data is not actually read from your v...

Страница 197: ...cle Map Buttons 2 Select 3 Select OK Resetting Your Score You can restart your current ecoChallenge 1 Select Apps ecoRoute ecoChallenge 2 Select Reset 3 Select Yes Viewing Your Fuel Economy 1 Select Apps ecoRoute Fuel Economy The graph along the bottom shows your average fuel economy for a period of driving time 2 Select a section of the graph to zoom in 3 Select Reset to clear the fuel economy da...

Страница 198: ...ap of current weather conditions as well as a weather icon on the map The weather icon changes to show weather in the vicinity such as rain snow and thunderstorms 1 Select Apps Weather 2 If necessary select a city 3 Select Weather Radar Viewing Weather Alerts While you are traveling with your device weather alerts may appear on the map You can also view a map of weather alerts near your current lo...

Страница 199: ...lect an option Select Rename Trip Select Edit Destinations to add and delete locations or to change the order of locations Select Delete Trip Select Optimize Order to arrange the stops on your trip in the most efficient order Viewing Previous Routes Destinations Before you can use this feature you must enable the travel history feature page 40 You can view your previous routes and places you have ...

Страница 200: ...n transmitting traffic data to receive traffic information You can add other subscriptions at any time For information about traffic receivers and coverage areas go to www garmin com kenwood Traffic Data Using Smartphone Link This feature is not available in all areas You can purchase a traffic subscription to receive traffic data using Smartphone Link When your navigation system is connected to S...

Страница 201: ...events appears organized by their location on the route 3 Select an event Manually Avoiding Traffic on Your Route 1 From the map select 2 Select Traffic On Route 3 If necessary use the arrows to view other traffic delays on your route 4 Select Avoid Taking an Alternate Route 1 While navigating an automobile route select 2 Select Alternate Route 3 Select a route Viewing Traffic on the Map The traff...

Страница 202: ...intersection 5 Select Save Viewing a Traffic Camera Before you can view a traffic camera you must save a traffic camera 1 Select Apps myCameras 2 Select a camera Adding a Traffic Subscription You can purchase traffic subscriptions for other regions or countries 1 From the main menu select Traffic 2 Select Subscriptions 3 Write down the FM Traffic Receiver unit ID 4 Go to www garmin com fmtraffic t...

Страница 203: ...gging Fuel Logs 2 If necessary select a truck 3 If necessary select a quarter 4 Select a log 5 Select an option Select a field to edit the information Select Yes to delete the log Exporting a Jurisdiction Summary 1 Select Apps IFTA Logging Juridiction Summary 2 If necessary select a truck 3 If necessary select a quarter 4 Connect a USB mass storage device to your Kenwood unit 5 Select Export OK to...

Страница 204: ... the time you are on duty but not driving a commercial motor vehicle Select Passenger Seat to record the time a second driver is in the passenger seat but is not on duty A driver can be in passenger seat status for up to two hours immediately after or before eight consecutive hours in the sleeper berth 5 Select Save Duty Status is automatically set to Off Duty when turning off the device About Dri...

Страница 205: ...1 Select Apps Hours of Service 2 Select a driver 3 Select Manage Shipments 4 Select a shipment 5 Select an option To edit the shipment information select a field To delete the shipments select Delete Shipments OK Exporting Drive Logs 1 Connect a USB mass storage device to your Kenwood unit 2 Select Apps Hours of Service 3 Select a driver 4 Select Export Log 5 If necessary enter your tractor number...

Страница 206: ...r settings for the active profile 1 Select Settings Truck Profile RV Profile 2 Select a profile type Select Truck to add a truck profile Select RV to add an RV profile 3 Select the profile 4 Select Select Profile Editing Truck or RV Profiles Before you can activate a profile you must activate a different profile 1 Select Settings Truck Profile RV Profile 2 Select a profile and select 3 Select Edit...

Страница 207: ...l is available only in Automobile mode Updating the Time Settings Select Settings Units Time Current Time select Automatic to update the time automatically When Automatic is not selected you can adjust the time in 15 minute increments Time Format select a 12 hour 24 hour or UTC time format Units sets the unit of measure used for distances Setting the Languages Select Settings Language Keyboard Voi...

Страница 208: ... 41 Restoring Settings You can restore a category of settings or all settings to the factory default values 1 Select Settings 2 If necessary select a settings category 3 Select Restore Customizing the Settings ...

Страница 209: ...l cases Always defer to all posted road signs and road conditions when making driving decisions Restriction Warnings Height Weight Axle Weight Length Width No Trucks Allowed No Trailers Allowed No Hazardous Materials Allowed No Flammables Allowed No Water Pollutants Allowed No Left Turn No Right Turn No U Turn Road Condition Warnings Risk of Grounding Lateral Wind Narrow Road Sharp Curve Steep Dow...

Страница 210: ...contain alert information for points such as safety cameras and school zones The navigation system can notify you when you approach one of these points You are responsible for ensuring that your use of safety camera information is lawful in your area WARNING Garmin and JVC KENWOOD are not responsible for the consequences of using custom POI databases or for the accuracy of custom POI databases Aft...

Страница 211: ...its subsidiaries registered in the USA and other countries ecoRoute myTrends and trafficTrends are trademarks of Garmin Ltd or its subsidiaries These trademarks may not be used without the express permission of Garmin NAVTEQ and NAVETEQ Traffic is a trademark of NAVTEQ Inc or its affiliates and is registered in one or more countries including the U S The Bluetooth word mark and logos are owned by ...

Страница 212: ...mer LIMITAnON OF IMPLIED WARRANTIES Any and all implied warranties including warranties ol merchantability and fitnessloraparticular purpose shall be limited 10 durationto the lengthofthis warranty EXCLUSION OF CERTAIN DAMAGES KENWOOD s liability lor a nydefective product is limited to the repair or replacement ol saidproduct a l our potion and shall not include damages o l any kind whether incide...

Страница 213: ...s which do not disclose any defects covered by thiswarranty GARANTIE KENWOOD KENWOOD ELECTRONIC SCAN ADA INC ci apres a ppelee KENWOOD donneparecril garantie suivanteal acheteur original de ch aq ue nouveauproduil Ken wood d istribut i au CanadaparKENWOODetacheteaunconcessionnaireautorise parKENWOOD K E NWOODgaran tit sousreservedestermesetdesconditions t inoncAs ci dessous q uechaquenouveauprodui...

Отзывы: