background image

Bluetooth Control

35

English


Ñ

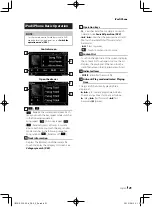
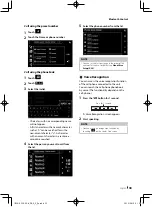
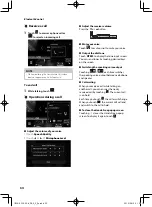
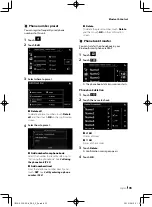
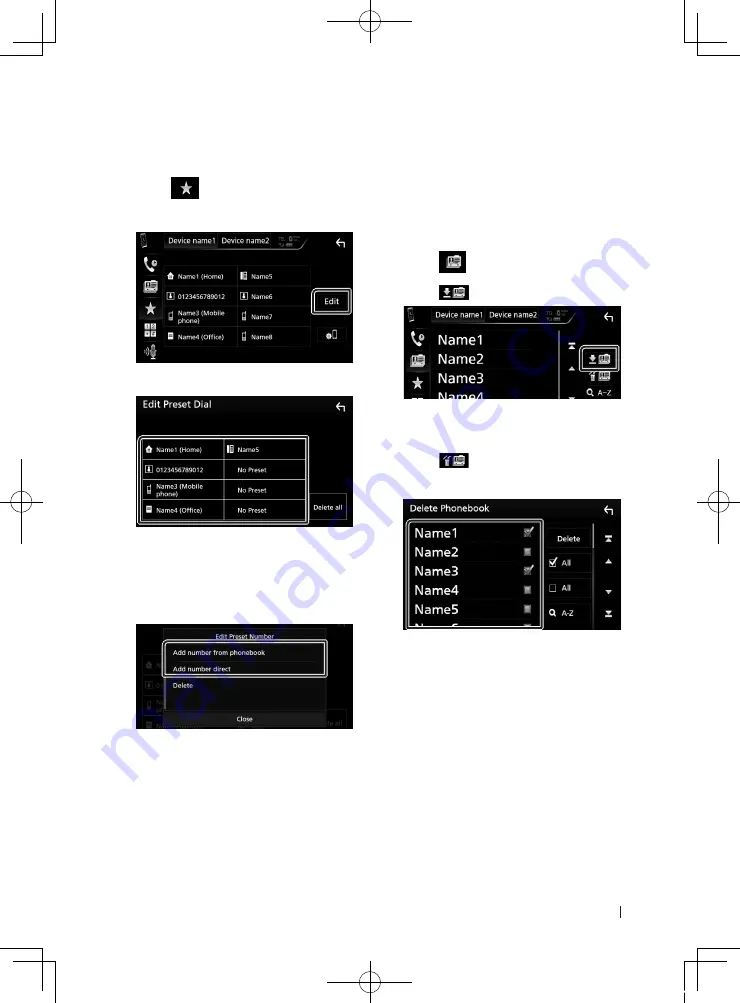
Phone number preset

You can register frequently used phone 

numbers to this unit.

Touch 

[

]

.

Touch 

[

Edit

]

.

Select where to preset.


[

Delete all

]

To delete all preset numbers, touch 

[

Delete 

all

]

 and then touch 

[

OK

]

 on the confirmation 

screen.

Select how to preset.


[

Add number from phonebook

]

Select the number to preset by referring to 
“Call using the phonebook”.  See 

Call using 

the phonebook (P.33)

.


[

Add number direct

]

Enter the telephone number directly and 
touch 

[

SET

]

. See 

Call by entering a phone 

number (P.32)

.


[

Delete

]

To delete the preset number, touch 

[

Delete

]


and then touch 

[

OK

]

 on the confirmation 

screen.


Ñ

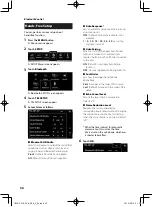
Phonebook transfer

You can transfer the phonebook in your 

Bluetooth smartphone via PBAP.

Touch 

[

]

.

Touch 

[

]

.

h

h

The phonebook data transmission starts.

Phonebook deletion

Touch 

[

]

.

Touch the name to check.


[

þ

 All

]

Checks all boxes.


[

¨

 All

]

Erases all check marks.

Touch 

[

Delete

]

.

h

h

Confirmation message appears.

Touch 

[

OK

]

.

!B5A-2302-00b_DDX_X_En.indb   35

2019/04/26   10:41

Содержание DMX8018S

Страница 1: ...Corporation DMX8018S MONITOR WITH RECEIVER INSTRUCTION MANUAL Updated information the latest Instruction Manual system updates new functions etc is available from http www kenwood com cs ce B5A 2302 00b_DDX_X_En indb 1 2019 04 26 10 41 ...

Страница 2: ...Play Operation 13 Android Auto Operation 14 WebLink Operation 15 Spotify Operation 16 USB 17 Connecting a USB device 17 USB Basic Operation 17 Search Operation 19 iPod iPhone 20 Preparation 20 iPod iPhone Basic Operation 21 Search Operation 22 Radio 23 Radio Basic Operation 23 Memory Operation 24 Selecting Operation 24 Traffic Information 25 Tuner Setup 25 Bluetooth Control 26 Information for usin...

Страница 3: ...tup 46 Speaker X over setup 47 Controlling General Audio 49 Equalizer Control 49 Volume Offset 50 Zone Control 51 Sound Effect 51 Listening Position DTA 52 Remote control 54 Battery Installation 54 Functions of the Remote control Buttons 54 Connection Installation 56 Before Installation 56 Installing the unit 57 Troubleshooting 63 Problems and Solutions 63 Error Messages 63 Appendix 64 Playable Me...

Страница 4: ...ning the unit If the faceplate of this unit is stained wipe it with a dry soft cloth such as a silicon cloth If the faceplate is stained badly wipe the stain off with a cloth moistened with neutral cleaner then wipe it again with a clean soft dry cloth NOTE Applying spray cleaner directly to the unit may affect its mechanical parts Wiping the faceplate with a hard cloth or using a volatile liquid ...

Страница 5: ...up until 15 when you keep pressing R 3 ATT Switches attenuation of the volume on off 4 HOME Displays the HOME screen P 9 Pressing for 1 second turns the power off When the power off turns the power on 5 MENU Displays the popup menu screen 6 Switch the APP CarPlay Android Auto WebLink source Pressing for 1 second displays the Voice Recognition screen P 33 7 CAM Switches view camera display on off P...

Страница 6: ...nguage used for the control screen and setting items Default is British English en 1 Touch Language 2 Touch Language Select 3 Select the desired language 4 Touch For detailed operation see User Interface Setup P 41 Clock Sets the synchronization of the clock and adjusts it For detailed operation see Calendar clock settings P 8 Display Set the button illumination color If it is hard to see the imag...

Страница 7: ...Touch SETUP h h SETUP Menu screen appears 3 Touch Security h h Security screen appears 4 Touch Security Code Set on the Security screen h h Security Code Set screen appears 5 Enter a security code with four digit number and touch Enter 6 Enter the same code again and touch Enter Now your security code is registered NOTE Touch BS to delete the last entry If you enter a different security code the s...

Страница 8: ...work with some functions Adjusting the volume To adjust the volume 0 to 40 Press R to increase and press S to decrease Holding R increases the volume continuously to level 15 Touch screen operations To perform operations on the screen you need to touch touch and hold flick or swipe to select an item display setting menu screen or to change the page etc Touch Touch the screen gently to select an it...

Страница 9: ... 9 6 Short cut playback source icons P 10 7 Displays the Hands Free screen P 32 When connecting as Apple CarPlay or Android Auto it works as a phone provided in Apple CarPlay or Android Auto Display the HOME 1 Press the HOME button h h HOME screen appears Source selection screen descriptions You can display all playback sources and options on the source selection screen 3 5 2 4 1 1 Changes the pla...

Страница 10: ...5 Displays the Audio screen P 46 Puts the unit in standby P 11 1 When iPhone compatible with CarPlay is connected Apple CarPlay is displayed When an Android device compatible with Android Auto is connected Android Auto is displayed To select the playback source on the HOME screen The 3 items displayed on the source selection screen as the large icons are shown on the HOME screen You can change ite...

Страница 11: ...nnected iPod iPhone Smartphone 2 All sources icon Displays all sources 3 Secondary screen The Secondary screen changes every time you touch it You can also change the Secondary screen by flicking left or right on the screen Indicators Displays the current source condition and so on ATT The attenuator is active DUAL The dual zone function is on MUTE The mute function is active LOUD The loudness con...

Страница 12: ...op up menu To turn on the screen 1 Touch the display List screen There are some common function keys in the list screens of most sources 6 1 2 3 4 5 1 Displays list type selection window 2 Displays music movie file list 3 Text scroll Scrolls the displayed text 4 etc Keys with various functions are displayed here Plays all tracks in the folder containing the current track Jump to the letter you ent...

Страница 13: ...to the USB Black terminal the Bluetooth Hands Free phone currently connected is disconnected 2 Unlock your iPhone Ñ Ñ Operation buttons and available Apps on the home screen of CarPlay You can use the Apps of the connected iPhone The items displayed and the language used on the screen differ among the connected devices To enter CarPlay mode touch Apple CarPlay icon in the source selection screen P...

Страница 14: ... connected to the USB terminal the device is connected via Bluetooth automatically and the Bluetooth Hands Free phone currently connected is disconnected 2 Unlock your Android device Ñ Ñ Operation buttons and available Apps on the Android Auto screen You can perform the operations of the Apps of the connected Android device The items displayed on the screen differ among the connected Android devic...

Страница 15: ...ate each other appears on the smartphone Touch Allow to establish connection or Ignore to cancel the connection You can check the connection status on the WebLink screen on your smartphone Ñ Ñ Operation buttons and available Apps on the App screen To enter WebLink mode touch WebLink icon in the source selection screen P 10 WebLink source screen 1 1 Displays the main menu of the WebLink source scre...

Страница 16: ...d playback starts Skips the current song Plays or pauses the content of the current station Saves currently playing song to My Music Touch to mute or not to mute 3 Content information Displays the information of the current content being played 4 Thumbs down to the current contents and skip to the next contents Registers the current contents as favorite content Repeats the current song Randomly pl...

Страница 17: ...erating conditions of the USB device We shall have no compensation for any damage arising from any erased data USB Basic Operation Most functions can be controlled from the source control screen and playback screen NOTE Set the remote controller mode switch to AUD mode before starting operation see Switch the operation mode P 54 Control screen 4 3 5 2 6 1 7 Open the drawer 5 4 1 CODEC When a high ...

Страница 18: ...n the right side of the screen to display the Content list Touch again to close the list Displays the playing list When you touch a track file name on the list playback will start 6 Indicator Items VIDEO Identifies the video file MUSIC Identifies the music file 7 Artwork Play mode indicator Playing time The jacket of the currently playing file is displayed D B etc Current play mode indicator The m...

Страница 19: ...ired item in the list Repeat this step until you find the desired file Ñ Ñ Link search You can search a file of same artist album genre as the current track 1 Touch Link Search 2 Touch the desired tag type You can select from artists albums and genres h h The list corresponding to your selection appears 3 Touch desired item from the content list Ñ Ñ Folder search You can search a file according to...

Страница 20: ...Pod iPhone with the KCA iP103 optional accessory while CarPlay is not connected With a CarPlay capable iPhone turn off CarPlay by operating the iPhone at functional setup before connecting iPhone For details of the setup method contact the manufacturer of the terminal Plug the iPod iPhone into the gray USB terminal with the KCA iP103 optional accessory Only one iPod iPhone can be connected 1 Conne...

Страница 21: ...ist screen See Category search P 22 3 Operation keys 1 Searches track file For details on search operation see Search Operation P 22 E F Searches the previous next track file Touch and hold to fast forward or fast backward DH Plays or pauses Touch to mute or not to mute 4 Content list Touch on the right side of the screen to display the Content list Touch again to close the list Displays the playi...

Страница 22: ... category h h The list corresponding to your selection appears 3 Touch to select desired item in the list Repeat this step until you find the desired file Ñ Ñ Link search You can search a file of same artist album genre composer as the current track 1 Touch Link Search 2 Touch the desired tag type You can select from artists albums genres and composers h h The list corresponding to your selection ...

Страница 23: ...on The method of frequency switching can be changed see 2 in table AME Presets stations automatically For details see Auto memory P 24 Displays the TUNER SETUP screen For details see Tuner Setup P 25 Touch to mute or not to mute 6 PTY FM only Searches a program by setting program type For details see Search by program type P 24 7 MONO FM only Select the Monaural reception 8 TI FM only Sets the tra...

Страница 24: ... in memory 3 Touch 1 6 in which you want to store the station for 2 seconds until a beep sounds Selecting Operation Ñ Ñ Preset select You can list and select memorized station 1 Select a station from the list Ñ Ñ Search by program type FM only You can tune to a station with a specific program type when listening to FM 1 Touch PTY h h PTY Search screen appears 2 Select a program type from the list ...

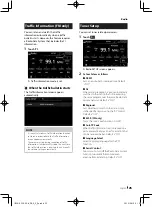
Страница 25: ...er Setup You can set tuner related parameters 1 Touch h h Radio SETUP screen appears 2 Set each item as follows NEWS Sets a news bulletin interrupt time Default is OFF AF When station reception is poor automatically switches to the station that is broadcasting the same program over the same Radio Data System network Default is OFF Regional Sets whether to switch to the station only in the specific...

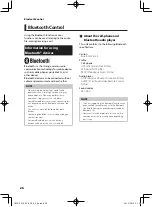
Страница 26: ...e device This unit may not work for some Bluetooth devices Connecting conditions may vary depending on your environment For some Bluetooth devices the device is disconnected when the unit is turned off Ñ Ñ About the cell phone and Bluetooth audio player This unit conforms to the following Bluetooth specifications Version Bluetooth Ver 3 0 Profile Cell phone HFP V1 6 Hands Free Profile SPP Serial P...

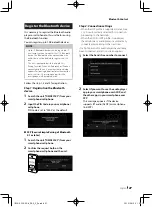
Страница 27: ...h the unit DMX8018S from your smartphone cell phone 2 Input the PIN Code in your smartphone cell phone PIN Code is set to 0000 as the default SSP Secure Simple Pairing of Bluetooth 2 1 or later 1 Search the unit DMX8018S from your smartphone cell phone 2 Confirm the request both on the smartphone cell phone and the unit Step 2 Connection settings When the HFP profile is supported Hands Free 1 or 2...

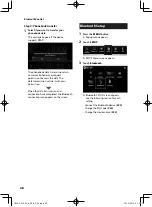
Страница 28: ...l start with your permission When the data transmission and connection have completed the Bluetooth connection icon appears on the screen Bluetooth Setup 1 Press the MENU button h h Popup menu appears 2 Touch SETUP h h SETUP Menu screen appears 3 Touch Bluetooth h h Bluetooth SETUP screen appears See the following section for each setting Connect the Bluetooth device P 29 Change the PIN Code P 30 ...

Страница 29: ...le as follows TEL HFP 1 TEL HFP 2 The device is connected with the unit as hands free phone 1 or 2 Audio A2DP App SPP Set to interwork with an application installed in a smartphone or to use as an audio player 4 Touch Close To delete the registered Bluetooth device 1 Touch Delete 2 Touch the device name to check þ All Select all Bluetooth device All Erases all check marks 3 Touch Delete h h Confir...

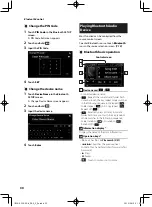
Страница 30: ...en P 10 Ñ Ñ Bluetooth basic operation Control screen 3 4 5 2 1 1 Device name Connected device name Repeats the current track folder Each time you touch the key repeat mode switches in the following sequence File repeat Folder repeat All songs repeat Repeat off Randomly plays all tracks in current folder Each time you touch the key random mode switches in the following sequence Folder random All ra...

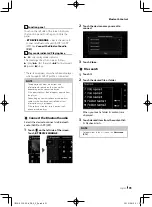
Страница 31: ...reen differ depending on the connected device If the operation keys do not appear operate from the player Depending on your cell phone or audio player audio may be heard and controlled but text information may not appear If the volume is too low raise it on your cell phone or audio player Ñ Ñ Connect the Bluetooth audio Selects the device to connect via Bluetooth audio A2DP or APP SPP 1 Touch on t...

Страница 32: ...entries including dialed calls received calls and missed calls 2 Select a dialing method Call using call records Call using the phonebook Call using the preset number Call by entering a phone number Voice Recognition P 33 Select the cell phone to use When you connect two cell phones 1 Touch to select the phone you want to use Bluetooth SETUP 1 Touch Bluetooth SETUP screen appears NOTE The status i...

Страница 33: ...ant to call from the list 5 Select the phone number from the list NOTE You can set the list to arrange in the order of last name or first name For details see Hands Free Setup P 36 Ñ Ñ Voice Recognition You can access the voice recognition function of the cell phone connected to this unit You can search the cell phone phonebook by voice The functionality depends on the cell phone 1 Press the butto...

Страница 34: ...put the dial tone Touch DTMF to display the tone input screen You can send tones by touching desired keys on the screen Switching the speaking voice output Touching each time switches the speaking voice output between cell phone and speaker Call waiting When you receive a call while talking on another call you can answer the newly received call by touching The current call is on hold Each time you...

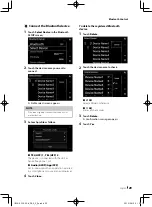
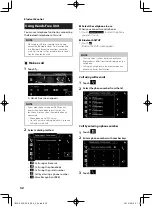
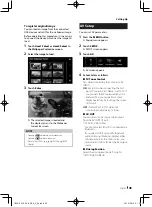
Страница 35: ...l using the phonebook P 33 Add number direct Enter the telephone number directly and touch SET See Call by entering a phone number P 32 Delete To delete the preset number touch Delete and then touch OK on the confirmation screen Ñ Ñ Phonebook transfer You can transfer the phonebook in your Bluetooth smartphone via PBAP 1 Touch 2 Touch h h The phonebook data transmission starts Phonebook deletion 1...

Страница 36: ... 25 30 Set calling ring time second Auto Pairing When set to ON the Apple Auto Pairing function is turned on to automatically register the iPod touch or iPhone connected to this unit ON Default Uses Apple Auto Pairing function OFF Not uses Apple Auto Pairing function Sort Order Sets how to arrange the cell phone phonebook First Arranges in the order of first name Last Default Arranges in the order...

Страница 37: ...ront Camera Rear Camera is set to CMOS 3 Series Camera Ñ Ñ Camera Setup 1 Press the MENU button h h Popup menu appears 2 Touch SETUP h h SETUP Menu screen appears 3 Touch Camera h h Camera screen appears 4 Set each item as follows Rear Camera CMOS 3 Series Camera Select this when the CMOS 3xx series with ID 1 Rear Camera set is connected Rear Camera Interruption turns on Other Default Select this ...

Страница 38: ...icture from the front view camera horizontally reversed OFF Default Displays the picture from the front view camera as it is To adjust the parking guidelines NOTE Install the rear view camera in the appropriate position according to the instructions supplied with the rear view camera When adjusting the parking guidelines make sure to use the parking brake to prevent the car from moving 1 Touch ON ...

Страница 39: ...creen 3 Key display Touch to display the dashboard camera control buttons External audio video players AV IN 1 Connect an external component to the AV IN input terminal P 60 2 Select AV IN as the source P 10 3 Turn on the connected component and start playing the source TV tuner You can connect the TV tuner commercially available with this unit and watch TV Preparation When you use TV control func...

Страница 40: ... on the screen Normal Displays with 4 3 ratio Auto USB device Displays video fully on vertical or horizontal with no ratio change NOTE Adjusting items are different depending on the current source System Setup NOTE Each operation in this section can be started from the multi function menu 1 Press the MENU button h h Popup menu appears 2 Touch SETUP See the following section for each setting Set up...

Страница 41: ...clock time with the GPS Manual Sets the clock manually Time Zone Select the time zone Clock Adjust If you select Manual for Clock adjust the date and time manually P 41 Ñ Ñ Adjust the date and time manually 1 Touch Clock in the User Interface screen 2 Select Manual 3 Touch Time Zone in the User Interface screen 4 Select the time zone 5 Touch Clock Adjust in the User Interface screen 6 Adjust the d...

Страница 42: ... the button you want to change in step 2 and then touch to select the changed function from the function list Confirm the contents of the settable function on the function list You cannot edit the function list To initialize the contents touch Learning initialisation of Steering Remote Controller in User Interface screen After you touch Initialise a confirmation message appears Follow the message ...

Страница 43: ... h h Popup menu appears 2 Touch SETUP h h SETUP screen appears 3 Touch Display h h Display screen appears 4 Set each item as follows Dimmer Select dimmer mode OFF The display and buttons do not dim ON The display and buttons dim SYNC Default Turns the dimmer function on or off when the vehicle light control switch is turned on or off OSD Clock Select if you want to display the clock while watching...

Страница 44: ...Touch User in the Key Color screen 2 Touch Adjust 3 Use and to adjust each color value 4 Touch Ñ Ñ Change wallpaper image or color 1 Touch Wallpaper Customize in the Display screen 2 Select an image 1 2 1 Select a wallpaper color in advance 2 Select an original image in advance To select wallpaper color 1 Touch Wallpaper Colour in the Wallpaper Customize screen 2 Select a wallpaper color 1 1 The c...

Страница 45: ...P screen appears 3 Touch AV h h AV screen appears 4 Set each item as follows TV Tuner Control Sets when connecting the TV tuner to AV INPUT ON Set to ON when connecting the 3rd party TV tuner AV IN1 Name is set to TV If you connect the TV tuner made by DOS and watch TV you can perform some simple operations by touching the screen of this unit OFF Default Set to OFF when not connecting the 3rd part...

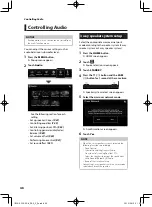
Страница 46: ...cording to the speaker system 2 way speaker system or 3 way speaker system 1 Press the HOME button h h HOME screen appears 2 Touch h h Source selection screen appears 3 Touch STANDBY 4 Press the S 1 button and the CAM 2 button for 1 second at the same time 2 1 h h Speaker system select screen appears 5 Select the crossover network mode h h A confirmation screen appears 6 Touch Yes NOTE When the 3 ...

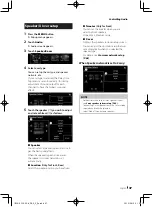
Страница 47: ...s When the speaker type and size are set the speaker crossover network is set automatically Location Only for Front Rear Select the speaker position you have fixed Tweeter Only for Front You can set the tweeter when you are selecting front speakers None Small Medium Large Xʼover Displays the speaker crossover setup screen You can adjust the crossover setup that was set automatically when you selec...

Страница 48: ...to Small Medium Large in Speaker Setup 3 Only when Subwoofer is set to a mode other than None in Speaker Setup When Speaker network is set to 3 way FREQ High Pass High Pass Filter adjustment When tweeter is selected on Speaker Select screen HPF FREQ LPF FREQ Band Pass Band Pass Filter adjustment When mid range speaker is selected on Speaker Select screen FREQ Low Pass Low Pass Filter adjustment Wh...

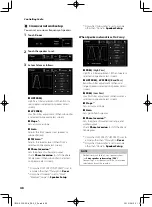
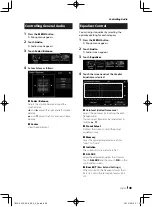
Страница 49: ...ars 2 Touch Audio h h Audio screen appears 3 Touch Equalizer 4 Touch the screen and set the Graphic Equalizer as desired Gain level dotted frame area Adjust the gain level by touching the each frequency bar You can select frequency bar and adjust its level by R S Preset Select Displays the screen to recall the preset equalizer curve Memory Saves the adjusted equalizer curve from User1 to User4 Ini...

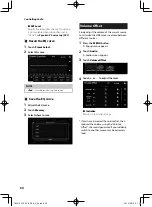
Страница 50: ...re to save Volume Offset Finely adjust the volume of the current source to minimize the difference in volume between different sources 1 Press the MENU button h h Popup menu appears 2 Touch Audio h h Audio screen appears 3 Touch Volume Offset 4 Touch or to adjust the level Initialise Returns to the initial settings If you have increased the volume first then reduced the volume using the Volume Off...

Страница 51: ...hen the dual zone function is set to on the following functions are not available Output from the subwoofer Subwoofer Level Bass Boost P 51 Equalizer Control Sound Effect Listening Position P 49 51 52 Speaker Setup P 47 High resolution Sound Source File Playback You cannot select iPod if it is connected via Bluetooth If you select USB iPod Disc Spotify Bluetooth audio Mirroring WebLink Apple CarPl...

Страница 52: ...ove the sound field depending on the position of the seat you sit Listening Position DTA allows you to set Listening Position and Front Focus You cannot set both at the same time 1 Press the MENU button h h Popup menu appears 2 Touch Audio h h Audio screen appears 3 Touch Position DTA Set up Listening Position P 52 Set up Front Focus P 53 Ñ Ñ Listening Position Adjust the sound delay time as neare...

Страница 53: ... Focus fine adjustment 1 Touch Adjust 2 Touch Delay 3 Set each item as follows Sound Image LR Front Adjust the sound image to focus on in front of front seats Sound Image LR Rear Adjust the sound image to focus on in front of rear seats Size of the Virtual Sound Field Adjust the size of sound image to meet your taste If the sound image is shifted from the front adjust it by Sound Image LR Front or...

Страница 54: ... a physician Battery Installation If the remote control operates only over shorter distances or does not operate at all it is possible that the batteries are depleted In such instances replace the both batteries with new ones 1 Insert two AAA R03 size batteries with the and poles aligned properly following the illustration inside the case Functions of the Remote control Buttons Ñ Ñ Switch the oper...

Страница 55: ... mode hangs up the phone 2 L AUD Pauses the track or file and resumes playing by pressing twice During radio source switches the seek mode 3 TOP MENU AUD Screen mode changes each time you press this key during video playback 4 MENU AUD Displays the control screen of current source USB iPod 5 AM FM AUD Selects the folder to be played During radio source select FM AM band to be received 6 E F AUD Se...

Страница 56: ...ect the ignition wires to a power source that can be turned on and off with the ignition key If you connect the ignition wire to a power source with a constant voltage supply such as with battery wires the battery may be drained If the console has a lid make sure to install the unit so that the front panel will not hit the lid when closing and opening If the fuse blows first make sure the wires ar...

Страница 57: ... the ignition and disconnect the terminal of the battery 2 Make the proper input and output wire connections for each unit 3 Connect the speaker wires of the wiring harness 4 Connect the wiring harness wires in the following order ground battery ignition 5 Connect the wiring harness connector to the unit 6 Install the unit in your car 7 Reconnect the terminal of the battery 8 Perform the Initial S...

Страница 58: ... GPS antenna in an area away from any antennas that are used with CB radios or satellite televisions The GPS antenna should be installed at a position that is spaced at least 12 inch 30 cm from cellular phone or other transmitting antennas Signals from the GPS satellite may be interfered with by these types of communication Painting the GPS antenna with metallic paint may cause a drop in performan...

Страница 59: ...s reverse lamp harness when using the optional rear view camera To steering remote To use the steering wheel remote control feature you need an exclusive remote adapter not supplied matched to your car If no connections are made do not let the cable come out from the tab Purple Black To rear right speaker To rear left speaker To front right speaker To front left speaker Speaker impedance 4 8 Ω Pur...

Страница 60: ...hone When connecting to an external amplifier connect its ground wire to the car s chassis to avoid damaging the unit White Black Gray Black Green Black Purple Black Speaker impedance 4 8 Ω Purple Green Gray White To mid range left speaker Subwoofer Preout To mid range right speaker Mid Range Preout To tweeter left speaker Tweeter Preout To tweeter right speaker Power amplifier optional accessory ...

Страница 61: ...old separately Use CA U1EX to extend the cable if necessary Max 500 mA 5V 3 See Securing the USB extension cable P 61 Ñ Ñ Connecting an iPod iPhone Lightning connector KCA iP103 0 8m 3 KCA iP103 0 8m 3 iPod iPhone 2 iPhone with CarPlay 2 USB Gray terminal 1 USB Black terminal 1 Accessory 2 Black 1 m 4 Accessory 3 Gray 1 m 4 1 USB maximum power supply current DC 5 V 1 5 A 2 Sold separately 3 Option...

Страница 62: ...essory 2 Black 1 m 3 Accessory 3 Gray 1 m 3 1 USB maximum power supply current DC 5 V 1 5 A 2 Sold separately 3 See Securing the USB extension cable P 61 Ñ Ñ Connecting a Dashboard camera DRV N520 1 Visual Yellow Front view camera Dashboard camera input Yellow Dashboard camera interface 1 Optional accessory B5A 2302 00b_DDX_X_En indb 62 2019 04 26 10 41 ...

Страница 63: ...he cause of the failure appears as the message on the screen There is an error in the speaker wiring Please check the connections Protective circuit has been activated because a speaker cord has shorted or it has come in contact with the car chassis Wire or insulate the speaker cord as appropriate and turn the power off and on again Hot Error When the internal temperature of this unit rises to 60 ...

Страница 64: ...hough the audio files are complied with the standards listed above the play may be impossible depending on the types or conditions of media or device This unit supports playback of High Resolution Audio files It is recommended that a car audio system should be configured with all High Resolution Audio compatible products from player to speaker to enjoy its high quality sound Acceptable Video files...

Страница 65: ...High Speed File System FAT 16 32 exFAT NTFS Maximum Power Supply Current DC 5 V 1 5 A 2 D A Converter 24 32 bit Audio Decoder MP3 WMA AAC WAV FLAC Vorbis DSD Video Decoder MPEG1 MPEG2 MPEG4 WMV H 264 MKV Frequency Response 192 kHz 20 88 000 Hz 96 kHz 20 44 000 Hz 48 kHz 20 22 000 Hz 44 1 kHz 20 20 000 Hz Total Harmonic Distortion 0 01 1 kHz S N Ratio dB 98 5 dB Dynamic Range 89 dB Bluetooth sectio...

Страница 66: ...0 dB Position Front Rear Subwoofer Delay 0 6 1 m 0 01 m Step Gain 8 0 dB Subwoofer level 50 10 dB FM tuner section Frequency Range step 87 5 MHz 108 0 MHz 50 kHz Usable Sensitivity S N 26 dB 9 3 dBf 0 8 μV 75 Ω Quieting Sensitivity S N 46 dB 15 2 dBf 1 6 μV 75 Ω Frequency Response 30 Hz 15 kHz S N Ratio dB 75 dB MONO Selectivity 400 kHz Over 80 dB Stereo Separation 45 dB 1 kHz AM tuner section Fre...

Страница 67: ... Dimensions W H D 178 100 155 mm Operational Temperature Range 10 C 60 C Weight 1 7 kg NOTE Although the effective pixels for the liquid crystal panel is given as 99 99 or more 0 01 of pixels may not light or may light incorrectly Specificationssubjecttochangewithoutnotice B5A 2302 00b_DDX_X_En indb 67 2019 04 26 10 41 ...

Страница 68: ...cenced by NEC Corporation FontAvenue is a registered trademark of NEC Corporation This product includes Ubiquitous QuickBoot TM technology developed by Ubiquitous Corp Ubiquitous QuickBoot TM is a trademark of Ubiquitous Corp Copyright 2017 Ubiquitous Corp All rights reserved THIS PRODUCT IS LICENSED UNDER THE AVC PATENT PORTFOLIO LICENSE FOR THE PERSONAL USE OF A CONSUMER OR OTHER USES IN WHICH I...

Страница 69: ...o endorse or promote products derived from this software without specific prior written permission THIS SOFTWARE IS PROVIDED BY THE COPYRIGHT HOLDERS AND CONTRIBUTORS AS IS AND ANY EXPRESS OR IMPLIED WARRANTIES INCLUDING BUT NOT LIMITED TO THE IMPLIED WARRANTIES OF MERCHANTABILITY AND FITNESS FOR A PARTICULAR PURPOSE ARE DISCLAIMED IN NO EVENT SHALL THE FOUNDATION OR CONTRIBUTORS BE LIABLE FOR ANY...

Страница 70: ...70 B5A 2302 00b_DDX_X_En indb 70 2019 04 26 10 41 ...

Страница 71: ...71 English B5A 2302 00b_DDX_X_En indb 71 2019 04 26 10 41 ...

Страница 72: ... B5A 2302 00b_DDX_X_En indb 72 2019 04 26 10 41 ...

Отзывы: