20
CYCLE SETTINGS
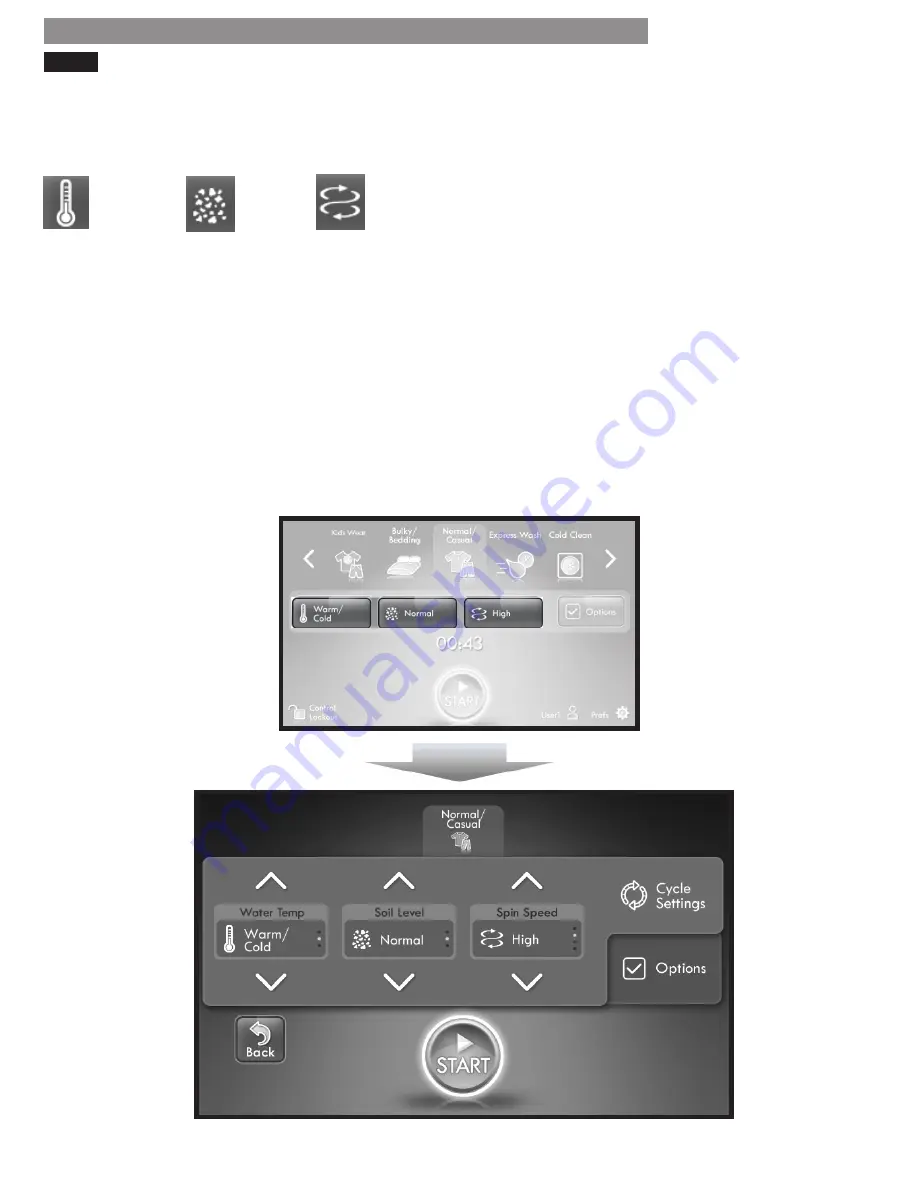
Below the cycles at the top of the HOME screen
are four buttons. The three left buttons are the cycle
setting buttons, which are used to adjust the Water
Temperature, Soil Level and Spin Speed. These can be
identified by the following icons:
Touch one of these buttons on the HOME screen to
navigate to the CYCLE SETTINGS screen. This screen
displays the selected cycle at the top, with the cycle
settings display in the middle of the screen. Each
button shows the current setting as a lighted dot with
available settings above and below the current setting.
The number of dots on each button indicates the
number of selections available for the selected cycle.
The illuminated dot only indicates the relative position
of the current selection within those available. Use the
up and down arrows to adjust the setting to the desired
selection.
Below the Cycle Settings tab on the right side of the
screen is the Options tab. Touch this tab to navigate to
the OPTIONS screen to select cycle options.
Water
Temp
Soil
Level
Spin
Speed
HOME SCREEN
HOW TO USE
CYCLE SETTINGS SCREEN
NOTE:
• The CYCLE SETTINGS screen is also accessible from
the OPTIONS screen by touching the Cycle Settings
tab, or when a cycle is paused by touching the
Change Settings button on the upper right corner of
the PAUSE screen.
• Options and cycle settings can be selected and
adjusted in any order before the cycle is started.
• Always change settings after first selecting the
appropriate cycle for the load. Selecting a new cycle
after settings have been adjusted changes all settings
to the default settings of the newly selected cycle.
• The CYCLE SETTINGS screen will dim after four
minutes of inactivity and the power button will remain
lighted to indicate that the control is still on. Touch the
display screen to reactivate the display. If no icons
are touched after four minutes, the control will shut
off one minute later and all settings will be lost.
• To protect your garments, not every option is available
with every cycle (refer to page 14 - 15).
• Refer to the Navigation Box on the next page for screen
navigation tips.


